Gateway NV-53 Support Question
Gateway NV-53 Support Question
Find answers below for this question about Gateway NV-53.Need a Gateway NV-53 manual? We have 16 online manuals for this item!
Question posted by arrichcu on March 4th, 2014
How To Remove The Power Button On An Nv53
The person who posted this question about this Gateway product did not include a detailed explanation. Please use the "Request More Information" button to the right if more details would help you to answer this question.
Current Answers
Answer #1: Posted by freginold on May 6th, 2014 3:35 AM
freginold

Member since:
December 20th, 2011 Points: 23,253,995

Member since:
December 20th, 2011 Points: 23,253,995
Hi, you can find instructions for removing the power button in the NV53 service guide, around page 100 or so.
Related Gateway NV-53 Manual Pages
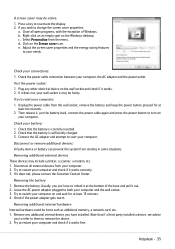
Gateway Quick Start Guide for Windows 7 - Page 12
...& Troubleshooting Guide Turning your Computer ON or OFF
Turning your computer by pressing the main power button. Display and Audio Ports VGA Port -
Memory cards are used to communicate with a... a hard disk drive) with other compatible lock to protect your computer by pressing the main power button on the computer, you to your Computer ON 1. DVI Port - S-Video (TV-Out)...
Gateway Quick Start Guide for Windows 7 - Page 13
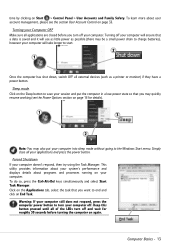
... computer. Simply close all external devices (such as a printer or monitor) if they have a power button.
Warning: If your computer still does not respond, press the computer power button to the Windows Start menu. Computer Basics - 13 Keep this button pressed until all applications are closed before turning the computer on your applications and press...
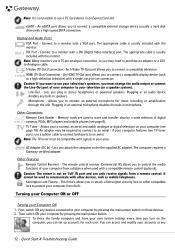
Gateway Quick Start Guide for Windows 7 - Page 34
...in either one of your computer and prevent problems in Sleep mode, press the power button. If the computer is in power saving mode, press a key on the keyboard
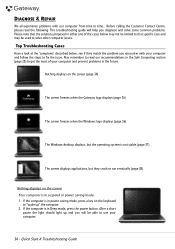
to read the following. Top...should light up " the computer. 2. Nothing displays on the screen Your computer is in suspend or power saving mode. 1. If the computer is in the future. Before calling the Customer Contact Centre, ...
Gateway Quick Start Guide for Windows 7 - Page 35
... connection between your needs. Note that the battery is sufficiently charged. 3. Close all external devices from the wall socket, remove the battery and keep the power button pressed for at least 15 minutes. 4.
Usually, you have to reactivate the display. 2. Disconnect all open programs, with the exception of the base and pull ...
Gateway NV50 Series User's Reference Guide - Canada/French - Page 14
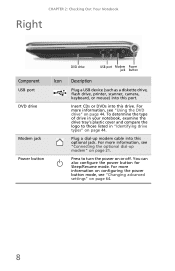
...on page 21. For more information, see "Using the DVD drive" on page 44. Power button
Press to those listed in "Identifying drive types" on page 44. DVD drive
Insert ...examine the drive tray's plastic cover and compare the logo to turn the power on page 64.
8 For more information on configuring the power button mode, see "Changing advanced settings" on or off. CHAPTER 2: Checking Out...
Gateway NV50 Series User's Reference Guide - Canada/French - Page 29

Tip
For more information about changing the power button mode, see "Changing advanced settings" on page 64.
3 If you are starting your notebook for...
Starting your notebook
Warning
Do not work with the notebook resting on your notebook: 1 Lift the LCD panel. 2 Press the power button located above the
keyboard. Do not use the notebook on a bed, sofa, rug, or other similar surface.
If the air...
Gateway NV50 Series User's Reference Guide - Canada/French - Page 32
....
❥ LED blinking - Press and hold the power button for more than 10 seconds. The status indicators are on - The drive is not being used or when a button has been pressed that affects how the keyboard is being...need to press FN+F1 to the lock
icon, then click Restart. Unplug the power cord and remove the battery for about five seconds, then release it. 2. Using the status indicators...
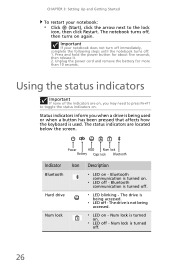
Gateway NV50 Series User's Reference Guide - English - Page 32

... lock is not being accessed.
❥ LED on .
❥ LED off - Unplug the power cord and remove the battery for about five seconds, then release it. 2. The drive is turned on - Bluetooth communication is used. Press and hold the power button for more than 10 seconds. Status indicators inform you may need to press...
Service Guide - Page 4

... Tape 44
Preparing the work space 45 Required tools 46 Preparing the notebook 47 Removing the battery 48 Removing the bay cover 49 Adding or replacing memory modules 50 Replacing the wireless card ...98 Replacing the LCD 100 Replacing the LCD panel hinge brackets 103 Replacing the power button board 105 Replacing the Kensington lock cap 107 Replacing the microphone 109 Replacing the antennas ...
Service Guide - Page 44

... Crisis Recovery disk
To create the Crisis Recovery disk:
1 Prepare a removable USB storage device with a capacity size greater than
10 MB. a power outage) can corrupt the BIOS code, which will automatically reboot.
4....exe and then select Run as administrator. 5 Keep the default settings and then click Start button. 6 When the pop-up a computer running the Windows XP or Windows Vista OS and ...
Service Guide - Page 46

... the tool on the two contacts, plug one end of the AC adapter
into the DC power jack and plug one end to an electrical outlet.
7 Press the power button to turn on the system. 8 After the POST, remove the tool from the hardware gap. 9 Reinstall the memory module(s), battery pack, and the bay...
Service Guide - Page 72

... the antenna cables from their palm rest latches, and then pull them
out from underneath the computer.
11 Disconnect the power button board cable from its system board connector, and then
release it from its palm rest latches.
12 Carefully open the LCD .... 13 Move the LCD, webcam, and microphone cables away from the top hinge screws. 14 Remove the top hinge screws securing the LCD assembly.
66
Service Guide - Page 73

...
antenna cables to the palm rest before pulling the ends downward to the wireless card compartment.
19 Arrange the power button cable on the palm rest and reconnect it
with the hinge screws removed in step 5. 24 Turn the notebook over so the palm rest is facing up and away from the notebook...
Service Guide - Page 103

www.gateway.com
7 Remove the front panel.
8 Place the new front panel on top of
the "Replacing the keyboard" procedure on page 62.
15 Reinstall the battery.
97 Make sure that the LCD, webcam, microphone, antenna, and power button cables are properly routed on the hinge sides.
9 Press the front panel on page 64...
Service Guide - Page 106

... 2-15 of the
"Replacing the LCD panel assembly" procedure on page 64.
3 Remove the LCD front panel by performing steps 3-7 of the "Replacing the
LCD front panel" procedure on page 95.
4 Release the LCD, webcam, microphone, antenna, and power button from
their LCD assembly lid latches.
100 CHAPTER 3: Replacing notebook components
Replacing the...
Service Guide - Page 111

... hinge covers)
•
4 black M2.5×6+Nylok (LCD front panel)
•
4 black M2.5×5 (LCD panel hinges)
To replace the power button board:
1 Complete the steps in "Preparing the notebook" on page 47.
2 Remove the LCD panel assembly by performing steps 2-15 of the
"Replacing the LCD panel assembly" procedure on page 64...
Service Guide - Page 112
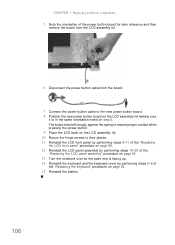
... board should fit snugly against the spring to ensure proper contact when pressing the power button.
9 Place the LCD back on the LCD assembly lid. 10 Return the ...power button board for later reference and then
remove the board from the LCD assembly lid.
6 Disconnect the power button cable from the board.
7 Connect the power button cable to the new power button board. 8 Position the new power button...
Service Guide - Page 119

... their places.
113 www.gateway.com
Replacing the LCD assembly lid
Tools you are going to use the same Kensington lock cap, power button
assembly, webcam, microphone and wireless antennas, remove these items from the old LCD assembly lid and attach them to complete this task:
Phillips #0 screwdriver
Flat screwdriver
or
Non-marring...
Service Guide - Page 163

... 17 muting 24 next button 23 pause button 23 play button 23 resolution 12 stop button 23
B
battery charge indicator 19, 21 latch 18 locating 18 release latch 18 remove 48
bay cover remove 49
bays hard drive...103
memory 50 microphone 109 modem 77 multimedia board 60 optical drive 56 palm rest 68 power button board 105 preparatory steps 47 processor 92 safety reminders 44
speakers 72 system board 86 ...
Service Guide - Page 165

... description 33 Password on Boot 33 remove 35 set 33 supervisor, description 33
Password on Boot 33
physical specifications 5
pointer identifying 25 moving 25
power button 17, 22 connector 16 Hybrid Sleep... 19, 21 Sleep mode 22 status indicator 19, 21
power button board replace 105
power system check 118 battery pack 119 power adapter 118
PowerSave key 24
printer USB port 17
processor replace...
Similar Questions


How To Reset The Power Button On A Gateway Nv53 Laptop
(Posted by amandAschu 10 years ago)


How To Remove Power Button Gateway Ml6732
(Posted by daY2ndb 10 years ago)