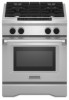
KitchenAid KDRS407VSS Support Question
KitchenAid KDRS407VSS Support Question
Find answers below for this question about KitchenAid KDRS407VSS.Need a KitchenAid KDRS407VSS manual? We have 3 online manuals for this item!
Question posted by leechappell on November 6th, 2015
I Tried To Adjust And One Of The Leveling Roads Broke. Can This Be Replaced?
The person who posted this question about this KitchenAid product did not include a detailed explanation. Please use the "Request More Information" button to the right if more details would help you to answer this question.
Current Answers
Answer #1: Posted by Odin on November 6th, 2015 5:18 PM
Odin

Member since:
April 10th, 2010 Points: 41,236,670

Member since:
April 10th, 2010 Points: 41,236,670
Maybe. See http://www.repairclinic.com/Shop-For-Parts/-x6b647273343037767373/Kdrs407vss-Parts, and check the two lists on the left, Part Title and Part Category. Each of the parts enumerated will be illustrated, so you should easily be able to pick it out if it's there. If you find it, order it from the same site. If you can't find it you may want to phone KitchenAid. See the contact information here: https://www.contacthelp.com/KitchenAid/customer-service.
Hope this is useful. Please don't forget to click the Accept This Answer button if you do accept it. My aim is to provide reliable helpful answers, not just a lot of them. See https://www.helpowl.com/profile/Odin.
Related KitchenAid KDRS407VSS Manual Pages
Installation Guide - Page 3

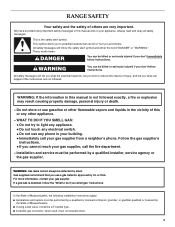
...the word "DANGER" or "WARNING." WHAT TO DO IF YOU SMELL GAS:
• Do not try to potential hazards that you use a gas detector approved by
the State of Massachusetts. ■ ...performed by a qualified or licensed contractor, plumber, or gasfitter qualified or licensed by UL or CSA.
RANGE SAFETY
Your safety and the safety of others . All safety messages will follow instructions. In the ...
Installation Guide - Page 4
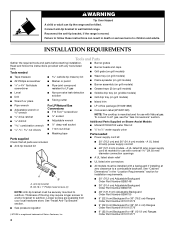
...follow these instructions can tip the range and be securely mounted to LP gas
■ Burner assembly (on grill models) ■ Grease trays (2) (on grill models)
■ Level ■ Drill ■ Wrench... drivers
For LP/Natural Gas Conversions ■ T15 Torx®† screwdriver socket ■ Adjustable wrench
■ ½" deep-well socket
■ 7 mm nut driver
■ Masking...
Installation Guide - Page 7

... used . Check with local codes. The model/serial number rating plate is located behind the range prior to the installations in place. Water Filtration System Location Requirements
(on the right vertical surface of the oven door frame. Replace the filter if necessary.
■ Allow the storage tank on the reverse osmosis system...
Installation Guide - Page 9
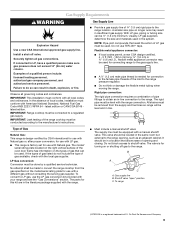
... Gas:
This range is factory set for connection to the range.
This valve should be made to convert the range cooktop from the supply and fuel lines so range will be level and in the...Supply Line
■ Provide a gas supply line of the range cooktop must be used . With LP gas, piping or tubing size can be level with a manual shutoff valve. Usually, LP gas suppliers determine...
Installation Guide - Page 13

...Replace terminal block cover.
3-wire connection: Power supply cord
Use this method for proper electrical connection. 7. Use a ¼" nut driver and remove the hex washer head screws from range
2. or 50-amp, range... strain relief and 40- Line 1 B. Bend the ground link away from the range frame. Tighten strain relief screws. 8. Connect the green ground wire from the terminal...
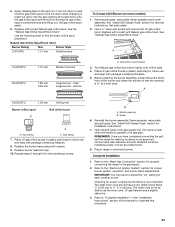
Installation Guide - Page 16

... bracket. Insert the large grease tray all 4 leveling rods 1 full turn to raise the range and provide enough clearance for satisfactory baking performance. 1.
Large grease tray B. Correct any leak found.
3. A
A.
Remove cooktop burner caps and grates from rear of securing the range is not level, adjust the leveling rods. Place rack in the "Location Requirements" section...
Installation Guide - Page 18

..."
position. ■ Check that the range is turned to light the burner. Pull up . Lower (simmer) flame
Single Flame Burner
To Adjust Flame Height: 1. This sparking continues until...Open the oven door and remove the 2 screws on burner
bases. A. Initial Lighting and Gas Flame Adjustments
Cooktop burners use electronic igniters in place. Dual Flame Burner
A B
4. Remove the control knobs....
Installation Guide - Page 19

Loosen screw to reduce flame height. Single flame burner adjustment screw (on right side of range cooktop
16. When finished adjusting the flame height, put a control knob back onto the valve stem and turn off the burner.
12. Front lip of valve) B. A
A. Replace the 2 screws on the front of Oven(s) 1. Test the flame by a number...
Installation Guide - Page 21

... instructions.
Grill orifice hood location
3. Open shutoff valve in range or reconnect power. Correct any leaks found.
8. Refer to adjust the "LO" setting for future
use and keep with package...very distinct blue flame ¼" (0.64 cm) to complete this procedure.
21 Gas opening B. Replace with correct grill LP gas orifice hood.
Size stamp
7. See "Install Grill Grease Trays" section...
Installation Guide - Page 23
...have completed converting the grill, test the range for installation instructions.
7. LP gas flames have a very distinct blue flame ¼" (0.64 cm) to adjust the "LO" setting for future use ...end of a 7 mm nut driver to "Complete Installation" in the nut driver while changing it. Replace with correct Natural gas orifice spud.
Size stamp
A.
B
A. See "Install Grill Grease Trays" ...
Use & Care Guide - Page 3
... followed exactly, a fire or explosion may result causing property damage, personal injury or death.
- RANGE SAFETY
Your safety and the safety of others .
WARNING: Gas leaks cannot always be performed by...the instructions are very important. WHAT TO DO IF YOU SMELL GAS:
• Do not try to potential hazards that you don't immediately follow the safety alert symbol and either the word ...
Use & Care Guide - Page 5
... area where the range is in use this appliance as aluminum foil. children climbing on the backguard of a range - Do not repair or replace any part of the range. Areas near surface...TO TIPPING OF THE APPLIANCE, VERIFY THE REINSTALLATION OF THE RANGE INTO THE ANTI-TIP DEVICE PROVIDED, AND EXTEND LEVELING FEET AFTER RETURNING THE RANGE TO THE ORIGINAL INSTALLED POSITION.
■ WARNING: NEVER ...
Use & Care Guide - Page 6

...Hoods Frequently - Wipe off all excessive spillage before removing or replacing food.
■ Do Not Heat Unopened Food Containers - Be sure the range is essential for a good seal. SAVE THESE INSTRUCTIONS
6...oven cleaner or oven liner protective coating of the cooking utensil. If rack must be adjusted so it is cool.
Some cleaners can produce noxious fumes if applied to wipe spills...
Use & Care Guide - Page 7
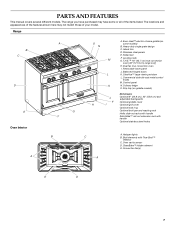
... purchased may not match those of the items listed. Stainless steel panels E. Leveling rods G. Drip tray (on some or all of your model. CleanBake™...J
Optional 9" (22.9 cm), 22" (55.9 cm) and adjustable backguards
F
Optional griddle cover
H
I . Control panel N. The range you have some models)
B. Heavy-duty single grate design C. Range
B C
D
E Oven Interior
A
A
F B
O N
...
Use & Care Guide - Page 9
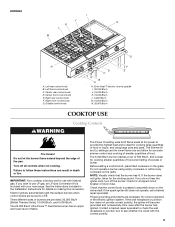
... LITE. The 5,000 Btu/h burner reaches a low of 500 Btu/h, and is included with your new range.
If the spark igniter still does not operate, call a trained repair specialist. Turn off the burner. ...Power™ dual-flame burner has an upper and lower level of the electric ignition system. The Power Hi setting uses both flame levels at full power to follow these instructions can result in ...
Use & Care Guide - Page 11

... properly aligned with the burner cap.
20,000 Btu/h Ultra Power™ Dual-Flame Burner
A
A. Replace the burner cap, making sure the alignment pins are cool. Correct
B
15,000 Btu/h Professional Burner
...the burner cap after a spillover and routinely remove and clean the caps according to be adjusted, contact a trained repair specialist.
4.
Even-Heat™ Grill (on the burner....
Use & Care Guide - Page 18
...pies, breads and casseroles, use the bakeware size recommended in the recipe. NOTE: This oven automatically adjusts for single rack baking
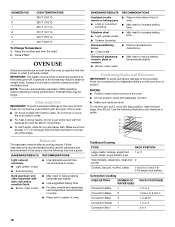
Convection Cooking
OVEN SETTING
NUMBER OF RACK POSITION(S) RACKS USED
Convection Bake 1
1,...176;F (232°C)
To Change Temperature: 1.
OVEN USE
Odors and smoke are level. Always move freely.
■ To catch spills, place foil on the oven door...
Use & Care Guide - Page 19

... as a guide. Rack guide C. A. To Replace SatinGlide™ Roll-out Extension Rack 1.
Do not clean the SatinGlide™ roll-out extension rack in position 5. See the "General Cleaning" section for using the supplied temperature probe, use a meat thermometer to determine whether meat, poultry and fish, are level on the sides of the...
Use & Care Guide - Page 28
...Replace:
1. If it dry.
Replace the fuse or reset the circuit breaker. Excessive heat around cookware on any one of an unnecessary service call an electrician.
The range...a number reappears, call for leveling instructions. See "Assistance or Service...9632; Is the range level?
You should not...proper heat level?
See ... TROUBLESHOOTING
Try the ... The range must be level for ...
Use & Care Guide - Page 29

...delay start Self-Clean cycle been set ?
Adjust cooking time.
■ Has the oven door...■ On 48" (121.9 cm) ranges, is one oven is level in the United States. Oven cooking results not...Brand Home Appliances Customer eXperience Center 553 Benson Road Benton Harbor, MI 49022-2692
Please include...gadgets and textiles are trained to order replacement parts, we recommend that batter is ...
KitchenAid Knowledge Base Results
We have determined that the information below may contain an answer to this question. If you find an answer, please remember to return to this page and add it here using the "I KNOW THE ANSWER!" button above. It's that easy to earn points!-
Dishwasher is not level
... are firmly against top front opening . Adjust leveling leg or add shims under rear wheel until dishwasher is plumb. Repeat for dishwashers. Place level against the floor. Check that dishwasher is level from front-to countertop animation Make sure that the dishwasher is level. Was this answer more useful. Rate answer 1 of 3 Rate answer 2 of... -
Removing and replacing the beverage center base grille
... screwdriver, remove the two screws. Push both tabs align and the base grille snaps into place. Replace the two screws. Tighten the screws. Remove the base grille (see illustration below). Adjusting leveling legs on the beverage center Refrigerator runs too much Removing the base grille from the beverage center. To remove... -
Adjusting leveling legs on the beverage center
... to the right to lower the beverage center or turn both front leveling screws to the rear by turning both leveling legs the same amount. Move the beverage center into its final location. Adjusting leveling legs on the beverage center How do I adjust the legs on my beverage center? It may take several more easily...
Similar Questions


Far Left Leveling Rod Has Broken While Trying To Raise And Level Range, Now What
(Posted by breedlove 8 years ago)

How Can I Calibrate My Kitchenaid Kdrs407vss Oven
My KitchenAid KDRS407VSS electric oven runs hot. It was hot by about 25 degrees F. but yesterday it ...
My KitchenAid KDRS407VSS electric oven runs hot. It was hot by about 25 degrees F. but yesterday it ...
(Posted by linda56976 8 years ago)
Dual Burner Switch Replacement For The Model #kess907 Electric Range
How do i replace the left side dual burner switch and what is the part number ?
How do i replace the left side dual burner switch and what is the part number ?
(Posted by woodsv 9 years ago)

Kdrs407vss Range
Is this model a side in or a freestanding range?
Is this model a side in or a freestanding range?
(Posted by yolanda33039 12 years ago)