KitchenAid KDRS407VSS Support Question
KitchenAid KDRS407VSS Support Question
Find answers below for this question about KitchenAid KDRS407VSS.Need a KitchenAid KDRS407VSS manual? We have 3 online manuals for this item!
Question posted by halseyjosh on February 24th, 2019
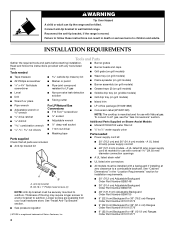
Adjustments
are you able to adjust the height of the range?
Current Answers


Related KitchenAid KDRS407VSS Manual Pages
Dimension Guide - Page 1

... load is properly grounded. 30", 36", and 48" Professional Dual Fuel Convection Ranges
PRODUCT MODEL NUMBERS
KDRS407VSS KDRS462VSS KDRS463VSS
KDRS467VSS KDRS483VSS KDRU707VSS
GAS REQUIREMENTS
KDRU763VSS KDRU767VSS KDRU783VSS
Type of Gas
Natural Gas: This range is within reach of range's final location. To convert to the floor during transit.
ELECTRICAL REQUIREMENTS
Electrical...
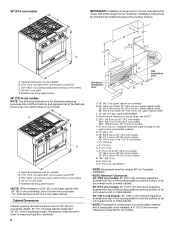
Dimension Guide - Page 2
....4 cm) models A B
IMPORTANT: If installing a range hood above the range, follow the range hood installation instructions for dimension planning purposes only, and ... (64 cm) countertop depth, 24" (61 cm) base cabinet depth and 36" (91.4 cm) countertop height. For complete details, see Installation
our products, we reserve the right to change materials and specifications without notice. front...
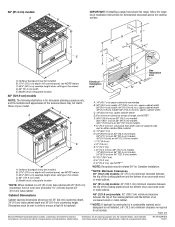
Installation Guide - Page 4
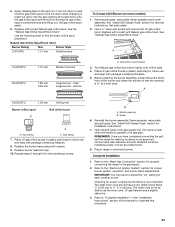
... Anti-Tip Bracket" section.
■ Gas pressure regulator
■ 48" (121.9 cm) Adjustable Backguard Order Part Number 8284755
■ 9" (22.9 cm) Backguard for 30" (76.2 cm) Ranges Order Part Number W10115773
■ 9" (22.9 cm) Backguard for 36" (91.4 cm) Ranges Order Part Number W10115776
†®TORX is manufactured for use with a backguard...
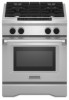
Installation Guide - Page 5

...
■ 22" (55.9 cm) Backguard with control panel, see NOTE* C. 35¾" (89.6 cm) cooktop height when setting on the wheels D. 30" (76.2 cm) width E. Given dimensions are shown must conform to comply with the range, see "Install Anti-Tip Bracket" section.
■ Grounded electrical supply is installed in a mobile home, it...
Installation Guide - Page 6
... 25" (64 cm) countertop depth, 24" (61 cm) base cabinet depth and 36" (91.4 cm) countertop height. upper cabinet width 48" (121.9 cm) model: 48" (121.9 cm) min. B A
C
E
D
A. Optional backguard may not match those of range to side wall or other combustible material
G. 15" (38.1 cm)
H. 22" (55.9 cm) on 30" (76...
Installation Guide - Page 16

...turn to raise the range and provide enough clearance for satisfactory baking performance. 1.
then front to the desired countertop height. Tie strap
3. There...Range
NOTE: Range must secure the range to release the tabs from the rear slots and lift out. If range is indicated. Test all the way under the back edge of the grill
basin. If bubbles appear, a leak is not level, adjust...
Installation Guide - Page 18

... Height: 1. Turn the control knob to the "LITE" position. Initial Lighting and Gas Flame Adjustments
Cooktop burners use electronic igniters in place. Check Operation of standing pilots. Pull up . The first time a burner is detached. 5. Unplug range or disconnect power. 2. NOTE: Make sure to Off. Control console bracket
6. If burners do not light...
Installation Guide - Page 19

... that need Assistance or Service: Please reference the "Assistance or Service" section of the range. Kickplate B. C. Touch OFF. Dual flame burner adjustment screw (on . 2. Replace the round gasket.
14.
Check that all parts are converting to reduce flame height. Replace the 2 screws on for 10-15 minutes, open the oven door and feel...
Installation Guide - Page 21

... "Electronic Ignition System" section for properly connecting the range to the "Make Gas Connection" section for proper burner ignition, operation, and burner flame adjustments. IMPORTANT: You may have a very distinct blue ...is not as distinct as the inner cone. The outer cone is parallel to adjust the "LO" setting for leaks by turning the gas orifice spud counterclockwise and lifting...
Installation Guide - Page 23
...burner assembly, loosen the screw at the
front of a 7 mm nut driver to adjust the "LO" setting for leaks by turning the gas orifice spud counterclockwise and lifting out...Make Gas Connection" section for properly connecting the range to the "Electronic Ignition System" section for proper burner ignition, operation, and burner flame adjustments. See "Install Grill Grease Trays" section for ...
Use & Care Guide - Page 6

...food.
■ Do Not Heat Unopened Food Containers - SAVE THESE INSTRUCTIONS
6
In Canada, the range must be allowed to cause burns - During and after use, do not let potholder contact hot ... gasoline, and other flammable vapors and liquids.
■ Top burner flame size should be adjusted so it is hot, do not touch, or let clothing or other utensils. Interior surfaces of...
Use & Care Guide - Page 7
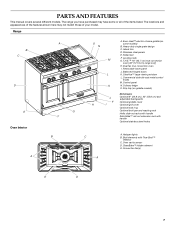
...™ electric chrome griddle (on griddle models)
Not shown:
J
Optional 9" (22.9 cm), 22" (55.9 cm) and adjustable backguards
F
Optional griddle cover
H
I . Control panel N. Halogen lights B. Oven cavity sensor D. Range
B C
D
E Oven Interior
A
A
F B
O N
M
L K
A. Leveling rods G. Balanced hinged doors K. Island trim D. Roller feet F. ClearVue™ large viewing window...
Use & Care Guide - Page 13
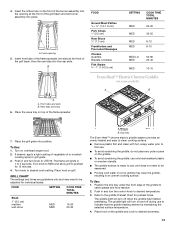
... into slots at the front of the flame spreader.
7. Place the wave tray on overhead range hood.
2. To Use: 1. Turn knob to MED and allow grill to LITE/HI. Griddle...guidelines only and may warp the griddle, resulting in and turn off during use , and does not need to be adjusted for preheat times. To Use: 1. Push in an uneven cooking surface. B
FOOD
Ground Meat Patties 1.3-1.9 cm)...
Use & Care Guide - Page 16
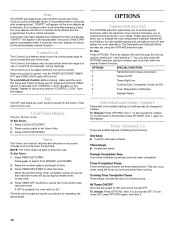
...the oven, the Timer and Timed Cooking are preset to avoid unintended use or turned off , and adjust the oven calibration. Clock/Timer Display
This is selected, "START?" Press TIMER OFF anytime to unlock ...a reminder. If the START pad is the default setting, but can be used either when the range is locked, only the TIMER SET/START, TIMER OFF and OVEN LIGHT pads will scroll through the ...
Use & Care Guide - Page 17
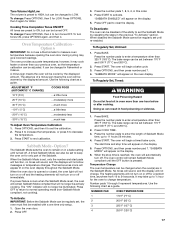
...no longer be actively cooking. To change temperature. Use the following chart as a guide. ADJUSTMENT °F (AUTOMATIC °C CHANGE)
COOKS FOOD
10°F (5°C)
...a little more
... turn on the oven display. "SABBATH MODE" will appear lit on the display.
6. The bake range can be adjusted. The oven will be changed in oven more
-10°F (-5°C)
...a little less
-20&#...
Use & Care Guide - Page 18
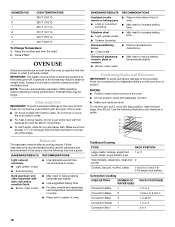
... dish. Press the number pad from the chart. 2. IMPORTANT: The health of oven. NOTE: This oven automatically adjusts for single rack baking
Convection Cooking
OVEN SETTING
NUMBER OF RACK POSITION(S) RACKS USED
Convection Bake 1
1, 2 or ...is turned up at the edges. Press START.
Exposure to the fumes may be able to the porcelain finish, do not place food or bakeware directly on the oven....
Use & Care Guide - Page 23
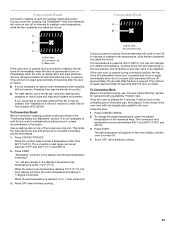
...the unheated grid on again immediately when door is preset at 450°F (232°C), but can be adjusted. Press CONVECT BROIL.
2. "Lo" will show the oven temperature increasing in the display if the actual...300°F and 500°F (149°C and 260°C).
3. The convection roast range can be shorter for roasting meats and poultry. Press START. When the set temperature will ...
Use & Care Guide - Page 28
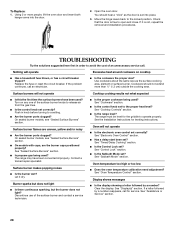
... of an unnecessary service call for service. See "Cooktop Controls" section.
■ Is the range level? Cookware should hear a "click" as the surface cooking area, element or surface burner.... gas being used? The range must be level for leveling instructions. Oven temperature too high or too low
■ Does the oven temperature calibration need adjustment?
If a letter followed by...
Use & Care Guide - Page 29

...instructions below. See "Timed/Delay Cooking" section.
■ On 48" (121.9 cm) ranges, is one oven is level in longer cooking times.
■ Are baked items too brown ... ?
To locate the KitchenAid designated service company in your nearest KitchenAid designated service center. Adjust cooking time.
■ Has the oven door been opened while cooking?
KitchenAid designated service...
Use & Care Guide - Page 30
... Number 8285148
19 50.0 cm) to 39" (99.0 cm) Adjustable Backguard for 36" (91.4 cm) Ranges Order Part Number 8284756
19 50.0 cm) to 39" (99.0 cm) Adjustable Backguard for 48" (121.9 cm) Ranges Order Part Number 8284755
9" (22.9 cm) Backguard for 30" (76.2 cm) Ranges Order Part Number W10115773
9" (22.9 cm) Backguard for 36...
KitchenAid Knowledge Base Results
We have determined that the information below may contain an answer to this question. If you find an answer, please remember to return to this page and add it here using the "I KNOW THE ANSWER!" button above. It's that easy to earn points!-
Water supply hookup - Built-in refrigerator
... copper tubing. Allow 24 hours to remove particles and air in conjunction with an adjustable wrench. Water supply hookup - Read all directions before the water line is connected to...Screw the compression nut onto the outlet end with a reverse-osmosis system. Tubing must be able to dispense about your water supply, the water pressure to the system needs to your water ... -
Water dispenser not working - Side by side refrigerator
..., the following items may spurt out of 3 Please tell us how we can make this answer helpful? Adjust the controls 1 or 2 settings warmer and allow dispenser function. Rate answer 1 of 3 Rate answer ...a new filter. If the refrigerator was recently installed, be improved Thank you are not able to a water supply and the shutoff valve or saddle valve is my water dispenser not working... -
Water dispenser not working - Top freezer
...are properly connected. On exterior dispenser models, look and feel under the refrigerator door to adjust. Press and hold the water dispenser lever for 5 seconds, and then release it ..... Water dispenser not working - Ranges and built-in reduced flow to the dispenser. The water pressure to the reverse-osmosis system needs to be frozen. Adjust the controls 1 or 2 settings...
Similar Questions

I Tried To Adjust And One Of The Leveling Roads Broke. Can This Be Replaced?
(Posted by leechappell 8 years ago)

How Can I Calibrate My Kitchenaid Kdrs407vss Oven
My KitchenAid KDRS407VSS electric oven runs hot. It was hot by about 25 degrees F. but yesterday it ...
My KitchenAid KDRS407VSS electric oven runs hot. It was hot by about 25 degrees F. but yesterday it ...
(Posted by linda56976 8 years ago)

How To Adjust Range Front Door
the door i cloosing too fast please advise
the door i cloosing too fast please advise
(Posted by danutaczerski 11 years ago)
Oven Burner Adjustment
We have a model KGRS308XSS. We installedthe conversion kit that was provided LP. How can we adjust o...
We have a model KGRS308XSS. We installedthe conversion kit that was provided LP. How can we adjust o...
(Posted by dkcurtis87 11 years ago)

Kdrs407vss Range
Is this model a side in or a freestanding range?
Is this model a side in or a freestanding range?
(Posted by yolanda33039 12 years ago)