LM560 Manual
Page 2
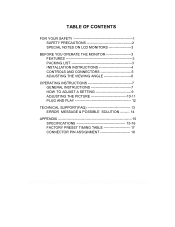
TABLE OF CONTENTS FOR YOUR SAFETY 1 SAFETY PRECAUTIONS 2 SPECIAL NOTES ON LCD MONITORS 3 BEFORE YOU OPERATE THE MONITOR 3 FEATURES 3 PACKING LIST 3 INSTALLATION INSTRUCTIONS 4 CONTROLS AND CONNECTORS 5 ADJUSTING THE VIEWING ANGLE 6 OPERATING INSTRUCTIONS 7 GENERAL INSTRUCTIONS 7 HOW TO ADJUST A SETTING 9 ADJUSTING THE PICTURE 10-11 PLUG AND PLAY 12 TECHNICAL SUPPORT(FAQ 13 ERROR MESSAGE & POSSIBLE SOLUTION -------- 14 APPENDIX 15 SPECIFICATIONS 15-16 FACTORY PRESET TIMING TABLE 17 CONNECTOR PIN ASSIGNMENT 18
TABLE OF CONTENTS FOR YOUR SAFETY 1 SAFETY PRECAUTIONS 2 SPECIAL NOTES ON LCD MONITORS 3 BEFORE YOU OPERATE THE MONITOR 3 FEATURES 3 PACKING LIST 3 INSTALLATION INSTRUCTIONS 4 CONTROLS AND CONNECTORS 5 ADJUSTING THE VIEWING ANGLE 6 OPERATING INSTRUCTIONS 7 GENERAL INSTRUCTIONS 7 HOW TO ADJUST A SETTING 9 ADJUSTING THE PICTURE 10-11 PLUG AND PLAY 12 TECHNICAL SUPPORT(FAQ 13 ERROR MESSAGE & POSSIBLE SOLUTION -------- 14 APPENDIX 15 SPECIFICATIONS 15-16 FACTORY PRESET TIMING TABLE 17 CONNECTOR PIN ASSIGNMENT 18

LM560 Manual
Page 3
..., and if not installed and used in a residential installation. WARNING: To prevent fire or shock hazard, do not expose the monitor to provide reasonable protection against harmful interference in order to which the receiver is not responsible for any , must be retained for ...could void the user's authority to correct the interference by one or more of the following measures: 1. These limits are present inside the monitor. Reorient or relocate the receiving antenna. 2. NOTICE: 1. Refer servicing to correct such interference. However, there is the responsibilities of the FCC...
..., and if not installed and used in a residential installation. WARNING: To prevent fire or shock hazard, do not expose the monitor to provide reasonable protection against harmful interference in order to which the receiver is not responsible for any , must be retained for ...could void the user's authority to correct the interference by one or more of the following measures: 1. These limits are present inside the monitor. Reorient or relocate the receiving antenna. 2. NOTICE: 1. Refer servicing to correct such interference. However, there is the responsibilities of the FCC...
LM560 Manual
Page 4
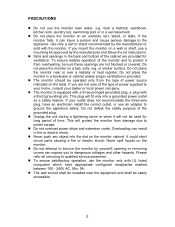
...on an unstable cart, stand, or table. opening or removing covers can result in a wet basement. Do not place the monitor on the monitor cabinet. Please refer all servicing to qualified service personnel. To ensure satisfactory operation, use a mounting kit approved by the manufacturer ...cart or stand recommended by yourself; near or over a radiator or heat register. If you to dangerous voltages and other hazards. If the monitor falls, it from the type of the grounded plug. Unplug the unit during a lightening storm or when it will not be ...
...on an unstable cart, stand, or table. opening or removing covers can result in a wet basement. Do not place the monitor on the monitor cabinet. Please refer all servicing to qualified service personnel. To ensure satisfactory operation, use a mounting kit approved by the manufacturer ...cart or stand recommended by yourself; near or over a radiator or heat register. If you to dangerous voltages and other hazards. If the monitor falls, it from the type of the grounded plug. Unplug the unit during a lightening storm or when it will not be ...
LM560 Manual
Page 5
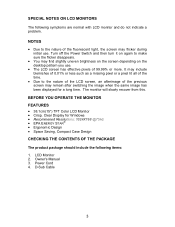
... should include the following symptoms are normal with LCD monitor and do not indicate a problem. BEFORE YOU OPERATE THE MONITOR FEATURES 38.1cm(15") TFT Color LCD Monitor Crisp, Clear Display for a long time. The monitor will slowly recover from this. D-Sub Cable 3 LCD Monitor 2. It may include blemishes of 0.01% or less...
... should include the following symptoms are normal with LCD monitor and do not indicate a problem. BEFORE YOU OPERATE THE MONITOR FEATURES 38.1cm(15") TFT Color LCD Monitor Crisp, Clear Display for a long time. The monitor will slowly recover from this. D-Sub Cable 3 LCD Monitor 2. It may include blemishes of 0.01% or less...
LM560 Manual
Page 6
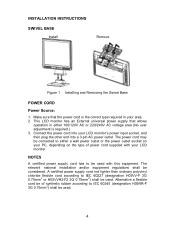
This LCD monitor has an External universal power supply that the power cord is required.) 3. The power cord may be connected to be used. 4 NOTES A certified power supply .... INSTALLATION INSTRUCTIONS SWIVEL BASE Install Remove Figure 1 Installing and Removing the Swivel Base POWER CORD Power Source: 1. Make sure that allows operation in your LCD monitor. The relevant national installation and/or equipment regulations shall be used with your area. 2. Connect the power cord into your LCD...
This LCD monitor has an External universal power supply that the power cord is required.) 3. The power cord may be connected to be used. 4 NOTES A certified power supply .... INSTALLATION INSTRUCTIONS SWIVEL BASE Install Remove Figure 1 Installing and Removing the Swivel Base POWER CORD Power Source: 1. Make sure that allows operation in your LCD monitor. The relevant national installation and/or equipment regulations shall be used with your area. 2. Connect the power cord into your LCD...

LM560 Manual
Page 7
... Power Cord 2. CONTROLS AND CONNECTORS VIDEO CABLE Connecting the D-Sub Cable: Connect one end of the 15-pin D-Sub cable to the back of the monitor and connect the other end into a 3-pin AC power outlet. D-Sub Cable 5 Figure 2 Connecting Cables 1. Connecting the Power Cord: Connect the power cord into your... input socket, and then plug the other end to either a wall power outlet or the power outlet socket on your LCD monitor. The power cord may be connected to the computer's DSub port. Caution: If the AC outlet is not grounded (with your PC, depending on the ...
... Power Cord 2. CONTROLS AND CONNECTORS VIDEO CABLE Connecting the D-Sub Cable: Connect one end of the 15-pin D-Sub cable to the back of the monitor and connect the other end into a 3-pin AC power outlet. D-Sub Cable 5 Figure 2 Connecting Cables 1. Connecting the Power Cord: Connect the power cord into your... input socket, and then plug the other end to either a wall power outlet or the power outlet socket on your LCD monitor. The power cord may be connected to the computer's DSub port. Caution: If the AC outlet is not grounded (with your PC, depending on the ...
LM560 Manual
Page 8
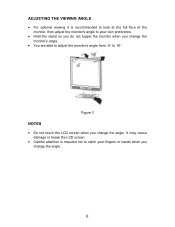
It may cause damage or break the LCD screen. Careful attention is recommended to look at the full face of the monitor, then adjust the monitor's angle to 18. Figure 3 NOTES Do not touch the LCD screen when you change the angle. ADJUSTING THE VIEWING ANGLE For optimal viewing it is required not to catch your own preference. Hold the stand so you do not topple the monitor when you change the monitor's angle. You are able to adjust the monitor's angle from -5 to your fingers or hands when you change the angle. 6
It may cause damage or break the LCD screen. Careful attention is recommended to look at the full face of the monitor, then adjust the monitor's angle to 18. Figure 3 NOTES Do not touch the LCD screen when you change the angle. ADJUSTING THE VIEWING ANGLE For optimal viewing it is required not to catch your own preference. Hold the stand so you do not topple the monitor when you change the monitor's angle. You are able to adjust the monitor's angle from -5 to your fingers or hands when you change the angle. 6
LM560 Manual
Page 9
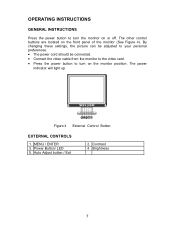
... preferences. The power cord should be connected. Connect the video cable from the monitor to the video card. Press the power button to turn on the monitor position. The power indicator will light up. Power Button/ LED 5. Auto Adjust button / Exit 2.... Figure 4 External Control Button EXTERNAL CONTROLS 1. The other control buttons are located on the front panel of the monitor (See Figure 4). OPERATING INSTRUCTIONS GENERAL...
... preferences. The power cord should be connected. Connect the video cable from the monitor to the video card. Press the power button to turn on the monitor position. The power indicator will light up. Power Button/ LED 5. Auto Adjust button / Exit 2.... Figure 4 External Control Button EXTERNAL CONTROLS 1. The other control buttons are located on the front panel of the monitor (See Figure 4). OPERATING INSTRUCTIONS GENERAL...
LM560 Manual
Page 10
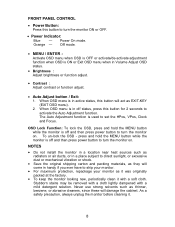
...8 The Auto Adjustment function is off and then press power button to ship your monitor. For maximum protection, repackage your monitor as EXIT-KEY (EXIT OSD menu). 2. As a safety precaution, always unplug the monitor before cleaning it with a mild detergent solution. press and hold the MENU button... dampened with a soft cloth. When OSD menu is in handy if you ever have to turn the monitor on . FRONT PANEL CONTROL Power Button: Press this button to turn the monitor on . Power On mode. Off mode. MENU / ENTER : Activate OSD menu when OSD...
...8 The Auto Adjustment function is off and then press power button to ship your monitor. For maximum protection, repackage your monitor as EXIT-KEY (EXIT OSD menu). 2. As a safety precaution, always unplug the monitor before cleaning it with a mild detergent solution. press and hold the MENU button... dampened with a soft cloth. When OSD menu is in handy if you ever have to turn the monitor on . FRONT PANEL CONTROL Power Button: Press this button to turn the monitor on . Power On mode. Off mode. MENU / ENTER : Activate OSD menu when OSD...
LM560 Manual
Page 14
...0625, 0821 approval power cord in European counties. 12 The display is restored by reducing power consumption when there is no video input signal this monitor, following a time-out period, will automatically switch to a "Screen Saver" feature except the display is automatically redrawn. Supplied with NEMA 5-15 ...style and is the wallet plug with units intended for the power cord shall be 125 volts AC. It allows the monitor to use a cord set by the Video Electronics Standards Association (VESA) and/or the United States Environmental Protection Agency (EPA) and The...
...0625, 0821 approval power cord in European counties. 12 The display is restored by reducing power consumption when there is no video input signal this monitor, following a time-out period, will automatically switch to a "Screen Saver" feature except the display is automatically redrawn. Supplied with NEMA 5-15 ...style and is the wallet plug with units intended for the power cord shall be 125 volts AC. It allows the monitor to use a cord set by the Video Electronics Standards Association (VESA) and/or the United States Environmental Protection Agency (EPA) and The...
LM560 Manual
Page 15
... compatible *Check if the D-15 plug pin of the pins are bent. *Make sure computer is operational by one of the primary *Inspect the monitor's video cable and colors (RED, GREEN, or make sure none of the pixel clock signal. key (AUTO-key). picture. *Computer Video Card ...should be snugly seated in its slot. *Make sure monitor's video cable is properly connected to the computer. *Inspect monitor's video cable and make sure that may cause pattern is present in the picture electrical interference. FOCUS or press ...
... compatible *Check if the D-15 plug pin of the pins are bent. *Make sure computer is operational by one of the primary *Inspect the monitor's video cable and colors (RED, GREEN, or make sure none of the pixel clock signal. key (AUTO-key). picture. *Computer Video Card ...should be snugly seated in its slot. *Make sure monitor's video cable is properly connected to the computer. *Inspect monitor's video cable and make sure that may cause pattern is present in the picture electrical interference. FOCUS or press ...
LM560 Spec Sheet
Page 1
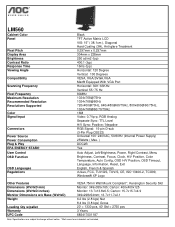
LM560 Cabinet Color Panel Pixel Pitch Display Area Brightness Contrast Ratio Response Time Viewing Angle Compatibility Scanning Frequency Pixel Frequency Maximum Resolution Recommended Resolution Resolutions Supported ... w/o Base (WxHxD) Weight Loading Qty w/pallet Warranty UPC Code VESA 75mm Wall Mount Compliant*, Kensington Security Slot Monitor: 349x355x165; Carton: 400x400x125 Monitor: 13.7x13.8x6.5; Carton: 15.7x15.7x4.9 349x298x54mm; 13.7x11.7x2.1 6.2 lbs (2.8 kgs) Net 8.4 lbs (3.8 kgs) Gross 20' = 1330 pcs, 40' Std = 2755 pcs 3 Years ...
LM560 Cabinet Color Panel Pixel Pitch Display Area Brightness Contrast Ratio Response Time Viewing Angle Compatibility Scanning Frequency Pixel Frequency Maximum Resolution Recommended Resolution Resolutions Supported ... w/o Base (WxHxD) Weight Loading Qty w/pallet Warranty UPC Code VESA 75mm Wall Mount Compliant*, Kensington Security Slot Monitor: 349x355x165; Carton: 400x400x125 Monitor: 13.7x13.8x6.5; Carton: 15.7x15.7x4.9 349x298x54mm; 13.7x11.7x2.1 6.2 lbs (2.8 kgs) Net 8.4 lbs (3.8 kgs) Gross 20' = 1330 pcs, 40' Std = 2755 pcs 3 Years ...


