Owners Manual
Page 5
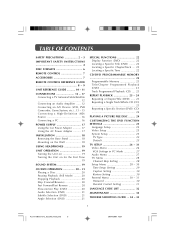
TABLE OF CONTENTS SAFETY PRECAUTIONS 2 - 3 IMPORTANT SAFETY INSTRUCTIONS 4 DISC FORMATS 6 REMOTE CONTROL 7 ACCESSORIES 7 REMOTE CONTROL REFERENCE GUIDE 8 - 9 UNIT REFERENCE GUIDE 10 - 11 CONNECTIONS 12 - 17 Connecting a TV Antenna/Cable/Satellite 12 Connecting an Audio Amplifier ...... 12 Connecting an A/V Device (VCR, PVR Camcorder, Game System...18 Removing the Base Stand 18 Mounting on the Wall 18 USING HEADPHONES 19 UNIT OPERATION 19 Turning the Unit on 19 Turning the Unit on for the First Time 19 SOUND SYSTEM 19 CD/DVD OPERATION 20 - 21 Playing a Disc 20 Pausing Playback (...
TABLE OF CONTENTS SAFETY PRECAUTIONS 2 - 3 IMPORTANT SAFETY INSTRUCTIONS 4 DISC FORMATS 6 REMOTE CONTROL 7 ACCESSORIES 7 REMOTE CONTROL REFERENCE GUIDE 8 - 9 UNIT REFERENCE GUIDE 10 - 11 CONNECTIONS 12 - 17 Connecting a TV Antenna/Cable/Satellite 12 Connecting an Audio Amplifier ...... 12 Connecting an A/V Device (VCR, PVR Camcorder, Game System...18 Removing the Base Stand 18 Mounting on the Wall 18 USING HEADPHONES 19 UNIT OPERATION 19 Turning the Unit on 19 Turning the Unit on for the First Time 19 SOUND SYSTEM 19 CD/DVD OPERATION 20 - 21 Playing a Disc 20 Pausing Playback (...

Owners Manual
Page 7
... notice. 7 PLV31190CS1-DC_IB_ENG_AUD.pmd 7 20/04/2007, 16:51 REMOTE CONTROL USING THE REMOTE CONTROL • Point the remote control at the REMOTE SENSOR located on the unit. • When using the remote control is not going to be greatly reduced and you must contact the...the battery door. 2. Do not mix ALKALINE, standard (CARBON-ZINC) or rechargeable (NICKEL-CADMIUM) batteries. TO CHANGE THE REMOTE CONTROL BATTERY 1. Remote control (with battery x 1 AC adapter ...x 1 Car power adapter x 1 Specifications and appearance are subject to the instructions included with the...
... notice. 7 PLV31190CS1-DC_IB_ENG_AUD.pmd 7 20/04/2007, 16:51 REMOTE CONTROL USING THE REMOTE CONTROL • Point the remote control at the REMOTE SENSOR located on the unit. • When using the remote control is not going to be greatly reduced and you must contact the...the battery door. 2. Do not mix ALKALINE, standard (CARBON-ZINC) or rechargeable (NICKEL-CADMIUM) batteries. TO CHANGE THE REMOTE CONTROL BATTERY 1. Remote control (with battery x 1 AC adapter ...x 1 Car power adapter x 1 Specifications and appearance are subject to the instructions included with the...
Owners Manual
Page 8
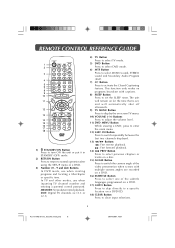
REMOTE CONTROL REFERENCE GUIDE 1 2 3 4 5 6 7 8 9 10 11 12 13 14 15 16 17 18 1) STANDBY/ON ...presentation when scenes with captions. 8) SLEEP Button Press to set , and will automatically shut off afterwards. 9) TV MENU Button Press to display the on-screen TV menu. 10) VOLUME (-/+) Buttons Press to adjust the volume level. 11) DVD MENU Button While viewing a ...Button Press to select one of a DVD. 3) Number (0 - 9 and dot) Buttons In DVD mode, use when inputting TV channel number and entering a parental control password. The unit will remain on for the time that is set the SLEEP timer.
REMOTE CONTROL REFERENCE GUIDE 1 2 3 4 5 6 7 8 9 10 11 12 13 14 15 16 17 18 1) STANDBY/ON ...presentation when scenes with captions. 8) SLEEP Button Press to set , and will automatically shut off afterwards. 9) TV MENU Button Press to display the on-screen TV menu. 10) VOLUME (-/+) Buttons Press to adjust the volume level. 11) DVD MENU Button While viewing a ...Button Press to select one of a DVD. 3) Number (0 - 9 and dot) Buttons In DVD mode, use when inputting TV channel number and entering a parental control password. The unit will remain on for the time that is set the SLEEP timer.
Owners Manual
Page 9
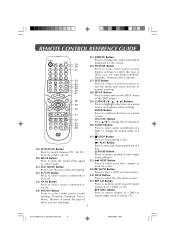
REMOTE CONTROL REFERENCE GUIDE 19 20 21 22 23 24 25 26 27 28 29 30 31 32 33 34 35 19) FUNCTION Button Press to switch between TV / AV IN / YUV IN / DVD / PC IN. 20) MUTE Button Press to enter and exit the SETUP menu of a DVD or repeat single track or ... playback of a CD. 31) STOP Button Press to change the output mode of a disc. Press again to cancel mute. 21) LCD MODE Button Press to set the size of the LCD display. 22) YUV IN Button Press to select source connected to YUV IN. 23) AV IN Button Press to select source...
REMOTE CONTROL REFERENCE GUIDE 19 20 21 22 23 24 25 26 27 28 29 30 31 32 33 34 35 19) FUNCTION Button Press to switch between TV / AV IN / YUV IN / DVD / PC IN. 20) MUTE Button Press to enter and exit the SETUP menu of a DVD or repeat single track or ... playback of a CD. 31) STOP Button Press to change the output mode of a disc. Press again to cancel mute. 21) LCD MODE Button Press to set the size of the LCD display. 22) YUV IN Button Press to select source connected to YUV IN. 23) AV IN Button Press to select source...

Owners Manual
Page 10
...PREV Button Press PREV button to go back to previous chapters/tracks. REMOTE CONTROL SENSOR Do not block this sensor or remote control will not work. 15) Removable Base Stand 10 PLV31190CS1-DC_IB_ENG_AUD..... 11) OPEN / CLOSE Button To open and close the disc door. 12) Color LCD Screen 13) Disc Door 14) STANDBY Indicator Indicates whether the unit is ON or in STANDBY...on the menu screen. 5) / Buttons Selects a TV channel and highlight selections (Up & Down) on and off. 2) MENU Button Enters and exits the TV menu. 3) FUNCTION Button Selects TV, AV IN, YUV IN, DVD or PC IN....
...PREV Button Press PREV button to go back to previous chapters/tracks. REMOTE CONTROL SENSOR Do not block this sensor or remote control will not work. 15) Removable Base Stand 10 PLV31190CS1-DC_IB_ENG_AUD..... 11) OPEN / CLOSE Button To open and close the disc door. 12) Color LCD Screen 13) Disc Door 14) STANDBY Indicator Indicates whether the unit is ON or in STANDBY...on the menu screen. 5) / Buttons Selects a TV channel and highlight selections (Up & Down) on and off. 2) MENU Button Enters and exits the TV menu. 3) FUNCTION Button Selects TV, AV IN, YUV IN, DVD or PC IN....
Owners Manual
Page 12
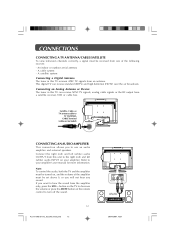
..., analog cable signals or the RF output from a satellite receiver, VCR or cable box. button on the TV to decrease the volume or press the MUTE button on the remote control to the right (red) and left (white) audio OUTPUT from the amplifier only, press the VOL - Connecting an Analog ...Antenna or Device The tuner in this TV can receive standard (SDTV) and high definition (HDTV) over the air broadcasts...
..., analog cable signals or the RF output from a satellite receiver, VCR or cable box. button on the TV to decrease the volume or press the MUTE button on the remote control to the right (red) and left (white) audio OUTPUT from the amplifier only, press the VOL - Connecting an Analog ...Antenna or Device The tuner in this TV can receive standard (SDTV) and high definition (HDTV) over the air broadcasts...
Owners Manual
Page 17
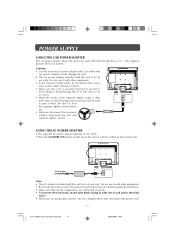
... POWER ADAPTER • The supplied AC power adapter operates on AC 120V. • Press the STANDBY/ON button on the top of the unit or remote control to use the unit for a long period of wall outlet, then fully insert. • When you are not going to turn on the unit...
... POWER ADAPTER • The supplied AC power adapter operates on AC 120V. • Press the STANDBY/ON button on the top of the unit or remote control to use the unit for a long period of wall outlet, then fully insert. • When you are not going to turn on the unit...
Owners Manual
Page 20
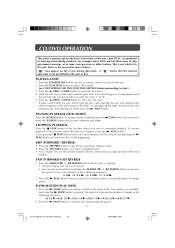
... main menu of the DVD, or start playing the DVD, press the PLAY button. Press the SLOW button on remote control in the unit. Press the STANDBY/ON button (on unit or remote control) to skip government warnings, or in the following sequence: SF 1/2 SF 1/3 SF 1/4 SF 1/5 SF 1/6 SF 1/7 2. Hold... back to previous chapters/tracks. • Press the NEXT button to advance chapters/tracks. • For an Audio CD, use the number buttons (remote control only) to jump directly to the beginning. Press the PLAY button to return to load the disc. Each time the SLOW button is pressed...
... main menu of the DVD, or start playing the DVD, press the PLAY button. Press the SLOW button on remote control in the unit. Press the STANDBY/ON button (on unit or remote control) to skip government warnings, or in the following sequence: SF 1/2 SF 1/3 SF 1/4 SF 1/5 SF 1/6 SF 1/7 2. Hold... back to previous chapters/tracks. • Press the NEXT button to advance chapters/tracks. • For an Audio CD, use the number buttons (remote control only) to jump directly to the beginning. Press the PLAY button to return to load the disc. Each time the SLOW button is pressed...

Owners Manual
Page 24
... the screen, while also beginning to play repeatedly. 2. While the disc is playing, press the REPEAT A-B button at the end of the disc on the remote control to be repeated are in different titles, A-B repeat is displayed) you want to play a specific section repeatedly. 1. PLAYING A PICTURE FILE DISC This unit can...
... the screen, while also beginning to play repeatedly. 2. While the disc is playing, press the REPEAT A-B button at the end of the disc on the remote control to be repeated are in different titles, A-B repeat is displayed) you want to play a specific section repeatedly. 1. PLAYING A PICTURE FILE DISC This unit can...

Owners Manual
Page 34
... Wait about an hour for 30 minutes to normal play . • There is no disc inside the unit due to a sudden change in the remote with new ones. Press the PLAY button to return to cool down . • Clean the disc. • A non-NTSC disc has been inserted.... The remote does not function. • Remove any obstacles between the remote and the unit. • Use the remote near the unit. • Point the remote at the remote sensor on the screen). • Insert the disc correctly with alcohol. • Clean ...
... Wait about an hour for 30 minutes to normal play . • There is no disc inside the unit due to a sudden change in the remote with new ones. Press the PLAY button to return to cool down . • Clean the disc. • A non-NTSC disc has been inserted.... The remote does not function. • Remove any obstacles between the remote and the unit. • Use the remote near the unit. • Point the remote at the remote sensor on the screen). • Insert the disc correctly with alcohol. • Clean ...

Owners Manual
Page 35
... is working properly. • Make sure all input cables are firmly connected. Black and white picture. • Check the Video setting within the TV Menu. • Check to check for possible station trouble. • Make sure the antenna is connected properly. • Increase the volume. &#...30 minutes, then try it if necessary. • Make sure the antenna cable is broadcast in and turned on the remote control. TROUBLE SHOOTING GUIDE SYMPTOM CAUSE (AND REMEDY) TV Bad Picture (snow, multiple images, distortion, blurry) • Check the location of picture. • Make sure ...
... is working properly. • Make sure all input cables are firmly connected. Black and white picture. • Check the Video setting within the TV Menu. • Check to check for possible station trouble. • Make sure the antenna is connected properly. • Increase the volume. &#...30 minutes, then try it if necessary. • Make sure the antenna cable is broadcast in and turned on the remote control. TROUBLE SHOOTING GUIDE SYMPTOM CAUSE (AND REMEDY) TV Bad Picture (snow, multiple images, distortion, blurry) • Check the location of picture. • Make sure ...


