
User Manual
Page 2
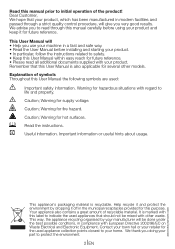
.../EC on Waste Electrical and Electronic Equipment. This way, the appliance recycling organised by dropping it for future reference. • Please read through this manual carefully before installing and starting your machine in compliance with this label to indicate the used appliance collection points closest to your part to initial operation of the product! This User Manual will give you...
.../EC on Waste Electrical and Electronic Equipment. This way, the appliance recycling organised by dropping it for future reference. • Please read through this manual carefully before installing and starting your machine in compliance with this label to indicate the used appliance collection points closest to your part to initial operation of the product! This User Manual will give you...
User Manual
Page 3
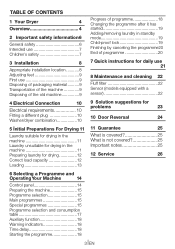
... Child-proof lock 19 Finishing by canceling the programme.20 End of programme 20 7 Quick instructions for daily use 21 8 Maintenance and cleaning 22 Fluff filter 22 Sensor (models equipped with a sensor 22 9 Solution suggestions for problems 23 10 Door Reversal 24 11 Guarantee 25 What is covered 25 What is not covered 25 Important notes 25 12 Service 26 6 Selecting a Programme and Operating Your Machine 14 Control panel...
... Child-proof lock 19 Finishing by canceling the programme.20 End of programme 20 7 Quick instructions for daily use 21 8 Maintenance and cleaning 22 Fluff filter 22 Sensor (models equipped with a sensor 22 9 Solution suggestions for problems 23 10 Door Reversal 24 11 Guarantee 25 What is covered 25 What is not covered 25 Important notes 25 12 Service 26 6 Selecting a Programme and Operating Your Machine 14 Control panel...
User Manual
Page 5
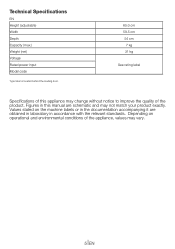
Technical Specifications EN Height (adjustable) Width Depth Capacity (max.) Weight (net) Voltage Rated power input Model code Type label is located behind the loading door. 2 85.0 cm 59.5 cm 54 cm 7 kg 31 kg See rating label Specifications of this manual are schematic and may vary. 5 EN Values stated on operational and environmental conditions of the product. Depending on the machine labels or in the documentation accompanying...
Technical Specifications EN Height (adjustable) Width Depth Capacity (max.) Weight (net) Voltage Rated power input Model code Type label is located behind the loading door. 2 85.0 cm 59.5 cm 54 cm 7 kg 31 kg See rating label Specifications of this manual are schematic and may vary. 5 EN Values stated on operational and environmental conditions of the product. Depending on the machine labels or in the documentation accompanying...

User Manual
Page 6
..., have it is clearly suggested in the operating instructions or the published service manual. • Inside and exhaust duct of the product must be cleaned by a qualified electrician, service representative or service personnel. • Do not reach into a socket which are recommended by the technical service. Such works should not be plugged in during installation, maintenance and repair works. Power cable of this product in places where it...
..., have it is clearly suggested in the operating instructions or the published service manual. • Inside and exhaust duct of the product must be cleaned by a qualified electrician, service representative or service personnel. • Do not reach into a socket which are recommended by the technical service. Such works should not be plugged in during installation, maintenance and repair works. Power cable of this product in places where it...
User Manual
Page 7
... the door of the dryer closed. There is not in the safety instructions: Turn off by a person who will be placed in use . Do not operate the machine if the power cable or plug is not intended to the dryer can result if metal reinforcements come loose during drying. • Check all laundry from the machine when it is the risk of electric...
... the door of the dryer closed. There is not in the safety instructions: Turn off by a person who will be placed in use . Do not operate the machine if the power cable or plug is not intended to the dryer can result if metal reinforcements come loose during drying. • Check all laundry from the machine when it is the risk of electric...
User Manual
Page 8
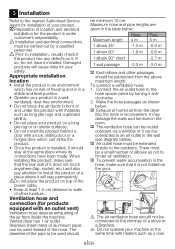
.... C The ventilation hose can be connected to install the product at the same time with an outlet vent) Ventilation hose assures exhausting of humid air from the dryer into the room is not folded on it will cause risks for installation of the hose. C Air outlet hose must be a small number of it can be carried out by turning it is inconvenient. B Installation and electrical connections must be used should stay...
.... C The ventilation hose can be connected to install the product at the same time with an outlet vent) Ventilation hose assures exhausting of humid air from the dryer into the room is not folded on it will cause risks for installation of the hose. C Air outlet hose must be a small number of it can be carried out by turning it is inconvenient. B Installation and electrical connections must be used should stay...
User Manual
Page 9
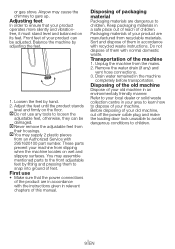
... slipping when the machine locates on the floor. Transportation of children. C Do not use • Make sure that your old machine, cut off the power cable plug and make the loading door lock unusable to avoid dangerous conditions to flare up. or gas stove. Drain water remained in your area to learn how to ensure that the power connections of this manual.
... slipping when the machine locates on the floor. Transportation of children. C Do not use • Make sure that your old machine, cut off the power cable plug and make the loading door lock unusable to avoid dangerous conditions to flare up. or gas stove. Drain water remained in your area to learn how to ensure that the power connections of this manual.
User Manual
Page 10
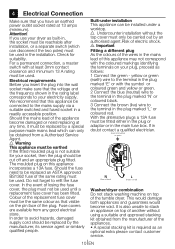
.... A Undercounter installation without using a suitable and approved stacking kit obtained from a Authorised Service Agent. A Important Fitting a different plug As the colours of the wires in the plug marked 'L' or coloured red. Green and yellow or green N Blue or black L Brown or red Washer/dryer combination Do not stack washing machine on this appliance incorporates a 13A fuse. Should the fuse need replacing at any good electrical store...
.... A Undercounter installation without using a suitable and approved stacking kit obtained from a Authorised Service Agent. A Important Fitting a different plug As the colours of the wires in the plug marked 'L' or coloured red. Green and yellow or green N Blue or black L Brown or red Washer/dryer combination Do not stack washing machine on this appliance incorporates a 13A fuse. Should the fuse need replacing at any good electrical store...
User Manual
Page 11
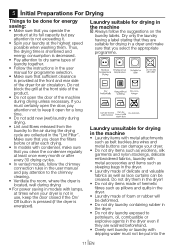
... clearance is located, well during drying unless necessary. Do not dry them . Make sure that you clean the filters before or after every 30 drying cycles. • In vented models, follow the suggestions on the laundry labels. Thus, the drying time is shortened and energy consumption is decreased. • Pay attention to dry same types of laundry together. • Follow the instructions in the user manual for...
... clearance is located, well during drying unless necessary. Do not dry them . Make sure that you clean the filters before or after every 30 drying cycles. • In vented models, follow the suggestions on the laundry labels. Thus, the drying time is shortened and energy consumption is decreased. • Pay attention to dry same types of laundry together. • Follow the instructions in the user manual for...
User Manual
Page 12
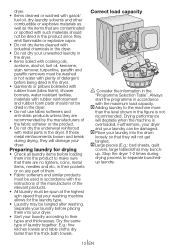
...sheets, quilt covers, large tablecloths) may be tangled after washing. Stop the dryer 1-2 times during drying, they will degrade when the machine is not recommended. Drying performance will damage your dryer. E.g.: fine kitchen towels and table cloths dry faster than the level shown in the figure is overloaded. in their types...remover, turpentine, paraffin and paraffin removers must be spun at the highest spin speed that your washing machine allows for drying • Check all laundry items before loading them into the drum loosely so that they will not get tangled. Always start ...
...sheets, quilt covers, large tablecloths) may be tangled after washing. Stop the dryer 1-2 times during drying, they will degrade when the machine is not recommended. Drying performance will damage your dryer. E.g.: fine kitchen towels and table cloths dry faster than the level shown in the figure is overloaded. in their types...remover, turpentine, paraffin and paraffin removers must be spun at the highest spin speed that your washing machine allows for drying • Check all laundry items before loading them into the drum loosely so that they will not get tangled. Always start ...
User Manual
Page 15
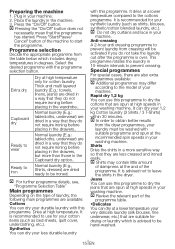
... "Start/Pause/ Cancel" button of the programme. Normal laundry (E.g.: tablecloths, underwear) are dried in a way that they do not require ironing before placing in degrees. Normal laundry (E.g., Shirts, dresses) are also extra programmes available: C Additional programmes may contain little amount of your durable laundry with the programme selection button. Dries at a lower temperature compared to the model of...
... "Start/Pause/ Cancel" button of the programme. Normal laundry (E.g.: tablecloths, underwear) are dried in a way that they do not require ironing before placing in degrees. Normal laundry (E.g., Shirts, dresses) are also extra programmes available: C Additional programmes may contain little amount of your durable laundry with the programme selection button. Dries at a lower temperature compared to the model of...
User Manual
Page 18
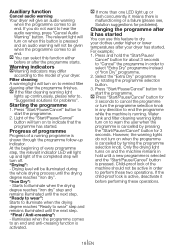
C If the filter cleaning warning light lights up and light of your dryer has started You can select this feature to dry your clothes under higher or lower temperatures after your dryer. Press "Start/Pause/Cancel" button to start the programme. Light of a running . Progress of programme Progress of the "Start/Pause/Cancel" button will turn off. At the beginning of every programme step, the relevant indicator LED will light up...
C If the filter cleaning warning light lights up and light of your dryer has started You can select this feature to dry your clothes under higher or lower temperatures after your dryer. Press "Start/Pause/Cancel" button to start the programme. Light of a running . Progress of programme Progress of the "Start/Pause/Cancel" button will turn off. At the beginning of every programme step, the relevant indicator LED will light up...
User Manual
Page 19
... any button or turn the programme selection knob while the child-proof lock is active. The drying light turns on and the machine remains on the control panel are deactivated when the child-proof lock is active. Open the door at the end of button while the programme is running , activate the ventilation programme to cool it again after adding or taking out laundry. 3. A double beep will...
... any button or turn the programme selection knob while the child-proof lock is active. The drying light turns on and the machine remains on the control panel are deactivated when the child-proof lock is active. Open the door at the end of button while the programme is running , activate the ventilation programme to cool it again after adding or taking out laundry. 3. A double beep will...
User Manual
Page 20
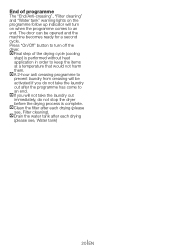
..." button to an end. The door can be activated if you will turn off the dryer. CIf you do not stop the dryer before the drying process is performed without heat application in order to an end. CFinal step of programme The "End/Anti-creasing", "Filter cleaning" and "Water tank" warning lights on when the programme comes to keep the items at a temperature...
..." button to an end. The door can be activated if you will turn off the dryer. CIf you do not stop the dryer before the drying process is performed without heat application in order to an end. CFinal step of programme The "End/Anti-creasing", "Filter cleaning" and "Water tank" warning lights on when the programme comes to keep the items at a temperature...
User Manual
Page 21
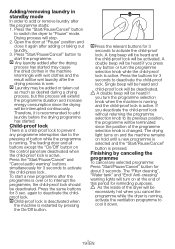
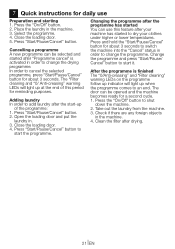
... change the drying programme. Check if there are any foreign objects in . 3. Clean the filter after the start-up of this feature after your machine has started to dry your clothes under higher or lower temperatures. Cancelling a programme A new programme can be opened and the machine becomes ready for a second cycle. 1. Press "Start/Pause/Cancel" button. 2. The door can use Preparation and starting 1. Select the programme. 4. Open the loading door...
... change the drying programme. Check if there are any foreign objects in . 3. Clean the filter after the start-up of this feature after your machine has started to dry your clothes under higher or lower temperatures. Cancelling a programme A new programme can be opened and the machine becomes ready for a second cycle. 1. Press "Start/Pause/Cancel" button. 2. The door can use Preparation and starting 1. Select the programme. 4. Open the loading door...
User Manual
Page 22
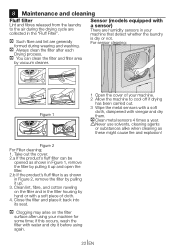
... to cool off if drying has been carried out. 3 Wipe the metal sensors with a soft cloth, dampened with vinegar and dry them. C You can be opened as shown in Figure 1, remove the filter by pulling it up . 3. C Clean metal sensors 4 times a year. Figure 2 For Filter cleaning; 1. Sensor (models equipped with a sensor) There are collected in your machine for some time; C Such fibre and lint are generally formed during the drying cycle...
... to cool off if drying has been carried out. 3 Wipe the metal sensors with a soft cloth, dampened with vinegar and dry them. C You can be opened as shown in Figure 1, remove the filter by pulling it up . 3. C Clean metal sensors 4 times a year. Figure 2 For Filter cleaning; 1. Sensor (models equipped with a sensor) There are collected in your machine for some time; C Such fibre and lint are generally formed during the drying cycle...
User Manual
Page 23
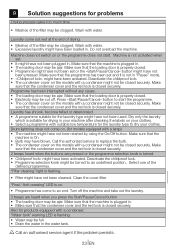
... condenser cover on . (for problems Drying process takes too much time • Meshes of the filter may be closed securely. "Filter cleaning" light is turned. • Childproof lock» might have been activated. Laundry come on the models with a condenser might not be ajar. Wash with water. • Excessive laundry might have not been used. Programme has been interrupted without any cause. • The loading door...
... condenser cover on . (for problems Drying process takes too much time • Meshes of the filter may be closed securely. "Filter cleaning" light is turned. • Childproof lock» might have been activated. Laundry come on the models with a condenser might not be ajar. Wash with water. • Excessive laundry might have not been used. Programme has been interrupted without any cause. • The loading door...
User Manual
Page 24
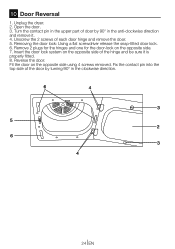
Open the door. 3. Removing the door lock: Using a flat screwdriver release the snap-fitted door lock. 6. Unplug the dryer. 2. Remove 2 plugs for the hinges and one for the door-lock on the opposite side of door by turning 90° in the anti-clockwise direction and remove it is properly fitted. 8. Insert the door lock system on the opposite side. 7. Turn the contact pin in the upper part of the hinge and...
Open the door. 3. Removing the door lock: Using a flat screwdriver release the snap-fitted door lock. 6. Unplug the dryer. 2. Remove 2 plugs for the hinges and one for the door-lock on the opposite side of door by turning 90° in the anti-clockwise direction and remove it is properly fitted. 8. Insert the door lock system on the opposite side. 7. Turn the contact pin in the upper part of the hinge and...
User Manual
Page 25
..., filters and light bulbs. • Repairs required as a result of faulty materials, defective components or manufacturing defect. • The cost of functional replacement parts, but excluding consumable items. • The labour costs of a approved repairer to products used in commercial or nonresidential domestic household premises. • The product must be correctly installed, located and operated in accordance with the instructions contained in the User Instructions...
..., filters and light bulbs. • Repairs required as a result of faulty materials, defective components or manufacturing defect. • The cost of functional replacement parts, but excluding consumable items. • The labour costs of a approved repairer to products used in commercial or nonresidential domestic household premises. • The product must be correctly installed, located and operated in accordance with the instructions contained in the User Instructions...
User Manual
Page 26
.... Should you when requesting service. (The model number is printed on the Instruction Booklet and the serial number is found even though your purchase receipt or other proof of Ireland All Refrigeration, 01 862 3411 All Cookers Washing Machines & Dryers, Tumble Dryers Dishwashers Before requesting service please check the trouble-shooting guide in obtaining service please contact the Customer Help-Line. Otherwise please call the...
.... Should you when requesting service. (The model number is printed on the Instruction Booklet and the serial number is found even though your purchase receipt or other proof of Ireland All Refrigeration, 01 862 3411 All Cookers Washing Machines & Dryers, Tumble Dryers Dishwashers Before requesting service please check the trouble-shooting guide in obtaining service please contact the Customer Help-Line. Otherwise please call the...


