
MX723 Data Sheet
Page 1
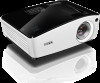
MX723 DIGITAL PROJECTOR Features Native XGA Resolution (1024x768) 3,700 ANSI Lumens 13,000:1 Contrast Ratio SmartEco™ Power Saving Technology 2D Keystone with Corner Fit LAN Control and ...
MX723 DIGITAL PROJECTOR Features Native XGA Resolution (1024x768) 3,700 ANSI Lumens 13,000:1 Contrast Ratio SmartEco™ Power Saving Technology 2D Keystone with Corner Fit LAN Control and ...
MX723 Data Sheet
Page 2
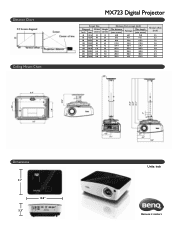
3.3" 5.8" 5.02" 25.3" 22.7" 21.1" .9" Distance Chart Ceiling Mount Chart 8.9" 9.5" Dimensions 9.1" 12.8" 5.3" MX723 Digital Projector Screen Size Diagonal Width Inch mm (inch) 40 1016 32 60 1524 48 80 2032 64 100 2540 80 120 3048 96 150 3810 120 ...
3.3" 5.8" 5.02" 25.3" 22.7" 21.1" .9" Distance Chart Ceiling Mount Chart 8.9" 9.5" Dimensions 9.1" 12.8" 5.3" MX723 Digital Projector Screen Size Diagonal Width Inch mm (inch) 40 1016 32 60 1524 48 80 2032 64 100 2540 80 120 3048 96 150 3810 120 ...
MX723 and MW724 Quick Start Guide
Page 4
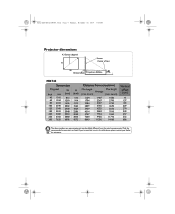
If your dealer for assistance. 4 BenQ QSG-MX723_MW724.book Page 4 Monday, November 10, 2014 3:08 PM Projector dimensions 4:3 Screen diagonal H Screen Center of lens W Vertical offset Projection distance MX723 40 1016 813 610 1124 1487 1850 91 60 1524 1219 914 1704 2247 2790 137 80 2032 1626 1219 2284 3007 3730 183 100...
If your dealer for assistance. 4 BenQ QSG-MX723_MW724.book Page 4 Monday, November 10, 2014 3:08 PM Projector dimensions 4:3 Screen diagonal H Screen Center of lens W Vertical offset Projection distance MX723 40 1016 813 610 1124 1487 1850 91 60 1524 1219 914 1704 2247 2790 137 80 2032 1626 1219 2284 3007 3730 183 100...
MX723 and MW724 Quick Start Guide
Page 5
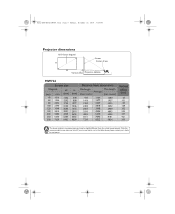
Only the recommended screen sizes are approximate and may be slightly different from the actual measurements. BenQ QSG-MX723_MW724.book Page 5 Monday, November 10, 2014 3:08 PM Projector dimensions 16:10 Screen diagonal H Screen Center of lens W Vertical offset Projection distance MW724 40 1016 862 538 933 1107 1280 67 60 1524 1292...
Only the recommended screen sizes are approximate and may be slightly different from the actual measurements. BenQ QSG-MX723_MW724.book Page 5 Monday, November 10, 2014 3:08 PM Projector dimensions 16:10 Screen diagonal H Screen Center of lens W Vertical offset Projection distance MW724 40 1016 862 538 933 1107 1280 67 60 1524 1292...

MX723 and MW724 Quick Start Guide
Page 6
BenQ QSG-MX723_MW724.book Page 6 Monday, November 10, 2014 3:08 PM Remote control World Wide Region Japan Region ON COMPUTER 1 COMPUTER 2 KEYSTONE / UP MENU/EXIT KEYSTONE / LEFT ECO BLANK KEYSTONE / DOWN *3QUICK INSTALL FREEZE *1PIP ASPECT NETWORK SETTING OFF *1COMPO 1 HDMI 1 HDMI 2 *1COMPO 2 AUTO KEYSTONE / RIGHT SOURCE MODE/ENTER *2LASER VOLUME + BRIGHT *3 CONTRAST VOLUME - MUTE LAMP MODE Number keys *1Not operational on this projector *2No LASER key on Japan region's remote controls *3TEST key acts as QUICK INSTALL key on Japan region's remote control 6
BenQ QSG-MX723_MW724.book Page 6 Monday, November 10, 2014 3:08 PM Remote control World Wide Region Japan Region ON COMPUTER 1 COMPUTER 2 KEYSTONE / UP MENU/EXIT KEYSTONE / LEFT ECO BLANK KEYSTONE / DOWN *3QUICK INSTALL FREEZE *1PIP ASPECT NETWORK SETTING OFF *1COMPO 1 HDMI 1 HDMI 2 *1COMPO 2 AUTO KEYSTONE / RIGHT SOURCE MODE/ENTER *2LASER VOLUME + BRIGHT *3 CONTRAST VOLUME - MUTE LAMP MODE Number keys *1Not operational on this projector *2No LASER key on Japan region's remote controls *3TEST key acts as QUICK INSTALL key on Japan region's remote control 6
MX723, MW724 User Manual
Page 1
MX723/MW724 Digital Projector User Manual
MX723/MW724 Digital Projector User Manual
MX723, MW724 User Manual
Page 2
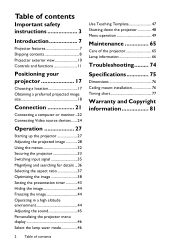
... Connection 21 Connecting a computer or monitor...22 Connecting Video source devices.......24 Operation 27 Starting up the projector 27 Adjusting the projected image 28 Using the menus 32 Securing the projector 33 Switching input signal 35 Magnifying and searching for details ...36 Selecting the aspect ratio 37 Optimizing the... timer 43 Hiding the image 44 Freezing the image 44 Operating in a high altitude environment 44 Adjusting the sound 45 Personalizing the projector menu display 46 Select the lamp saver mode 46 2 Table of contents Use Teaching Template 47 Shutting down the...
... Connection 21 Connecting a computer or monitor...22 Connecting Video source devices.......24 Operation 27 Starting up the projector 27 Adjusting the projected image 28 Using the menus 32 Securing the projector 33 Switching input signal 35 Magnifying and searching for details ...36 Selecting the aspect ratio 37 Optimizing the... timer 43 Hiding the image 44 Freezing the image 44 Operating in a high altitude environment 44 Adjusting the sound 45 Personalizing the projector menu display 46 Select the lamp saver mode 46 2 Table of contents Use Teaching Template 47 Shutting down the...

MX723, MW724 User Manual
Page 3
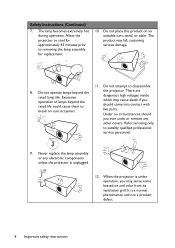
... voltage between 100 to 240 volts AC, but could cause the objects to meet the latest standards for future reference. This projector is NOT stable. Important safety instructions 3 Safety Instructions 1. The intense light beam may fluctuate or cut out, it is ... service personnel. 6. Please read this product, it for safety of this manual before 4. Important safety instructions Your projector is important that you connect your projector through a power stabilizer, surge protector or uninterruptible power supply (UPS). 3. Always open the lens shutter or remove...
... voltage between 100 to 240 volts AC, but could cause the objects to meet the latest standards for future reference. This projector is NOT stable. Important safety instructions 3 Safety Instructions 1. The intense light beam may fluctuate or cut out, it is ... service personnel. 6. Please read this product, it for safety of this manual before 4. Important safety instructions Your projector is important that you connect your projector through a power stabilizer, surge protector or uninterruptible power supply (UPS). 3. Always open the lens shutter or remove...
MX723, MW724 User Manual
Page 4
... operation. There are dangerous high voltages inside which may cause death if you should you may fall, sustaining serious damage. 11. When the projector is a normal phenomenon and not a product defect. 4 Important safety instructions Refer servicing only to disassemble 8. Under no circumstances should come into... contact with live parts. It is under operation, you ever undo or remove any electronic components unless the projector is unplugged. 12. Allow the projector to cool for approximately 45 minutes prior to break on an unstable cart, stand, or table.
... operation. There are dangerous high voltages inside which may cause death if you should you may fall, sustaining serious damage. 11. When the projector is a normal phenomenon and not a product defect. 4 Important safety instructions Refer servicing only to disassemble 8. Under no circumstances should come into... contact with live parts. It is under operation, you ever undo or remove any electronic components unless the projector is unplugged. 12. Allow the projector to cool for approximately 45 minutes prior to break on an unstable cart, stand, or table.
MX723, MW724 User Manual
Page 5
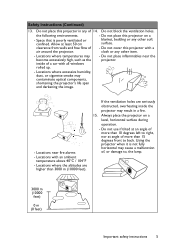
...image. - Do not place inflammables near fire alarms - Locations with all windows rolled up. - Always place the projector on a blanket, bedding or any other item. - Locations near the projector. - If the ventilation holes are higher than 15 degrees front to , the lamp. 3000 m (10000 feet)... 0 m (0 feet) Important safety instructions 5 Do not place this projector in a fire. 15. Locations where temperatures may cause a malfunction of 14. Locations where the altitudes are seriously obstructed, overheating inside of ...
...image. - Do not place inflammables near fire alarms - Locations with all windows rolled up. - Always place the projector on a blanket, bedding or any other item. - Locations near the projector. - If the ventilation holes are higher than 15 degrees front to , the lamp. 3000 m (10000 feet)... 0 m (0 feet) Important safety instructions 5 Do not place this projector in a fire. 15. Locations where temperatures may cause a malfunction of 14. Locations where the altitudes are seriously obstructed, overheating inside of ...
MX723, MW724 User Manual
Page 6
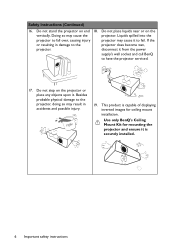
...Mount Kit for ceiling mount installation. disconnect it . Do not step on the projector or place any objects upon it from the power supply's wall socket and call BenQ to the projector does become wet, projector. Do not place liquids near or on end 18. If the or resulting... in accidents and possible injury. 19. Besides probable physical damage to the projector, doing so may cause the projector. This product is securely installed....
...Mount Kit for ceiling mount installation. disconnect it . Do not step on the projector or place any objects upon it from the power supply's wall socket and call BenQ to the projector does become wet, projector. Do not place liquids near or on end 18. If the or resulting... in accidents and possible injury. 19. Besides probable physical damage to the projector, doing so may cause the projector. This product is securely installed....

MX723, MW724 User Manual
Page 7
...projection distance. • The lamp brightness will decline over time and may vary within the lamp manufacturers specifications. Introduction 7 The projector offers the following features. • 2D keystone for easy horizontal and vertical keystone correction allows you to project a rectangular image from... signal detecting process • 3D color management allowing color adjusents to your liking • Selectable quick cooling function makes the projector cool in a shorter time • Presentation timer for better control of the projected image will vary depending on the ambient ...
...projection distance. • The lamp brightness will decline over time and may vary within the lamp manufacturers specifications. Introduction 7 The projector offers the following features. • 2D keystone for easy horizontal and vertical keystone correction allows you to project a rectangular image from... signal detecting process • 3D color management allowing color adjusents to your liking • Selectable quick cooling function makes the projector cool in a shorter time • Presentation timer for better control of the projected image will vary depending on the ambient ...

MX723, MW724 User Manual
Page 8
MX723 projector MW724 projector Remote control or remote control without laser (depending on region) & batteries Power cord VGA cable User manual CD 8 Introduction Quick start guide Warranty card* Standard ...
MX723 projector MW724 projector Remote control or remote control without laser (depending on region) & batteries Power cord VGA cable User manual CD 8 Introduction Quick start guide Warranty card* Standard ...
MX723, MW724 User Manual
Page 10
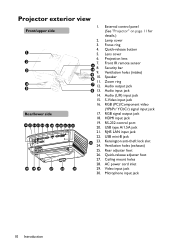
Projector exterior view Front/upper side 1 2 3 4 5 Rear/lower side 12 13 14 15 16 17 18 19 20 21 22 23 30 29 28 27 26 .... 11. 7 12. 6 13. 14. 15. 16. 17. 18. 19. 20. 21. 22. 24 23. 24. 25. 26. 27. 28. 29. 30. External control panel (See "Projector" on page 11 for details.) Lamp cover Focus ring Quick-release button Lens cover Projection lens Front IR remote sensor Security bar Ventilation holes (intake...
Projector exterior view Front/upper side 1 2 3 4 5 Rear/lower side 12 13 14 15 16 17 18 19 20 21 22 23 30 29 28 27 26 .... 11. 7 12. 6 13. 14. 15. 16. 17. 18. 19. 20. 21. 22. 24 23. 24. 25. 26. 27. 28. 29. 30. External control panel (See "Projector" on page 11 for details.) Lamp cover Focus ring Quick-release button Lens cover Projection lens Front IR remote sensor Security bar Ventilation holes (intake...
MX723, MW724 User Manual
Page 11
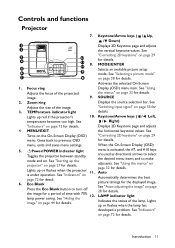
...size of the lamp. See Display (OSD) menu item. Eco Blank picture timings for details. LAMP indicator light lamp power saving. Controls and functions Projector 7. See "Selecting a picture mode" 7 8 on page 35 for details. See "Switching input signal" on page 38 for details. 10. ... page and adjusts 4. See "Using the menus" on page 32 for details. Auto is activated, the #7, and #10 keys Toggles the projector between standby are used as directional arrows to turn off 28 for details. Introduction 11 See "Correcting 2D keystone" on page 72 for details...
...size of the lamp. See Display (OSD) menu item. Eco Blank picture timings for details. LAMP indicator light lamp power saving. Controls and functions Projector 7. See "Selecting a picture mode" 7 8 on page 35 for details. See "Switching input signal" on page 38 for details. 10. ... page and adjusts 4. See "Using the menus" on page 32 for details. Auto is activated, the #7, and #10 keys Toggles the projector between standby are used as directional arrows to turn off 28 for details. Introduction 11 See "Correcting 2D keystone" on page 72 for details...
MX723, MW724 User Manual
Page 12
...the place you purchased your attention to prevent possible damage to person and property. Mounting the projector We want you to have a pleasant experience using your BenQ projector, so we strongly recommend that you use a proper fitting BenQ projector ceiling mount kit or wall mount kit and that you ensure it is a safety risk...and attach it securely to both the Kensington lock slot on the ceiling or wall, we need to bring this safety matter to your BenQ projector. If you intend to the mounting bracket become loose. 12 Introduction This will perform the secondary role of restraining the...
...the place you purchased your attention to prevent possible damage to person and property. Mounting the projector We want you to have a pleasant experience using your BenQ projector, so we strongly recommend that you use a proper fitting BenQ projector ceiling mount kit or wall mount kit and that you ensure it is a safety risk...and attach it securely to both the Kensington lock slot on the ceiling or wall, we need to bring this safety matter to your BenQ projector. If you intend to the mounting bracket become loose. 12 Introduction This will perform the secondary role of restraining the...
MX723, MW724 User Manual
Page 13
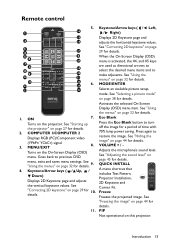
...Display (OSD) menu item. Eco Blank Press the Eco Blank button to make adjusents. QUICK INSTALL A menu shortcut that includes Test Pattern, Projector Installation, 2D Keystone and Corner Fit. See page 32 for 10. See "Adjusting the sound level" on page 32 for details. 2. See...details. See "Using the menus" on page 44 for details. Press again to previous OSD menu, "Using exits and saves the menus" on this projector. VOLUME + / Adjusts the microphone's sound level. PIP Not operational on menu settings. COMPUTER 1/COMPUTER 2 Displays RGB (PC)/Component video (YPbPr/ ...
...Display (OSD) menu item. Eco Blank Press the Eco Blank button to make adjusents. QUICK INSTALL A menu shortcut that includes Test Pattern, Projector Installation, 2D Keystone and Corner Fit. See page 32 for 10. See "Adjusting the sound level" on page 32 for details. 2. See...details. See "Using the menus" on page 44 for details. Press again to previous OSD menu, "Using exits and saves the menus" on this projector. VOLUME + / Adjusts the microphone's sound level. PIP Not operational on menu settings. COMPUTER 1/COMPUTER 2 Displays RGB (PC)/Component video (YPbPr/ ...
MX723, MW724 User Manual
Page 14
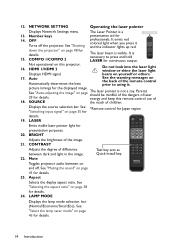
... when you press it . beam on page 38 for details. Parents should be mindful of the dangers of laser energy and keep this projector. 16. Not operational on page 28 for details. 24. See "Auto-adjusting the image" on this remote control out of the image...window or shine the laser light Displays HDMI signal. picture timings for details. 23. See "Muting the sound" on and off the projector. 12. The Laser Pointer is visible. NETWORK SETTING Operating the laser pointer Displays Network Settings menu. CONTRAST Adjusts the degree of difference between...
... when you press it . beam on page 38 for details. Parents should be mindful of the dangers of laser energy and keep this projector. 16. Not operational on page 28 for details. 24. See "Auto-adjusting the image" on this remote control out of the image...window or shine the laser light Displays HDMI signal. picture timings for details. 23. See "Muting the sound" on and off the projector. 12. The Laser Pointer is visible. NETWORK SETTING Operating the laser pointer Displays Network Settings menu. CONTRAST Adjusts the degree of difference between...
MX723, MW724 User Manual
Page 15
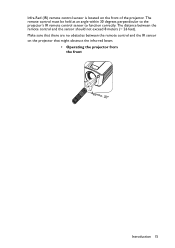
Make sure that there are no obstacles between the remote control and the sensor should not exceed 8 meters (~ 26 feet). The remote control must be held at an angle within 30 degrees perpendicular to the projector's IR remote control sensor to function correctly. The distance between the remote control and the IR sensor on the front of the projector. Infra-Red (IR) remote control sensor is located on the projector that might obstruct the infra-red beam. • Operating the projector from the front Approx. 30° Introduction 15
Make sure that there are no obstacles between the remote control and the sensor should not exceed 8 meters (~ 26 feet). The remote control must be held at an angle within 30 degrees perpendicular to the projector's IR remote control sensor to function correctly. The distance between the remote control and the IR sensor on the front of the projector. Infra-Red (IR) remote control sensor is located on the projector that might obstruct the infra-red beam. • Operating the projector from the front Approx. 30° Introduction 15

MX723, MW724 User Manual
Page 17
...the location of a suitable power outlet, as well as the location and distance between the projector and the rest of the screen. Note that a special rear projection screen and the BenQ Projector Ceiling Mounting Kit are required for quick setup and portability. 2. Set Rear Table in ...the SYSTEM SETUP: Basic > Projector Installation menu after you turn the projector on. 3. You can also use QUICK INSTALL key on ...
...the location of a suitable power outlet, as well as the location and distance between the projector and the rest of the screen. Note that a special rear projection screen and the BenQ Projector Ceiling Mounting Kit are required for quick setup and portability. 2. Set Rear Table in ...the SYSTEM SETUP: Basic > Projector Installation menu after you turn the projector on. 3. You can also use QUICK INSTALL key on ...


