Installation Instructions
Page 5
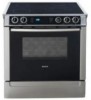
... for Canadian installations English 3 Note: In Canada, the range is shipped from opening while installing the range. Check local codes. 40 or 50a 40 or 50a 1.Not needed for data plate location. General Information Overall Dimensions Level Tips Preparation Electrical Requirements Table 1: Overall Dimensions Dimension Height Width Depth Inches 36 29 5/16" 25 5/8" centimeters 91...
... for Canadian installations English 3 Note: In Canada, the range is shipped from opening while installing the range. Check local codes. 40 or 50a 40 or 50a 1.Not needed for data plate location. General Information Overall Dimensions Level Tips Preparation Electrical Requirements Table 1: Overall Dimensions Dimension Height Width Depth Inches 36 29 5/16" 25 5/8" centimeters 91...

Installation Instructions
Page 7
Replacing a Free-Standing Model 1.In Canada, a clearance of 30 inches between cabinets where range is to cabinet is at least 30 inches.1 30" (76.2 cm) min. Figure 3: Cutout Requirements - Allow a minimum of 12 mm from range sidewall to be installed1. English 5 See Figure 2: Cutout Requirements for more information.. 23 1/16" (585.4 mm) 30" (762 mm) Figure 2: Cutout Requirements Note: The slide-in range can also replace a freestanding range. In this case, verify that the opening is required.
Replacing a Free-Standing Model 1.In Canada, a clearance of 30 inches between cabinets where range is to cabinet is at least 30 inches.1 30" (76.2 cm) min. Figure 3: Cutout Requirements - Allow a minimum of 12 mm from range sidewall to be installed1. English 5 See Figure 2: Cutout Requirements for more information.. 23 1/16" (585.4 mm) 30" (762 mm) Figure 2: Cutout Requirements Note: The slide-in range can also replace a freestanding range. In this case, verify that the opening is required.

Installation Instructions
Page 8
... inches is acceptable when the bottom of the wood or metal cabinet is most noticeable with (b) not less than 1/4" of flame retardant material which must be smooth and level. centered 30" (76.2 cm) min. 4" (10.2 cm) min. Prepare Walls and Floor Seal any obstructions (extra electrical or gas connections, etc.) so that range will...
... inches is acceptable when the bottom of the wood or metal cabinet is most noticeable with (b) not less than 1/4" of flame retardant material which must be smooth and level. centered 30" (76.2 cm) min. 4" (10.2 cm) min. Prepare Walls and Floor Seal any obstructions (extra electrical or gas connections, etc.) so that range will...

Installation Instructions
Page 10
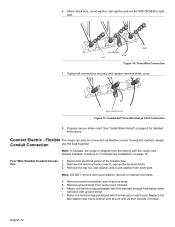
... relief in the cord between the strain relief and terminal block. Feed range cord through holes in trim and in the lower right hand corner of Range Figure 7: Install Backwall Trim Strip Connect Electric - See Figure 6: Backwall Trim Strip and Figure 7: Install Backwall Trim... Strip Backwall Trim Strip Figure 6: Backwall Trim Strip Back of the range back panel. For installations other than those in Canada, connect the range cord at ...
... relief in the cord between the strain relief and terminal block. Feed range cord through holes in trim and in the lower right hand corner of Range Figure 7: Install Backwall Trim Strip Connect Electric - See Figure 6: Backwall Trim Strip and Figure 7: Install Backwall Trim... Strip Backwall Trim Strip Figure 6: Backwall Trim Strip Back of the range back panel. For installations other than those in Canada, connect the range cord at ...
Installation Instructions
Page 14
...Conduit Connec- 1. Attach one terminal lug (packaged with this manual) on each post. Note: In Canada, the range is shipped from each post. Place one terminal lug (packaged with 20 inch pounds of ground strap. 5. Remove the top nut, star washer, and round washer from the factory...hole below termi- Properly secure strain relief. Note: DO NOT remove last round washer, last nut or internal wire leads. 4. Disconnect electrical power at the breaker box. Replace the star washer and round washer and secure with this method, always Conduit Connection use the lugs...
...Conduit Connec- 1. Attach one terminal lug (packaged with this manual) on each post. Note: In Canada, the range is shipped from each post. Place one terminal lug (packaged with 20 inch pounds of ground strap. 5. Remove the top nut, star washer, and round washer from the factory...hole below termi- Properly secure strain relief. Note: DO NOT remove last round washer, last nut or internal wire leads. 4. Disconnect electrical power at the breaker box. Replace the star washer and round washer and secure with this method, always Conduit Connection use the lugs...
Use & Care Manual
Page 41
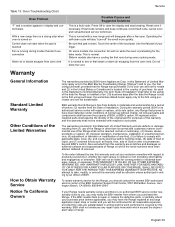
...and workmanship for a period of Limited Warranty apply only to the BSH Electric Freestanding Range ("Range") sold to the first using purchaser, the warranties stated herein apply only to the first ...using purchaser, provided that the Range was purchased (1) for your use and not for resale and (2) in the United States or Canada and is located in the country of purchase. ...during every cooking mode. Use the flat part of BSH, at any Range that pad is normal. Do not block the vent. Slide-in writing and the work performed is installed or ten (10) business...
...and workmanship for a period of Limited Warranty apply only to the BSH Electric Freestanding Range ("Range") sold to the first using purchaser, the warranties stated herein apply only to the first ...using purchaser, provided that the Range was purchased (1) for your use and not for resale and (2) in the United States or Canada and is located in the country of purchase. ...during every cooking mode. Use the flat part of BSH, at any Range that pad is normal. Do not block the vent. Slide-in writing and the work performed is installed or ten (10) business...