User Guide
Page 4
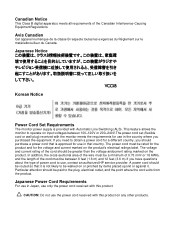
... service provider. This feature allows the monitor to obtain a power cord for a different country, you should be rated for the product and for the voltage and current marked on input voltages between 6 feet (1.8 m) and 12 feet (3.6 m).If you purchased the equipment. If you need to operate on the product's electrical ratings label. Japanese Notice Korean Notice Power Cord Set Requirements The monitor power supply...
... service provider. This feature allows the monitor to obtain a power cord for a different country, you should be rated for the product and for the voltage and current marked on input voltages between 6 feet (1.8 m) and 12 feet (3.6 m).If you purchased the equipment. If you need to operate on the product's electrical ratings label. Japanese Notice Korean Notice Power Cord Set Requirements The monitor power supply...

User Guide
Page 6
Table of Contents Safety Instructions ...2 Recycling Information ...3 System components and accessories 4 Connection instructions ...5 Installing the display...5 Packaging procedures ...5 Adjusting the viewing angle ...5 Connection instructions...6 Using the display...7 Turning on the display...7 Function controls...7 Installing the Touch Driver (for Windows XP only 8 Control of the Touch Function...10 OSD selection ...11 OSD Menu ...11 Troubleshooting ...13 Production Specifications 14 Preset Modes ...15 Appendix ...16 Connector pin assignment ...16 1
Table of Contents Safety Instructions ...2 Recycling Information ...3 System components and accessories 4 Connection instructions ...5 Installing the display...5 Packaging procedures ...5 Adjusting the viewing angle ...5 Connection instructions...6 Using the display...7 Turning on the display...7 Function controls...7 Installing the Touch Driver (for Windows XP only 8 Control of the Touch Function...10 OSD selection ...11 OSD Menu ...11 Troubleshooting ...13 Production Specifications 14 Preset Modes ...15 Appendix ...16 Connector pin assignment ...16 1

User Guide
Page 7
... sunlight. If your problem cannot be solved according to repair this product yourself! Use a soft lint-free cloth instead of the product may use the display • As the display surface is vulnerable to danger! Safety Instructions • Please keep the display away from any objects. • Remove protective film on the display are designed for ventilation. Do not cover or block the...
... sunlight. If your problem cannot be solved according to repair this product yourself! Use a soft lint-free cloth instead of the product may use the display • As the display surface is vulnerable to danger! Safety Instructions • Please keep the display away from any objects. • Remove protective film on the display are designed for ventilation. Do not cover or block the...
User Guide
Page 10
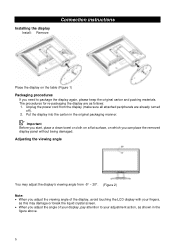
... the display again, please keep the original carton and packing materials. Put the display into the carton in the figure above. 5 Installing the display Install: Remove: Connection instructions Place the display on which you can place the removed display panel without being damaged. Adjusting the viewing angle You may damage or break the liquid crystal screen. • When you adjust the angle of the display, avoid touching the LCD display with...
... the display again, please keep the original carton and packing materials. Put the display into the carton in the figure above. 5 Installing the display Install: Remove: Connection instructions Place the display on which you can place the removed display panel without being damaged. Adjusting the viewing angle You may damage or break the liquid crystal screen. • When you adjust the angle of the display, avoid touching the LCD display with...
User Guide
Page 11
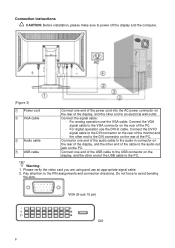
... electrical wall outlet. VGA (D-sub 15 pin) 6 For analog operation use the DVI-D cable. For digital operation use the VGA cable. Do not force to the PIN assignments and connection directions. Connection instructions CAUTION: Before installation, please make sure to power off the display and the computer. (Figure 3) ○1 Power cord ○2 VGA cable ○3 Audio cable ○4 USB cable Connect one end of the USB cable to the USB connector on the display, and the other end of the USB cable to...
... electrical wall outlet. VGA (D-sub 15 pin) 6 For analog operation use the DVI-D cable. For digital operation use the VGA cable. Do not force to the PIN assignments and connection directions. Connection instructions CAUTION: Before installation, please make sure to power off the display and the computer. (Figure 3) ○1 Power cord ○2 VGA cable ○3 Audio cable ○4 USB cable Connect one end of the USB cable to the USB connector on the display, and the other end of the USB cable to...
User Guide
Page 13
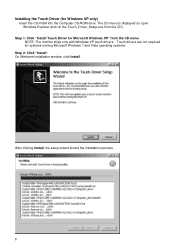
Installing the Touch Driver (for systems running Microsoft Windows 7 and Vista operating systems. Step 2: Click "Install" On Welcome installation window, click Install. After clicking Install, the setup wizard shows the installation process. 8 The CD menu is displayed (or open Windows Explorer and run the Touch_Driver_Setup.exe from the CD menu NOTE: The monitor ships only with Windows XP touch drivers. Touch drivers are not required for Windows XP only) Insert the CD-ROM into the Computer CD-ROM drive. Step 1: Click "Install Touch Driver for Microsoft Windows XP" from the CD).
Installing the Touch Driver (for systems running Microsoft Windows 7 and Vista operating systems. Step 2: Click "Install" On Welcome installation window, click Install. After clicking Install, the setup wizard shows the installation process. 8 The CD menu is displayed (or open Windows Explorer and run the Touch_Driver_Setup.exe from the CD menu NOTE: The monitor ships only with Windows XP touch drivers. Touch drivers are not required for Windows XP only) Insert the CD-ROM into the Computer CD-ROM drive. Step 1: Click "Install Touch Driver for Microsoft Windows XP" from the CD).
User Guide
Page 15
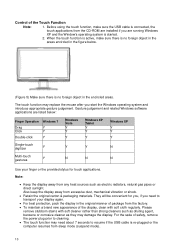
... touch applications. Note: • Keep the display away from sleep mode (suspend mode). 10 The touch function may damage the display. When the touch function is active, make sure the USB cable is connected, the touch applications from excessive dust, mechanical vibration or shock. • Retain the original carton & packaging materials. Control of safety, remove the power plug prior to cleaning. • The touch function may need to resume if the USB cable...
... touch applications. Note: • Keep the display away from sleep mode (suspend mode). 10 The touch function may damage the display. When the touch function is active, make sure the USB cable is connected, the touch applications from excessive dust, mechanical vibration or shock. • Retain the original carton & packaging materials. Control of safety, remove the power plug prior to cleaning. • The touch function may need to resume if the USB cable...

User Guide
Page 16
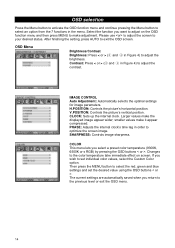
... press MENU to make adjustment. SHARPNESS: Controls image sharpness. OSD Menu Brightness/Contrast Brightness: Press < or > (○2 and ○3 in Figure 4) to adjust the brightness. Contrast: Press < or > (○2 and ○3 in Figure 4) to adjust the contrast. The current settings are automatically saved when you select a preset color temperature (9300K, 6500K or sRGB) by pressing the OSD buttons < or >. COLOR This menu lets you return to select the red, green and blue settings and set individual color values...
... press MENU to make adjustment. SHARPNESS: Controls image sharpness. OSD Menu Brightness/Contrast Brightness: Press < or > (○2 and ○3 in Figure 4) to adjust the brightness. Contrast: Press < or > (○2 and ○3 in Figure 4) to adjust the contrast. The current settings are automatically saved when you select a preset color temperature (9300K, 6500K or sRGB) by pressing the OSD buttons < or >. COLOR This menu lets you return to select the red, green and blue settings and set individual color values...

User Guide
Page 17
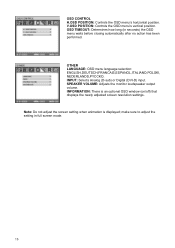
...menu's horizontal position. INPUT: Selects Analog (D-sub) or Digital (DVI-D) input. make sure to adjust the setting in seconds) the OSD menu waits before closing automatically after no action has been performed. OTHER LANGUAGE: OSD menu language selection: ENGLISH,DEUTSCH,FRANCAIS,ESPANOL,ITALIANO,POLSKI, NEDERLANDS,PYCCKO. V.OSD POSITION: Controls the OSD menu's vertical position. SPEAKER VOLUME: Adjusts the monitor loudspeaker output volume. OSD TIMEOUT: Determines how long (in full screen mode. 12 Note: Do not adjust the screen setting when animation is an optional OSD window...
...menu's horizontal position. INPUT: Selects Analog (D-sub) or Digital (DVI-D) input. make sure to adjust the setting in seconds) the OSD menu waits before closing automatically after no action has been performed. OTHER LANGUAGE: OSD menu language selection: ENGLISH,DEUTSCH,FRANCAIS,ESPANOL,ITALIANO,POLSKI, NEDERLANDS,PYCCKO. V.OSD POSITION: Controls the OSD menu's vertical position. SPEAKER VOLUME: Adjusts the monitor loudspeaker output volume. OSD TIMEOUT: Determines how long (in full screen mode. 12 Note: Do not adjust the screen setting when animation is an optional OSD window...
User Guide
Page 18
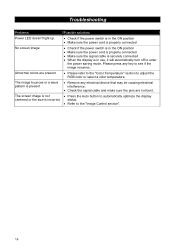
Troubleshooting Problems Power LED doesn't light up. No screen image Abnormal colors are not bent. • Press the Auto button to automatically optimize the display status. • Refer to enter the power saving mode. Note: Never disassemble or repair the product yourself. If your local dealer. 13 Please press any key to see if the image resumes. • Please refer to the "Color Temperature" section to adjust the RGB color or select a color temperature...
Troubleshooting Problems Power LED doesn't light up. No screen image Abnormal colors are not bent. • Press the Auto button to automatically optimize the display status. • Refer to enter the power saving mode. Note: Never disassemble or repair the product yourself. If your local dealer. 13 Please press any key to see if the image resumes. • Please refer to the "Color Temperature" section to adjust the RGB color or select a color temperature...

Users MANUAL L2105tm / 2209t LCD Touch Monitors
Page 4
... power cord set (flexible cord or wall plug) received with the monitor meets the requirements for a different country, you should be walked on or pinched by items placed uponit or against it is provided with Automatic Line Switching (ALS). A power cord should purchase a power cord that is approved for the voltage and current marked on the product's electrical ratings label. Japanese Power Cord Requirements For use...
... power cord set (flexible cord or wall plug) received with the monitor meets the requirements for a different country, you should be walked on or pinched by items placed uponit or against it is provided with Automatic Line Switching (ALS). A power cord should purchase a power cord that is approved for the voltage and current marked on the product's electrical ratings label. Japanese Power Cord Requirements For use...

Users MANUAL L2105tm / 2209t LCD Touch Monitors
Page 11
... end of the USB cable to the PC. For analog operation use the VGA cable. Connect the DVI-D signal cable to the DVI connector on the rear of the monitor and the other end to an electrical wall outlet. Connection instructions CAUTION: Before installation, please make sure to power off the display and the computer. (Figure 3) ○1 Power cord ○2 VGA cable ○3 Audio cable ○4 USB cable Connect one end of the power cord into the AC power connector on the rear...
... end of the USB cable to the PC. For analog operation use the VGA cable. Connect the DVI-D signal cable to the DVI connector on the rear of the monitor and the other end to an electrical wall outlet. Connection instructions CAUTION: Before installation, please make sure to power off the display and the computer. (Figure 3) ○1 Power cord ○2 VGA cable ○3 Audio cable ○4 USB cable Connect one end of the power cord into the AC power connector on the rear...
Users MANUAL L2105tm / 2209t LCD Touch Monitors
Page 13
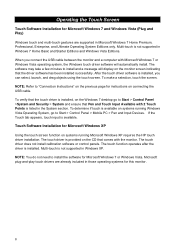
..., touch input is installed, you connect the USB cable between the monitor and a computer with the monitor. The touch driver does not install calibration software or control panels. Touch Software Installation for Microsoft Windows XP Using the touch screen function on systems running Microsoft Windows XP requires the HP touch driver installation. NOTE: You do not need to install and a message will display on the CD that the driver software has been installed successfully. The touch function operates after the driver is not supported in Windows...
..., touch input is installed, you connect the USB cable between the monitor and a computer with the monitor. The touch driver does not install calibration software or control panels. Touch Software Installation for Microsoft Windows XP Using the touch screen function on systems running Microsoft Windows XP requires the HP touch driver installation. NOTE: You do not need to install and a message will display on the CD that the driver software has been installed successfully. The touch function operates after the driver is not supported in Windows...
Users MANUAL L2105tm / 2209t LCD Touch Monitors
Page 14
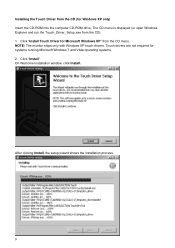
... monitor ships only with Windows XP touch drivers. Click "Install Touch Driver for Microsoft Windows XP" from the CD (for systems running Microsoft Windows 7 and Vista operating systems. 2. Installing the Touch Driver from the CD menu. Touch drivers are not required for Windows XP only) Insert the CD-ROM into the computer CD-ROM drive. After clicking Install, the setup wizard shows the installation process. 9 The CD menu is displayed (or open Windows...
... monitor ships only with Windows XP touch drivers. Click "Install Touch Driver for Microsoft Windows XP" from the CD (for systems running Microsoft Windows 7 and Vista operating systems. 2. Installing the Touch Driver from the CD menu. Touch drivers are not required for Windows XP only) Insert the CD-ROM into the computer CD-ROM drive. After clicking Install, the setup wizard shows the installation process. 9 The CD menu is displayed (or open Windows...
Users MANUAL L2105tm / 2209t LCD Touch Monitors
Page 15
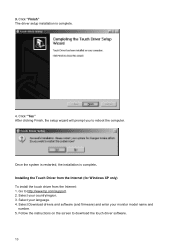
...://www.hp.com/support. 2. Go to reboot the computer. Select your monitor model name and number. 5. Follow the instructions on the screen to download the touch driver software. 10 3. Once the system is restarted, the installation is complete. 4. Select Download drivers and software (and firmware) and enter your language. 4. Installing the Touch Driver from the Internet (for Windows XP only) To install the touch driver from the Internet: 1. Click "Finish" The driver setup installation is complete...
...://www.hp.com/support. 2. Go to reboot the computer. Select your monitor model name and number. 5. Follow the instructions on the screen to download the touch driver software. 10 3. Once the system is restarted, the installation is complete. 4. Select Download drivers and software (and firmware) and enter your language. 4. Installing the Touch Driver from the Internet (for Windows XP only) To install the touch driver from the Internet: 1. Click "Finish" The driver setup installation is complete...

Users MANUAL L2105tm / 2209t LCD Touch Monitors
Page 18
... if the USB cable is calibrated first, as both will appear with soft cloth regularly. Also keep the display away from sleep mode (low power mode). 13 When Using Your Touchscreen Monitor • Keep the display away from the factory. • To maintain a brand new appearance of safety, remove the power plug prior to cleaning. • The touch function may damage the display. For the sake of the display, clean with identical...
... if the USB cable is calibrated first, as both will appear with soft cloth regularly. Also keep the display away from sleep mode (low power mode). 13 When Using Your Touchscreen Monitor • Keep the display away from the factory. • To maintain a brand new appearance of safety, remove the power plug prior to cleaning. • The touch function may damage the display. For the sake of the display, clean with identical...
Users MANUAL L2105tm / 2209t LCD Touch Monitors
Page 19
... the menu. V.POSITION: Controls the picture's vertical position. Larger values make it appear compressed. smaller values make the displayed image appear wider; If you want to adjust on screen. SHARPNESS: Controls image sharpness. Then press the MENU button to make adjustment. Contrast: Press < or > (② and ③ in order to adjust the contrast. Changes to the color temperature take immediate effect on the OSD function menu and then press MENU to select the red, green and blue settings and set individual color...
... the menu. V.POSITION: Controls the picture's vertical position. Larger values make it appear compressed. smaller values make the displayed image appear wider; If you want to adjust on screen. SHARPNESS: Controls image sharpness. Then press the MENU button to make adjustment. Contrast: Press < or > (② and ③ in order to adjust the contrast. Changes to the color temperature take immediate effect on the OSD function menu and then press MENU to select the red, green and blue settings and set individual color...
Users MANUAL L2105tm / 2209t LCD Touch Monitors
Page 20
... OSD menu's horizontal position. INPUT: Selects Analog (D-sub) or Digital (DVI-D) input. Note: Do not adjust the screen setting when animation is an optional OSD window (on/off) that displays the newly adjusted screen resolution settings. make sure to adjust the setting in seconds) the OSD menu waits before closing automatically after no action has been performed. OTHER LANGUAGE: OSD menu language selection: ENGLISH,DEUTSCH,FRANCAIS,ESPANOL,ITALIANO,POLSKI, NEDERLANDS,PYCCKO. OSD TIMEOUT: Determines how long (in full screen mode. 15 V.OSD POSITION: Controls the OSD menu's vertical...
... OSD menu's horizontal position. INPUT: Selects Analog (D-sub) or Digital (DVI-D) input. Note: Do not adjust the screen setting when animation is an optional OSD window (on/off) that displays the newly adjusted screen resolution settings. make sure to adjust the setting in seconds) the OSD menu waits before closing automatically after no action has been performed. OTHER LANGUAGE: OSD menu language selection: ENGLISH,DEUTSCH,FRANCAIS,ESPANOL,ITALIANO,POLSKI, NEDERLANDS,PYCCKO. OSD TIMEOUT: Determines how long (in full screen mode. 15 V.OSD POSITION: Controls the OSD menu's vertical...
Users MANUAL L2105tm / 2209t LCD Touch Monitors
Page 21
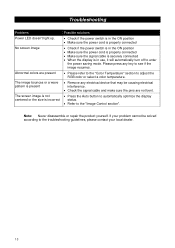
Troubleshooting Problems Power LED doesn't light up. No screen image Abnormal colors are not bent. Press the Auto button to automatically optimize the display status. Refer to enter the power saving mode. Please press any key to see if the image resumes. Please refer to the "Color Temperature" section to adjust the RGB color or select a color temperature. Remove any electrical device that may be causing electrical interference. ...
Troubleshooting Problems Power LED doesn't light up. No screen image Abnormal colors are not bent. Press the Auto button to automatically optimize the display status. Refer to enter the power saving mode. Please press any key to see if the image resumes. Please refer to the "Color Temperature" section to adjust the RGB color or select a color temperature. Remove any electrical device that may be causing electrical interference. ...
Users MANUAL L2105tm / 2209t LCD Touch Monitors
Page 22
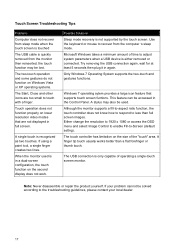
... are too small to -Screen (default settng). Possible Solutions Sleep mode recovery is recognized as two touches. Note: Never disassemble or repair the product yourself. A stylus may be used is either removed or connected. A finger tip touch usually works better than full screen images. When the monitor used . Try removing the USB connection again, wait for at least 5 seconds then plug it in the Control Panel. The two-touch operation and some gestures...
... are too small to -Screen (default settng). Possible Solutions Sleep mode recovery is recognized as two touches. Note: Never disassemble or repair the product yourself. A stylus may be used is either removed or connected. A finger tip touch usually works better than full screen images. When the monitor used . Try removing the USB connection again, wait for at least 5 seconds then plug it in the Control Panel. The two-touch operation and some gestures...


