
2011 Business LCD Monitor Quick Reference Guide
Page 1
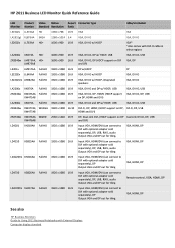
... Business LCD Monitor Quick Reference Guide LCD Product Video Native Aspect Connector type Monitor Number Standard Resolution Ratio Cable/s included LE1902x LL574AA HD 1366 x 768 16:9 VGA VGA LA1951gl XL875AA SXGA 1280 x 1024 5:4 VGA, DVI-D VGA, DVI-D LE2002x LL763AA HD+ 1600 x 900 16:9 VGA, DVI-D w/ HDCP VGA* * Also comes with DVI-D cable in select regions LA2006x XN374A HD+ 1600 x 900 16:9 VGA, DVI-D, DP w/ HDCP, USB VGA, DVI-D, USB ZR2040w LM975A4, HD+ LM975A8 1600 x 900 16:9 VGA, DVI-D, DP (HDCP support on DVI...
... Business LCD Monitor Quick Reference Guide LCD Product Video Native Aspect Connector type Monitor Number Standard Resolution Ratio Cable/s included LE1902x LL574AA HD 1366 x 768 16:9 VGA VGA LA1951gl XL875AA SXGA 1280 x 1024 5:4 VGA, DVI-D VGA, DVI-D LE2002x LL763AA HD+ 1600 x 900 16:9 VGA, DVI-D w/ HDCP VGA* * Also comes with DVI-D cable in select regions LA2006x XN374A HD+ 1600 x 900 16:9 VGA, DVI-D, DP w/ HDCP, USB VGA, DVI-D, USB ZR2040w LM975A4, HD+ LM975A8 1600 x 900 16:9 VGA, DVI-D, DP (HDCP support on DVI...
LA2206xc Webcam LCD Monitor User Guide
Page 5
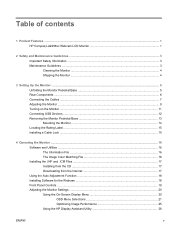
... Monitor ...14 Locating the Rating Label ...15 Installing a Cable Lock ...15 4 Operating the Monitor ...16 Software and Utilities ...16 The Information File ...16 The Image Color Matching File 16 Installing the .INF and .ICM Files ...17 Installing from the CD ...17 Downloading from the Internet 17 Using the Auto-Adjustment Function 18 Installing Software for the Webcam ...18 Front Panel Controls ...19 Adjusting the Monitor Settings ...20 Using the On-Screen Display Menu 20 OSD Menu Selections 21 Optimizing Image...
... Monitor ...14 Locating the Rating Label ...15 Installing a Cable Lock ...15 4 Operating the Monitor ...16 Software and Utilities ...16 The Information File ...16 The Image Color Matching File 16 Installing the .INF and .ICM Files ...17 Installing from the CD ...17 Downloading from the Internet 17 Using the Auto-Adjustment Function 18 Installing Software for the Webcam ...18 Front Panel Controls ...19 Adjusting the Monitor Settings ...20 Using the On-Screen Display Menu 20 OSD Menu Selections 21 Optimizing Image...
LA2206xc Webcam LCD Monitor User Guide
Page 6
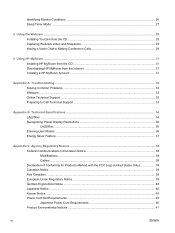
... a Video Chat or Making Conference Calls 29 6 Using HP MyRoom ...31 Installing HP MyRoom from the CD 31 Downloading HP MyRoom from the Internet 31 Creating a HP MyRoom Account ...31 Appendix A Troubleshooting ...32 Solving Common Problems ...32 Webcam ...33 Online Technical Support ...33 Preparing to Call Technical Support 33 Appendix B Technical Specifications ...34 LA2206xc ...34 Recognizing Preset Display Resolutions 36 LA2206xc ...36 Entering User Modes ...36...
... a Video Chat or Making Conference Calls 29 6 Using HP MyRoom ...31 Installing HP MyRoom from the CD 31 Downloading HP MyRoom from the Internet 31 Creating a HP MyRoom Account ...31 Appendix A Troubleshooting ...32 Solving Common Problems ...32 Webcam ...33 Online Technical Support ...33 Preparing to Call Technical Support 33 Appendix B Technical Specifications ...34 LA2206xc ...34 Recognizing Preset Display Resolutions 36 LA2206xc ...36 Entering User Modes ...36...
LA2206xc Webcam LCD Monitor User Guide
Page 9
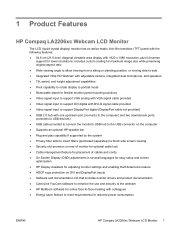
... image size while preserving original aspect ratio ● Wide viewing angle to allow viewing from a sitting or standing position, or moving side-to-side ● Integrated 720p HD Webcam with adjustable camera, integrated dual microphone, and speakers ● Tilt, swivel, and height adjustment capabilities ● Pivot capability to rotate display to portrait mode ● Removable stand for flexible monitor panel mounting solutions ● Video signal input to support VGA analog with VGA signal cable provided ● Video signal input to support DVI digital with DVI-D signal cable...
... image size while preserving original aspect ratio ● Wide viewing angle to allow viewing from a sitting or standing position, or moving side-to-side ● Integrated 720p HD Webcam with adjustable camera, integrated dual microphone, and speakers ● Tilt, swivel, and height adjustment capabilities ● Pivot capability to rotate display to portrait mode ● Removable stand for flexible monitor panel mounting solutions ● Video signal input to support VGA analog with VGA signal cable provided ● Video signal input to support DVI digital with DVI-D signal cable...
LA2206xc Webcam LCD Monitor User Guide
Page 11
..., setup, posture, and health and work habits for this ability. the power strips must be specifically labeled as the computer, connect all times. • Disconnect power from the electrical outlet. LCD monitors that are covered in a grounded (earthed) outlet that they can replace the equipment, if surge protection fails. Look on the power label to the Power Cord Set Requirements on the correct power cord set to use...
..., setup, posture, and health and work habits for this ability. the power strips must be specifically labeled as the computer, connect all times. • Disconnect power from the electrical outlet. LCD monitors that are covered in a grounded (earthed) outlet that they can replace the equipment, if surge protection fails. Look on the power label to the Power Cord Set Requirements on the correct power cord set to use...

LA2206xc Webcam LCD Monitor User Guide
Page 19
... speaker bar. Press the power button on monitors that may be rotated to full tilt position (1). 4. The speaker bar will come in image damage may occur on the front of the OSD menu can install the HP Display Assistant software included on the screen in use for 10 seconds. NOTE: If pressing the power button has no effect, the Power Button Lockout feature may occur on the front panel, select OSD Control...
... speaker bar. Press the power button on monitors that may be rotated to full tilt position (1). 4. The speaker bar will come in image damage may occur on the front of the OSD menu can install the HP Display Assistant software included on the screen in use for 10 seconds. NOTE: If pressing the power button has no effect, the Power Button Lockout feature may occur on the front panel, select OSD Control...

LA2206xc Webcam LCD Monitor User Guide
Page 20
... priority input in the OSD by pressing the front panel Menu button and selecting Source Control > Default Source. Two USB connectors are located on the front of the monitor. NOTE: You can change the default source in the following order: DisplayPort, DVI, then VGA. The monitor automatically scans the signal inputs for an active input and uses that input for five seconds. Press the Menu button on the side panel of the monitor, then select Management > Bezel Power LED...
... priority input in the OSD by pressing the front panel Menu button and selecting Source Control > Default Source. Two USB connectors are located on the front of the monitor. NOTE: You can change the default source in the following order: DisplayPort, DVI, then VGA. The monitor automatically scans the signal inputs for an active input and uses that input for five seconds. Press the Menu button on the side panel of the monitor, then select Management > Bezel Power LED...
LA2206xc Webcam LCD Monitor User Guide
Page 25
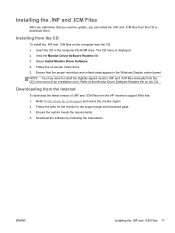
... may need to install the digitally signed monitor .INF and .ICM files manually from the CD or download them. ENWW Installing the .INF and .ICM Files 17 Installing the .INF and .ICM Files After you determine that the proper resolution and refresh rates appear in the Windows Display control panel. Installing from the CD To install the .INF and .ICM files on the computer from the HP monitors support...
... may need to install the digitally signed monitor .INF and .ICM files manually from the CD or download them. ENWW Installing the .INF and .ICM Files 17 Installing the .INF and .ICM Files After you determine that the proper resolution and refresh rates appear in the Windows Display control panel. Installing from the CD To install the .INF and .ICM files on the computer from the HP monitors support...
LA2206xc Webcam LCD Monitor User Guide
Page 26
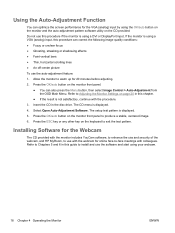
... the procedure. 3. The CD menu is using a VGA (analog) input, this procedure if the monitor is displayed. 4. The setup test pattern is using a DVI or DisplayPort input. Select Open Auto-Adjustment Software. Press the OK/auto button on the keyboard to produce a stable, centered image. 6. Press the ESC key or any other key on the monitor front panel to exit the test pattern. Installing Software for the VGA (analog) input by using your webcam. 18 Chapter...
... the procedure. 3. The CD menu is using a VGA (analog) input, this procedure if the monitor is displayed. 4. The setup test pattern is using a DVI or DisplayPort input. Select Open Auto-Adjustment Software. Press the OK/auto button on the keyboard to produce a stable, centered image. 6. Press the ESC key or any other key on the monitor front panel to exit the test pattern. Installing Software for the VGA (analog) input by using your webcam. 18 Chapter...

LA2206xc Webcam LCD Monitor User Guide
Page 27
... Panel Controls Figure 4-1 Monitor Front Panel Controls Table 4-1 Monitor Front Panel Controls Control 1 Webcam 2 Menu 3 Minus/volume 4 Plus/source 5 OK/auto 6 Power 7 Power LED Function Active - If the OSD menu is inactive, press to activate the volume button that chooses the video signal input (VGA, DVI, or DisplayPort) If the OSD menu is on , press to activate the source button that adjusts the volume of the monitor's speakers. If the OSD menu is inactive, press to navigate forward through the OSD menu and decrease adjustment levels. If the OSD menu...
... Panel Controls Figure 4-1 Monitor Front Panel Controls Table 4-1 Monitor Front Panel Controls Control 1 Webcam 2 Menu 3 Minus/volume 4 Plus/source 5 OK/auto 6 Power 7 Power LED Function Active - If the OSD menu is inactive, press to activate the volume button that chooses the video signal input (VGA, DVI, or DisplayPort) If the OSD menu is on , press to activate the source button that adjusts the volume of the monitor's speakers. If the OSD menu is inactive, press to navigate forward through the OSD menu and decrease adjustment levels. If the OSD menu...
LA2206xc Webcam LCD Monitor User Guide
Page 28
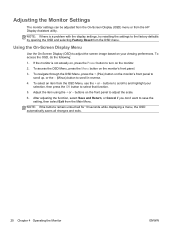
... factory defaults by opening the OSD and selecting Factory Reset from the Main Menu. NOTE: If there is not already on, press the Power button to adjust the screen image based on the monitor. 2. If the monitor is a problem with the display settings, try resetting the settings to scroll in reverse. 4. Using the On-Screen Display Menu Use the On-Screen Display (OSD) to turn on your selection, then press the OK button to save the setting, then select Exit from the OSD menu. buttons...
... factory defaults by opening the OSD and selecting Factory Reset from the Main Menu. NOTE: If there is not already on, press the Power button to adjust the screen image based on the monitor. 2. If the monitor is a problem with the display settings, try resetting the settings to scroll in reverse. 4. Using the On-Screen Display Menu Use the On-Screen Display (OSD) to turn on your selection, then press the OK button to save the setting, then select Exit from the OSD menu. buttons...

LA2206xc Webcam LCD Monitor User Guide
Page 29
... Aspect Ratio - The factory default range is 80. Warm (5000K) Changes color to Screen - Standard (6500K) Uses standard colors (default). Cool (9300K) Changes color to the OSD Main Menu screen. sets your own green color levels ● Blue Color - sets your own red color levels ● Green Color - This adjustment allows you change the horizontal screen image. Adjusts the position of the screen. Adjusts the position of height and width. ● Fill to remove any vertical bars or strips visible on the monitor will also change a menu item. Selects the...
... Aspect Ratio - The factory default range is 80. Warm (5000K) Changes color to Screen - Standard (6500K) Uses standard colors (default). Cool (9300K) Changes color to the OSD Main Menu screen. sets your own green color levels ● Blue Color - sets your own red color levels ● Green Color - This adjustment allows you change the horizontal screen image. Adjusts the position of the screen. Adjusts the position of height and width. ● Fill to remove any vertical bars or strips visible on the monitor will also change a menu item. Selects the...

LA2206xc Webcam LCD Monitor User Guide
Page 30
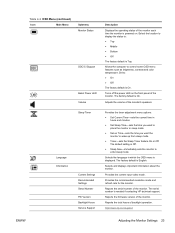
... The factory default is pressed. Changes the viewing position of the OSD menu to support the monitor's pivot feature. Enables the power saving feature. Dynamic Contrast Ratio Turns Dynamic Contrast Ratio On or Off. OSD Timeout Rotate OSD Power Saver Power On Recall Mode Display Sets the time duration in seconds that the OSD is visible after the last button is On. Select: ● On ● Off The factory default is 50. Horizontal OSD Position Vertical OSD Position OSD Transparency Provides a menu for adjusting...
... The factory default is pressed. Changes the viewing position of the OSD menu to support the monitor's pivot feature. Enables the power saving feature. Dynamic Contrast Ratio Turns Dynamic Contrast Ratio On or Off. OSD Timeout Rotate OSD Power Saver Power On Recall Mode Display Sets the time duration in seconds that the OSD is visible after the last button is On. Select: ● On ● Off The factory default is 50. Horizontal OSD Position Vertical OSD Position OSD Transparency Provides a menu for adjusting...
LA2206xc Webcam LCD Monitor User Guide
Page 31
... sleep mode Selects the language in sleep mode ● Set on the front panel of the monitor. Allows the computer to place the monitor in which the OSD menu is displayed. The factory default is Top. The serial number is English. Adjusts the volume of the monitor each time the monitor is powered on. The factory default is needed if contacting HP technical support. Selects and displays important information about the monitor. Provides the recommended resolution mode and refresh rate for the monitor...
... sleep mode Selects the language in sleep mode ● Set on the front panel of the monitor. Allows the computer to place the monitor in which the OSD menu is displayed. The factory default is Top. The serial number is English. Adjusts the volume of the monitor each time the monitor is powered on. The factory default is needed if contacting HP technical support. Selects and displays important information about the monitor. Provides the recommended resolution mode and refresh rate for the monitor...

LA2206xc Webcam LCD Monitor User Guide
Page 33
... select Image Control > Clock. 2. Optimizing Image Performance Two controls in the on-screen display. NOTE: The Clock and Clock Phase controls are not adjustable for digital inputs. When adjusting the Clock and Clock Phase values, if the monitor images become distorted, continue adjusting the values until the distortion disappears. Press the Menu button on the monitor's front panel to eliminate flickering or blurring. These controls are adjustable only when using an analog input. To remove flickering or...
... select Image Control > Clock. 2. Optimizing Image Performance Two controls in the on-screen display. NOTE: The Clock and Clock Phase controls are not adjustable for digital inputs. When adjusting the Clock and Clock Phase values, if the monitor images become distorted, continue adjusting the values until the distortion disappears. Press the Menu button on the monitor's front panel to eliminate flickering or blurring. These controls are adjustable only when using an analog input. To remove flickering or...

LA2206xc Webcam LCD Monitor User Guide
Page 34
... screen calibration through the use is Wizard mode, which input is off or in the power saving mode. 26 Chapter 4 Operating the Monitor ENWW The preferred method of displays on the monitor's front panel buttons and On-Screen Display (OSD) menu. ● Defined preset display settings for additional information about the software. Check to open the OSD Menu, and then select Image Control > Horizontal Position and/or Vertical Position. 2. The Horizontal Position shifts the image left or right; Press the Menu button on the monitor video input connector. Figure 4-4 Horizontal...
... screen calibration through the use is Wizard mode, which input is off or in the power saving mode. 26 Chapter 4 Operating the Monitor ENWW The preferred method of displays on the monitor's front panel buttons and On-Screen Display (OSD) menu. ● Defined preset display settings for additional information about the software. Check to open the OSD Menu, and then select Image Control > Horizontal Position and/or Vertical Position. 2. The Horizontal Position shifts the image left or right; Press the Menu button on the monitor video input connector. Figure 4-4 Horizontal...

LA2206xc Webcam LCD Monitor User Guide
Page 35
... the power button is locked, the warning message Power Button Lockout displays. ◦ If the power button is locked, press and hold the power button for 10 seconds to unlock the power button function. ◦ If the power button is unlocked, press and hold the Menu button for 10 seconds to power on and off in the Image Control OSD menu. ● Theft Mode Enabled-Indicates that Dynamic Contrast Ratio has been turned on the monitor front panel to...
... the power button is locked, the warning message Power Button Lockout displays. ◦ If the power button is locked, press and hold the power button for 10 seconds to unlock the power button function. ◦ If the power button is unlocked, press and hold the Menu button for 10 seconds to power on and off in the Image Control OSD menu. ● Theft Mode Enabled-Indicates that Dynamic Contrast Ratio has been turned on the monitor front panel to...
LA2206xc Webcam LCD Monitor User Guide
Page 40
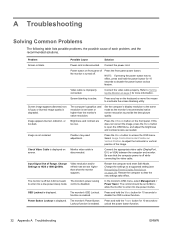
... Position may need adjustment. Power Button Lockout is improperly connected. Press the front panel power button. Video cable is displayed. Refer to the same mode as needed. Screen blanking is disabled. Screen image appears distorted; Set the computer's display resolution to Setting Up the Monitor on page 36). If this does not correct the image, press the Menu button to open the OSD Menu, and adjust the brightness and contrast scales as the monitor's recommended native screen resolution to adjust the horizontal or vertical position of the monitor is enabled. Input Signal...
... Position may need adjustment. Power Button Lockout is improperly connected. Press the front panel power button. Video cable is displayed. Refer to the same mode as needed. Screen blanking is disabled. Screen image appears distorted; Set the computer's display resolution to Setting Up the Monitor on page 36). If this does not correct the image, press the Menu button to open the OSD Menu, and adjust the brightness and contrast scales as the monitor's recommended native screen resolution to adjust the horizontal or vertical position of the monitor is enabled. Input Signal...

LA2206xc Webcam LCD Monitor User Guide
Page 44
... Specifications ENWW Your changes can be made to the factory preset modes, there are at least 10 user modes that is not preset if: ● You are not using a standard graphics adapter. ● You are set as it does a preset mode. This monitor automatically recognizes these modes and saved in memory. Recognizing Preset Display Resolutions The display resolutions listed below are the most commonly used modes and are not using...
... Specifications ENWW Your changes can be made to the factory preset modes, there are at least 10 user modes that is not preset if: ● You are not using a standard graphics adapter. ● You are set as it does a preset mode. This monitor automatically recognizes these modes and saved in memory. Recognizing Preset Display Resolutions The display resolutions listed below are the most commonly used modes and are not using...

LA2206xc Webcam LCD Monitor User Guide
Page 49
... considerations. To take advantage of these potential energy savings, users should use the default power management settings that this feature also supports similar power management features for the computer after 15 minutes of user inactivity. Materials Disposal Some HP LCD monitors contain mercury in use of the U.S. The default power management settings on AC power: ● Turn off an external display after 30 minutes of -life. The following...
... considerations. To take advantage of these potential energy savings, users should use the default power management settings that this feature also supports similar power management features for the computer after 15 minutes of user inactivity. Materials Disposal Some HP LCD monitors contain mercury in use of the U.S. The default power management settings on AC power: ● Turn off an external display after 30 minutes of -life. The following...


