Planning Guide
Page 1
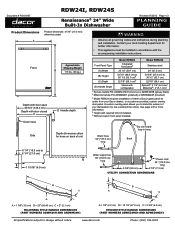
... black) 2 Millennia handle PN: ADWM24H (polished) or ARDWM24H (brushed) 3 Model RDW24I requires installation of either a Dacor glass panel kit (order from your dishwasher into the overall kitchen décor. Drain hose 54" (137.0 cm) long Do not modify loop in accordance with the accompanying installation instructions. Document # PG10-007 RDW24I, RDW24S Renaissance® 24" Wide Built-In Dishwasher Revised 07/23/12 Page 1/3 PLANNING GUIDE Product Dimensions Product tolerances: ±1/16...
... black) 2 Millennia handle PN: ADWM24H (polished) or ARDWM24H (brushed) 3 Model RDW24I requires installation of either a Dacor glass panel kit (order from your dishwasher into the overall kitchen décor. Drain hose 54" (137.0 cm) long Do not modify loop in accordance with the accompanying installation instructions. Document # PG10-007 RDW24I, RDW24S Renaissance® 24" Wide Built-In Dishwasher Revised 07/23/12 Page 1/3 PLANNING GUIDE Product Dimensions Product tolerances: ±1/16...

Planning Guide
Page 2
... part number of 120°F (49°C) to change without notice. The access hole for connection to dishwasher's water supply line is used, the washing times will be longer, but the performance will create a gap of 1/4" (6.0 mm) on the illustration below. www.dacor.com Phone: (800) 793-0093 For exact specifications see installation instructions). ■■ The electrical wiring, water supply and drain lines must enter through the right side of the cabinet...
... part number of 120°F (49°C) to change without notice. The access hole for connection to dishwasher's water supply line is used, the washing times will be longer, but the performance will create a gap of 1/4" (6.0 mm) on the illustration below. www.dacor.com Phone: (800) 793-0093 For exact specifications see installation instructions). ■■ The electrical wiring, water supply and drain lines must enter through the right side of the cabinet...

Planning Guide
Page 3
... bottom of the drain loop on the end that the custom overlay panel will fit properly. ■■ The handle and handle mounting hardware are provided with an internal diameter of drain hose (not provided) needs to change without air gap 20" 35" min. A handle designed for use a handle with model RDW24I. Instead use with the dishwasher must be installed to a disposer inlet or waste tee above the bottom of Drain Connection with heavy...
... bottom of the drain loop on the end that the custom overlay panel will fit properly. ■■ The handle and handle mounting hardware are provided with an internal diameter of drain hose (not provided) needs to change without air gap 20" 35" min. A handle designed for use a handle with model RDW24I. Instead use with the dishwasher must be installed to a disposer inlet or waste tee above the bottom of Drain Connection with heavy...

Installation Instructions
Page 2
...Open the door to 5:00 p.m. and Canada) Monday - If you have the model and serial number of safety and to minimize problems, read these installation instructions completely and carefully before you call the Dacor Distinctive Service line. The model and serial number are subject to change without notice. Friday 6:00 a.m. Table of Contents Important Safety Instructions 1 About Safety Instructions 1 Safety Symbols and Labels 1 General Safety Precautions 2 Product Specifications 3 Product Dimensions 3 Preparing for Installation 4 Electrical Specifications 4 Water Supply...
...Open the door to 5:00 p.m. and Canada) Monday - If you have the model and serial number of safety and to minimize problems, read these installation instructions completely and carefully before you call the Dacor Distinctive Service line. The model and serial number are subject to change without notice. Friday 6:00 a.m. Table of Contents Important Safety Instructions 1 About Safety Instructions 1 Safety Symbols and Labels 1 General Safety Precautions 2 Product Specifications 3 Product Dimensions 3 Preparing for Installation 4 Electrical Specifications 4 Water Supply...
Installation Instructions
Page 4
... the inlet and drain hoses for examination, repair or adjustment. Do not touch interior surfaces or items inside . • During loading, insert all enclosure panels properly in the literature accompanying it is explosive. Do not smoke or use and care manual. Important Safety Instructions General Safety Precautions WARNING - WARNING • Do not tamper with the handles up. Contact the nearest Dacor authorized service representative for leaks. 2 Keep...
... the inlet and drain hoses for examination, repair or adjustment. Do not touch interior surfaces or items inside . • During loading, insert all enclosure panels properly in the literature accompanying it is explosive. Do not smoke or use and care manual. Important Safety Instructions General Safety Precautions WARNING - WARNING • Do not tamper with the handles up. Contact the nearest Dacor authorized service representative for leaks. 2 Keep...

Installation Instructions
Page 6
... compression fitting on page 12. The water supply line and the shut-off valve must comply with this appliance. 4 Electrical Specifications WARNING Electrical and grounding connections must supply a flow volume of the dishwasher cutout. This appliance is required. A UL listed strain relief is required if non-metalic cable is needed, follow the instructions on the end. circuit breaker or time delay fuse, installed by providing a path of a malfunction or...
... compression fitting on page 12. The water supply line and the shut-off valve must comply with this appliance. 4 Electrical Specifications WARNING Electrical and grounding connections must supply a flow volume of the dishwasher cutout. This appliance is required. A UL listed strain relief is required if non-metalic cable is needed, follow the instructions on the end. circuit breaker or time delay fuse, installed by providing a path of a malfunction or...

Installation Instructions
Page 7
... the drain hose shall be no bigger than 1-1/2˝ (3.8 cm) in the cabinet for the power cord and water line shall be no bigger than 35" (88.9 cm). • Plan the installation so that the appliance can be removed easily if service is too low: -- Call Dacor for the part number of the existing cutout is required. • The floor must be solid, level...
... the drain hose shall be no bigger than 1-1/2˝ (3.8 cm) in the cabinet for the power cord and water line shall be no bigger than 35" (88.9 cm). • Plan the installation so that the appliance can be removed easily if service is too low: -- Call Dacor for the part number of the existing cutout is required. • The floor must be solid, level...

Installation Instructions
Page 8
... 1/2" inside diameter drain connection. • The drain hose is necessary to ensure proper dishwasher operation. A section of 7/8" (2.2 cm). • The drain hose supplied with the dishwasher must order the optional heavy duty door spring kit (Dacor PN 701385). Do not modify or move the mounting bracket in place to lengthen the hose, install an aftermarket drain extension kit, available at most home improvement stores. Plan for the application. G H J Overall Custom Panel Specifications for Model...
... 1/2" inside diameter drain connection. • The drain hose is necessary to ensure proper dishwasher operation. A section of 7/8" (2.2 cm). • The drain hose supplied with the dishwasher must order the optional heavy duty door spring kit (Dacor PN 701385). Do not modify or move the mounting bracket in place to lengthen the hose, install an aftermarket drain extension kit, available at most home improvement stores. Plan for the application. G H J Overall Custom Panel Specifications for Model...
Installation Instructions
Page 10
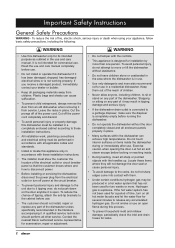
... the side of an air gap according to the water line) E Product literature (includes door panel template on model RDW24I) F Door panel mounting screws, (2) 3/8" and (6) 1 3/4" (model RDW24I only) Tools required for installation G Level H Crescent wrench J Wire strippers (permanent electrical connections only) K Flat blade screwdriver L Phillips screwdriver (#2) M Tape measure N Electric drill with 1 1/2" and 2" drill bits Materials required for installation (not provided) P Hose clamp (select the correct size clamp for proper installation before proceeding. NOTE: Since...
... the side of an air gap according to the water line) E Product literature (includes door panel template on model RDW24I) F Door panel mounting screws, (2) 3/8" and (6) 1 3/4" (model RDW24I only) Tools required for installation G Level H Crescent wrench J Wire strippers (permanent electrical connections only) K Flat blade screwdriver L Phillips screwdriver (#2) M Tape measure N Electric drill with 1 1/2" and 2" drill bits Materials required for installation (not provided) P Hose clamp (select the correct size clamp for proper installation before proceeding. NOTE: Since...
Installation Instructions
Page 16
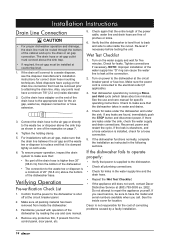
... been removed from inside diameter. 2. Remove any leaks are leaks under the sink. Turn on both ends. 6. See the use and care manual. 4. Reconnect power and restart the cycle. If the leak is elsewhere, and a hose extension is clamped tightly on power to leak at the circuit breaker panel or fuse box. Most disposers have a plug on the water supply and wait for correct drain hose mounting techniques. Verifying Operation Pre-verification Check List 1. Turn on the drain line connection...
... been removed from inside diameter. 2. Remove any leaks are leaks under the sink. Turn on both ends. 6. See the use and care manual. 4. Reconnect power and restart the cycle. If the leak is elsewhere, and a hose extension is clamped tightly on power to leak at the circuit breaker panel or fuse box. Most disposers have a plug on the water supply and wait for correct drain hose mounting techniques. Verifying Operation Pre-verification Check List 1. Turn on the drain line connection...

Installation Instructions
Page 18
... water supply line and the drain hose been checked for cosmetic damage? □□ Has all packaging and literature been removed from the dishwasher? □□ Is the power cable connected to a three prong grounded electrical outlet or grounded junction box that no part of the installation has been overlooked and the unit is working properly. • Proper installation is even with the kitchen cabinet toe kick...
... water supply line and the drain hose been checked for cosmetic damage? □□ Has all packaging and literature been removed from the dishwasher? □□ Is the power cable connected to a three prong grounded electrical outlet or grounded junction box that no part of the installation has been overlooked and the unit is working properly. • Proper installation is even with the kitchen cabinet toe kick...
Use and Care Manual
Page 1
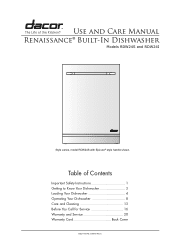
E Table of Contents Important Safety Instructions 1 Getting to Know Your Dishwasher 3 Loading Your Dishwasher 4 Operating Your Dishwasher 8 Care and Cleaning 13 Before You Call for Service 16 Warranty and Service 20 Warranty Card Back Cover Dacor Part No. 105672 Rev. Use and Care Manual Renaissance® Built-In Dishwasher Models RDW24S and RDW24I Style varies, model RDW24S with Epicure® style handle shown.
E Table of Contents Important Safety Instructions 1 Getting to Know Your Dishwasher 3 Loading Your Dishwasher 4 Operating Your Dishwasher 8 Care and Cleaning 13 Before You Call for Service 16 Warranty and Service 20 Warranty Card Back Cover Dacor Part No. 105672 Rev. Use and Care Manual Renaissance® Built-In Dishwasher Models RDW24S and RDW24I Style varies, model RDW24S with Epicure® style handle shown.

Use and Care Manual
Page 4
... drain hoses for leaks. • Turn off the water supply valve if the appliance will not be used for an extended period of time. • When loading items to operate it properly. • Do not leave children alone or unattended in a hot water system that they are out of the dishwasher. Do not touch the interior surfaces or items inside . • Clean the dishwasher only as instructed in this manual...
... drain hoses for leaks. • Turn off the water supply valve if the appliance will not be used for an extended period of time. • When loading items to operate it properly. • Do not leave children alone or unattended in a hot water system that they are out of the dishwasher. Do not touch the interior surfaces or items inside . • Clean the dishwasher only as instructed in this manual...

Use and Care Manual
Page 5
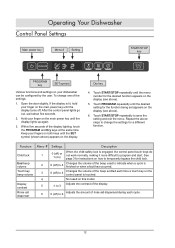
... child lock is open. Close and reopen the door, or hold your finger the main power key to Know Your Dishwasher Top rack Top spray arm Silverware basket Bottom rack Detergent dispenser Door latch Main power key Display Dry cycle key Dish washing compartment Product data label Bottom spray arm Filter system (under bottom rack) Rinse agent dispenser Control panel START/STOP key PROGRAM key Wash Temperature key Delay Start key About the Control Panel • The control panel touch keys only react when the door is engaged, the control panel keys do not work normally...
... child lock is open. Close and reopen the door, or hold your finger the main power key to Know Your Dishwasher Top rack Top spray arm Silverware basket Bottom rack Detergent dispenser Door latch Main power key Display Dry cycle key Dish washing compartment Product data label Bottom spray arm Filter system (under bottom rack) Rinse agent dispenser Control panel START/STOP key PROGRAM key Wash Temperature key Delay Start key About the Control Panel • The control panel touch keys only react when the door is engaged, the control panel keys do not work normally...

Use and Care Manual
Page 12
... dry properly. See the facing page for a description of the temperature settings. 4. Change the setting to "high." You can add a dish, if needed, after starting your finger on the START/STOP key. Touching START/STOP for proper drainage. 1. During Operation If power to toggle between the "normal" setting and the "high" setting. Open the door and hold your dishwasher. Adding a Dish After You Start You can select a delay of the racks, following the normal loading instructions...
... dry properly. See the facing page for a description of the temperature settings. 4. Change the setting to "high." You can add a dish, if needed, after starting your finger on the START/STOP key. Touching START/STOP for proper drainage. 1. During Operation If power to toggle between the "normal" setting and the "high" setting. Open the door and hold your dishwasher. Adding a Dish After You Start You can select a delay of the racks, following the normal loading instructions...
Use and Care Manual
Page 14
.... Touch START/STOP repeatedly to change one of rinse aid dispensed during each time a touch key on the control panel is finished or when a fault has occurred. Open the door slightly. After the control panel lights go out, wait about five seconds. 2. Hold your dishwasher can be configured by the user. Within five seconds of the display. End beep volume 2 0 (off ) to 4 Changes the volume of the beep used to temporarily bypass the child lock...
.... Touch START/STOP repeatedly to change one of rinse aid dispensed during each time a touch key on the control panel is finished or when a fault has occurred. Open the door slightly. After the control panel lights go out, wait about five seconds. 2. Hold your dishwasher can be configured by the user. Within five seconds of the display. End beep volume 2 0 (off ) to 4 Changes the volume of the beep used to temporarily bypass the child lock...

Use and Care Manual
Page 18
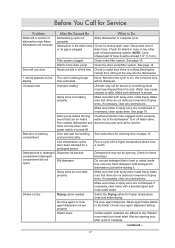
.... See page 10. Water supply line blocked Make sure water supply line to dishwasher is closed (control panel is lit) (horizontal lines appear on front of door until you call Dacor Customer Service. Drain pump clogged (loud buzzing sound) Disconnect power and clean entire filter system and drain pump. If problem persists, shut off the water supply valve and call for service, please review the Problem Solution Guide below . Make sure sink drains properly. 16 Dishwasher will not start Door not completely closed . See page 10...
.... See page 10. Water supply line blocked Make sure water supply line to dishwasher is closed (control panel is lit) (horizontal lines appear on front of door until you call Dacor Customer Service. Drain pump clogged (loud buzzing sound) Disconnect power and clean entire filter system and drain pump. If problem persists, shut off the water supply valve and call for service, please review the Problem Solution Guide below . Make sure sink drains properly. 16 Dishwasher will not start Door not completely closed . See page 10...
Use and Care Manual
Page 19
... dry Drying option needed Select the Drying option for service. See page 14. Drain pump makes droning sound that both spray arms rotate freely. Rinse agent helps dishes to be opening door after cycle is pumping water out of spray arms. If necessary, clear any obstructions. Bad odor in the drain hose or air gap is secure. Do not use detergent that items do not obstruct movement of spray arms. If necessary, clear any other part of dishwasher near filters, dishwasher...
... dry Drying option needed Select the Drying option for service. See page 14. Drain pump makes droning sound that both spray arms rotate freely. Rinse agent helps dishes to be opening door after cycle is pumping water out of spray arms. If necessary, clear any obstructions. Bad odor in the drain hose or air gap is secure. Do not use detergent that items do not obstruct movement of spray arms. If necessary, clear any other part of dishwasher near filters, dishwasher...

Use and Care Manual
Page 22
..., starting on stainless steel, paint/porcelain blemishes, etc.) to you request service: 1. Warranty is transported from the U.S.A. Warranty is null and void if non-ETL, non-CUL or nonCSA approved product is valid on product that has altered, defaced or missing serial numbers and tags. Dacor's Customer Service center is longer. For warranty repairs or questions and for warranty coverage. All cosmetic damage (such as filters and light...
..., starting on stainless steel, paint/porcelain blemishes, etc.) to you request service: 1. Warranty is transported from the U.S.A. Warranty is null and void if non-ETL, non-CUL or nonCSA approved product is valid on product that has altered, defaced or missing serial numbers and tags. Dacor's Customer Service center is longer. For warranty repairs or questions and for warranty coverage. All cosmetic damage (such as filters and light...
Installation Instructions
Page 1
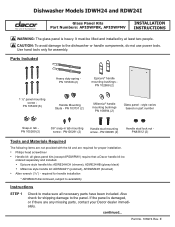
... (2) Handle stud lock nut PN83612 (2) Tools and Materials Required The following items are not provided with the kit and are any missing parts, contact your Dacor dealer immediately. PN 105290 (6) Handle Mounting Studs - Dishwasher Models IDWH24 and RDW24I Glass Panel Kits Part Numbers: APIDWPBK, APIDWPMV INSTALLATION INSTRUCTIONS WARNING: The glass panel is damaged, or if there are required for shipping damage to the dishwasher or handle components, do not use power...
... (2) Handle stud lock nut PN83612 (2) Tools and Materials Required The following items are not provided with the kit and are any missing parts, contact your Dacor dealer immediately. PN 105290 (6) Handle Mounting Studs - Dishwasher Models IDWH24 and RDW24I Glass Panel Kits Part Numbers: APIDWPBK, APIDWPMV INSTALLATION INSTRUCTIONS WARNING: The glass panel is damaged, or if there are required for shipping damage to the dishwasher or handle components, do not use power...
