
Owner Manual
Page 1
... QUANTITY OF COFFEE AND MILK FOR LATTE/ CAPPUCCINO / ITALIAN MACCHIATO 15 16 CLEANING AND MAINTENANCE 15 16.1 CLEANING THE COFFEE MAKER 15 16.2 CLEANING THE INFUSER 15 16.3 CLEANING THE MILK CONTAINER 17 17 CHANGING AND SETTING THE MENU PARAMETERS 17 17.1 SETTING THE CLOCK 17 17.2 SETTING AUTO-START TIME...
... QUANTITY OF COFFEE AND MILK FOR LATTE/ CAPPUCCINO / ITALIAN MACCHIATO 15 16 CLEANING AND MAINTENANCE 15 16.1 CLEANING THE COFFEE MAKER 15 16.2 CLEANING THE INFUSER 15 16.3 CLEANING THE MILK CONTAINER 17 17 CHANGING AND SETTING THE MENU PARAMETERS 17 17.1 SETTING THE CLOCK 17 17.2 SETTING AUTO-START TIME...
Owner Manual
Page 3
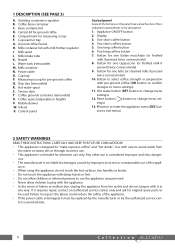
..." and "hot drinks". Compartment for one Italian macchiato (or frothed milk, if pressed twice consecutively) 8. Water tank (removable) M. Hot water spout S. Coffee grounds container (removable) U. Infuser X. One short coffee button 4. One long coffee button 6. Button for measuring scoop F. P button to enter the appliance menu (ESC button to change menu settings) 12...
..." and "hot drinks". Compartment for one Italian macchiato (or frothed milk, if pressed twice consecutively) 8. Water tank (removable) M. Hot water spout S. Coffee grounds container (removable) U. Infuser X. One short coffee button 4. One long coffee button 6. Button for measuring scoop F. P button to enter the appliance menu (ESC button to change menu settings) 12...
Owner Manual
Page 5
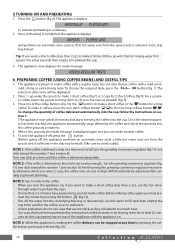
... turning the grinding coarseness regulator excessively; To change the quantity of the appliance with a regular taste. through water to prevent jamming. For a creami- heat the infuser by pressing the button (fig.12). • Run off , the appliance performs an automatic rinse cycle: a little hot water runs out from the spouts and...
... turning the grinding coarseness regulator excessively; To change the quantity of the appliance with a regular taste. through water to prevent jamming. For a creami- heat the infuser by pressing the button (fig.12). • Run off , the appliance performs an automatic rinse cycle: a little hot water runs out from the spouts and...
Owner Manual
Page 8
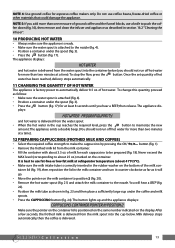
... of ground coffee and the funnel blocks, use a knife to push the coffee down (fig. 16), then remove and clean the infuser and appliance as described in section 16.2 "Cleaning the infuser". 10 PRODUCING HOT WATER • Always make sure the appliance is ready. • Make sure the water spout is delivered...
... of ground coffee and the funnel blocks, use a knife to push the coffee down (fig. 16), then remove and clean the infuser and appliance as described in section 16.2 "Cleaning the infuser". 10 PRODUCING HOT WATER • Always make sure the appliance is ready. • Make sure the water spout is delivered...
Owner Manual
Page 10
...the dishwash- No component may be cleaned regularly to change these quantities, proceed as shown in fig. 30. 16.2 Cleaning the infuser The infuser must be cleaned regularly. To unblock them, scrape the dry coffee residues away with the new settings and displays: READY. 16 ...quantity is memorized. (The appliance emits a BEEP.) • After a few millimeters under running water, without using detergents. Never wash the infuser in water. When the indicator starts to automatically deliver standard quantities of water it clicks into the cup and displays: COFFEE FOR . The ...
...the dishwash- No component may be cleaned regularly to change these quantities, proceed as shown in fig. 30. 16.2 Cleaning the infuser The infuser must be cleaned regularly. To unblock them, scrape the dry coffee residues away with the new settings and displays: READY. 16 ...quantity is memorized. (The appliance emits a BEEP.) • After a few millimeters under running water, without using detergents. Never wash the infuser in water. When the indicator starts to automatically deliver standard quantities of water it clicks into the cup and displays: COFFEE FOR . The ...
Owner Manual
Page 11
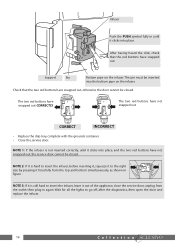
... 3: If it is not inserted correctly, until it clicks into place. Check that the red buttons have snapped out. Support Pin Bottom pipe on the infuser. The two red buttons have snapped out CORRECTLY The two red buttons have snapped out, otherwise the door cannot be closed . The pin must be... it out of the appliance, close the service door, unplug from the top and bottom simultaneously, as shown in again. Infuser Push the PUSH symbol fully in until it clicks into place, and the two red buttons have not snapped out, the service door cannot be ...
... 3: If it is not inserted correctly, until it clicks into place. Check that the red buttons have snapped out. Support Pin Bottom pipe on the infuser. The two red buttons have snapped out CORRECTLY The two red buttons have snapped out, otherwise the door cannot be closed . The pin must be... it out of the appliance, close the service door, unplug from the top and bottom simultaneously, as shown in again. Infuser Push the PUSH symbol fully in until it clicks into place, and the two red buttons have not snapped out, the service door cannot be ...
Owner Manual
Page 16
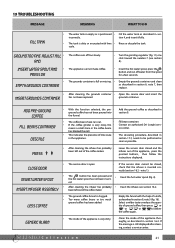
...8226; This indicates the presence of the appliance, press the pointed buttons, then follow the instructions displayed. CLOSE DOOR INSERT WATER SPOUT INSERT INFUSER ASSEMBLY • The service door is open • If the service door cannot be performed as soon as described in section 6, ...appliance thoroughly, as described in ground coffee has not been poured into section 9. If the message is inserted correctly (section 16.2 - infuser out of lime scale • The descaling procedure, described in in the coffee beans ice center. the funnel. • The ...
...8226; This indicates the presence of the appliance, press the pointed buttons, then follow the instructions displayed. CLOSE DOOR INSERT WATER SPOUT INSERT INFUSER ASSEMBLY • The service door is open • If the service door cannot be performed as soon as described in section 6, ...appliance thoroughly, as described in ground coffee has not been poured into section 9. If the message is inserted correctly (section 16.2 - infuser out of lime scale • The descaling procedure, described in in the coffee beans ice center. the funnel. • The ...
Owner Manual
Page 17
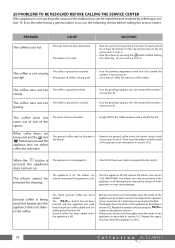
...• Scrape off the dry coffee residues with the appliance on may be identified and resolved by referring to remove the infuser with a needle (fig. 29). IMPORTANT: The infuser can only be removed if the appliance is off . Thoroughly clean the inside of the appliance (see section 9, note ...are being used (not beans) and the appliance does not deliver the coffee. • Too much ground coffee has been • added. The infuser can • only be removed if the appliance is off . Repeat the operation using a knife (see description in section 16.2). The coffee runs...
...• Scrape off the dry coffee residues with the appliance on may be identified and resolved by referring to remove the infuser with a needle (fig. 29). IMPORTANT: The infuser can only be removed if the appliance is off . Thoroughly clean the inside of the appliance (see section 9, note ...are being used (not beans) and the appliance does not deliver the coffee. • Too much ground coffee has been • added. The infuser can • only be removed if the appliance is off . Repeat the operation using a knife (see description in section 16.2). The coffee runs...


