Owner Manual
Page 2
... heavy or hot objects on the power cable. • Do not install the appliance in order to an efficiently grounded electrical system. Do not install near the air conditioner. • The unit should be replaced by the manufacturer or an authorized technical service centre in rooms contai- Before transporting the unit, drain the unit. IMPORTANT SAFEGUARDS • Use this appliance only as possible, caution...
... heavy or hot objects on the power cable. • Do not install the appliance in order to an efficiently grounded electrical system. Do not install near the air conditioner. • The unit should be replaced by the manufacturer or an authorized technical service centre in rooms contai- Before transporting the unit, drain the unit. IMPORTANT SAFEGUARDS • Use this appliance only as possible, caution...
Owner Manual
Page 3
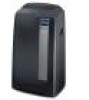
... the room. In single unit models, a small part of the water which is discharged outside. Hot air from the room is passed through the cooling effect of this air conditioner unbeatable cooling efficiency. SAVE THESE INSTRUCTIONS THIS PRODUCT IS INTENDED FOR HOUSHOLD USE ONLY. 3 WHAT IS THE WATER-AIR PINGUINO During the summer, you feel comfortable at a temperature of between 75 - 80°F (24 - 27°C) with wall mounted models, portable air conditioners...
... the room. In single unit models, a small part of the water which is discharged outside. Hot air from the room is passed through the cooling effect of this air conditioner unbeatable cooling efficiency. SAVE THESE INSTRUCTIONS THIS PRODUCT IS INTENDED FOR HOUSHOLD USE ONLY. 3 WHAT IS THE WATER-AIR PINGUINO During the summer, you feel comfortable at a temperature of between 75 - 80°F (24 - 27°C) with wall mounted models, portable air conditioners...
Owner Manual
Page 4
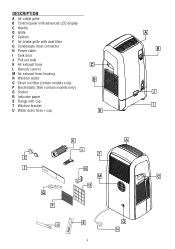
Description A Air outlet grille B Control panel with advanced LCD display C Handle D Grille I A E Castors F Air intake grille with dust filter G Condensate drain connector H Power cable B I Tank door J Pull out tank K Air exhaust hose C L Remote control M Air exhaust hose housing N Window outlet D O Silver ion filter (certain models only) P Electrostatic filter (certain models only) Q Sucker J R Indicator paper S Flange with cap T Window bracket U Water drain hose + cap E K A L F S T N M C O Q P U R 4 G H
Description A Air outlet grille B Control panel with advanced LCD display C Handle D Grille I A E Castors F Air intake grille with dust filter G Condensate drain connector H Power cable B I Tank door J Pull out tank K Air exhaust hose C L Remote control M Air exhaust hose housing N Window outlet D O Silver ion filter (certain models only) P Electrostatic filter (certain models only) Q Sucker J R Indicator paper S Flange with cap T Window bracket U Water drain hose + cap E K A L F S T N M C O Q P U R 4 G H
Owner Manual
Page 5
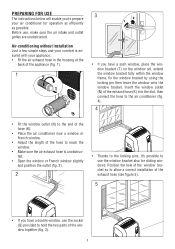
... the air exhaust hose in the housing at the back of the appliance (fig. 1). 1 2 1 3 2 1 • If you have a sash window, place the window bracket (T) on the window sill, extend the window bracket fully within the window frame, fix the window bracket by using the locking pin then lower the window onto the window bracket. Position the hole of the window bracket so to allow a correct installation of the window together (fig. 3). 5 Air-conditioning without installation...
... the air exhaust hose in the housing at the back of the appliance (fig. 1). 1 2 1 3 2 1 • If you have a sash window, place the window bracket (T) on the window sill, extend the window bracket fully within the window frame, fix the window bracket by using the locking pin then lower the window onto the window bracket. Position the hole of the window bracket so to allow a correct installation of the window together (fig. 3). 5 Air-conditioning without installation...
Owner Manual
Page 6
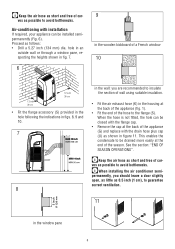
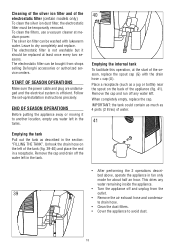
... hole can be installed semipermanently (Fig. 6). Keep the air hose as short and free of curves as possible to avoid bottlenecks. See the section: "END OF SEASON OPERATIONS". When installing the air conditioner semipermanently, you are recommended to insulate the section of wall using suitable insulation. • Fit the air exhaust hose (K) in the housing at the back of the appliance (G) and replace with the drain hose...
... hole can be installed semipermanently (Fig. 6). Keep the air hose as short and free of curves as possible to avoid bottlenecks. See the section: "END OF SEASON OPERATIONS". When installing the air conditioner semipermanently, you are recommended to insulate the section of wall using suitable insulation. • Fit the air exhaust hose (K) in the housing at the back of the appliance (G) and replace with the drain hose...
Owner Manual
Page 7
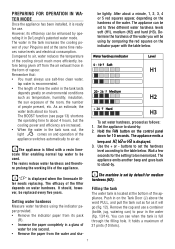
... the control panel down for use a container (bottle, jug, watering can see page 13) shortens the operating time to air, water reduces the temperature of the water. Setting water hardness Measure water hardness using by . PREPARING FOR OPERATION IN WA- The appliance emits another beep and goes back to pour in the tank increases the cooling po- TER MODE Once the appliance has been installed, it is set water...
... the control panel down for use a container (bottle, jug, watering can see page 13) shortens the operating time to air, water reduces the temperature of the water. Setting water hardness Measure water hardness using by . PREPARING FOR OPERATION IN WA- The appliance emits another beep and goes back to pour in the tank increases the cooling po- TER MODE Once the appliance has been installed, it is set water...
Owner Manual
Page 8
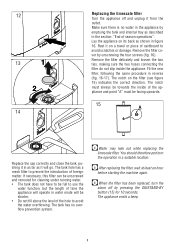
... unplug it in water mode will go. The notch must be shorter. • Do not fill above the level of season operations". Fit the new filter, following the same procedure in figure 16. Water may leak out while replacing the limescale filter. The notch on the filter (see figure 15) indicates the correct direction. 12 13 1 2 14 Replacing the limescale filter Turn the appliance...
... unplug it in water mode will go. The notch must be shorter. • Do not fill above the level of season operations". Fit the new filter, following the same procedure in figure 16. Water may leak out while replacing the limescale filter. The notch on the filter (see figure 15) indicates the correct direction. 12 13 1 2 14 Replacing the limescale filter Turn the appliance...

Owner Manual
Page 9
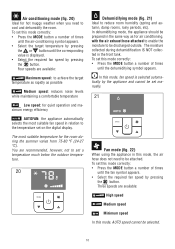
... OF THE CONTROL PANEL WITH ADVANCED LCD DISPLAY 1 Air conditioning symbol 2 Dehumidifying symbol 3 Fan symbol 4 SMART symbol 5 BOOST symbol 6 SLEEP symbol 7 Alarm symbol 8 Temperature indicator 9 "No water" symbol 10 Timer symbol 11 Fan speed indicator 12 AUTOFAN indicator 13 FAN button 14 Increase (+) and decrease (-) temperature buttons Turning the appliance on . The last function active when it was turned off will appear. • Never turn the air conditioner off by...
... OF THE CONTROL PANEL WITH ADVANCED LCD DISPLAY 1 Air conditioning symbol 2 Dehumidifying symbol 3 Fan symbol 4 SMART symbol 5 BOOST symbol 6 SLEEP symbol 7 Alarm symbol 8 Temperature indicator 9 "No water" symbol 10 Timer symbol 11 Fan speed indicator 12 AUTOFAN indicator 13 FAN button 14 Increase (+) and decrease (-) temperature buttons Turning the appliance on . The last function active when it was turned off will appear. • Never turn the air conditioner off by...
Owner Manual
Page 10
... as for air conditioning, with the air exhaust hose attached to enable the moisture to set a temperature much below the outdoor tempera- ring the summer varies from 75-80 °F (24-27 °C). The most suitable temperature for2th2e room du- The moisture collected during dehumidification IS NOT collected in this mode, the air hose does To set this nmootdneeecdortroecbtelya: ttached5. • Press the MODE button a number of...
... as for air conditioning, with the air exhaust hose attached to enable the moisture to set a temperature much below the outdoor tempera- ring the summer varies from 75-80 °F (24-27 °C). The most suitable temperature for2th2e room du- The moisture collected during dehumidification IS NOT collected in this mode, the air hose does To set this nmootdneeecdortroecbtelya: ttached5. • Press the MODE button a number of...
Owner Manual
Page 11
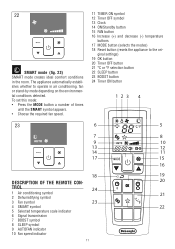
... The appliance automatically establishes whether to the ori- To set this mode: • Press the MODE button a number of times until the SMART symbol appears. • Choose the required fan speed. 11 TIMER ON symbol 12 Timer OFF symbol 13 Clock 14 ON/Standby button 15 FAN button 16 Increase (+) and decrease (-) temperature buttons 17 MODE button (selects the modes) 18 Reset button (resets the appliance to operate in the room.
... The appliance automatically establishes whether to the ori- To set this mode: • Press the MODE button a number of times until the SMART symbol appears. • Choose the required fan speed. 11 TIMER ON symbol 12 Timer OFF symbol 13 Clock 14 ON/Standby button 15 FAN button 16 Increase (+) and decrease (-) temperature buttons 17 MODE button (selects the modes) 18 Reset button (resets the appliance to operate in the room.
Owner Manual
Page 12
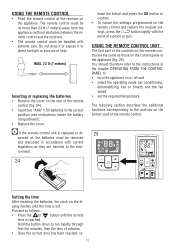
... the operating mode (air conditioning, dehumidifying, fan or Smart) and the fan speed. • set . Proceed as those on the remote control are harmful to the environment. 24 lease the button and press the OK button to direct sunlight or sources of minutes. • Once the correct time has been reached, re- 12 USING THE REMOTE CONTROL UNIT The first part of the controls on the control panel of the...
... the operating mode (air conditioning, dehumidifying, fan or Smart) and the fan speed. • set . Proceed as those on the remote control are harmful to the environment. 24 lease the button and press the OK button to direct sunlight or sources of minutes. • Once the correct time has been reached, re- 12 USING THE REMOTE CONTROL UNIT The first part of the controls on the control panel of the...
Owner Manual
Page 13
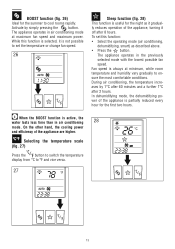
... than in the previously selected mode with the lowest possible fan speed. In dehumidifying mode, the dehumidifying power of the appliance are higher. Selecting the temperature scale (fig. 27) Press the button to switch the temperature display from °C to ensure the most comfortable conditions. To set the temperature or change fan speed. 26 Sleep function (fig. 28) This function is useful for the night as...
... than in the previously selected mode with the lowest possible fan speed. In dehumidifying mode, the dehumidifying power of the appliance are higher. Selecting the temperature scale (fig. 27) Press the button to switch the temperature display from °C to ensure the most comfortable conditions. To set the temperature or change fan speed. 26 Sleep function (fig. 28) This function is useful for the night as...
Owner Manual
Page 14
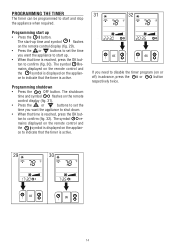
... start-up time and symbol flashes on the remote control display (fig. 29). • Press the or buttons to set the time you want the appliance to shut down. • When that the timer is displayed on the applian- The shutdown time and symbol flashes on or off) in advance, press the or button respectively twice. 29 30 14 Programming start and stop...
... start-up time and symbol flashes on the remote control display (fig. 29). • Press the or buttons to set the time you want the appliance to shut down. • When that the timer is displayed on the applian- The shutdown time and symbol flashes on or off) in advance, press the or button respectively twice. 29 30 14 Programming start and stop...
Owner Manual
Page 15
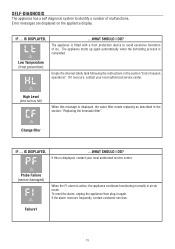
... a number of season operations". Probe Failure (sensor damaged) When the F1 alarm is displayed, the water filter needs replacing as described in air-air mode. Failure1 15 If it reoccurs, contact your local authorized service center. IF ... IS DISPLAYED, ...WHAT SHOULD I DO? Error messages are displayed on the appliance display. If this message is active, the appliance continues functioning normally in the section: "Replacing the limescale filter". Low Temperature...
... a number of season operations". Probe Failure (sensor damaged) When the F1 alarm is displayed, the water filter needs replacing as described in air-air mode. Failure1 15 If it reoccurs, contact your local authorized service center. IF ... IS DISPLAYED, ...WHAT SHOULD I DO? Error messages are displayed on the appliance display. If this message is active, the appliance continues functioning normally in the section: "Replacing the limescale filter". Low Temperature...
Owner Manual
Page 16
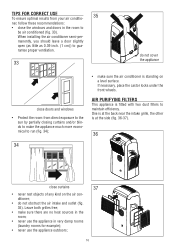
... appliance is fitted with two dust filters to gua- When installing the air conditioner semi-per- Leave both grilles free; • make sure the air conditioner is standing on the air conditioner; • do not cover the appliance close the windows and doors in very damp rooms (laundry rooms for example); • never use the appliance in the room to be air conditioned (fig. 33). One is at...
... appliance is fitted with two dust filters to gua- When installing the air conditioner semi-per- Leave both grilles free; • make sure the air conditioner is standing on the air conditioner; • do not cover the appliance close the windows and doors in very damp rooms (laundry rooms for example); • never use the appliance in the room to be air conditioned (fig. 33). One is at...
Owner Manual
Page 17
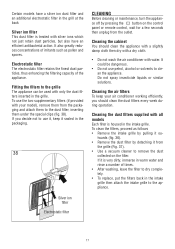
... grille to remove the dust collected on the control panel or remote control, wait for a few seconds then unplug from the grille (Fig. 37). • Use a vacuum cleaner to the appliance. Cleaning the cabinet You should clean the dust filters every week during operation. Certain models have an efficient antibacterial action. Cleaning the dust filters supplied with all models Each filter is very dirty, immerse in warm water...
... grille to remove the dust collected on the control panel or remote control, wait for a few seconds then unplug from the grille (Fig. 37). • Use a vacuum cleaner to the appliance. Cleaning the cabinet You should clean the dust filters every week during operation. Certain models have an efficient antibacterial action. Cleaning the dust filters supplied with all models Each filter is very dirty, immerse in warm water...
Owner Manual
Page 18
... unplug from shops selling De'longhi accessories or authorized service centers. When completely empty, replace the cap. The electrostatic filter is efficient. Follow the set-up/installation instructions precisely. bed above, operate the appliance in fan only mode for about half an hour. The silver ion filter can be temporarily removed. te drain hose. • Clean the dust filters. • Cover the appliance to dry completely and...
... unplug from shops selling De'longhi accessories or authorized service centers. When completely empty, replace the cap. The electrostatic filter is efficient. Follow the set-up/installation instructions precisely. bed above, operate the appliance in fan only mode for about half an hour. The silver ion filter can be temporarily removed. te drain hose. • Clean the dust filters. • Cover the appliance to dry completely and...
Owner Manual
Page 19
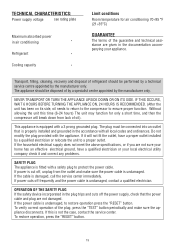
... has an effective electrical ground, have a proper outlet installed by the manufacturer only. Do not modify the plug provided with a 3 prong grounded plug. If the cable is not the case, contact the service center. TECHNICAL CHARACTERISTICS: Power supply voltage see rating plate Maximum absorbed power in air conditioning " Refrigerant " Cooling capacity " Limit conditions Room temperature for only a short time, and then the compressor will not fit...
... has an effective electrical ground, have a proper outlet installed by the manufacturer only. Do not modify the plug provided with a 3 prong grounded plug. If the cable is not the case, contact the service center. TECHNICAL CHARACTERISTICS: Power supply voltage see rating plate Maximum absorbed power in air conditioning " Refrigerant " Cooling capacity " Limit conditions Room temperature for only a short time, and then the compressor will not fit...
Owner Manual
Page 20
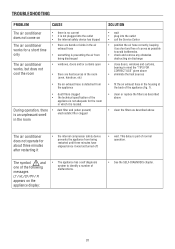
TROUBLESHOOTING problem CAUSE SOLUTION The air conditioner does not come on the appliance display: • The appliance has a self diagnosis system to avoid bottlenecks. • check and remove any obstacles obstructing air discharge • close doors, windows and curtains, bearing in mind the "tips for correct use" given above • eliminate the heat sources • fit the air exhaust hose in the housing at the...
TROUBLESHOOTING problem CAUSE SOLUTION The air conditioner does not come on the appliance display: • The appliance has a self diagnosis system to avoid bottlenecks. • check and remove any obstacles obstructing air discharge • close doors, windows and curtains, bearing in mind the "tips for correct use" given above • eliminate the heat sources • fit the air exhaust hose in the housing at the...
Owner Manual
Page 21
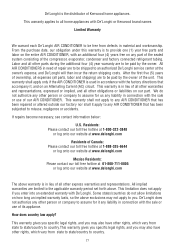
This warranty shall apply only if the AIR CONDITIONER is used in accordance with an additional four (4) years free on any part of the sealed system consisting of the compressor, evaporator, condenser and factory connected refrigerant tubing. Residents: Please contact our toll free hotline at 1-800-322-3848 or log onto our website at www.delonghi.com Residents of our AIR CONDITIONER. All implied warranties are...
This warranty shall apply only if the AIR CONDITIONER is used in accordance with an additional four (4) years free on any part of the sealed system consisting of the compressor, evaporator, condenser and factory connected refrigerant tubing. Residents: Please contact our toll free hotline at 1-800-322-3848 or log onto our website at www.delonghi.com Residents of our AIR CONDITIONER. All implied warranties are...


