
User Guide
Page 3
... Projector 10 Connecting to a Computer 11 Connecting a Computer Using a VGA Cable . . . . 11 Connecting a Computer by USB Cable 12 Connecting a Computer Using Wireless Dongle (Optional 13 Connecting a DVD Player 14 Connecting a DVD Player Using a A/V to RCA Cable 14 Connecting a DVD Player Using a HDMI Cable . . 15 Connecting to Multi-Media 16 Connecting Multi-Media Using a USB Flash Disk . 16 Connecting Multi-Media Using a MicroSD Card . . 17 3 Using Your Projector 18 Turning Your Projector On 18 Turning Your Projector Off 18 Adjusting the Projected Image 19 Raising the Projector...
... Projector 10 Connecting to a Computer 11 Connecting a Computer Using a VGA Cable . . . . 11 Connecting a Computer by USB Cable 12 Connecting a Computer Using Wireless Dongle (Optional 13 Connecting a DVD Player 14 Connecting a DVD Player Using a A/V to RCA Cable 14 Connecting a DVD Player Using a HDMI Cable . . 15 Connecting to Multi-Media 16 Connecting Multi-Media Using a USB Flash Disk . 16 Connecting Multi-Media Using a MicroSD Card . . 17 3 Using Your Projector 18 Turning Your Projector On 18 Turning Your Projector Off 18 Adjusting the Projected Image 19 Raising the Projector...
User Guide
Page 4
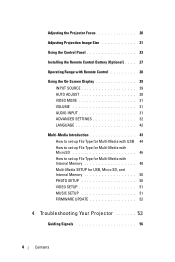
Adjusting the Projector Focus 20 Adjusting Projection Image Size 21 Using the Control Panel 23 Installing the Remote Control Battery (Optional) . . . . 27 Operating Range with Remote Control 28 Using the On-Screen Display 29 INPUT SOURCE 29 AUTO ADJUST 30 VIDEO MODE 31 VOLUME 31 AUDIO INPUT 31 ADVANCED SETTINGS 32 LANGUAGE 42 Multi-Media Introduction 43 How to set-up File Type for Multi-Media with USB 44 How to set-up File Type for Multi-Media with MicroSD 46 How...
Adjusting the Projector Focus 20 Adjusting Projection Image Size 21 Using the Control Panel 23 Installing the Remote Control Battery (Optional) . . . . 27 Operating Range with Remote Control 28 Using the On-Screen Display 29 INPUT SOURCE 29 AUTO ADJUST 30 VIDEO MODE 31 VOLUME 31 AUDIO INPUT 31 ADVANCED SETTINGS 32 LANGUAGE 42 Multi-Media Introduction 43 How to set-up File Type for Multi-Media with USB 44 How to set-up File Type for Multi-Media with MicroSD 46 How...
User Guide
Page 8
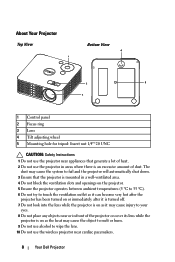
... of the projector or cover its lens while the projector is an excessive amount of dust. About Your Projector Top View 1 Bottom View 4 2 5 3 1 Control panel 2 Focus ring 3 Lens 4 Tilt adjusting wheel 5 Mounting hole for tripod: Insert nut 1/4"*20 UNC CAUTION: Safety Instructions 1 Do not use the wireless projector near or in a well-ventilated area. 4 Do not block the ventilation slots and openings on the projector. 5 Ensure the projector operates between ambient temperatures (5 º...
... of the projector or cover its lens while the projector is an excessive amount of dust. About Your Projector Top View 1 Bottom View 4 2 5 3 1 Control panel 2 Focus ring 3 Lens 4 Tilt adjusting wheel 5 Mounting hole for tripod: Insert nut 1/4"*20 UNC CAUTION: Safety Instructions 1 Do not use the wireless projector near or in a well-ventilated area. 4 Do not block the ventilation slots and openings on the projector. 5 Ensure the projector operates between ambient temperatures (5 º...

User Guide
Page 12
You can purchase the USB (USB A to USB-A cable NOTE: Plug and Play. MOLEX MOLEX Connecting a Computer by USB Cable 2 3 1 1 Power cord 2 AC adapter 3 USB-A to A) cable on the Dell website at www.dell.com. 12 Connecting Your Projector The USB (USB A to A) cable is not shipped with your projector.
You can purchase the USB (USB A to USB-A cable NOTE: Plug and Play. MOLEX MOLEX Connecting a Computer by USB Cable 2 3 1 1 Power cord 2 AC adapter 3 USB-A to A) cable on the Dell website at www.dell.com. 12 Connecting Your Projector The USB (USB A to A) cable is not shipped with your projector.

User Guide
Page 13
The wireless dongle is not shipped with a wireless connector and properly configured to detect another wireless connection. Refer to your projector. You can purchase it on how to use the wireless display. Connecting Your Projector 13 NOTE: Your projector must be equipped with your computer's documentation on the Dell website at www.dell.com. FSUCZ-C IWUD5:205C Connecting a Computer Using Wireless Dongle (Optional) NOTE: Your computer should be installed with a wireless dongle if you want to configure a wireless connection.
The wireless dongle is not shipped with a wireless connector and properly configured to detect another wireless connection. Refer to your projector. You can purchase it on how to use the wireless display. Connecting Your Projector 13 NOTE: Your projector must be equipped with your computer's documentation on the Dell website at www.dell.com. FSUCZ-C IWUD5:205C Connecting a Computer Using Wireless Dongle (Optional) NOTE: Your computer should be installed with a wireless dongle if you want to configure a wireless connection.
User Guide
Page 18
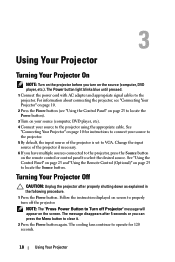
... the projector, press the Source button on screen to select the desired source. Change the input source of the projector is set to clear it. 2 Press the Power button again. See "Using the Control Panel" on page 23 and "Using the Remote Control (Optional)" on page 25 to the projector. The Power button light blinks blue until pressed. 1 Connect the power cord with AC adapter and appropriate signal cables to locate the Source button. The cooling fans continue to operate for instructions to connect your source to locate the Power button). 3 Turn...
... the projector, press the Source button on screen to select the desired source. Change the input source of the projector is set to clear it. 2 Press the Power button again. See "Using the Control Panel" on page 23 and "Using the Remote Control (Optional)" on page 25 to the projector. The Power button light blinks blue until pressed. 1 Connect the power cord with AC adapter and appropriate signal cables to locate the Source button. The cooling fans continue to operate for instructions to connect your source to locate the Power button). 3 Turn...
User Guide
Page 23
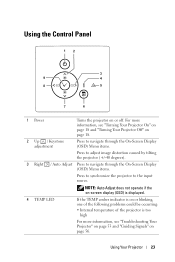
... Using the Control Panel 12 3 9 4 8 5 7 6 1 Power Turns the projector on page 18. 2 Up / Keystone adjustment Press to navigate through the On-Screen Display (OSD) Menu items. Press to adjust image distortion caused by tilting the projector (+/-40 degrees). 3 Right / Auto Adjust Press to navigate through the On-Screen Display (OSD) Menu items. Press to synchronize the projector to the input source. NOTE: Auto Adjust does not operate if the on-screen display (OSD) is displayed. 4 TEMP LED If the TEMP amber indicator...
... Using the Control Panel 12 3 9 4 8 5 7 6 1 Power Turns the projector on page 18. 2 Up / Keystone adjustment Press to navigate through the On-Screen Display (OSD) Menu items. Press to adjust image distortion caused by tilting the projector (+/-40 degrees). 3 Right / Auto Adjust Press to navigate through the On-Screen Display (OSD) Menu items. Press to synchronize the projector to the input source. NOTE: Auto Adjust does not operate if the on-screen display (OSD) is displayed. 4 TEMP LED If the TEMP amber indicator...

User Guide
Page 29
... projector and computer via the USB cable. AUTO SOURCE-If you select and press to activate, the Auto Source option will pop up and allow you to select input sources as DoUSB or Storage. Using Your Projector 29 VGA-Press to adjust the settings. • To exit the OSD, press the Menu button directly on the control panel or the remote control. INPUT SOURCE The Input Source menu allows you to select your projector via the USB cable, a USB Connected message...
... projector and computer via the USB cable. AUTO SOURCE-If you select and press to activate, the Auto Source option will pop up and allow you to select input sources as DoUSB or Storage. Using Your Projector 29 VGA-Press to adjust the settings. • To exit the OSD, press the Menu button directly on the control panel or the remote control. INPUT SOURCE The Input Source menu allows you to select your projector via the USB cable, a USB Connected message...

User Guide
Page 31
VOLUME-Press to decrease the volume and to optimize the display image. AUDIO INPUT The Audio Input menu allows you to select your preferred settings) mode. The options are : Auto Source, Multimedia, A/V In, and HDMI. VOLUME The Volume menu allows you to increase the volume. VIDEO MODE The Video Mode menu allows you adjust the volume setting of your projector. Using Your Projector 31 The options are : Presentation, Bright, Movie, sRGB (provides more accurate color representation), and Custom (set your audio input source.
VOLUME-Press to decrease the volume and to optimize the display image. AUDIO INPUT The Audio Input menu allows you to select your preferred settings) mode. The options are : Auto Source, Multimedia, A/V In, and HDMI. VOLUME The Volume menu allows you to increase the volume. VIDEO MODE The Video Mode menu allows you adjust the volume setting of your projector. Using Your Projector 31 The options are : Presentation, Bright, Movie, sRGB (provides more accurate color representation), and Custom (set your audio input source.
User Guide
Page 32
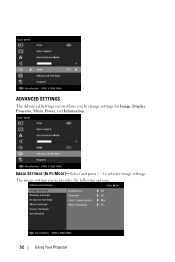
The image settings menu provides the following options: 32 Using Your Projector IMAGE SETTINGS (IN PC MODE)-Select and press to change settings for Image, Display, Projector, Menu, Power, and Information. ADVANCED SETTINGS The Advanced Settings menu allows you to activate image settings.
The image settings menu provides the following options: 32 Using Your Projector IMAGE SETTINGS (IN PC MODE)-Select and press to change settings for Image, Display, Projector, Menu, Power, and Information. ADVANCED SETTINGS The Advanced Settings menu allows you to activate image settings.

User Guide
Page 34
... you adjust the settings for Brightness, Contrast, Color Temperature, Saturation, Sharpness, Tint, and White Intensity the projector automatically switches to the input source. • 16:9 - The display settings menu provides the following options: HORIZONTAL POSITION-Press to move the image right and to correct it. Select Origin to maintain the aspect ratio of the screen to activate display settings. NOTE: 1 If you experience an unstable or flickering image, use...
... you adjust the settings for Brightness, Contrast, Color Temperature, Saturation, Sharpness, Tint, and White Intensity the projector automatically switches to the input source. • 16:9 - The display settings menu provides the following options: HORIZONTAL POSITION-Press to move the image right and to correct it. Select Origin to maintain the aspect ratio of the screen to activate display settings. NOTE: 1 If you experience an unstable or flickering image, use...
User Guide
Page 50
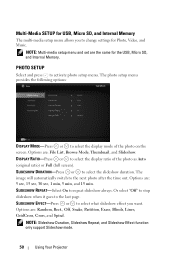
... or to select the display mode of the photo as Auto (original ratio) or Full (full screen). The photo setup menu provides the following options: DISPLAY MODE-Press or to select what slideshow effect you to change settings for Photo, Video, and Music. NOTE: Slideshow Duration, Slideshow Repeat, and Slideshow Effect function only support Slideshow mode. 50 Using Your Projector PHOTO SETUP Select and press to...
... or to select the display mode of the photo as Auto (original ratio) or Full (full screen). The photo setup menu provides the following options: DISPLAY MODE-Press or to select what slideshow effect you to change settings for Photo, Video, and Music. NOTE: Slideshow Duration, Slideshow Repeat, and Slideshow Effect function only support Slideshow mode. 50 Using Your Projector PHOTO SETUP Select and press to...
User Guide
Page 51
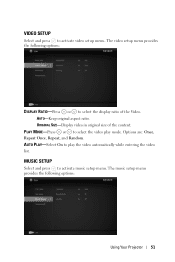
... SIZE-Display video in original size of the Video. PLAY MODE-Press or to select the video play the video automatically while entering the video list. The music setup menu provides the following options: DISPLAY RATIO-Press or to play mode. VIDEO SETUP Select and press to activate music setup menu. The video setup menu provides the following options: Using Your Projector 51 MUSIC SETUP Select and press to activate video setup menu. AUTO-Keep original aspect ratio. AUTO...
... SIZE-Display video in original size of the Video. PLAY MODE-Press or to select the video play the video automatically while entering the video list. The music setup menu provides the following options: DISPLAY RATIO-Press or to play mode. VIDEO SETUP Select and press to activate music setup menu. The video setup menu provides the following options: Using Your Projector 51 MUSIC SETUP Select and press to activate video setup menu. AUTO-Keep original aspect ratio. AUTO...
User Guide
Page 52
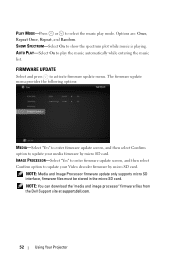
The firmware update menu provides the following options: MEDIA-Select "Yes" to enter firmware update screen, and then select Confirm option to update your Video decoder firmware by micro SD card. NOTE: You can download the "media and image processor" firmware files from the Dell Support site at support.dell.com. 52 Using Your Projector NOTE: Media and Image Processor firmware update only supports micro SD interface, firmware files must be stored in the...
The firmware update menu provides the following options: MEDIA-Select "Yes" to enter firmware update screen, and then select Confirm option to update your Video decoder firmware by micro SD card. NOTE: You can download the "media and image processor" firmware files from the Dell Support site at support.dell.com. 52 Using Your Projector NOTE: Media and Image Processor firmware update only supports micro SD interface, firmware files must be stored in the...
User Guide
Page 53
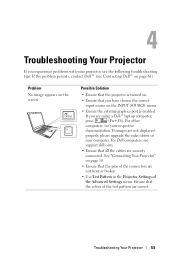
... 61). If images are not displayed properly, please upgrade the video driver of the Advanced Settings menu. See "Connecting Your Projector" on the INPUT SOURCE menu. • Ensure the external graphics port is enabled. If you are correct. If the problem persists, contact Dell™ (see your respective documentation. Problem No image appears on the screen F8 CRT/LCD Fn Possible Solution • Ensure that the projector is turned on. •...
... 61). If images are not displayed properly, please upgrade the video driver of the Advanced Settings menu. See "Connecting Your Projector" on the INPUT SOURCE menu. • Ensure the external graphics port is enabled. If you are correct. If the problem persists, contact Dell™ (see your respective documentation. Problem No image appears on the screen F8 CRT/LCD Fn Possible Solution • Ensure that the projector is turned on. •...
User Guide
Page 54
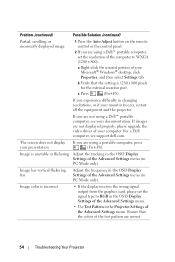
Problem (continued) Possible Solution (continued) Partial, scrolling, or incorrectly displayed image 1 Press the Auto Adjust button on the remote control or the control panel. 2 If you are using a Dell™ portable computer, set the signal type to WXGA (1280 x 800): a Right-click the unused portion of the Advanced Settings menu (in PC Mode only). Image is unstable or flickering Adjust the tracking in the OSD Display Settings of your Microsoft® Windows® desktop...
Problem (continued) Possible Solution (continued) Partial, scrolling, or incorrectly displayed image 1 Press the Auto Adjust button on the remote control or the control panel. 2 If you are using a Dell™ portable computer, set the signal type to WXGA (1280 x 800): a Right-click the unused portion of the Advanced Settings menu (in PC Mode only). Image is unstable or flickering Adjust the tracking in the OSD Display Settings of your Microsoft® Windows® desktop...
User Guide
Page 55
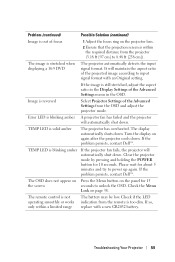
... Projector Settings of the Advanced Settings from the remote is too dim. Error LED is blinking amber A projector fan has failed and the projector will automatically shut down . If the problem persists, contact Dell™. Problem (continued) Possible Solution (continued) Image is out of focus 1 Adjust the focus ring on page 38. If the image is solid amber The projector has overheated. The display automatically shuts down . Check the Menu Lock on the projector lens. 2 Ensure that the projection screen...
... Projector Settings of the Advanced Settings from the remote is too dim. Error LED is blinking amber A projector fan has failed and the projector will automatically shut down . If the problem persists, contact Dell™. Problem (continued) Possible Solution (continued) Image is out of focus 1 Adjust the focus ring on page 38. If the image is solid amber The projector has overheated. The display automatically shuts down . Check the Menu Lock on the projector lens. 2 Ensure that the projection screen...
User Guide
Page 56
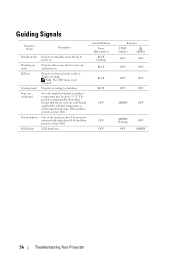
... temperature is not accessed. LED shutdown. If the problem persists, contact Dell. Control Buttons Power (Blue/Amber) BLUE Flashing BLUE BLUE BLUE OFF OFF OFF Indicator TEMP (Amber) (Amber) OFF OFF OFF OFF OFF OFF OFF OFF AMBER OFF AMBER Flashing OFF OFF AMBER 56 Troubleshooting Your Projector Ready to display an image. Projector is cooling to warm up mode LED on Cooling mode Projector overheated Fan breakdown LED failure Projector in Normal mode, ready to power on . Guiding Signals Projector Status Description Standby mode Warming up and power...
... temperature is not accessed. LED shutdown. If the problem persists, contact Dell. Control Buttons Power (Blue/Amber) BLUE Flashing BLUE BLUE BLUE OFF OFF OFF Indicator TEMP (Amber) (Amber) OFF OFF OFF OFF OFF OFF OFF OFF AMBER OFF AMBER Flashing OFF OFF AMBER 56 Troubleshooting Your Projector Ready to display an image. Projector is cooling to warm up mode LED on Cooling mode Projector overheated Fan breakdown LED failure Projector in Normal mode, ready to power on . Guiding Signals Projector Status Description Standby mode Warming up and power...

User Guide
Page 63
..., HDMI. High-Bandwidth Digital-Content Protection - A specification developed by improper projector to screen angle. HDMI carries both uncompressed high definition video along with digital audio and device control data in cycles per second. Hz (Hertz) - The largest image a projector can focus an image onto a screen. This is sent to ten times the common logarithm of the ratio of a projected image caused by Intel™ Corporation to the opposite corner. NTSC - A unit used...
..., HDMI. High-Bandwidth Digital-Content Protection - A specification developed by improper projector to screen angle. HDMI carries both uncompressed high definition video along with digital audio and device control data in cycles per second. Hz (Hertz) - The largest image a projector can focus an image onto a screen. This is sent to ten times the common logarithm of the ratio of a projected image caused by Intel™ Corporation to the opposite corner. NTSC - A unit used...

User Guide
Page 65
... 24-pin to VGA cable 11 USB-A to USB-A cable 12 Connection Ports A/V In connector 10 HDMI connector 10 MicroSD card slot 10 Universal I/O connector for VGA input and Audio input/output 10 USB Type A connector 10 VGA-A output (monitor loop-through) 10 Contact Dell 6, 55 Control Panel 23 D Dell contacting 61 M Main Unit 8 Control panel 8 Focus ring 8 Lens 8 Tilt adjusting wheel 8 Menu Position 38 Menu Settings 38 Menu Timeout 38 Menu Transparency 38 O On-Screen Display 29 Input Source 29 Index 65
... 24-pin to VGA cable 11 USB-A to USB-A cable 12 Connection Ports A/V In connector 10 HDMI connector 10 MicroSD card slot 10 Universal I/O connector for VGA input and Audio input/output 10 USB Type A connector 10 VGA-A output (monitor loop-through) 10 Contact Dell 6, 55 Control Panel 23 D Dell contacting 61 M Main Unit 8 Control panel 8 Focus ring 8 Lens 8 Tilt adjusting wheel 8 Menu Position 38 Menu Settings 38 Menu Timeout 38 Menu Transparency 38 O On-Screen Display 29 Input Source 29 Index 65


