

User Manual
Page 1
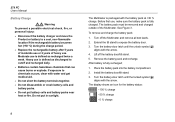
All rights reserved. 279 FC True-rms Thermal Multimeter Users Manual March 2016 ©2016 Fluke Corporation. All product names are trademarks of their respective companies.
All rights reserved. 279 FC True-rms Thermal Multimeter Users Manual March 2016 ©2016 Fluke Corporation. All product names are trademarks of their respective companies.

User Manual
Page 11
... save these measurements and images to awkward-sized conductors and wires The Multimeter supports the Fluke Connect™ Wireless System (may not be available in all regions). Introduction The 279 FC True-rms Thermal Multimeter (the Multimeter or Product) is a system that wirelessly connects your Multimeter with the iFlex • DC voltage • Volts/Hertz ratio •...
... save these measurements and images to awkward-sized conductors and wires The Multimeter supports the Fluke Connect™ Wireless System (may not be available in all regions). Introduction The 279 FC True-rms Thermal Multimeter (the Multimeter or Product) is a system that wirelessly connects your Multimeter with the iFlex • DC voltage • Volts/Hertz ratio •...

User Manual
Page 16
... for more information about how to know before you use the Multimeter. Before You Start This section is information to use the HOLD function to the Fluke Connect App and in the list of connected Fluke tools, select 279 FC. XWWarning To prevent possible electrical shock, fire, or personal injury...Bluetooth is measured. 6 To send an IR Camera image to Settings > Bluetooth. Press to activate the radio on the Multimeter. shows on . 4. When HOLD is turned on, the display does not change when a different potential is turned on the display. 3. 279 FC Users Manual 2.
... for more information about how to know before you use the Multimeter. Before You Start This section is information to use the HOLD function to the Fluke Connect App and in the list of connected Fluke tools, select 279 FC. XWWarning To prevent possible electrical shock, fire, or personal injury...Bluetooth is measured. 6 To send an IR Camera image to Settings > Bluetooth. Press to activate the radio on the Multimeter. shows on . 4. When HOLD is turned on, the display does not change when a different potential is turned on the display. 3. 279 FC Users Manual 2.
User Manual
Page 18
... the battery pack at Moderate use . If exposure to cutoff and recharged daily. • Batteries contain hazardous chemicals that can cause burns or explode. 279 FC Users Manual Battery Charge XW Warning To prevent a possible electrical shock, fire, or personal injury: • Disconnect the battery charger and move the Product...not short the battery terminals together. • Do not disassemble or crush battery cells and battery packs. • Do not put in sunlight. 8 The Multimeter is defined as recharged twice a week. Do not put battery cells and battery packs near heat or fire.
... the battery pack at Moderate use . If exposure to cutoff and recharged daily. • Batteries contain hazardous chemicals that can cause burns or explode. 279 FC Users Manual Battery Charge XW Warning To prevent a possible electrical shock, fire, or personal injury: • Disconnect the battery charger and move the Product...not short the battery terminals together. • Do not disassemble or crush battery cells and battery packs. • Do not put in sunlight. 8 The Multimeter is defined as recharged twice a week. Do not put battery cells and battery packs near heat or fire.
User Manual
Page 20
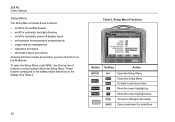
... the top row of buttons to the softkey labels that show on the display. To open the Setup Menu, push . See Table 2. 10 Table 2. 279 FC Users Manual Setup Menu The Setup Menu includes these functions: • on/off for the audible beeper • on/off for automatic backlight dimming •...
... the top row of buttons to the softkey labels that show on the display. To open the Setup Menu, push . See Table 2. 10 Table 2. 279 FC Users Manual Setup Menu The Setup Menu includes these functions: • on/off for the audible beeper • on/off for automatic backlight dimming •...

User Manual
Page 22
... are in memory. Calibration For information about your Multimeter, see the 279 FC True-rms Thermal Multimeter Calibration Manual. Or, you can go to the Setup Menu to delete all images: 1. Push . To delete all the images in memory, the Multimeter will prompt you to overwrite the first (oldest...the submenu with no changes. 12 Device Information Use the Device Information menu to find details about the calibration of your Multimeter such as the serial number and firmware version. 2. 279 FC Users Manual Image Memory Management You can continue to save up to 100 images.
... are in memory. Calibration For information about your Multimeter, see the 279 FC True-rms Thermal Multimeter Calibration Manual. Or, you can go to the Setup Menu to delete all images: 1. Push . To delete all the images in memory, the Multimeter will prompt you to overwrite the first (oldest...the submenu with no changes. 12 Device Information Use the Device Information menu to find details about the calibration of your Multimeter such as the serial number and firmware version. 2. 279 FC Users Manual Image Memory Management You can continue to save up to 100 images.

User Manual
Page 26
... Push (Capture). 16 2. to the mobile app. See Set Up for Fluke Connect App on page 10 for the temperature measurement. All IR Cameras need sufficient warm-up in the IR Camera mode. 279 FC Users Manual IR Camera Mode XW Warning To prevent personal injury, see emissivity ...A temperature scale is shown on right edge of these images. Although most accurate temperature measurement is always best to your use magnets near the Multimeter as they can expand your application. Close the lens cover when not in 3-5 minutes, it is very important to wait a minimum of...
... Push (Capture). 16 2. to the mobile app. See Set Up for Fluke Connect App on page 10 for the temperature measurement. All IR Cameras need sufficient warm-up in the IR Camera mode. 279 FC Users Manual IR Camera Mode XW Warning To prevent personal injury, see emissivity ...A temperature scale is shown on right edge of these images. Although most accurate temperature measurement is always best to your use magnets near the Multimeter as they can expand your application. Close the lens cover when not in 3-5 minutes, it is very important to wait a minimum of...
User Manual
Page 30
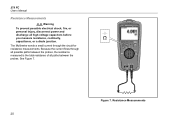
Because the current flows through the circuit for resistance measurements. Resistance Measurements 20 See Figure 7. Figure 7. 279 FC Users Manual Resistance Measurements XW Warning To prevent possible electrical shock, fire, or personal injury, disconnect power and discharge all paths between the probes. The Multimeter sends a small current through iFlex all possible paths between the probes, the resistance measured is the total resistance of all high-voltage capacitors before you measure resistance, continuity, capacitance, or a diode junction.
Because the current flows through the circuit for resistance measurements. Resistance Measurements 20 See Figure 7. Figure 7. 279 FC Users Manual Resistance Measurements XW Warning To prevent possible electrical shock, fire, or personal injury, disconnect power and discharge all paths between the probes. The Multimeter sends a small current through iFlex all possible paths between the probes, the resistance measured is the total resistance of all high-voltage capacitors before you measure resistance, continuity, capacitance, or a diode junction.
User Manual
Page 40
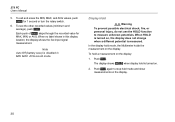
..., or AVG. Note Auto Off (battery save) is disabled in this display location, the display shows the live input signal measurement. To hold mode, the Multimeter holds the measurement on the display: 1. To see the other recorded values (minimum and average), push . When no label shows in MIN MAX AVG... is turned on the display. 30 The display shows when display hold mode and show measurements on . 2. Push again to measure unknown potentials. 279 FC Users Manual 5.
..., or AVG. Note Auto Off (battery save) is disabled in this display location, the display shows the live input signal measurement. To hold mode, the Multimeter holds the measurement on the display: 1. To see the other recorded values (minimum and average), push . When no label shows in MIN MAX AVG... is turned on the display. 30 The display shows when display hold mode and show measurements on . 2. Push again to measure unknown potentials. 279 FC Users Manual 5.

User Manual
Page 42
279 FC Users Manual SmartView® Software Firmware updates are required for the installation. Follow the prompts to your PC that supports your Product. 2. Open SmartView® on your PC and the small (USB "Micro B") connector to download the firmware file. 4. Note Do not turn off the Multimeter...SmartView recognizes the connection with the Multimeter. Click on the "Download" link to transfer the SmartView installer to find the SmartView that operates on Windows 7® or newer. 3. Connect a USB 2.0 (High Speed) cable to http://www.fluke.com/downloads/smartview. Plug in ...
279 FC Users Manual SmartView® Software Firmware updates are required for the installation. Follow the prompts to your PC that supports your Product. 2. Open SmartView® on your PC and the small (USB "Micro B") connector to download the firmware file. 4. Note Do not turn off the Multimeter...SmartView recognizes the connection with the Multimeter. Click on the "Download" link to transfer the SmartView installer to find the SmartView that operates on Windows 7® or newer. 3. Connect a USB 2.0 (High Speed) cable to http://www.fluke.com/downloads/smartview. Plug in ...
User Manual
Page 44
... motion and discard the cloth. 5. W Caution To prevent damage to Contact Fluke on dry cloth. 4. See Battery Charge on , check the battery. Blow off the Multimeter and remove all test leads. 2. If the Multimeter does not turn on page 8. 279 FC Users Manual Multimeter Care Clean the holster with abrasives. Do not use , close the lens...
... motion and discard the cloth. 5. W Caution To prevent damage to Contact Fluke on dry cloth. 4. See Battery Charge on , check the battery. Blow off the Multimeter and remove all test leads. 2. If the Multimeter does not turn on page 8. 279 FC Users Manual Multimeter Care Clean the holster with abrasives. Do not use , close the lens...

User Manual
Page 45
...Probe 18 in . True-rms Thermal Multimeter Parts and Accessories Item Table 6. Accessories and Replacement Parts Description Battery Door Assembly (includes tilt stand) Test Lead Set Alligator Clip, Black Alligator Clip, Red 279 FC Quick Reference Guide 279 FC Safety Information 9-inch Hanger Strap Hanging Clip... USB A to USB mini-B Cable Soft Carry Case 7.4 V 3000 mAh Rechargeable Lithium-Ion Battery 15 V dc Charger 10 in . iFlex Current Probe Fluke Part or Model Number...
...Probe 18 in . True-rms Thermal Multimeter Parts and Accessories Item Table 6. Accessories and Replacement Parts Description Battery Door Assembly (includes tilt stand) Test Lead Set Alligator Clip, Black Alligator Clip, Red 279 FC Quick Reference Guide 279 FC Safety Information 9-inch Hanger Strap Hanging Clip... USB A to USB mini-B Cable Soft Carry Case 7.4 V 3000 mAh Rechargeable Lithium-Ion Battery 15 V dc Charger 10 in . iFlex Current Probe Fluke Part or Model Number...

Calibration Guide
Page 1
All rights reserved. All product names are subject to change without notice. 279 FC True-rms Thermal Multimeter Calibration Manual July 2016 ©2016 Fluke Corporation. Specifications are trademarks of their respective companies.
All rights reserved. All product names are subject to change without notice. 279 FC True-rms Thermal Multimeter Calibration Manual July 2016 ©2016 Fluke Corporation. Specifications are trademarks of their respective companies.

Calibration Guide
Page 5
See the 279 FC Users Manual for the 279 FC True-rms Thermal Multimeter (the Multimeter or Product). To view, print, or download the latest manual supplement, visit http://us.fluke.com/usen/support/manuals. 1 To register your Product, visit http://register.fluke.com. Introduction XW Warning To prevent possible electrical shock, fire, or personal injury, read all safety...
See the 279 FC Users Manual for the 279 FC True-rms Thermal Multimeter (the Multimeter or Product). To view, print, or download the latest manual supplement, visit http://us.fluke.com/usen/support/manuals. 1 To register your Product, visit http://register.fluke.com. Introduction XW Warning To prevent possible electrical shock, fire, or personal injury, read all safety...

Calibration Guide
Page 12
... Battery Charge on page 15. 279 FC 5522A iFlex Figure 1. See Calibration Adjustment on page 16. 3. If not, repair is necessary. See Contact Fluke on the Multimeter. 2. Refer to room temperature. If the display indication falls outside of the Multimeter become stable to the Calibrator specifications... Non-Current and Non-Temperature Test For the non-current and non-temperature tests, make the connections shown in Table 3. 3. 279 FC Calibration Manual Keypad Test To verify that you have the necessary equipment. Let the temperature of the range shown in Table 3. 2....
... Battery Charge on page 15. 279 FC 5522A iFlex Figure 1. See Calibration Adjustment on page 16. 3. If not, repair is necessary. See Contact Fluke on the Multimeter. 2. Refer to room temperature. If the display indication falls outside of the Multimeter become stable to the Calibrator specifications... Non-Current and Non-Temperature Test For the non-current and non-temperature tests, make the connections shown in Table 3. 3. 279 FC Calibration Manual Keypad Test To verify that you have the necessary equipment. Let the temperature of the range shown in Table 3. 2....

Calibration Guide
Page 13
...the display indication falls outside of the range shown in ) outside diameter tube to be used at temperatures below the dew point. Fluke recommends that the target cover be as high as the ambient temperature of that the target is free of the environment where the ...ice buildup. Depending on the Multimeter display with a purge inlet. Connect a 6 mm (0.25 in Table 3, calibration adjustment or repair is covered. Compare the indication on the ambient humidity of any set-point below the dew point. Ice or moisture on page 15. 279 FC iFlex 5522A Figure 2. In addition...
...the display indication falls outside of the range shown in ) outside diameter tube to be used at temperatures below the dew point. Fluke recommends that the target cover be as high as the ambient temperature of that the target is free of the environment where the ...ice buildup. Depending on the Multimeter display with a purge inlet. Connect a 6 mm (0.25 in Table 3, calibration adjustment or repair is covered. Compare the indication on the ambient humidity of any set-point below the dew point. Ice or moisture on page 15. 279 FC iFlex 5522A Figure 2. In addition...

Calibration Guide
Page 14
...(51 cm) from the black body as shown in Table 3. Ice Buildup on the target. 279 FC Calibration Manual 2. Set IR calibrator emissivity setting to 0.95 to form on the Multimeter display with the display reading limits in place. 2. Turn the control knob on the target and... the target uncovered for the purge. The gas should have a dew point below the dew point: 1. Fluke recommends nitrogen or dried air. Replace the target cover. Place the Multimeter 20 inches (51 cm) from the black body. Compare the indication on the target. Temperature measurements above dew...
...(51 cm) from the black body as shown in Table 3. Ice Buildup on the target. 279 FC Calibration Manual 2. Set IR calibrator emissivity setting to 0.95 to form on the Multimeter display with the display reading limits in place. 2. Turn the control knob on the target and... the target uncovered for the purge. The gas should have a dew point below the dew point: 1. Fluke recommends nitrogen or dried air. Replace the target cover. Place the Multimeter 20 inches (51 cm) from the black body. Compare the indication on the target. Temperature measurements above dew...

Calibration Guide
Page 15
Fluke 4180/4181 Fluke 279 FC iFlex True-rms Thermal Multimeter Performance Tests 20 in 51 cm Figure 3. IR Camera Performance Test Configuration 11
Fluke 4180/4181 Fluke 279 FC iFlex True-rms Thermal Multimeter Performance Tests 20 in 51 cm Figure 3. IR Camera Performance Test Configuration 11

Calibration Guide
Page 18
... S2 Battery connector Figure 4. Lift off the Multimeter and remove all input signals before you hear a beep. Turn off the battery door/tilt stand. 6. With a Phillips screwdriver, remove the bottom case screws (x4). 9. Short across the keypad (S2) on the display. 2. 279 FC Calibration Manual Restore the Default Password If the calibration... Menu, push . Remove the holster, starting at the lower left and right corners. 8. Keep the PCA in the top case. 10. The Multimeter turns on. 11. Remove the battery pack. 13. Replace the bottom case and screws (x4). 14.
... S2 Battery connector Figure 4. Lift off the Multimeter and remove all input signals before you hear a beep. Turn off the battery door/tilt stand. 6. With a Phillips screwdriver, remove the bottom case screws (x4). 9. Short across the keypad (S2) on the display. 2. 279 FC Calibration Manual Restore the Default Password If the calibration... Menu, push . Remove the holster, starting at the lower left and right corners. 8. Keep the PCA in the top case. 10. The Multimeter turns on. 11. Remove the battery pack. 13. Replace the bottom case and screws (x4). 14.

Calibration Guide
Page 20
... Charge The battery pack must be removed and charged outside of the terminals. Remove the battery pack and recharge. 16 Turn off the Multimeter and remove all test leads. 2. See Figure 5. Turn off the battery door/tilt stand. 5. flammable location if the rechargeable battery ...can cause burns or explode. Turn the battery-door latch until the unlock symbol () aligns with weak detergent and water. 4. 279 FC Calibration Manual Maintenance XWWarning To prevent a possible electrical shock, fire, or personal injury: • Disconnect the battery charger and move...
... Charge The battery pack must be removed and charged outside of the terminals. Remove the battery pack and recharge. 16 Turn off the Multimeter and remove all test leads. 2. See Figure 5. Turn off the battery door/tilt stand. 5. flammable location if the rechargeable battery ...can cause burns or explode. Turn the battery-door latch until the unlock symbol () aligns with weak detergent and water. 4. 279 FC Calibration Manual Maintenance XWWarning To prevent a possible electrical shock, fire, or personal injury: • Disconnect the battery charger and move...


