
User Manual
Page 2
... to fuses, disposable batteries, or to a Fluke authorized service center within the warranty period. Fluke does not warrant that failure was caused by neglect, misuse, contamination, alteration, accident, or abnormal condition of operation or handling, including overvoltage failures caused by use and service. Fluke's warranty obligation is limited, at Fluke's option, to refund of the purchase price, free of charge repair, or replacement...
... to fuses, disposable batteries, or to a Fluke authorized service center within the warranty period. Fluke does not warrant that failure was caused by neglect, misuse, contamination, alteration, accident, or abnormal condition of operation or handling, including overvoltage failures caused by use and service. Fluke's warranty obligation is limited, at Fluke's option, to refund of the purchase price, free of charge repair, or replacement...

User Manual
Page 3
... to Contact Fluke 2 Safety Information 2 Radio Frequency Data 4 Accessories 6 Before You Start 7 How to Charge the Battery 8 Two-Bay Battery Charger Base 8 On-Imager AC Power Socket 8 Optional 12 V Vehicle Charger 9 Power On and Off 9 Features and Controls 10 Focus 11 Primary and Secondary Triggers 13 How to Use the Control Buttons 13 How to Use the Menus 14 Image Capture 14 IR-PhotoNotes 15 Voice Records 15 Listen...
... to Contact Fluke 2 Safety Information 2 Radio Frequency Data 4 Accessories 6 Before You Start 7 How to Charge the Battery 8 Two-Bay Battery Charger Base 8 On-Imager AC Power Socket 8 Optional 12 V Vehicle Charger 9 Power On and Off 9 Features and Controls 10 Focus 11 Primary and Secondary Triggers 13 How to Use the Control Buttons 13 How to Use the Menus 14 Image Capture 14 IR-PhotoNotes 15 Voice Records 15 Listen...
User Manual
Page 4
... Camera Menu 33 Compass 33 Video 34 Video Recording 35 Video Playback 35 Laser Pointer 36 Torch 37 Backlight 37 CNX™ Wireless System 38 Memory Menu 39 Review Data Files 39 Delete Data Files 39 Settings Menu 40 Units 40 File Format 40 Auto Off 41 Date 42 Time 43 Language 43 Imager Information 44 Maintenance 45 How to Clean the Case 45 Battery Care 45 General Specifications...
... Camera Menu 33 Compass 33 Video 34 Video Recording 35 Video Playback 35 Laser Pointer 36 Torch 37 Backlight 37 CNX™ Wireless System 38 Memory Menu 39 Review Data Files 39 Delete Data Files 39 Settings Menu 40 Units 40 File Format 40 Auto Off 41 Date 42 Time 43 Language 43 Imager Information 44 Maintenance 45 How to Clean the Case 45 Battery Care 45 General Specifications...
User Manual
Page 7
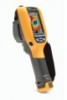
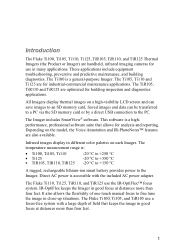
... images and data can save images to the Imager. Infrared images display in good focus at distances more than four feet. 1 Depending on a high-visibility LCD screen and can be transferred to a PC via the SD memory card or by a direct USB connection to fine tune the image in close-up situations. Direct AC power is a highperformance, professional software suite...
... images and data can save images to the Imager. Infrared images display in good focus at distances more than four feet. 1 Depending on a high-visibility LCD screen and can be transferred to a PC via the SD memory card or by a direct USB connection to fine tune the image in close-up situations. Direct AC power is a highperformance, professional software suite...

User Manual
Page 10
... experienced radio/TV technician for operation in a residential environment not withstanding use in a particular installation. This Product can radiate radio frequency energy and, if not installed and used in a residential installation. This Product complies with the limits for operation by the general public. Ti100, Ti105, Ti110, Ti125, TiR105, TiR110, TiR125 Users Manual Radio Frequency Data Note Changes or modifications to the wireless 2.4 GHz radio not expressly approved by Fluke Corporation...
... experienced radio/TV technician for operation in a residential environment not withstanding use in a particular installation. This Product can radiate radio frequency energy and, if not installed and used in a residential installation. This Product complies with the limits for operation by the general public. Ti100, Ti105, Ti110, Ti125, TiR105, TiR110, TiR125 Users Manual Radio Frequency Data Note Changes or modifications to the wireless 2.4 GHz radio not expressly approved by Fluke Corporation...

User Manual
Page 11
..." product. Important information. Do not mix with the displayed image. This product complies with the WEEE Directive (2002/96/EC) marking requirements. Contact your authorized Fluke Service Center for recycling information. 5 Do not dispose of symbols used on the Imager and in this manual. Battery charging when animated. Spent batteries should be disposed of European Union and European Free Trade Association...
..." product. Important information. Do not mix with the displayed image. This product complies with the WEEE Directive (2002/96/EC) marking requirements. Contact your authorized Fluke Service Center for recycling information. 5 Do not dispose of symbols used on the Imager and in this manual. Battery charging when animated. Spent batteries should be disposed of European Union and European Free Trade Association...

User Manual
Page 14
... temperature specification. Connect the ac power adapter into bays of charger base. 3. When the Imager's power is off and the ac power adapter is connected, flashes in the center of the display to the Imager's ac power socket. flashes in hot or cold areas. Remove smart batteries and disconnect the power supply when batteries are not fully charged. Ti100, Ti105, Ti110, Ti125, TiR105, TiR110, TiR125 Users Manual How...
... temperature specification. Connect the ac power adapter into bays of charger base. 3. When the Imager's power is off and the ac power adapter is connected, flashes in the center of the display to the Imager's ac power socket. flashes in hot or cold areas. Remove smart batteries and disconnect the power supply when batteries are not fully charged. Ti100, Ti105, Ti110, Ti125, TiR105, TiR110, TiR125 Users Manual How...

User Manual
Page 17
... focus-free system. Models with Mains Adapters Focus Models Ti110, Ti125, TiR110, and TiR125 have the flexibility for Ti100, Ti105, TiR105) Lithium-ion Smart Battery 2-Bay Battery Charging Base AC Power Adapter with IR-OptiFlex focus can operate in a focus-free mode, but also have IR-OptiFlex focus. Item Thermal Imagers Focus Table 4. Features and Controls (cont.) Description AC Adapter/Charger Input...
... focus-free system. Models with Mains Adapters Focus Models Ti110, Ti125, TiR110, and TiR125 have the flexibility for Ti100, Ti105, TiR105) Lithium-ion Smart Battery 2-Bay Battery Charging Base AC Power Adapter with IR-OptiFlex focus can operate in a focus-free mode, but also have IR-OptiFlex focus. Item Thermal Imagers Focus Table 4. Features and Controls (cont.) Description AC Adapter/Charger Input...
User Manual
Page 20
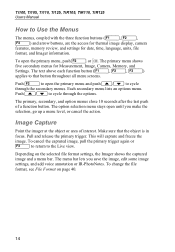
... to return to Use the Menus The menus, coupled with the three function buttons and arrow buttons, are the access for thermal image display, camera features, memory review, and settings for Measurement, Image, Camera, Memory, and Settings. Each secondary menu lists an options menu. Image Capture Point the imager at the object or area of a function button. To change the file format, see...
... to return to Use the Menus The menus, coupled with the three function buttons and arrow buttons, are the access for thermal image display, camera features, memory review, and settings for Measurement, Image, Camera, Memory, and Settings. Each secondary menu lists an options menu. Image Capture Point the imager at the object or area of a function button. To change the file format, see...

User Manual
Page 25
... for thermal image display, camera features, memory setup, and settings for manual adjustment. Push to set the change and go back to the previous menu. • to cancel the change and go back to the thermal images. Push or to highlight Range. 5. Push / to view the menu. 6. These settings include the Range (Auto and Manual Level and Span adjustment), Emissivity, Background, Transmission...
... for thermal image display, camera features, memory setup, and settings for manual adjustment. Push to set the change and go back to the previous menu. • to cancel the change and go back to the thermal images. Push or to highlight Range. 5. Push / to view the menu. 6. These settings include the Range (Auto and Manual Level and Span adjustment), Emissivity, Background, Transmission...
User Manual
Page 26
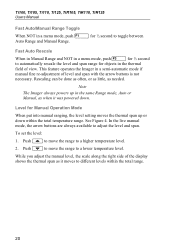
... of the display shows the thermal span as needed. Ti100, Ti105, Ti110, Ti125, TiR105, TiR110, TiR125 Users Manual Fast Auto/Manual Range Toggle When NOT in a menu mode, push for objects in the thermal field of view. Level for Manual Operation Mode When put into manual ranging, the level setting moves the thermal span up in the same Range mode, Auto or Manual, as when it moves to adjust the level...
... of the display shows the thermal span as needed. Ti100, Ti105, Ti110, Ti125, TiR105, TiR110, TiR125 Users Manual Fast Auto/Manual Range Toggle When NOT in a menu mode, push for objects in the thermal field of view. Level for Manual Operation Mode When put into manual ranging, the level setting moves the thermal span up in the same Range mode, Auto or Manual, as when it moves to adjust the level...
User Manual
Page 27
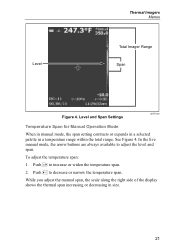
... Span for Manual Operation Mode When in manual mode, the span setting contracts or expands in a selected palette in size. 21 See Figure 4. Push to decrease or narrow the temperature span. Level Thermal Imagers Menus Total Imager Range Span Figure 4. To adjust the temperature span: 1. While you adjust the manual span, the scale along the right side of the display shows...
... Span for Manual Operation Mode When in manual mode, the span setting contracts or expands in a selected palette in size. 21 See Figure 4. Push to decrease or narrow the temperature span. Level Thermal Imagers Menus Total Imager Range Span Figure 4. To adjust the temperature span: 1. While you adjust the manual span, the scale along the right side of the display shows...
User Manual
Page 34
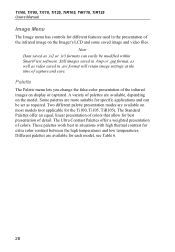
... Users Manual Image Menu The Image menu has controls for different features used in .avi format will retain image settings at the time of capture and save. A variety of palettes are available on the model. Palette The Palette menu lets you change the false-color presentation of detail. Two different palette presentation modes are available, depending on most models (not applicable for specific applications...
... Users Manual Image Menu The Image menu has controls for different features used in .avi format will retain image settings at the time of capture and save. A variety of palettes are available on the model. Palette The Palette menu lets you change the false-color presentation of detail. Two different palette presentation modes are available, depending on most models (not applicable for specific applications...
User Manual
Page 36
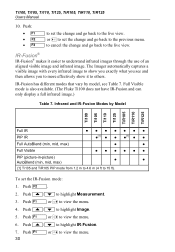
To set the change and go back to the previous menu. • to cancel the change and go back to view the menu. 6. Push / to view the menu. 30 The Imager automatically captures a visible image with every infrared image to show it easier to view the menu. 4. Infrared and IR-Fusion Modes by model, see and then allows you to...
To set the change and go back to the previous menu. • to cancel the change and go back to view the menu. 6. Push / to view the menu. 30 The Imager automatically captures a visible image with every infrared image to show it easier to view the menu. 4. Infrared and IR-Fusion Modes by model, see and then allows you to...

User Manual
Page 39
... highlight Compass. 33 Push: • to set the change and go back to set the display: 1. Camera Menu The Camera menu has controls and options for secondary camera features such as Compass, Video, Laser Pointer, Torch, and Backlight level. The compass has on the display. Push / to view the menu. 4. Push / to highlight Display. 7. Push / to highlight Measurement...
... highlight Compass. 33 Push: • to set the change and go back to set the display: 1. Camera Menu The Camera menu has controls and options for secondary camera features such as Compass, Video, Laser Pointer, Torch, and Backlight level. The compass has on the display. Push / to view the menu. 4. Push / to highlight Display. 7. Push / to highlight Measurement...

User Manual
Page 44
... m distance. 10. Turn on the display. 13. Push or start the discovery process. When done, the Imager presents a list with the ID and name of each wireless tool and make sure the wireless feature is enabled. Push to exit the CNX setup menu. By default, the Imager shows and saves the data for more information about how to...
... m distance. 10. Turn on the display. 13. Push or start the discovery process. When done, the Imager presents a list with the ID and name of each wireless tool and make sure the wireless feature is enabled. Push to exit the CNX setup menu. By default, the Imager shows and saves the data for more information about how to...

User Manual
Page 46
... memory card in different file formats. Push / to highlight an option. 40 Ti100, Ti105, Ti110, Ti125, TiR105, TiR110, TiR125 Users Manual Settings Menu The Settings menu has adjustments for user preferences such as model number, serial number, and firmware versions. Push . 2. Push . 2. Push / to highlight Units. 5. Push: • to set the change and go back to view the menu. 6. Units To change the temperature units: 1. Push...
... memory card in different file formats. Push / to highlight an option. 40 Ti100, Ti105, Ti110, Ti125, TiR105, TiR110, TiR125 Users Manual Settings Menu The Settings menu has adjustments for user preferences such as model number, serial number, and firmware versions. Push . 2. Push . 2. Push / to highlight Units. 5. Push: • to set the change and go back to view the menu. 6. Units To change the temperature units: 1. Push...
User Manual
Page 50
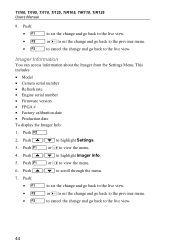
... through the menu. 7. Push / to view the menu. 6. This includes: • Model • Camera serial number • Refresh rate • Engine serial number • Firmware version • FPGA # • Factory calibration date • Production date To display the Imager Info: 1. Imager Information You can access information about the Imager from the Settings Menu. Ti100, Ti105, Ti110, Ti125, TiR105, TiR110, TiR125 Users Manual 8. Push / to view the menu. 4. Push...
... through the menu. 7. Push / to view the menu. 6. This includes: • Model • Camera serial number • Refresh rate • Engine serial number • Firmware version • FPGA # • Factory calibration date • Production date To display the Imager Info: 1. Imager Information You can access information about the Imager from the Settings Menu. Ti100, Ti105, Ti110, Ti125, TiR105, TiR110, TiR125 Users Manual 8. Push / to view the menu. 4. Push...
User Manual
Page 52
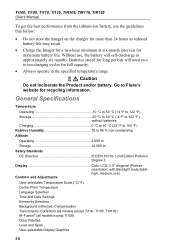
..., TiR105, TiR110, TiR125 Users Manual To get the best performance from the lithium-ion battery, use , the battery will need two to Fluke's website for recycling information. Batteries stored for long periods will self-discharge in the specified temperature range. Caution Do not incinerate the Product and/or battery. Go to ten charging cycles for maximum battery life. General Specifications Temperature Operating 10...
..., TiR105, TiR110, TiR125 Users Manual To get the best performance from the lithium-ion battery, use , the battery will need two to Fluke's website for recycling information. Batteries stored for long periods will self-discharge in the specified temperature range. Caution Do not incinerate the Product and/or battery. Go to ten charging cycles for maximum battery life. General Specifications Temperature Operating 10...

User Manual
Page 54
..., and Turkish Detailed Specifications Temperature Measurements Temperature Range (not calibrated below -10 °C) Ti100, Ti105, Ti110 20 °C to +250 °C Ti125 20 °C to +350 °C TiR105, TiR110 20 °C to +150 °C TiR125 20 °C to be used in homes. Vibration 2 G, IEC 68-2-26 Shock 25 G, IEC 68-2-29 Drop 2 meter Size (H x W x L 28.4 x 8.6 x 13.5 cm...
..., and Turkish Detailed Specifications Temperature Measurements Temperature Range (not calibrated below -10 °C) Ti100, Ti105, Ti110 20 °C to +250 °C Ti125 20 °C to +350 °C TiR105, TiR110 20 °C to +150 °C TiR125 20 °C to be used in homes. Vibration 2 G, IEC 68-2-26 Shock 25 G, IEC 68-2-29 Drop 2 meter Size (H x W x L 28.4 x 8.6 x 13.5 cm...


