Cleaning & Maintenance
Page 7
CAUTION CAUTION indicates that personal injury like pinching of fingers or hands may result if you perform a procedure correctly. NOTE A NOTE provides "how-to" tips or suggestions to the scanner may result if you do not follow a procedure correctly. Official Fujitsu part names are indicated with an initial capital letter, as follows: WARNING WARNING indicates that damage to help you do not follow a procedure correctly. Conventions Important information that requires special attention is indicated as in the part name "Pick roller". vi
CAUTION CAUTION indicates that personal injury like pinching of fingers or hands may result if you perform a procedure correctly. NOTE A NOTE provides "how-to" tips or suggestions to the scanner may result if you do not follow a procedure correctly. Official Fujitsu part names are indicated with an initial capital letter, as follows: WARNING WARNING indicates that damage to help you do not follow a procedure correctly. Conventions Important information that requires special attention is indicated as in the part name "Pick roller". vi

Cleaning & Maintenance
Page 8
CONTENTS CHAPTER 1 DESCRIPTION 1-1 Units 1-2 Assemblies 1-4 Operator panel 1-5 Panel Display 1-6 CHAPTER 2 CLEANING 2-1 Cleaning Supplies and Areas Requiring Cleaning .......... 2-2 Supplies 2-2 Areas Requiring Cleaning 2-3 Cleaning the ADF 2-4 Cleaning the Flatbed 2-10 CHAPTER 3 REPLACEMENT OF PARTS 3-1 Pad Assembly 3-2 Pick Roller 3-4 CHAPTER 4 TROUBLESHOOTING 4-1 Clearing Paper Jams 4-2 Initial Checks 4-3 Problem Checklist 4-20 vii
CONTENTS CHAPTER 1 DESCRIPTION 1-1 Units 1-2 Assemblies 1-4 Operator panel 1-5 Panel Display 1-6 CHAPTER 2 CLEANING 2-1 Cleaning Supplies and Areas Requiring Cleaning .......... 2-2 Supplies 2-2 Areas Requiring Cleaning 2-3 Cleaning the ADF 2-4 Cleaning the Flatbed 2-10 CHAPTER 3 REPLACEMENT OF PARTS 3-1 Pad Assembly 3-2 Pick Roller 3-4 CHAPTER 4 TROUBLESHOOTING 4-1 Clearing Paper Jams 4-2 Initial Checks 4-3 Problem Checklist 4-20 vii

Cleaning & Maintenance
Page 13
Assemblies Thumb screw Guide A ASY Stacker Pad ASY Pick roller 2 Pick roller 1 1-4
Assemblies Thumb screw Guide A ASY Stacker Pad ASY Pick roller 2 Pick roller 1 1-4

Cleaning & Maintenance
Page 17
...Display turns Off and the power indicator remains "On", the scanner is necessary, the scanner displays the following on the LCD: Clean the Pick roller or the ADF glass in accordance with the instructions given in the Low Power Mode. NOTE One of the following will wake up the scanner: • ... the Video Interface Option is installed.) The scanner displays the following screen when waiting for the Start button to be pressed: When the Pick roller cleaning is necessary, the scanner displays the following on the upper line: When the ADF glass cleaning is in chapter 2, Cleaning the...
...Display turns Off and the power indicator remains "On", the scanner is necessary, the scanner displays the following on the LCD: Clean the Pick roller or the ADF glass in accordance with the instructions given in the Low Power Mode. NOTE One of the following will wake up the scanner: • ... the Video Interface Option is installed.) The scanner displays the following screen when waiting for the Start button to be pressed: When the Pick roller cleaning is necessary, the scanner displays the following on the upper line: When the ADF glass cleaning is in chapter 2, Cleaning the...

Cleaning & Maintenance
Page 22
...• Paper with cleaner F2. Frequencies (*1)(*3) Remarks Cleaning paper Cleaner F2 Contact your dealer or distributor Every 5,000 sheets • Plastic rollers (*2) 1 bottle Apply Cleaner F2 to cloth. Apply Cleaner F1 to cotton swab. NOTE When the following paper types are used, it .... Cleaner F1 or Isopropyl alcohol • PAD assembly Every 5,000 sheets • Pick roller/Feed rollers/ Glass/Sheet guide Every 5,000 sheets 1 bottle. CAUTION *2 Do not clean the rubber rollers with special chemical coatings, such as carbonless paper. *3 Refer to the Abrasion counter on ...
...• Paper with cleaner F2. Frequencies (*1)(*3) Remarks Cleaning paper Cleaner F2 Contact your dealer or distributor Every 5,000 sheets • Plastic rollers (*2) 1 bottle Apply Cleaner F2 to cloth. Apply Cleaner F1 to cotton swab. NOTE When the following paper types are used, it .... Cleaner F1 or Isopropyl alcohol • PAD assembly Every 5,000 sheets • Pick roller/Feed rollers/ Glass/Sheet guide Every 5,000 sheets 1 bottle. CAUTION *2 Do not clean the rubber rollers with special chemical coatings, such as carbonless paper. *3 Refer to the Abrasion counter on ...
Cleaning & Maintenance
Page 23
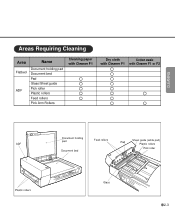
CLEANING Areas Requiring Cleaning Area Name Flatbed ADF Document holding pad Document bed Pad Glass/Sheet guide Pick roller Plastic rollers Feed rollers Pick Arm Rollers Cleaning paper with Cleaner F1 Dry cloth Cotton swab with Cleaner F1 with Cleaner F1 or F2 ADF Plastic rollers Document holding pad Document bed Feed rollers Sheet guide (white part) Pad Plastic rollers Pick roller Glass 2-3
CLEANING Areas Requiring Cleaning Area Name Flatbed ADF Document holding pad Document bed Pad Glass/Sheet guide Pick roller Plastic rollers Feed rollers Pick Arm Rollers Cleaning paper with Cleaner F1 Dry cloth Cotton swab with Cleaner F1 with Cleaner F1 or F2 ADF Plastic rollers Document holding pad Document bed Feed rollers Sheet guide (white part) Pad Plastic rollers Pick roller Glass 2-3

Cleaning & Maintenance
Page 24
Cleaning paper Cleaning paper Plastic rollers 4 Close the ADF and turn the power on to a new piece of cleaning paper. 3 Place the cleaning paper on the ADF so that the edge of the short side touches the Plastic roller. Cleaning the ADF Cleaning the ADF with cleaning paper 1 Pull the ADF lever to open the ADF. 2 Apply cleaner F1 to start the cleaning. 5 Turn the power off. 6 Repeat steps 1 through 5. 2-4 Power off
Cleaning paper Cleaning paper Plastic rollers 4 Close the ADF and turn the power on to a new piece of cleaning paper. 3 Place the cleaning paper on the ADF so that the edge of the short side touches the Plastic roller. Cleaning the ADF Cleaning the ADF with cleaning paper 1 Pull the ADF lever to open the ADF. 2 Apply cleaner F1 to start the cleaning. 5 Turn the power off. 6 Repeat steps 1 through 5. 2-4 Power off

Cleaning & Maintenance
Page 26
Feed rollers Plastic rollers Plastic rollers 2-6 Be careful not to damage the surface of the rollers. Pick roller Feed rollers and Plastic rollers: Wipe the rollers. Pick roller: Wipe the roller. Be careful not to damage the surface of the roller and the mylar strip above the Pick roller.
Feed rollers Plastic rollers Plastic rollers 2-6 Be careful not to damage the surface of the rollers. Pick roller Feed rollers and Plastic rollers: Wipe the rollers. Pick roller: Wipe the roller. Be careful not to damage the surface of the roller and the mylar strip above the Pick roller.

Cleaning & Maintenance
Page 28
NOTE When non-carbon paper is used, the Pick Arm rollers may become dirty with a clean, dry cloth to dry them. Cleaning the Pick Arm Rollers 1 Pull the ADF lever to open the ADF. 2 Moisten a cotton swab or Dry cloth with F1 or F2 Cleaner. 3 Wipe the small Plastic rollers at the tip of the Pick Arm. 4 Wipe the small Plastic rollers and the Pick Arm with a black substance. Don't wipe the pad rubbers with the F2 cleaner. 2. Use Cleaner F2 to the pad rubber. 2-8 Don't apply the F2 cleaner to remove the contamination. CAUTION 1.
NOTE When non-carbon paper is used, the Pick Arm rollers may become dirty with a clean, dry cloth to dry them. Cleaning the Pick Arm Rollers 1 Pull the ADF lever to open the ADF. 2 Moisten a cotton swab or Dry cloth with F1 or F2 Cleaner. 3 Wipe the small Plastic rollers at the tip of the Pick Arm. 4 Wipe the small Plastic rollers and the Pick Arm with a black substance. Don't wipe the pad rubbers with the F2 cleaner. 2. Use Cleaner F2 to the pad rubber. 2-8 Don't apply the F2 cleaner to remove the contamination. CAUTION 1.

Cleaning & Maintenance
Page 29
Allow it to open the ADF. 2 Moisten a cotton swab with Cleaner F2. 3 Wipe the Plastic roller surfaces. CLEANING Cleaning the Plastic rollers with Cleaner F2 1 Pull the ADF lever to dry. Plastic rollers 2-9 Plastic rollers CAUTION Don't wipe the Pick Rollers with a cotton swab using cleaner F2. 4 Wipe the Plastic roller surface with a clean, dry cloth.
Allow it to open the ADF. 2 Moisten a cotton swab with Cleaner F2. 3 Wipe the Plastic roller surfaces. CLEANING Cleaning the Plastic rollers with Cleaner F2 1 Pull the ADF lever to dry. Plastic rollers 2-9 Plastic rollers CAUTION Don't wipe the Pick Rollers with a cotton swab using cleaner F2. 4 Wipe the Plastic roller surface with a clean, dry cloth.

Cleaning & Maintenance
Page 31
CHAPTER 3 REPLACEMENT OF PARTS This chapter describes how to replace the pad assembly and the pick roller. Pad Assembly Pick Roller 3-1
CHAPTER 3 REPLACEMENT OF PARTS This chapter describes how to replace the pad assembly and the pick roller. Pad Assembly Pick Roller 3-1

Cleaning & Maintenance
Page 34
Pick Roller Pick rollers (PA03951-0153) (Two rollers are tight. Use the Abrasion counter on the operator panel to open the ADF. 2 Remove the two Thumb screws. Thumb screws 3-4 NOTE Use a Phillips screwdriver if they are included) NOTE The life span of the Pick roller is about 200, 000 sheets or one year. WARNING Turn off the power before replacing the Pick Rollers. 1 Pull the ADF lever to estimate when the Pick roller needs replacement. The life span may be decreased by as much as half when carbonless sheets are frequently read.
Pick Roller Pick rollers (PA03951-0153) (Two rollers are tight. Use the Abrasion counter on the operator panel to open the ADF. 2 Remove the two Thumb screws. Thumb screws 3-4 NOTE Use a Phillips screwdriver if they are included) NOTE The life span of the Pick roller is about 200, 000 sheets or one year. WARNING Turn off the power before replacing the Pick Rollers. 1 Pull the ADF lever to estimate when the Pick roller needs replacement. The life span may be decreased by as much as half when carbonless sheets are frequently read.

Cleaning & Maintenance
Page 35
3 With both hands, lift up Guide A and disengage its tip from the right hole. Then lift the right side of the cover and remove it. 4 To remove the Pick rollers, turn the stopper counterclockwise. Stopper Pick roller 2 Pick roller 1 REPLACEMENT OF PARTS Position for Replacement 3-5
3 With both hands, lift up Guide A and disengage its tip from the right hole. Then lift the right side of the cover and remove it. 4 To remove the Pick rollers, turn the stopper counterclockwise. Stopper Pick roller 2 Pick roller 1 REPLACEMENT OF PARTS Position for Replacement 3-5

Cleaning & Maintenance
Page 36
5 To remove the Pick roller 1, move it to the left and then lift it. 6 Immediately after removing the Pick roller 1, remove the Pick roller 2 in the same way. 3-6
5 To remove the Pick roller 1, move it to the left and then lift it. 6 Immediately after removing the Pick roller 1, remove the Pick roller 2 in the same way. 3-6

Cleaning & Maintenance
Page 37
NOTE Pick roller 1 has a groove in its rubber. NOTE Make sure that the shaft is securely fixed to the bearings. 3-7 Then, slide Pick roller 1 toward the right side. REPLACEMENT OF PARTS 7 To attach the new Pick rollers, place Pick roller 1 from the right side above the bearing for Pick roller 1. Put the shaft of Pick roller 1 into the bearing.
NOTE Pick roller 1 has a groove in its rubber. NOTE Make sure that the shaft is securely fixed to the bearings. 3-7 Then, slide Pick roller 1 toward the right side. REPLACEMENT OF PARTS 7 To attach the new Pick rollers, place Pick roller 1 from the right side above the bearing for Pick roller 1. Put the shaft of Pick roller 1 into the bearing.

Cleaning & Maintenance
Page 38
Then slide the Pick roller 2 toward right side. 8 Attach Pick roller 2, in the same way as Pick roller 1 as shown in step 7 . NOTE Make sure that the shaft is securely fixed to the bearings. 3-8
Then slide the Pick roller 2 toward right side. 8 Attach Pick roller 2, in the same way as Pick roller 1 as shown in step 7 . NOTE Make sure that the shaft is securely fixed to the bearings. 3-8

Cleaning & Maintenance
Page 39
Stopper REPLACEMENT OF PARTS Operating Position 3-9 9 Turn the stopper clockwise to secure the Pick rollers.
Stopper REPLACEMENT OF PARTS Operating Position 3-9 9 Turn the stopper clockwise to secure the Pick rollers.

Cleaning & Maintenance
Page 52
YES Clean or replace the Pad assembly. (See p. 3-2, p. 3-3) NO Contact the manufacturer's authorized service center. 4-12 Flatten the curl or use the Flatbed to read the document. YES Is the Pad assembly dirty or worn out? 9 Symptom "Please clean Pick-roller" is displayed. YES Clean the Pick roller. (See p. 2-6) NO NO Do documents meet specification described in the Operator's Guide? Is the Pick roller dirty?
YES Clean or replace the Pad assembly. (See p. 3-2, p. 3-3) NO Contact the manufacturer's authorized service center. 4-12 Flatten the curl or use the Flatbed to read the document. YES Is the Pad assembly dirty or worn out? 9 Symptom "Please clean Pick-roller" is displayed. YES Clean the Pick roller. (See p. 2-6) NO NO Do documents meet specification described in the Operator's Guide? Is the Pick roller dirty?

Cleaning & Maintenance
Page 57
Replace the Pick roller. (See p. 3-4) NO Contact the manufacturer's authorized service center. YES Clean the Pick roller. (See p. 2-6) NO YES Is the Pick roller worn out? TROUBLESHOOTING 4-17 Is the Pick roller dirty?
Replace the Pick roller. (See p. 3-4) NO Contact the manufacturer's authorized service center. YES Clean the Pick roller. (See p. 2-6) NO YES Is the Pick roller worn out? TROUBLESHOOTING 4-17 Is the Pick roller dirty?

Operator's Guide
Page 8
CAUTION CAUTION indicates that damage to help you perform a procedure correctly. Conventions Important information that requires special attention is indicated as in the part name "Pick roller". Official Fujitsu part names are indicated with an initial capital letter, as follows: WARNING WARNING indicates that personal injury like pinching of fingers or hands may result if you do not follow a procedure correctly. NOTICE A NOTICE provides "how-to" tips or suggestions to the scanner may result if you do not follow a procedure correctly. vi
CAUTION CAUTION indicates that damage to help you perform a procedure correctly. Conventions Important information that requires special attention is indicated as in the part name "Pick roller". Official Fujitsu part names are indicated with an initial capital letter, as follows: WARNING WARNING indicates that personal injury like pinching of fingers or hands may result if you do not follow a procedure correctly. NOTICE A NOTICE provides "how-to" tips or suggestions to the scanner may result if you do not follow a procedure correctly. vi


