

Cleaning & Maintenance
Page 8
CONTENTS CHAPTER 1 DESCRIPTION 1-1 Units 1-2 Assemblies 1-4 Operator panel 1-5 Panel Display 1-6 CHAPTER 2 CLEANING 2-1 Cleaning Supplies and Areas Requiring Cleaning .......... 2-2 Supplies 2-2 Areas Requiring Cleaning 2-3 Cleaning the ADF 2-4 Cleaning the Flatbed 2-10 CHAPTER 3 REPLACEMENT OF PARTS 3-1 Pad Assembly 3-2 Pick Roller 3-4 CHAPTER 4 TROUBLESHOOTING 4-1 Clearing Paper Jams 4-2 Initial Checks 4-3 Problem Checklist 4-20 vii
CONTENTS CHAPTER 1 DESCRIPTION 1-1 Units 1-2 Assemblies 1-4 Operator panel 1-5 Panel Display 1-6 CHAPTER 2 CLEANING 2-1 Cleaning Supplies and Areas Requiring Cleaning .......... 2-2 Supplies 2-2 Areas Requiring Cleaning 2-3 Cleaning the ADF 2-4 Cleaning the Flatbed 2-10 CHAPTER 3 REPLACEMENT OF PARTS 3-1 Pad Assembly 3-2 Pick Roller 3-4 CHAPTER 4 TROUBLESHOOTING 4-1 Clearing Paper Jams 4-2 Initial Checks 4-3 Problem Checklist 4-20 vii

Cleaning & Maintenance
Page 9
CHAPTER 1 CHAPTER 2 CHAPTER 3 CHAPTER 4 DESCRIPTION CLEANING REPLACEMENT OF PARTS TROUBLESHOOTING TROUBLESHOOTING REPLACEMENT OF PARTS CLEANING D DEESSCCRRIIPTPITOINON
CHAPTER 1 CHAPTER 2 CHAPTER 3 CHAPTER 4 DESCRIPTION CLEANING REPLACEMENT OF PARTS TROUBLESHOOTING TROUBLESHOOTING REPLACEMENT OF PARTS CLEANING D DEESSCCRRIIPTPITOINON

Cleaning & Maintenance
Page 16
... sheets. Abrasion counter Abrasion counter counts the accumulated number of sheets that have been scanned in Chapter 6. How to check the cleaning cycle or parts replacement cycle. The counter is scanned.
... sheets. Abrasion counter Abrasion counter counts the accumulated number of sheets that have been scanned in Chapter 6. How to check the cleaning cycle or parts replacement cycle. The counter is scanned.
Cleaning & Maintenance
Page 20
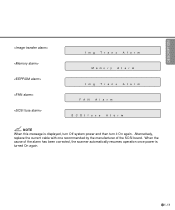
DESCRIPTION NOTE When this message is turned On again. 1-11 When the cause of the SCSI board. Alternatively, replace the current cable with one recommended by the manufacturer of the alarm has been corrected, the scanner automatically resumes operation once power is displayed, turn Off system power and then turn it On again.
DESCRIPTION NOTE When this message is turned On again. 1-11 When the cause of the SCSI board. Alternatively, replace the current cable with one recommended by the manufacturer of the alarm has been corrected, the scanner automatically resumes operation once power is displayed, turn Off system power and then turn it On again.

Cleaning & Maintenance
Page 31
Pad Assembly Pick Roller 3-1 CHAPTER 3 REPLACEMENT OF PARTS This chapter describes how to replace the pad assembly and the pick roller.
Pad Assembly Pick Roller 3-1 CHAPTER 3 REPLACEMENT OF PARTS This chapter describes how to replace the pad assembly and the pick roller.

Cleaning & Maintenance
Page 32
The life span may be decreased by as much as half when carbonless paper is about 100,000 sheets or one year. Pick Arm 1 Pull the ADF lever to estimate when the Pad assembly needs replacement. Use the Abrasion counter on the Operator panel to open the ADF. 2 Push the Pick Arm carefully. 3-2 WARNING Turn off the power before replacing the Pad Assembly. Pad Assembly ADF lever Pad ASY (PA03951-0151) NOTE The life span of the pad assembly is read frequently.
The life span may be decreased by as much as half when carbonless paper is about 100,000 sheets or one year. Pick Arm 1 Pull the ADF lever to estimate when the Pad assembly needs replacement. Use the Abrasion counter on the Operator panel to open the ADF. 2 Push the Pick Arm carefully. 3-2 WARNING Turn off the power before replacing the Pad Assembly. Pad Assembly ADF lever Pad ASY (PA03951-0151) NOTE The life span of the pad assembly is read frequently.

Cleaning & Maintenance
Page 33
CAUTION Don't hold the sensor arm with the Pad assembly. REPLACEMENT OF PARTS 3 Slide the Pad Assembly to hook the Pad spring, remove the Pad Assembly. Then, being careful not to the left photo. NOTE Hold both ends of the Pad assembly as shown in the reverse sequence of step 3. NOTE Fit the Pad assembly pin into the larger hole, then slide it stops. 5 Close the ADF. 3-3 Pad assembly 4 Attach the Pad Assembly to the right until it to the ADF in the left and pull it towards you.
CAUTION Don't hold the sensor arm with the Pad assembly. REPLACEMENT OF PARTS 3 Slide the Pad Assembly to hook the Pad spring, remove the Pad Assembly. Then, being careful not to the left photo. NOTE Hold both ends of the Pad assembly as shown in the reverse sequence of step 3. NOTE Fit the Pad assembly pin into the larger hole, then slide it stops. 5 Close the ADF. 3-3 Pad assembly 4 Attach the Pad Assembly to the right until it to the ADF in the left and pull it towards you.

Cleaning & Maintenance
Page 34
NOTE Use a Phillips screwdriver if they are included) NOTE The life span of the Pick roller is about 200, 000 sheets or one year. WARNING Turn off the power before replacing the Pick Rollers. 1 Pull the ADF lever to estimate when the Pick roller needs replacement. Thumb screws 3-4 Use the Abrasion counter on the operator panel to open the ADF. 2 Remove the two Thumb screws. Pick Roller Pick rollers (PA03951-0153) (Two rollers are tight. The life span may be decreased by as much as half when carbonless sheets are frequently read.
NOTE Use a Phillips screwdriver if they are included) NOTE The life span of the Pick roller is about 200, 000 sheets or one year. WARNING Turn off the power before replacing the Pick Rollers. 1 Pull the ADF lever to estimate when the Pick roller needs replacement. Thumb screws 3-4 Use the Abrasion counter on the operator panel to open the ADF. 2 Remove the two Thumb screws. Pick Roller Pick rollers (PA03951-0153) (Two rollers are tight. The life span may be decreased by as much as half when carbonless sheets are frequently read.

Cleaning & Maintenance
Page 35
Stopper Pick roller 2 Pick roller 1 REPLACEMENT OF PARTS Position for Replacement 3-5 3 With both hands, lift up Guide A and disengage its tip from the right hole. Then lift the right side of the cover and remove it. 4 To remove the Pick rollers, turn the stopper counterclockwise.
Stopper Pick roller 2 Pick roller 1 REPLACEMENT OF PARTS Position for Replacement 3-5 3 With both hands, lift up Guide A and disengage its tip from the right hole. Then lift the right side of the cover and remove it. 4 To remove the Pick rollers, turn the stopper counterclockwise.

Cleaning & Maintenance
Page 37
Put the shaft of Pick roller 1 into the bearing. Then, slide Pick roller 1 toward the right side. NOTE Make sure that the shaft is securely fixed to the bearings. 3-7 REPLACEMENT OF PARTS 7 To attach the new Pick rollers, place Pick roller 1 from the right side above the bearing for Pick roller 1. NOTE Pick roller 1 has a groove in its rubber.
Put the shaft of Pick roller 1 into the bearing. Then, slide Pick roller 1 toward the right side. NOTE Make sure that the shaft is securely fixed to the bearings. 3-7 REPLACEMENT OF PARTS 7 To attach the new Pick rollers, place Pick roller 1 from the right side above the bearing for Pick roller 1. NOTE Pick roller 1 has a groove in its rubber.

Cleaning & Maintenance
Page 39
Stopper REPLACEMENT OF PARTS Operating Position 3-9 9 Turn the stopper clockwise to secure the Pick rollers.
Stopper REPLACEMENT OF PARTS Operating Position 3-9 9 Turn the stopper clockwise to secure the Pick rollers.

Cleaning & Maintenance
Page 52
YES Clean the Pick roller. (See p. 2-6) NO NO Do documents meet specification described in the Operator's Guide? YES Is the Pad assembly dirty or worn out? Is the Pick roller dirty? YES Clean or replace the Pad assembly. (See p. 3-2, p. 3-3) NO Contact the manufacturer's authorized service center. 4-12 9 Symptom "Please clean Pick-roller" is displayed. Flatten the curl or use the Flatbed to read the document.
YES Clean the Pick roller. (See p. 2-6) NO NO Do documents meet specification described in the Operator's Guide? YES Is the Pad assembly dirty or worn out? Is the Pick roller dirty? YES Clean or replace the Pad assembly. (See p. 3-2, p. 3-3) NO Contact the manufacturer's authorized service center. 4-12 9 Symptom "Please clean Pick-roller" is displayed. Flatten the curl or use the Flatbed to read the document.

Cleaning & Maintenance
Page 55
YES Replace the Pad assembly. (See p. 3-2) NO Contact the manufacturer's authorized service center. 4-15 YES Is the Pad dirty? YES Clean the Pad assembly. (See p. 2-4) NO Is the Pad worn out? Reduce the batch size of the documents. TROUBLESHOOTING NO Is the document stack less than 0.32" (8mm) in height?
YES Replace the Pad assembly. (See p. 3-2) NO Contact the manufacturer's authorized service center. 4-15 YES Is the Pad dirty? YES Clean the Pad assembly. (See p. 2-4) NO Is the Pad worn out? Reduce the batch size of the documents. TROUBLESHOOTING NO Is the document stack less than 0.32" (8mm) in height?

Cleaning & Maintenance
Page 57
Replace the Pick roller. (See p. 3-4) NO Contact the manufacturer's authorized service center. Is the Pick roller dirty? TROUBLESHOOTING 4-17 YES Clean the Pick roller. (See p. 2-6) NO YES Is the Pick roller worn out?
Replace the Pick roller. (See p. 3-4) NO Contact the manufacturer's authorized service center. Is the Pick roller dirty? TROUBLESHOOTING 4-17 YES Clean the Pick roller. (See p. 2-6) NO YES Is the Pick roller worn out?

Cleaning & Maintenance
Page 60
... by facsimile or by the double line. The revision is indicated by mail? (Example) M4097D (Example) CA02956-2300 (Example) 00002 (Example) 2000-2 The revision is your daily usage? Date of last cleaning. Date of the consumable replacement. Image error Interface controller model Software/application name Can you send the original and output...
... by facsimile or by the double line. The revision is indicated by mail? (Example) M4097D (Example) CA02956-2300 (Example) 00002 (Example) 2000-2 The revision is your daily usage? Date of last cleaning. Date of the consumable replacement. Image error Interface controller model Software/application name Can you send the original and output...

Operator's Guide
Page 7
... contains chapters on the following topics: COMPONENTS INSTALLATION AND CONNECTIONS OPERATING INSTRUCTIONS ADF DOCUMENT SPECIFICATIONS SCANNER SPECFICATIONS SETUP MODE It also contains a Glossary of the M4097D. Refer to use the M4097D image scanner. This manual contains chapters on OPERATING INSTRUCTIONS, CLEANING, REPLACEMENT OF PARTS, ADJUSTMENT and TROUBLESHOOTING. Preface This manual explains how to Cleaning...
... contains chapters on the following topics: COMPONENTS INSTALLATION AND CONNECTIONS OPERATING INSTRUCTIONS ADF DOCUMENT SPECIFICATIONS SCANNER SPECFICATIONS SETUP MODE It also contains a Glossary of the M4097D. Refer to use the M4097D image scanner. This manual contains chapters on OPERATING INSTRUCTIONS, CLEANING, REPLACEMENT OF PARTS, ADJUSTMENT and TROUBLESHOOTING. Preface This manual explains how to Cleaning...

Operator's Guide
Page 19
... every 10 sheets. When the button is pressed This counter increments each time a document is displayed. 1-7 How to check the cleaning cycle or the parts replacement cycle. It is useful to reset it is detected. NOTICE When the counter value is 0, no number is scanned. The counter can be used for...
... every 10 sheets. When the button is pressed This counter increments each time a document is displayed. 1-7 How to check the cleaning cycle or the parts replacement cycle. It is useful to reset it is detected. NOTICE When the counter value is 0, no number is scanned. The counter can be used for...

Operator's Guide
Page 52
... Maintenance" manual. CAUTION As there is always a possibility that damages the Pad and Pick roller. The leading edge of all documents fed using the ADF, important original documents should be straightened so the curl of the paper meets the specifications shown below: More than 30 mm Less than 3 mm Top... of parts: If misspicks occur frequently, clean the Pad and Pick roller in flatbed mode. NOTICES 1. Therefore, note the following: Cleaning: Replacement of the paper Feed direction Read surface More than 30 mm Less than if PPC paper documents are fed. 3.
... Maintenance" manual. CAUTION As there is always a possibility that damages the Pad and Pick roller. The leading edge of all documents fed using the ADF, important original documents should be straightened so the curl of the paper meets the specifications shown below: More than 30 mm Less than 3 mm Top... of parts: If misspicks occur frequently, clean the Pad and Pick roller in flatbed mode. NOTICES 1. Therefore, note the following: Cleaning: Replacement of the paper Feed direction Read surface More than 30 mm Less than if PPC paper documents are fed. 3.
Operator's Guide
Page 64
If they are included.) NOTICE Refer to the M4097D Image Scanner Cleaning and Maintenance manual for replacing the consumables. CAUTION Certain paper types or conditions might reduce the life of documents scanned since the last replacement(s). Up to 200,000 sheets or one year. Be sure to keep some consumables in the "Cleaning and...
If they are included.) NOTICE Refer to the M4097D Image Scanner Cleaning and Maintenance manual for replacing the consumables. CAUTION Certain paper types or conditions might reduce the life of documents scanned since the last replacement(s). Up to 200,000 sheets or one year. Be sure to keep some consumables in the "Cleaning and...
Operator's Guide
Page 87
...between text and photos, and chooses the threshold accordingly. Paper size is 74 x 105 mm. The counter should be reset when these consumables are replaced. Automatic start mode ( manual start mode) In this mode, the reading operation is 210 x 297 mm. GL-1 A5 size A standard paper... size. Automatic separation allows the scanner to indicate when belts/rollers should be replaced. Paper size is activated only by issuing the the START command. A7 size A standard paper size. A6 size A standard paper size. A8 ...
...between text and photos, and chooses the threshold accordingly. Paper size is 74 x 105 mm. The counter should be reset when these consumables are replaced. Automatic start mode ( manual start mode) In this mode, the reading operation is 210 x 297 mm. GL-1 A5 size A standard paper... size. Automatic separation allows the scanner to indicate when belts/rollers should be replaced. Paper size is activated only by issuing the the START command. A7 size A standard paper size. A6 size A standard paper size. A8 ...


