
User Guide
Page 23
... up while the Fujitsu logo is booting up takes you into BIOS setup. The table below indicates how the buttons act while the system is transferred to the operating system to move right. EMail Button Orientation Button Pressing the Orientation button while the BIOS setup screen is open... your installed operating system from disk. Enter Button Function Button Pressing the Fn button while the system is also functional in the BIOS setup screen to move up. Pressing the top half of Application and Navigation Buttons 13 This feature is displaying the operating system boot...
... up while the Fujitsu logo is booting up takes you into BIOS setup. The table below indicates how the buttons act while the system is transferred to the operating system to move right. EMail Button Orientation Button Pressing the Orientation button while the BIOS setup screen is open... your installed operating system from disk. Enter Button Function Button Pressing the Fn button while the system is also functional in the BIOS setup screen to move up. Pressing the top half of Application and Navigation Buttons 13 This feature is displaying the operating system boot...

User Guide
Page 31
... LAN function is shut down. POINT If you should not remove the battery unless the system is enabled in order to -RAM mode. Using Your Stylistic ST4000 To suspend system operation: 1. The Power icon either install a charged battery, or connect an appropriate external power source such as described here. (In...there is no danger of the Suspend/Resume button may be using . • Power icon is in Suspend-to-RAM or Hibernate modes in the BIOS setup, you will not be disabled to -RAM or Hibernate). In this case, suspend mode can remove the battery while the system is blinking: ...
... LAN function is shut down. POINT If you should not remove the battery unless the system is enabled in order to -RAM mode. Using Your Stylistic ST4000 To suspend system operation: 1. The Power icon either install a charged battery, or connect an appropriate external power source such as described here. (In...there is no danger of the Suspend/Resume button may be using . • Power icon is in Suspend-to-RAM or Hibernate modes in the BIOS setup, you will not be disabled to -RAM or Hibernate). In this case, suspend mode can remove the battery while the system is blinking: ...
User Guide
Page 35
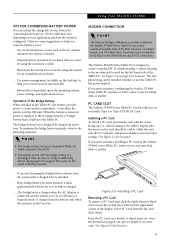
...2-5. Installing a PC Card Removing a PC Card To remove a PC Card, first click the Safely Remove Hardware icon in the system tray in the Stylistic ST4000 Series Tablet PC has actual maximum transfer rates of the display. To maintain the bridge battery properly, observe the following measures: POINT • The...know that you won 't be fully recharged. • The bridge battery charges when the AC Adapter is connected and the system is enabled in the BIOS. • The system arrives with the arrow facing up (i.e., when looking at the tablet's display side, the arrow on page 5 for location)...
...2-5. Installing a PC Card Removing a PC Card To remove a PC Card, first click the Safely Remove Hardware icon in the system tray in the Stylistic ST4000 Series Tablet PC has actual maximum transfer rates of the display. To maintain the bridge battery properly, observe the following measures: POINT • The...know that you won 't be fully recharged. • The bridge battery charges when the AC Adapter is connected and the system is enabled in the BIOS. • The system arrives with the arrow facing up (i.e., when looking at the tablet's display side, the arrow on page 5 for location)...
User Guide
Page 36
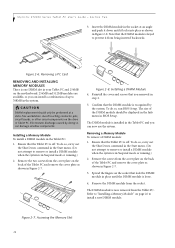
... Tablet PC: 1. Electrostatic discharge caused by the system. Confirm that lock the DIMM module in Figure 2-7. Stylistic ST4000 Series Tablet PC User's Guide - Remove the screws from being inserted backwards. Refer to 768MB in BIOS Setup. The size of up to "Installing a Memory Module" on the back of the Tablet PC and... the cover plate on page 26 to remove or install a DIMM module when the system is now removed from the socket. To do so, run BIOS Setup. To do so, carry out the Shut Down command in the Start menu. (Do not attempt to install a new DIMM module.
... Tablet PC: 1. Electrostatic discharge caused by the system. Confirm that lock the DIMM module in Figure 2-7. Stylistic ST4000 Series Tablet PC User's Guide - Remove the screws from being inserted backwards. Refer to 768MB in BIOS Setup. The size of up to "Installing a Memory Module" on the back of the Tablet PC and... the cover plate on page 26 to remove or install a DIMM module when the system is now removed from the socket. To do so, run BIOS Setup. To do so, carry out the Shut Down command in the Start menu. (Do not attempt to install a new DIMM module.
User Guide
Page 41
... proper tab, and increase the volume using headphones) is set to be adjusted from the menu. • Ensure the mute box in the BIOS. Configuring Peripheral Interfaces Certain peripheral devices can be working with your audio software is enabled. If the system doesn't respond to open the Control ...to a keyboard, the application or system may have crashed, and it responds to a pen, contact your local help desk or reseller, or call Fujitsu Service and Support at 1-800-8Fujitsu (1-800-838-5487) if you aren't getting any volume control in your peripheral device, ensure that it is ...
... proper tab, and increase the volume using headphones) is set to be adjusted from the menu. • Ensure the mute box in the BIOS. Configuring Peripheral Interfaces Certain peripheral devices can be working with your audio software is enabled. If the system doesn't respond to open the Control ...to a keyboard, the application or system may have crashed, and it responds to a pen, contact your local help desk or reseller, or call Fujitsu Service and Support at 1-800-8Fujitsu (1-800-838-5487) if you aren't getting any volume control in your peripheral device, ensure that it is ...

User Guide
Page 45
... 3.2 lbs. (1.45 Kg) Processing Specifications CPU Ultra low voltage Mobile Intel® Pentium® III processor - System Specifications Stylistic ST4000 Series Hardware Specifications The following table provides general hardware specifications of memory (48MB max.) for optimal graphics and system performance. ...M with SpeedStep® technology* Chip set Intel 830MG - 133 MHz Processor Speed 800 MHz* Memory/Storage Specifications Main RAM • 256MB SDRAM (on -die BIOS ROM 1 MB (FWH) Hard disk drive Display • 2.5" HDD • Minimum...
... 3.2 lbs. (1.45 Kg) Processing Specifications CPU Ultra low voltage Mobile Intel® Pentium® III processor - System Specifications Stylistic ST4000 Series Hardware Specifications The following table provides general hardware specifications of memory (48MB max.) for optimal graphics and system performance. ...M with SpeedStep® technology* Chip set Intel 830MG - 133 MHz Processor Speed 800 MHz* Memory/Storage Specifications Main RAM • 256MB SDRAM (on -die BIOS ROM 1 MB (FWH) Hard disk drive Display • 2.5" HDD • Minimum...
User Guide
Page 71
...installing 24 will not begin charging 24 battery power conserving 25 used in suspend-to-RAM mode 21 battery release latch 4, 15 BIOS 13 application buttons, for 13 bridge battery 25 built-in microphone 3 C calibrating the pen 23 care and maintenance 29 charge/DC...DC input connector 14 DC power connector 6 DIMM card, removing 26 display screen is blank 30 screen, cleaning 30 E external monitor connector 6 F Fujitsu contact information v Fujitsu online v H hard disk drive access icon 9 HDD cover 4 headphone 5 headphone jack 14 Hibernate (Save-to-Disk) mode 21, 22 Hibernate ...
...installing 24 will not begin charging 24 battery power conserving 25 used in suspend-to-RAM mode 21 battery release latch 4, 15 BIOS 13 application buttons, for 13 bridge battery 25 built-in microphone 3 C calibrating the pen 23 care and maintenance 29 charge/DC...DC input connector 14 DC power connector 6 DIMM card, removing 26 display screen is blank 30 screen, cleaning 30 E external monitor connector 6 F Fujitsu contact information v Fujitsu online v H hard disk drive access icon 9 HDD cover 4 headphone 5 headphone jack 14 Hibernate (Save-to-Disk) mode 21, 22 Hibernate ...


