User Manual
Page 1
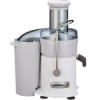
Model and attachments are subject to change GASTROBACK® INSTRUCTIONS FOR USE AND RECIPES DESIGN JUICER BASIC Art.-Nr. 40119 DESIGN JUICER BASIC Read all provided instructions before first usage!
Model and attachments are subject to change GASTROBACK® INSTRUCTIONS FOR USE AND RECIPES DESIGN JUICER BASIC Art.-Nr. 40119 DESIGN JUICER BASIC Read all provided instructions before first usage!
User Manual
Page 2
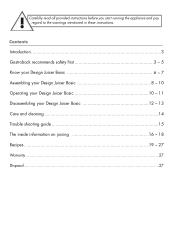
Contents Introduction ...3 Gastroback recommends safety first 3 - 5 Know your Design Juicer Basic 6 - 7 Assembling your Design Juicer Basic 8 - 10 Operating your Design Juicer Basic 10 - 11 Disassembling your Design Juicer Basic 12 - 13 Care and cleaning 14 Trouble shooting guide 15 The inside information on juicing 16 - 18 Recipes 19 - 27 Warranty ...27 Disposal...27 ! Carefully read all provided instructions before you start running the appliance and pay regard to the warnings mentioned in these instructions.
Contents Introduction ...3 Gastroback recommends safety first 3 - 5 Know your Design Juicer Basic 6 - 7 Assembling your Design Juicer Basic 8 - 10 Operating your Design Juicer Basic 10 - 11 Disassembling your Design Juicer Basic 12 - 13 Care and cleaning 14 Trouble shooting guide 15 The inside information on juicing 16 - 18 Recipes 19 - 27 Warranty ...27 Disposal...27 ! Carefully read all provided instructions before you start running the appliance and pay regard to the warnings mentioned in these instructions.
User Manual
Page 8
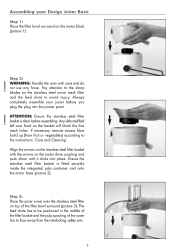
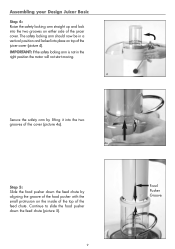
...: Ensure the stainless steel filter basket is fitted securely inside the integrated pulp container and onto the motor base (picture 2). Assembling your juicer before assembling. Pay attention to the sharp blades on the stainless steel micro mesh filter and the feed chute to the instructions ´... positioned in the middle of the filter basket and the pulp spouting of the filter bowl surround (picture 3). Always completely assemble your Design Juicer Basic Step 1: Place the filter bowl surround on top of the cover has to face away from fruit or vegetables) according to avoid ...
...: Ensure the stainless steel filter basket is fitted securely inside the integrated pulp container and onto the motor base (picture 2). Assembling your juicer before assembling. Pay attention to the sharp blades on the stainless steel micro mesh filter and the feed chute to the instructions ´... positioned in the middle of the filter basket and the pulp spouting of the filter bowl surround (picture 3). Always completely assemble your Design Juicer Basic Step 1: Place the filter bowl surround on top of the cover has to face away from fruit or vegetables) according to avoid ...
User Manual
Page 9
... to slide the food pusher down the feed chute by aligning the groove of the food pusher with the small protrusion on top of the juicer cover (picture 4). The safety locking arm should now be in the right position the motor will not start moving. 4 Secure the safety arm by lifting... into the two grooves of the cover (picture 4a). 4a Step 5: Slide the food pusher down the feed chute (picture 5). 5 9 Food Pusher Groove Assembling your Design Juicer Basic Step 4: Raise the safety locking arm straight up and lock into place on the inside of the top of the feed chute.
... to slide the food pusher down the feed chute by aligning the groove of the food pusher with the small protrusion on top of the juicer cover (picture 4). The safety locking arm should now be in the right position the motor will not start moving. 4 Secure the safety arm by lifting... into the two grooves of the cover (picture 4a). 4a Step 5: Slide the food pusher down the feed chute (picture 5). 5 9 Food Pusher Groove Assembling your Design Juicer Basic Step 4: Raise the safety locking arm straight up and lock into place on the inside of the top of the feed chute.

User Manual
Page 10
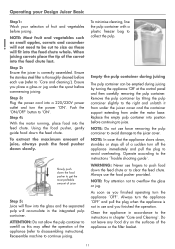
... the appliance to stop moving before putting the plug into the power point. Operate according to collect the pulp. Assembling your Design Juicer Basic WARNING: Make sure the appliance is supported by the container support extending from under the motor base (picture 6). Step 6: ...the instructions ´Trouble shooting guide`. 10 The juice nozzle will prevent splatter, ensuring mess free juicing (picture 7). 7 Operating your Design Juicer Basic Slide the food pusher all the way down the feed chute (picture 5a). Keep the working place clean and dry. Always turn...
... the appliance to stop moving before putting the plug into the power point. Operate according to collect the pulp. Assembling your Design Juicer Basic WARNING: Make sure the appliance is supported by the container support extending from under the motor base (picture 6). Step 6: ...the instructions ´Trouble shooting guide`. 10 The juice nozzle will prevent splatter, ensuring mess free juicing (picture 7). 7 Operating your Design Juicer Basic Slide the food pusher all the way down the feed chute (picture 5a). Keep the working place clean and dry. Always turn...
User Manual
Page 11
... place a glass or jug under the motor base. Replace the empty pulp container into position before commencing juicing. Step 2: Ensure the juicer is not in chapter 'Care and Cleaning`. Ensure the stainless steel filter is thoroughly cleaned before juicing. Step 4: With the motor running...appliance slows down, stumbles or stops all of a sudden turn the appliance ´OFF`. Operate according to avoid overheating. Operating your Design Juicer Basic Step1: Wash your selection of fruit and vegetables before each use force removing the pulp container to avoid damage to collect the pulp....
... place a glass or jug under the motor base. Replace the empty pulp container into position before commencing juicing. Step 2: Ensure the juicer is not in chapter 'Care and Cleaning`. Ensure the stainless steel filter is thoroughly cleaned before juicing. Step 4: With the motor running...appliance slows down, stumbles or stops all of a sudden turn the appliance ´OFF`. Operate according to avoid overheating. Operating your Design Juicer Basic Step1: Wash your selection of fruit and vegetables before each use force removing the pulp container to avoid damage to collect the pulp....
User Manual
Page 12
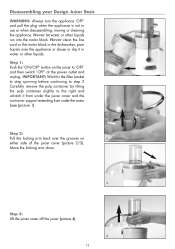
...from under the motor base (picture 1). Move the locking arm down. 3 Step 3: Lift the juicer cover off the juicer (picture 4). 4 12 Never let water or other liquids. Disassembling your Design Juicer Basic WARNING: Always turn the appliance 'OFF' and pull the plug when the appliance is not in ...the dishwasher, poor liquids over the grooves on the juicer to the right and unlatch it in water or other...
...from under the motor base (picture 1). Move the locking arm down. 3 Step 3: Lift the juicer cover off the juicer (picture 4). 4 12 Never let water or other liquids. Disassembling your Design Juicer Basic WARNING: Always turn the appliance 'OFF' and pull the plug when the appliance is not in ...the dishwasher, poor liquids over the grooves on the juicer to the right and unlatch it in water or other...
User Manual
Page 13
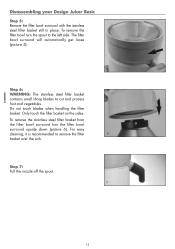
... filter basket. For easy cleaning, it is recommended to cut and process fruit and vegetables. Step 7: Pull the nozzle off the spout. 7 13 Disassembling your Design Juicer Basic Step 5: Remove the filter bowl surround with the stainless steel filter basket still in place. To remove the stainless steel filter basket from the filter...
... filter basket. For easy cleaning, it is recommended to cut and process fruit and vegetables. Step 7: Pull the nozzle off the spout. 7 13 Disassembling your Design Juicer Basic Step 5: Remove the filter bowl surround with the stainless steel filter basket still in place. To remove the stainless steel filter basket from the filter...

User Manual
Page 14
... dry them with clear water and he provided nylon brush. Always assemble the appliance completely before storing. WARNING: Please store the juicer in hot soapy water for approximately 10 minutes immediately after each use water jet to avoid discolouration: Clean as compost for glasses ...Never clean the appliance or units with a plastic freezer bag to loosen the blocked holes. Allow parts to ´Disassembling your Design Juicer Basic`. Ensure the juicer is switched off at the power outlet. IMPORTANT: Soak the stainless steel filter basket in a frost-free, clean and dry ...
... dry them with clear water and he provided nylon brush. Always assemble the appliance completely before storing. WARNING: Please store the juicer in hot soapy water for approximately 10 minutes immediately after each use water jet to avoid discolouration: Clean as compost for glasses ...Never clean the appliance or units with a plastic freezer bag to loosen the blocked holes. Allow parts to ´Disassembling your Design Juicer Basic`. Ensure the juicer is switched off at the power outlet. IMPORTANT: Soak the stainless steel filter basket in a frost-free, clean and dry ...
User Manual
Page 15
... Avoid overloading pulp in the pulp container. The pulp has to stall when juicing Excess pulp building up in a solution of the juicer cover (regard ´Assembling the appliance)`. Stop the juicing process. Remove stainless steel filter basket and thoroughly clean mesh walls with a... with the locking arm located into position. Try a slower juicing action by pushing the food pusher down more slowly. Disassemble the Design Juicer Basic (refer to ´Care and Cleaning`. Refer to ´disassembling`). Disassemble the appliance according to the instruction ´Care and ...
... Avoid overloading pulp in the pulp container. The pulp has to stall when juicing Excess pulp building up in a solution of the juicer cover (regard ´Assembling the appliance)`. Stop the juicing process. Remove stainless steel filter basket and thoroughly clean mesh walls with a... with the locking arm located into position. Try a slower juicing action by pushing the food pusher down more slowly. Disassemble the Design Juicer Basic (refer to ´Care and Cleaning`. Refer to ´disassembling`). Disassemble the appliance according to the instruction ´Care and ...