
User Guide
Page 3
... Your Gateway Flat-panel Monitor 1 Connecting the monitor 2 Setting up the optional stand 4 Attaching the USB stand 4 Adjusting monitor height tension 7 Adjusting monitor tilt tension 8 Connecting the USB hub 9 Setting up the optional speaker bar 10 Installing the speaker bar 10 Starting the monitor 11 Adjusting monitor settings 12 Monitor buttons 12 On-screen display...
... Your Gateway Flat-panel Monitor 1 Connecting the monitor 2 Setting up the optional stand 4 Attaching the USB stand 4 Adjusting monitor height tension 7 Adjusting monitor tilt tension 8 Connecting the USB hub 9 Setting up the optional speaker bar 10 Installing the speaker bar 10 Starting the monitor 11 Adjusting monitor settings 12 Monitor buttons 12 On-screen display...
User Guide
Page 6
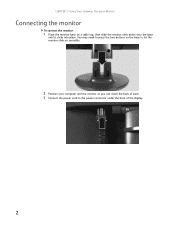
CHAPTER 1: Using Your Gateway Flat-panel Monitor Connecting the monitor To connect the monitor: 1 Place the monitor base on smoothly. 2 Position your computer and the monitor so you can reach the back of each. 3 Connect the power cord to let the monitor slide on a table top, then slide the monitor neck down onto the base until it clicks into place. You may need to press the two buttons on the base to the power connector under the back of the display. 2
CHAPTER 1: Using Your Gateway Flat-panel Monitor Connecting the monitor To connect the monitor: 1 Place the monitor base on smoothly. 2 Position your computer and the monitor so you can reach the back of each. 3 Connect the power cord to let the monitor slide on a table top, then slide the monitor neck down onto the base until it clicks into place. You may need to press the two buttons on the base to the power connector under the back of the display. 2
User Guide
Page 15
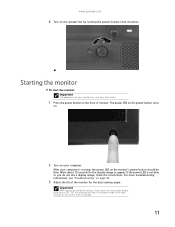
... on your monitor may vary from that shown. 1 Press the power button on the speaker bar by rotating the power/volume knob clockwise. www.gateway.com 6 Turn on the front of monitor. This will automatically adjust the display image to the ideal settings for the display image to appear. Important When adjusting the monitor settings, always...
... on your monitor may vary from that shown. 1 Press the power button on the speaker bar by rotating the power/volume knob clockwise. www.gateway.com 6 Turn on the front of monitor. This will automatically adjust the display image to the ideal settings for the display image to appear. Important When adjusting the monitor settings, always...
User Guide
Page 18
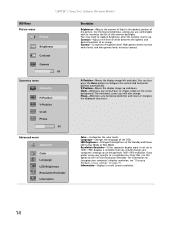
...comfortable with to Day Mode or Nite Mode. For information on changing your computer's display resolution, see "Changing Windows screen settings" on the screen background. CHAPTER 1: Using Your Gateway Flat-panel Monitor OSD Menu Picture menu Picture Brightness Contrast Gamma 80 Geometry menu Geometry H-Position ...distortion and clears or sharpens the displayed characters. Language-Changes the language of the Standby and Power LED to maximize the life of the monitor backlights. Gamma-Customizes the gamma level. You can also press the Auto button to readjust brightness after the monitor...
...comfortable with to Day Mode or Nite Mode. For information on changing your computer's display resolution, see "Changing Windows screen settings" on the screen background. CHAPTER 1: Using Your Gateway Flat-panel Monitor OSD Menu Picture menu Picture Brightness Contrast Gamma 80 Geometry menu Geometry H-Position ...distortion and clears or sharpens the displayed characters. Language-Changes the language of the Standby and Power LED to maximize the life of the monitor backlights. Gamma-Customizes the gamma level. You can also press the Auto button to readjust brightness after the monitor...
User Guide
Page 23
... be bent or pushed in . 19 For more information about color uniformity or brightness. For more information about connecting the video cable, see "Connecting the monitor" on page 2. • Make sure that the monitor is turned on. • If the power LED is orange: • Make... correctly, a "No Signal" message appears. www.gateway.com No power Make sure that the power cord is connected correctly to the back of the monitor and your computer. Display colors are wrong • Press the Auto button to automatically adjust the display image to the ideal settings. • Restart your...
... be bent or pushed in . 19 For more information about color uniformity or brightness. For more information about connecting the video cable, see "Connecting the monitor" on page 2. • Make sure that the monitor is turned on. • If the power LED is orange: • Make... correctly, a "No Signal" message appears. www.gateway.com No power Make sure that the power cord is connected correctly to the back of the monitor and your computer. Display colors are wrong • Press the Auto button to automatically adjust the display image to the ideal settings. • Restart your...
User Guide
Page 24
...of pixels affected. CHAPTER 1: Using Your Gateway Flat-panel Monitor Image is not sized or centered correctly • Press the Auto button to automatically adjust the display image to the ideal settings. • ...power indicator lights blue when power is connected and the speakers are always dark or too bright • This condition is normal and inherent in the TFT technology used in active-matrix LCD ... setting. For instructions on the number of your display, contact Gateway Customer Care to . The monitor has pixels that you set too high, the speaker bar's sound may always be distorted...
...of pixels affected. CHAPTER 1: Using Your Gateway Flat-panel Monitor Image is not sized or centered correctly • Press the Auto button to automatically adjust the display image to the ideal settings. • ...power indicator lights blue when power is connected and the speakers are always dark or too bright • This condition is normal and inherent in the TFT technology used in active-matrix LCD ... setting. For instructions on the number of your display, contact Gateway Customer Care to . The monitor has pixels that you set too high, the speaker bar's sound may always be distorted...


