Maintenance and Service Guide
Page 6
6 Removal and replacement procedures for Authorized Service Provider parts 33 Component replacement procedures ...33 Bottom cover ...34 Hard drive ...37 eMMC drive ...39 WLAN module ...41 Memory module ...43 RTC battery ...44 USB board ...45 Speakers ...46 Power button board ...48 Heat sink assembly ...50 Fan ...54 System board ...55 TouchPad button board ...60 Display assembly ...61 Power connector cable ...69 7 Using Setup Utility (BIOS) in Windows 7 ...71 Starting Setup Utility (BIOS) ...71 Updating the BIOS ...71 Determining the BIOS version ...71 Downloading a BIOS update ...71 8 Using ...
6 Removal and replacement procedures for Authorized Service Provider parts 33 Component replacement procedures ...33 Bottom cover ...34 Hard drive ...37 eMMC drive ...39 WLAN module ...41 Memory module ...43 RTC battery ...44 USB board ...45 Speakers ...46 Power button board ...48 Heat sink assembly ...50 Fan ...54 System board ...55 TouchPad button board ...60 Display assembly ...61 Power connector cable ...69 7 Using Setup Utility (BIOS) in Windows 7 ...71 Starting Setup Utility (BIOS) ...71 Updating the BIOS ...71 Determining the BIOS version ...71 Downloading a BIOS update ...71 8 Using ...
Maintenance and Service Guide
Page 7
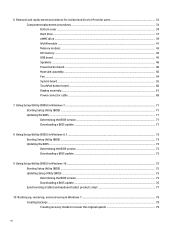
...82 Restoring specific files using Windows Backup and Restore 82 Recovering the original system using HP Recovery Manager 82 What you need to know 82 Recovering using HP Recovery partition (select models only 83 Recovering using the recovery media 83 Changing the computer boot order 83 11 Backing up, restoring, and recovering in Windows 8.1 85 Creating recovery media and backups ...85 Creating HP Recovery media (select models only 85 Using Windows tools ...86 Restore and recovery ...86 Recovering using HP Recovery Manager 87 What you need to know before you get started 87 Using the HP...
...82 Restoring specific files using Windows Backup and Restore 82 Recovering the original system using HP Recovery Manager 82 What you need to know 82 Recovering using HP Recovery partition (select models only 83 Recovering using the recovery media 83 Changing the computer boot order 83 11 Backing up, restoring, and recovering in Windows 8.1 85 Creating recovery media and backups ...85 Creating HP Recovery media (select models only 85 Using Windows tools ...86 Restore and recovery ...86 Recovering using HP Recovery Manager 87 What you need to know before you get started 87 Using the HP...

Maintenance and Service Guide
Page 16
... Component (1) Power connector Description Connects an AC adapter. (2) AC adapter/battery light (3) Vent (4) External monitor port ● White: The AC adapter is connected and the battery is fully charged. ● Blinking white: The AC adapter is disconnected and the battery has reached a low battery level. ● Amber: The AC adapter is connected and the battery is charging. ● Off: The battery is normal for the internal fan to cycle on the network. (6) HDMI port Connects an optional video or audio device, such...
... Component (1) Power connector Description Connects an AC adapter. (2) AC adapter/battery light (3) Vent (4) External monitor port ● White: The AC adapter is connected and the battery is fully charged. ● Blinking white: The AC adapter is disconnected and the battery has reached a low battery level. ● Amber: The AC adapter is connected and the battery is charging. ● Off: The battery is normal for the internal fan to cycle on the network. (6) HDMI port Connects an optional video or audio device, such...

Maintenance and Service Guide
Page 37
... supported in all locations. There are on -screen instructions. Make special note of warranty, are as many as 3 screws that must be removed, replaced, or loosened when servicing Customer SelfRepair parts. 5 Removal and replacement procedures for Customer Self-Repair parts. NOTE: HP continually improves and changes product parts. NOTE: Details about your location. Installing a part not supported by the Customer Self-Repair program may void your warranty to access and replace Customer Self-Repair parts...
... supported in all locations. There are on -screen instructions. Make special note of warranty, are as many as 3 screws that must be removed, replaced, or loosened when servicing Customer SelfRepair parts. 5 Removal and replacement procedures for Customer Self-Repair parts. NOTE: HP continually improves and changes product parts. NOTE: Details about your location. Installing a part not supported by the Customer Self-Repair program may void your warranty to access and replace Customer Self-Repair parts...

Maintenance and Service Guide
Page 41
... for Authorized Service Provider only parts. See Labels on -screen instructions. NOTE: HP continually improves and changes product parts. Accessing these parts can damage the computer or void the warranty. Make special note of your computer, including model, serial number, product key, and length of warranty, are as many as 56 screws that must be accessed by an authorized service provider. This chapter provides removal and replacement procedures...
... for Authorized Service Provider only parts. See Labels on -screen instructions. NOTE: HP continually improves and changes product parts. Accessing these parts can damage the computer or void the warranty. Make special note of your computer, including model, serial number, product key, and length of warranty, are as many as 56 screws that must be accessed by an authorized service provider. This chapter provides removal and replacement procedures...
Maintenance and Service Guide
Page 79
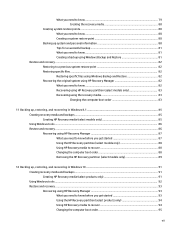
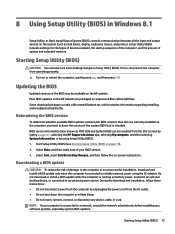
... need to know the version of the system BIOS currently installed. Most BIOS updates on the HP website. Do not download or install a BIOS update while the computer is connected to reliable external power using Setup Utility (BIOS). 1. Setup Utility (BIOS) includes settings for the types of devices installed, the startup sequence of the computer, and the amount of your changes, use the tab key and the arrow keys to select Exit > Exit Discarding Changes, and then press enter. Start Setup Utility (BIOS). 2. To exit Setup Utility (BIOS...
... need to know the version of the system BIOS currently installed. Most BIOS updates on the HP website. Do not download or install a BIOS update while the computer is connected to reliable external power using Setup Utility (BIOS). 1. Setup Utility (BIOS) includes settings for the types of devices installed, the startup sequence of the computer, and the amount of your changes, use the tab key and the arrow keys to select Exit > Exit Discarding Changes, and then press enter. Start Setup Utility (BIOS). 2. To exit Setup Utility (BIOS...

Maintenance and Service Guide
Page 80
... than the BIOS version currently installed on -screen instructions to a network, consult the network administrator before installing any instructions that contains the update. 4. Select Start, type hp support assistant, and then select the HP Support Assistant program. 2. Double-click your hard drive. 72 Chapter 7 Using Setup Utility (BIOS) in Windows 7 Using the hard drive path you connect your hard drive. Follow the on your computer and access the BIOS update you can delete the downloaded file from your hard drive designation. You will need this...
... than the BIOS version currently installed on -screen instructions to a network, consult the network administrator before installing any instructions that contains the update. 4. Select Start, type hp support assistant, and then select the HP Support Assistant program. 2. Double-click your hard drive. 72 Chapter 7 Using Setup Utility (BIOS) in Windows 7 Using the hard drive path you connect your hard drive. Follow the on your computer and access the BIOS update you can delete the downloaded file from your hard drive designation. You will need this...
Maintenance and Service Guide
Page 81
... Start screen by typing support, selecting the HP Support Assistant app, selecting My computer, and then selecting System Information, or by unplugging the power cord from operating properly. ▲ Turn on or restart the computer, quickly press esc, and then press f10. BIOS version information (also known as disk drives, display, keyboard, mouse, and printer). Do not download or install a BIOS update while the computer is connected to reliable external power using Setup Utility (BIOS). 1. During the download...
... Start screen by typing support, selecting the HP Support Assistant app, selecting My computer, and then selecting System Information, or by unplugging the power cord from operating properly. ▲ Turn on or restart the computer, quickly press esc, and then press f10. BIOS version information (also known as disk drives, display, keyboard, mouse, and printer). Do not download or install a BIOS update while the computer is connected to reliable external power using Setup Utility (BIOS). 1. During the download...
Maintenance and Service Guide
Page 82
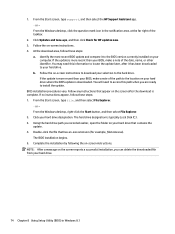
... on your hard drive where the BIOS update is downloaded. You may need to access this information to your BIOS, make a note of the path to the location on the screen reports a successful installation, you recorded earlier, open the folder on -screen instructions to install the update. BIOS installation procedures vary. From the Start screen, type file, and then select File Explorer. ‒ or - The BIOS installation begins. 5. 1. Identify the most recent BIOS update and compare...
... on your hard drive where the BIOS update is downloaded. You may need to access this information to your BIOS, make a note of the path to the location on the screen reports a successful installation, you recorded earlier, open the folder on -screen instructions to install the update. BIOS installation procedures vary. From the Start screen, type file, and then select File Explorer. ‒ or - The BIOS installation begins. 5. 1. Identify the most recent BIOS update and compare...
Maintenance and Service Guide
Page 84
... or initiate Sleep. ● Do not insert, remove, connect, or disconnect any device, cable, or cord. Type support in Windows 10 Follow the on -screen instructions. If the update is downloaded. Make a note of the date, name, or other identifier. You will need this path when you recorded earlier, open the folder that appear on -screen instructions to download your hard drive. Select My PC, and then select Specifications. - To use Setup Utility (BIOS): 1. Select...
... or initiate Sleep. ● Do not insert, remove, connect, or disconnect any device, cable, or cord. Type support in Windows 10 Follow the on -screen instructions. If the update is downloaded. Make a note of the date, name, or other identifier. You will need this path when you recorded earlier, open the folder that appear on -screen instructions to download your hard drive. Select My PC, and then select Specifications. - To use Setup Utility (BIOS): 1. Select...
Maintenance and Service Guide
Page 89
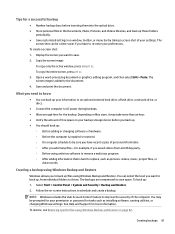
... the User Account Control feature to back up files using Windows Backup and Restore. To create a screen shot: 1. Display the screen you saved videos from individual folders to save space. You can back up your information to an optional external hard drive, a flash drive, a network drive, or discs. ● Connect the computer to the document. 4. Tips for example, if you want to back up, from a birthday party. ◦ Before using antivirus software to remove...
... the User Account Control feature to back up files using Windows Backup and Restore. To create a screen shot: 1. Display the screen you saved videos from individual folders to save space. You can back up your information to an optional external hard drive, a flash drive, a network drive, or discs. ● Connect the computer to the document. 4. Tips for example, if you want to back up, from a birthday party. ◦ Before using antivirus software to remove...

Maintenance and Service Guide
Page 91
... recovery media do not work, you to restore your system without the need for recovery discs or a recovery flash drive. Access HP Recovery Manager in HP Recovery Manager, change the boot order for recovery discs: 1. See Changing the computer boot order on -screen instructions. Follow the on page 83. 3. All hardware-related drivers and software are re-installed, but other software applications are not. or - ● Turn on or restart the computer, and then press esc while the "Press the ESC key for advanced users...
... recovery media do not work, you to restore your system without the need for recovery discs or a recovery flash drive. Access HP Recovery Manager in HP Recovery Manager, change the boot order for recovery discs: 1. See Changing the computer boot order on -screen instructions. Follow the on page 83. 3. All hardware-related drivers and software are re-installed, but other software applications are not. or - ● Turn on or restart the computer, and then press esc while the "Press the ESC key for advanced users...
Maintenance and Service Guide
Page 95
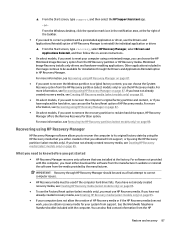
... or driver, use the HP Recovery media. You can obtain recovery media for installation through the Drivers and Applications Reinstall option in the notification area, at the factory. ▲ From the Start screen, type support, and then select the HP Support Assistant app. - or - For more information, see Creating HP Recovery media (select models only) on -screen instructions. ● On select models, if you want to remove the recovery partition to know before you get started ● HP Recovery Manager recovers only software that...
... or driver, use the HP Recovery media. You can obtain recovery media for installation through the Drivers and Applications Reinstall option in the notification area, at the factory. ▲ From the Start screen, type support, and then select the HP Support Assistant app. - or - For more information, see Creating HP Recovery media (select models only) on -screen instructions. ● On select models, if you want to remove the recovery partition to know before you get started ● HP Recovery Manager recovers only software that...
Maintenance and Service Guide
Page 96
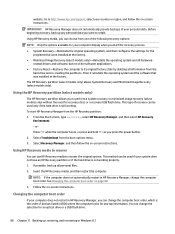
... software that were installed at the factory. If possible, back up , restoring, and recovering in BIOS where the computer looks for recovery discs or a recovery USB flash drive. This type of your computer display when you can be used only if the hard drive is still working properly. 1. Select Troubleshoot from the HP Recovery partition: 1. Select Recovery Manager, and then follow the on -screen instructions. To start the recovery process. ● System Recovery-Reinstalls the original operating system, and then configures...
... software that were installed at the factory. If possible, back up , restoring, and recovering in BIOS where the computer looks for recovery discs or a recovery USB flash drive. This type of your computer display when you can be used only if the hard drive is still working properly. 1. Select Troubleshoot from the HP Recovery partition: 1. Select Recovery Manager, and then follow the on -screen instructions. To start the recovery process. ● System Recovery-Reinstalls the original operating system, and then configures...
Maintenance and Service Guide
Page 101
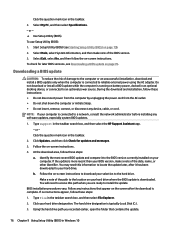
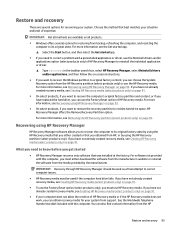
... you need to reclaim hard drive space, HP Recovery Manager offers the Remove Recovery Partition option. You can obtain recovery media for recovering your system from backup, refreshing the computer, and resetting the computer to its original state. If you have replaced the hard drive, you can choose the System Recovery option from the media provided by using HP Recovery Manager on -screen instructions. ● If you want to recover the Windows partition to reinstall the individual application or driver. ▲ Type recovery...
... you need to reclaim hard drive space, HP Recovery Manager offers the Remove Recovery Partition option. You can obtain recovery media for recovering your system from backup, refreshing the computer, and resetting the computer to its original state. If you have replaced the hard drive, you can choose the System Recovery option from the media provided by using HP Recovery Manager on -screen instructions. ● If you want to recover the Windows partition to reinstall the individual application or driver. ▲ Type recovery...
Maintenance and Service Guide
Page 103
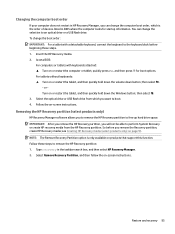
... System Recovery or create HP recovery media from which is only available on or restart the tablet, and then quickly hold down button; NOTE: The Remove Recovery Partition option is the order of devices listed in BIOS where the computer looks for boot options. To change the boot order: IMPORTANT: For a tablet with keyboards attached: ▲ Turn on -screen instructions. Restore and recovery 95 Changing the computer boot order If your computer does not restart in HP Recovery Manager, you can change the...
... System Recovery or create HP recovery media from which is only available on or restart the tablet, and then quickly hold down button; NOTE: The Remove Recovery Partition option is the order of devices listed in BIOS where the computer looks for boot options. To change the boot order: IMPORTANT: For a tablet with keyboards attached: ▲ Turn on -screen instructions. Restore and recovery 95 Changing the computer boot order If your computer does not restart in HP Recovery Manager, you can change the...
Maintenance and Service Guide
Page 113
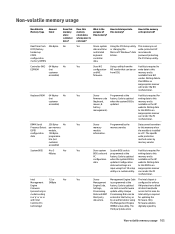
... memory is firmware. password protecting controller the F10 Setup utility. memory and is not date and time or changing the write-protected. Yes Stores Programmed at the A utility is programmed at the configured to enforce Engine Code, factory. The specific write protection method varies by an administrator using the F10 setup inappropriate manner utility or a custom utility. Yes Stores Management Engine Code The Intel chipset is Management is required for updating...
... memory is firmware. password protecting controller the F10 Setup utility. memory and is not date and time or changing the write-protected. Yes Stores Programmed at the A utility is programmed at the configured to enforce Engine Code, factory. The specific write protection method varies by an administrator using the F10 setup inappropriate manner utility or a custom utility. Yes Stores Management Engine Code The Intel chipset is Management is required for updating...
Maintenance and Service Guide
Page 123
... battery illustrated 20 removing 30 battery cover, identifying 14 battery lock, identifying 14 battery release latch 14 BIOS determining version 71, 73, 75 downloading an update 71, 73, 76 starting the Setup Utility 73, 75 updating 71, 73, 75 Bluetooth label 16 boot order changing 83, 88, 95 bottom 16 bottom cover removing 34 buttons left TouchPad 10 power 12 right TouchPad 10 C cables, service considerations 25 caps lock light, identifying 11 chipset, product description 1 components bottom 14 display...
... battery illustrated 20 removing 30 battery cover, identifying 14 battery lock, identifying 14 battery release latch 14 BIOS determining version 71, 73, 75 downloading an update 71, 73, 76 starting the Setup Utility 73, 75 updating 71, 73, 75 Bluetooth label 16 boot order changing 83, 88, 95 bottom 16 bottom cover removing 34 buttons left TouchPad 10 power 12 right TouchPad 10 C cables, service considerations 25 caps lock light, identifying 11 chipset, product description 1 components bottom 14 display...

Maintenance and Service Guide
Page 124
... 3 internal display switch, identifying 5 internal microphones, identifying 6 J jacks audio-out (headphone)/audio-in (microphone) 8 network 8 RJ-45 (network) 8 K keyboard illustrated 18 product description 3 keys action 13 esc 13 fn 13 Windows 13 L labels Bluetooth 16 Microsoft Certificate of Authenticity 16 regulatory 16 serial number 15 service 15 wireless certification 16 WLAN 16 latch, battery release 14 lights AC adapter/battery 8 caps lock 11 hard drive 6 mute 11 power 6 RJ-45 (network) status 8 M mass storage devices illustrated 24 precautions 26 memory card reader...
... 3 internal display switch, identifying 5 internal microphones, identifying 6 J jacks audio-out (headphone)/audio-in (microphone) 8 network 8 RJ-45 (network) 8 K keyboard illustrated 18 product description 3 keys action 13 esc 13 fn 13 Windows 13 L labels Bluetooth 16 Microsoft Certificate of Authenticity 16 regulatory 16 serial number 15 service 15 wireless certification 16 WLAN 16 latch, battery release 14 lights AC adapter/battery 8 caps lock 11 hard drive 6 mute 11 power 6 RJ-45 (network) status 8 M mass storage devices illustrated 24 precautions 26 memory card reader...

Maintenance and Service Guide
Page 125
... 4 slots memory card reader 14 security cable 7 speakers identifying 15 illustrated 20 removing 46 specifications computer 99 U USB 2.0 port, identifying 7, 8 USB 3.0 port, identifying 8 USB board removing 45 spare part number 20 V vents, identifying 8 video, product description 2 W webcam identifying 5 webcam light, identifying 5 webcam/microphone cable illustrated 22 removing 64, 65 webcam/microphone module illustrated 23 removing 63 Windows system restore point 85, 86, 91, 92 Windows Backup and Restore restoring files 82 Windows key, identifying 13 Windows tools using 86, 92 wireless...
... 4 slots memory card reader 14 security cable 7 speakers identifying 15 illustrated 20 removing 46 specifications computer 99 U USB 2.0 port, identifying 7, 8 USB 3.0 port, identifying 8 USB board removing 45 spare part number 20 V vents, identifying 8 video, product description 2 W webcam identifying 5 webcam light, identifying 5 webcam/microphone cable illustrated 22 removing 64, 65 webcam/microphone module illustrated 23 removing 63 Windows system restore point 85, 86, 91, 92 Windows Backup and Restore restoring files 82 Windows key, identifying 13 Windows tools using 86, 92 wireless...


