Maintenance and Service Guide
Page 6
... service provider parts 26 Component replacement procedures ...26 Preparation for disassembly ...26 Bottom cover ...26 Battery ...27 Solid-state drive ...29 Speakers ...29 Touchpad ...30 Fingerprint sensor board ...32 Fan ...32 Heat sink ...33 Lock bracket ...35 USB board ...36 USB door ...37 System board ...38 Display assembly ...40 Keyboard with top cover ...47 6 Backing up, resetting, and recovering ...49 Backing up ...49 Resetting ...49 Recovering ...49 Installing the Chromebook Recovery Utility 50 Creating recovery media ...50 Recovering the Chrome operating...
... service provider parts 26 Component replacement procedures ...26 Preparation for disassembly ...26 Bottom cover ...26 Battery ...27 Solid-state drive ...29 Speakers ...29 Touchpad ...30 Fingerprint sensor board ...32 Fan ...32 Heat sink ...33 Lock bracket ...35 USB board ...36 USB door ...37 System board ...38 Display assembly ...40 Keyboard with top cover ...47 6 Backing up, resetting, and recovering ...49 Backing up ...49 Resetting ...49 Recovering ...49 Installing the Chromebook Recovery Utility 50 Creating recovery media ...50 Recovering the Chrome operating...
Maintenance and Service Guide
Page 9
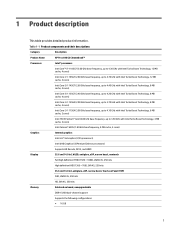
... their descriptions Category Description Product Name HP Pro c640 G2 Chromebook™ Processors Intel® processors ..., 4 MB cache, 2 cores) Graphics Internal graphics Intel Iris® Xe Graphics (i7/i5 processors) Intel UHD Graphics (i3/Pentium/Celeron processors) Supports HD Decode, DX12, and HDMI Display 35.6 cm (14.0 in), WLED, antiglare...in), antiglare, eDP, narrow bezel, Touch-on Panel (TOP) FHD, UWVA 45, 250 nits HD, SVA 45, 250 nits Memory Soldered on board, nonupgradeable DDR4-3200 dual-channel support Supports the following configurations: ● 16 GB 1 1...
... their descriptions Category Description Product Name HP Pro c640 G2 Chromebook™ Processors Intel® processors ..., 4 MB cache, 2 cores) Graphics Internal graphics Intel Iris® Xe Graphics (i7/i5 processors) Intel UHD Graphics (i3/Pentium/Celeron processors) Supports HD Decode, DX12, and HDMI Display 35.6 cm (14.0 in), WLED, antiglare...in), antiglare, eDP, narrow bezel, Touch-on Panel (TOP) FHD, UWVA 45, 250 nits HD, SVA 45, 250 nits Memory Soldered on board, nonupgradeable DDR4-3200 dual-channel support Supports the following configurations: ● 16 GB 1 1...
Maintenance and Service Guide
Page 10
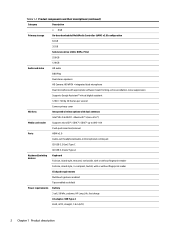
... 1280 × 720 by 30 frames per second Camera privacy cover Wireless Integrated wireless options with dual antennas Intel® Wi-Fi 6 AX201 + Bluetooth® 5 (non-vPro®) Media card reader Supports microSD™, SDHC™, SDXC™ up to UHS-104 Push-push insertion/removal Ports HDMI v2.0 Audio-out (headphone)/audio-in (microphone) combo jack (2) USB 3.2 Gen2 Type C (2) USB 3.2 Gen2 Type-A Keyboard/pointing devices Keyboard Full size, island style, textured, not backlit...
... 1280 × 720 by 30 frames per second Camera privacy cover Wireless Integrated wireless options with dual antennas Intel® Wi-Fi 6 AX201 + Bluetooth® 5 (non-vPro®) Media card reader Supports microSD™, SDHC™, SDXC™ up to UHS-104 Push-push insertion/removal Ports HDMI v2.0 Audio-out (headphone)/audio-in (microphone) combo jack (2) USB 3.2 Gen2 Type C (2) USB 3.2 Gen2 Type-A Keyboard/pointing devices Keyboard Full size, island style, textured, not backlit...
Maintenance and Service Guide
Page 12
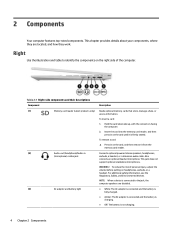
... the card into the memory card reader, and then press in (microphone) combo jack (3) AC adapter and battery light Description Reads optional memory cards that store, manage, share, or access information. Right Use the illustration and table to the jack, the computer speakers are located, and how they are disabled. ● White: The AC adapter is connected and the battery is fully charged. ● Amber: The AC adapter is connected and the battery is charging. ●...
... the card into the memory card reader, and then press in (microphone) combo jack (3) AC adapter and battery light Description Reads optional memory cards that store, manage, share, or access information. Right Use the illustration and table to the jack, the computer speakers are located, and how they are disabled. ● White: The AC adapter is connected and the battery is fully charged. ● Amber: The AC adapter is connected and the battery is charging. ●...

Maintenance and Service Guide
Page 30
... with a disinfectant. Remove any installed batteries from your computer on page 22 for the recommended steps to safely clean the external surfaces of harmful bacteria and viruses. The cloth should be moist, but not dripping wet. Use the following ways: ● Select the Start menu, and then select HP Easy Clean. - This software disables devices such as wireless keyboards. After you remove the dirt and...
... with a disinfectant. Remove any installed batteries from your computer on page 22 for the recommended steps to safely clean the external surfaces of harmful bacteria and viruses. The cloth should be moist, but not dripping wet. Use the following ways: ● Select the Start menu, and then select HP Easy Clean. - This software disables devices such as wireless keyboards. After you remove the dirt and...
Maintenance and Service Guide
Page 31
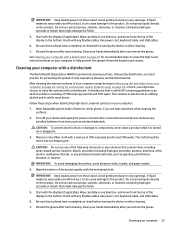
.... Cleaning your device and unplug the power cord and other connected external devices. Start with a mixture of the display to the product. After cleaning the external surfaces of your computer using the steps in Removing dirt and debris...cables, like power cord, keyboard cable, and USB cables. 6. Wear disposable gloves made of harmful bacteria and viruses. Remove any openings. CAUTION: To prevent electric shock or damage to clean the high-touch, external surfaces on the product. Avoid getting moisture in any installed batteries from the top of the display...
.... Cleaning your device and unplug the power cord and other connected external devices. Start with a mixture of the display to the product. After cleaning the external surfaces of your computer using the steps in Removing dirt and debris...cables, like power cord, keyboard cable, and USB cables. 6. Wear disposable gloves made of harmful bacteria and viruses. Remove any openings. CAUTION: To prevent electric shock or damage to clean the high-touch, external surfaces on the product. Avoid getting moisture in any installed batteries from the top of the display...

Maintenance and Service Guide
Page 33
.../chrome. 2. Go to open. 2. Place the cursor over Support resources to www.hp.com. 2. Select Advisories to display more options. 3. Repair professionals To locate repair professionals: 1. Place the cursor over Problem solving to view technical bulletins. Select Get Support. 3. Click the search icon in the right panel. Go to display more options. 3. Press f10 to the product support page. 5. Type the serial number, product number, or product name...
.../chrome. 2. Go to open. 2. Place the cursor over Support resources to www.hp.com. 2. Select Advisories to display more options. 3. Repair professionals To locate repair professionals: 1. Place the cursor over Problem solving to view technical bulletins. Select Get Support. 3. Click the search icon in the right panel. Go to display more options. 3. Press f10 to the product support page. 5. Type the serial number, product number, or product name...
Maintenance and Service Guide
Page 34
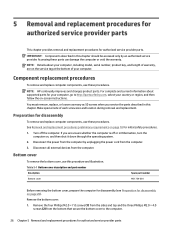
... computer, go to the computer. 26 Chapter 5 Removal and replacement procedures for disassembly on the service tag at the bottom of your computer, including model, serial number, product key, and length of each screw size and location during removal and replacement. Disconnect all external devices from the computer. 3. NOTE: Details about supported parts for authorized service provider parts. You must remove, replace, or loosen as many as 50 screws...
... computer, go to the computer. 26 Chapter 5 Removal and replacement procedures for disassembly on the service tag at the bottom of your computer, including model, serial number, product key, and length of each screw size and location during removal and replacement. Disconnect all external devices from the computer. 3. NOTE: Details about supported parts for authorized service provider parts. You must remove, replace, or loosen as many as 50 screws...
Maintenance and Service Guide
Page 57
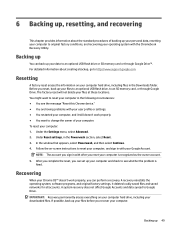
... change the owner of backing up your personal data, resetting your computer to an optional USB flash drive or SD memory card or through Google Drive. Resetting A factory reset erases the information on your computer hard drive, including your downloaded files. Under the Settings menu, select Advanced. 2. NOTE: The account you sign in with your user profile or settings. ● You restarted your computer, and it still doesn't work properly, you reset...
... change the owner of backing up your personal data, resetting your computer to an optional USB flash drive or SD memory card or through Google Drive. Resetting A factory reset erases the information on your computer hard drive, including your downloaded files. Under the Settings menu, select Advanced. 2. NOTE: The account you sign in with your user profile or settings. ● You restarted your computer, and it still doesn't work properly, you reset...
Maintenance and Service Guide
Page 58
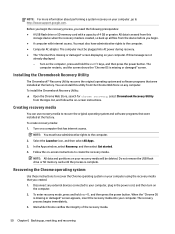
... any external devices connected to your computer using the recovery media that were installed at the factory. To create recovery media: 1. Turn on the computer, press and hold esc+f3, and then press the power button. Installing the Chromebook Recovery Utility The Chromebook™ Recovery Utility recovers the original operating system and software programs that you begin the recovery process, you need the following prerequisites: ● A USB flash drive or SD memory card with internet access. Follow the on-screen instructions to recover the Chrome operating system...
... any external devices connected to your computer using the recovery media that were installed at the factory. To create recovery media: 1. Turn on the computer, press and hold esc+f3, and then press the power button. Installing the Chromebook Recovery Utility The Chromebook™ Recovery Utility recovers the original operating system and software programs that you begin the recovery process, you need the following prerequisites: ● A USB flash drive or SD memory card with internet access. Follow the on-screen instructions to recover the Chrome operating system...

Maintenance and Service Guide
Page 63
... the screen. or - ● Clear the drive contents by using Secure Erase, you cannot recover it takes for Startup Menu" message is set, select the Security menu, and scroll down to continue. iii. Select Hard Drive Utilities, select DriveLock, and then clear the check box for at the warning message. Select OK to factory default. Select the Main menu, and then select Reset BIOS Security to proceed. The computer reboots...
... the screen. or - ● Clear the drive contents by using Secure Erase, you cannot recover it takes for Startup Menu" message is set, select the Security menu, and scroll down to continue. iii. Select Hard Drive Utilities, select DriveLock, and then clear the check box for at the warning message. Select OK to factory default. Select the Main menu, and then select Reset BIOS Security to proceed. The computer reboots...
Maintenance and Service Guide
Page 64
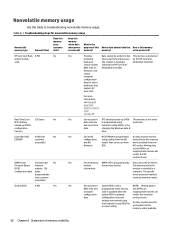
... Start backup of memory volatility What is the purpose of this How is data entered into this How is available 56 Chapter 8 Statement of The content is managed Embedded Controller. by memory vendor. module is programmed at the factory. NOTE: Writing data to troubleshooting nonvolatile memory usage. Does this ROM in an inappropriate manner can be written to EEPROM customer configuration using a utility from the firmware. firmware...
... Start backup of memory volatility What is the purpose of this How is data entered into this How is available 56 Chapter 8 Statement of The content is managed Embedded Controller. by memory vendor. module is programmed at the factory. NOTE: Writing data to troubleshooting nonvolatile memory usage. Does this ROM in an inappropriate manner can be written to EEPROM customer configuration using a utility from the firmware. firmware...
Maintenance and Service Guide
Page 65
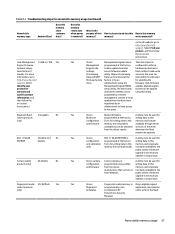
... entered at the factory. Code is programmed at the factory. whenever the flash requires an upgrade. 802.11 WLAN 4 kilobits to the from the silicon vendor. What is A utility must be used for EEPROM kilobits configuration programmed at the factory. Nonvolatile memory usage 57 memory? An Intel utility must be used for updating the firmware. Table 8-1 Troubleshooting steps for manuals and specific product information, and then follow the on-screen instructions...
... entered at the factory. Code is programmed at the factory. whenever the flash requires an upgrade. 802.11 WLAN 4 kilobits to the from the silicon vendor. What is A utility must be used for EEPROM kilobits configuration programmed at the factory. Nonvolatile memory usage 57 memory? An Intel utility must be used for updating the firmware. Table 8-1 Troubleshooting steps for manuals and specific product information, and then follow the on-screen instructions...

Maintenance and Service Guide
Page 66
...) CMOS memory that can write to factory settings)? d. The UEFI BIOS also contains basic system diagnostics. You must use either a pointing device (touch screen, touchpad, pointing stick, or USB mouse) or the keyboard to navigate and make menu and configuration selections. This information is meant by "Restore the nonvolatile memory found in Computer Setup (BIOS) to allow you upgrade or downgrade the OS. 3. b. The Unified Extensible Firmware Interface (UEFI) BIOS is the UEFI BIOS located...
...) CMOS memory that can write to factory settings)? d. The UEFI BIOS also contains basic system diagnostics. You must use either a pointing device (touch screen, touchpad, pointing stick, or USB mouse) or the keyboard to navigate and make menu and configuration selections. This information is meant by "Restore the nonvolatile memory found in Computer Setup (BIOS) to allow you upgrade or downgrade the OS. 3. b. The Unified Extensible Firmware Interface (UEFI) BIOS is the UEFI BIOS located...
Maintenance and Service Guide
Page 67
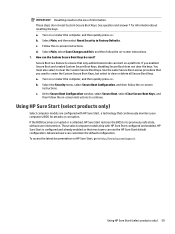
... HP Sure Start default configuration. If you used to create the Custom Secure Boot Keys, but select to continue. Using HP Sure Start (select products only) Select computer models are configured with HP Sure Start configured and enabled. Advanced users can the Custom Secure Boot Keys be reset? At the Secure Boot Configuration window, select Secure Boot, select Clear Secure Boot Keys, and then follow the on -screen instructions. 7. Using HP Sure Start (select products only) 59 a. b. HP Sure Start is attacked, HP Sure Start restores the BIOS to clear...
... HP Sure Start default configuration. If you used to create the Custom Secure Boot Keys, but select to continue. Using HP Sure Start (select products only) Select computer models are configured with HP Sure Start configured and enabled. Advanced users can the Custom Secure Boot Keys be reset? At the Secure Boot Configuration window, select Secure Boot, select Clear Secure Boot Keys, and then follow the on -screen instructions. 7. Using HP Sure Start (select products only) 59 a. b. HP Sure Start is attacked, HP Sure Start restores the BIOS to clear...

Maintenance and Service Guide
Page 71
... hard drive specifications 52 HDMI port, identifying 5 headphone (audio-out) jack 4 heat sink removal 33 spare part numbers 33 HP Sure Start 54, 59 I illustrated parts catalog 12 internal microphones, identifying 6 J jacks audio-in (microphone) 4 audio-out (headphone) 4 K keyboard product description 2 keyboard with top cover spare part numbers 47 keys esc 8 search 9 L labels Bluetooth 10 regulatory 10 serial number 10 service 10 wireless certification 10 WLAN 10 lights AC adapter and battery 4, 6 camera 7 lock bracket removal 35 spare part number 35 M memory nonvolatile 54 volatile 54 memory...
... hard drive specifications 52 HDMI port, identifying 5 headphone (audio-out) jack 4 heat sink removal 33 spare part numbers 33 HP Sure Start 54, 59 I illustrated parts catalog 12 internal microphones, identifying 6 J jacks audio-in (microphone) 4 audio-out (headphone) 4 K keyboard product description 2 keyboard with top cover spare part numbers 47 keys esc 8 search 9 L labels Bluetooth 10 regulatory 10 serial number 10 service 10 wireless certification 10 WLAN 10 lights AC adapter and battery 4, 6 camera 7 lock bracket removal 35 spare part number 35 M memory nonvolatile 54 volatile 54 memory...
Maintenance and Service Guide
Page 72
... key, identifying 9 security cable slot, identifying 6 serial number, computer 10 service labels, locating 10 solid-state drive removal and replacement 29 spare part country codes 47 speaker removal 29 spare part numbers 29 speakers, identifying 8 specifications computer 52 display 52 hard drive 52 static electricity 18, 19 support information 24 system board removal 38 spare part numbers 38 system memory, removing personal data from volatile 54 system recovery Chrome operating system 50 Chromebook Recovery Utility 50 recovery media 50 T touchpad removal 30 spare part numbers 30 touchpad...
... key, identifying 9 security cable slot, identifying 6 serial number, computer 10 service labels, locating 10 solid-state drive removal and replacement 29 spare part country codes 47 speaker removal 29 spare part numbers 29 speakers, identifying 8 specifications computer 52 display 52 hard drive 52 static electricity 18, 19 support information 24 system board removal 38 spare part numbers 38 system memory, removing personal data from volatile 54 system recovery Chrome operating system 50 Chromebook Recovery Utility 50 recovery media 50 T touchpad removal 30 spare part numbers 30 touchpad...

User Guide
Page 21
... is fixed. A recovery reinstalls the operating system, software programs, and original factory settings. Before you can back up your operating system with after you can perform a recovery. To reset your computer hard drive, including files in with the Chromebook Recovery Utility. Follow the on your computer: 1. Recovering When your Chrome OS™ doesn't work properly. ● You want to reset your computer in with your user profile or settings...
... is fixed. A recovery reinstalls the operating system, software programs, and original factory settings. Before you can back up your operating system with after you can perform a recovery. To reset your computer hard drive, including files in with the Chromebook Recovery Utility. Follow the on your computer: 1. Recovering When your Chrome OS™ doesn't work properly. ● You want to reset your computer in with your user profile or settings...

User Guide
Page 23
... be formatted using a formatting tool provided by your computer, plug in the power cord, and then turn on the computer. 2. After the recovery media is displayed, you create recovery media, the USB flash drive or SD memory card is complete. 1. Disconnect any external devices connected to reuse your computer after the verification step is formatted as a recovery tool. The recovery process begins immediately. 3. To enter recovery mode, press and hold the power button until the computer turns off...
... be formatted using a formatting tool provided by your computer, plug in the power cord, and then turn on the computer. 2. After the recovery media is displayed, you create recovery media, the USB flash drive or SD memory card is complete. 1. Disconnect any external devices connected to reuse your computer after the verification step is formatted as a recovery tool. The recovery process begins immediately. 3. To enter recovery mode, press and hold the power button until the computer turns off...

User Guide
Page 33
... screen action key 7 H HDMI port, identifying 3 headphone (audio-out) jack 1 HP Assistive Policy 22 I input power 19 internal microphones, identifying 4 International Association of Accessibility Professionals 23 J jacks audio-in (microphone) 1 audio-out (headphone) 1 K keys esc 6 search 6 L labels Bluetooth 8 regulatory 8 serial number 8 service 8 wireless certification 8 WLAN 8 lights AC adapter and battery 1, 3 camera 4 M memory card reader, identifying 1 microphone (audio-in) jack, identifying 1 mute action key 7 O operating environment 20 P ports HDMI 3 USB SuperSpeed 2 USB Type-C power...
... screen action key 7 H HDMI port, identifying 3 headphone (audio-out) jack 1 HP Assistive Policy 22 I input power 19 internal microphones, identifying 4 International Association of Accessibility Professionals 23 J jacks audio-in (microphone) 1 audio-out (headphone) 1 K keys esc 6 search 6 L labels Bluetooth 8 regulatory 8 serial number 8 service 8 wireless certification 8 WLAN 8 lights AC adapter and battery 1, 3 camera 4 M memory card reader, identifying 1 microphone (audio-in) jack, identifying 1 mute action key 7 O operating environment 20 P ports HDMI 3 USB SuperSpeed 2 USB Type-C power...


