User Manual
Page 8
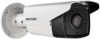
User Manual of Network Camera 6.3.9 6.3.10 6.3.11 6.3.12 6.3.13 6.3.14 Configuring Wireless Dial Settings 55 Email Sending Triggered by Alarm 58 Configuring NAT (Network Address Translation) Settings 60 ... 96 6.6.9 Configuring Scene Change Detection 97 6.6.10 Configuring Face Detection 98 6.6.11 Configuring Line Crossing Detection 99 6.6.12 Configuring Intrusion Detection 101 6.6.13 Configuring Region Entrance Detection 103 6.6.14 Configuring Region Exiting Detection 104 6.6.15 Configuring Unattended Baggage Detection 105 6.6.16 Configuring Object Removal Detection 107 6.7...
User Manual of Network Camera 6.3.9 6.3.10 6.3.11 6.3.12 6.3.13 6.3.14 Configuring Wireless Dial Settings 55 Email Sending Triggered by Alarm 58 Configuring NAT (Network Address Translation) Settings 60 ... 96 6.6.9 Configuring Scene Change Detection 97 6.6.10 Configuring Face Detection 98 6.6.11 Configuring Line Crossing Detection 99 6.6.12 Configuring Intrusion Detection 101 6.6.13 Configuring Region Entrance Detection 103 6.6.14 Configuring Region Exiting Detection 104 6.6.15 Configuring Unattended Baggage Detection 105 6.6.16 Configuring Object Removal Detection 107 6.7...
User Manual
Page 13
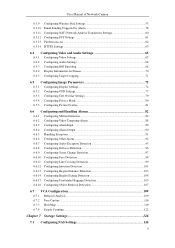
... for detecting the online device, activating the camera, and resetting the password. Get the SADP software from the device list, and select the inactive device. 13 Steps: 1. And we recommend you create a strong password of your own choosing (using a minimum of 8 characters, including upper case letters, lower case letters, numbers, and...
... for detecting the online device, activating the camera, and resetting the password. Get the SADP software from the device list, and select the inactive device. 13 Steps: 1. And we recommend you create a strong password of your own choosing (using a minimum of 8 characters, including upper case letters, lower case letters, numbers, and...
User Manual
Page 21
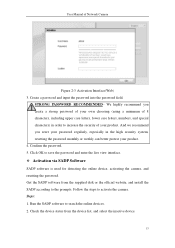
... the network camera through the LAN with a static IP. 2. Install and run the IP Server software in the DDNS Settings interface of Network Camera Figure 2-13 Normal Domain Name Resolution Steps: 1. Configure the DDNS settings in a computer with a web browser or the client software. 3. Refer to Section 6.3.4 Configuring DDNS Settings for...
... the network camera through the LAN with a static IP. 2. Install and run the IP Server software in the DDNS Settings interface of Network Camera Figure 2-13 Normal Domain Name Resolution Steps: 1. Configure the DDNS settings in a computer with a web browser or the client software. 3. Refer to Section 6.3.4 Configuring DDNS Settings for...
User Manual
Page 29
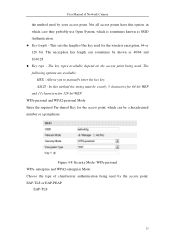
... Camera the method used for the wireless encryption, 64 or 128 bit. The encryption key length can be exactly 5 characters for 64-bit WEP and 13 characters for 128-bit WEP. ASCII - Not all access points have this method the string must be a hexadecimal number or a passphrase. EAP-TLS 29 Allows...
... Camera the method used for the wireless encryption, 64 or 128 bit. The encryption key length can be exactly 5 characters for 64-bit WEP and 13 characters for 128-bit WEP. ASCII - Not all access points have this method the string must be a hexadecimal number or a passphrase. EAP-TLS 29 Allows...
User Manual
Page 50
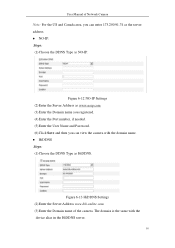
.... (5) Enter the User Name and Password. (6) Click Save and then you can view the camera with the device alias in the HiDDNS server. 50 Figure 6-13 HiDDNS Settings (2) Enter the Server Address www.hik-online.com. (3) Enter the Domain name of Network Camera Note: For the US and Canada area, you...
.... (5) Enter the User Name and Password. (6) Click Save and then you can view the camera with the device alias in the HiDDNS server. 50 Figure 6-13 HiDDNS Settings (2) Enter the Server Address www.hik-online.com. (3) Enter the Domain name of Network Camera Note: For the US and Canada area, you...
User Manual
Page 62
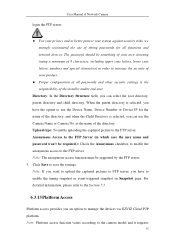
... FTP Server (in order to increase the security of your product. Proper configuration of the directory. For detailed information, please refer to the Section 7.3. 6.3.13 Platform Access Platform access provides you an option to the FTP server. as the name of all functions and network devices. Click Save to the...
... FTP Server (in order to increase the security of your product. Proper configuration of the directory. For detailed information, please refer to the Section 7.3. 6.3.13 Platform Access Platform access provides you an option to the FTP server. as the name of all functions and network devices. Click Save to the...
User Manual
Page 103
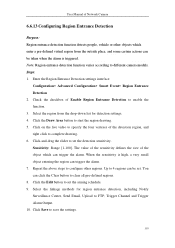
...-defined regions. 8. Repeat the above steps to configure other objects which can click the Clear button to enable the function. 3. User Manual of Network Camera 6.6.13 Configuring Region Entrance Detection Purpose: Region entrance detection function detects people, vehicle or other regions. Note: Region entrance detection function varies according to start the...
...-defined regions. 8. Repeat the above steps to configure other objects which can click the Clear button to enable the function. 3. User Manual of Network Camera 6.6.13 Configuring Region Entrance Detection Purpose: Region entrance detection function detects people, vehicle or other regions. Note: Region entrance detection function varies according to start the...
User Manual
Page 156
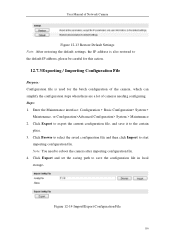
... configuration of the camera, which can simplify the configuration steps when there are a lot of cameras needing configuring. User Manual of Network Camera Figure 12-13 Restore Default Settings Note: After restoring the default settings, the IP address is also restored to start importing configuration file. Note: You need to export...
... configuration of the camera, which can simplify the configuration steps when there are a lot of cameras needing configuring. User Manual of Network Camera Figure 12-13 Restore Default Settings Note: After restoring the default settings, the IP address is also restored to start importing configuration file. Note: You need to export...
Quick Start Guide
Page 9
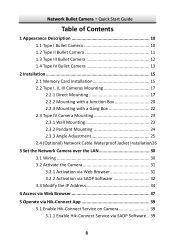
... Guide Table of Contents 1 Appearance Description 10 1.1 Type I Bullet Camera 10 1.2 Type II Bullet Camera 11 1.3 Type III Bullet Camera 12 1.4 Type IV Bullet Camera 13 2 Installation 15 2.1 Memory Card Installation 15 2.2 Type I, II, III Cameras Mounting 17 2.2.1 Direct Mounting 17 2.2.2 Mounting with a Junction Box 20 2.2.3 Mounting with a Gang Box 22...
... Guide Table of Contents 1 Appearance Description 10 1.1 Type I Bullet Camera 10 1.2 Type II Bullet Camera 11 1.3 Type III Bullet Camera 12 1.4 Type IV Bullet Camera 13 2 Installation 15 2.1 Memory Card Installation 15 2.2 Type I, II, III Cameras Mounting 17 2.2.1 Direct Mounting 17 2.2.2 Mounting with a Junction Box 20 2.2.3 Mounting with a Gang Box 22...
Quick Start Guide
Page 14
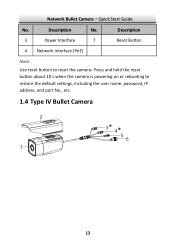
Description No. 3 Power Interface 7 Description Reset Button 4 Network Interface (PoE) Note: Use reset button to reset the camera: Press and hold the reset button about 10 s when the camera is powering on or rebooting to restore the default settings, including the user name, password, IP address, and port No., etc. 1.4 Type IV Bullet Camera 2 1 3* 4* DC12V I N 5 6 13 Network Bullet Camera·Quick Start Guide No.
Description No. 3 Power Interface 7 Description Reset Button 4 Network Interface (PoE) Note: Use reset button to reset the camera: Press and hold the reset button about 10 s when the camera is powering on or rebooting to restore the default settings, including the user name, password, IP address, and port No., etc. 1.4 Type IV Bullet Camera 2 1 3* 4* DC12V I N 5 6 13 Network Bullet Camera·Quick Start Guide No.