User Manual
Page 7
... Settings for Wireless Network Connection 33 Chapter 5 Live View 35 5.1 Live View Page ...35 5.2 Starting Live View 36 5.3 Recording and Capturing Pictures Manually 37 5.4 Operating PTZ Control 37 5.4.1 PTZ Control Panel ...37 5.4.2 Setting / Calling a Preset 38 5.4.3 Setting / Calling a Patrol 40 Chapter 6 Network Camera Configuration 41 6.1 Configuring Local Parameters 41 6.2 Configuring Time Settings 43 6.3 Configuring Network Settings 45 6.3.1 Configuring TCP/IP Settings 45 6.3.2 Configuring Port Settings 46 6.3.3 Configuring PPPoE Settings 47 6.3.4 Configuring DDNS Settings...
... Settings for Wireless Network Connection 33 Chapter 5 Live View 35 5.1 Live View Page ...35 5.2 Starting Live View 36 5.3 Recording and Capturing Pictures Manually 37 5.4 Operating PTZ Control 37 5.4.1 PTZ Control Panel ...37 5.4.2 Setting / Calling a Preset 38 5.4.3 Setting / Calling a Patrol 40 Chapter 6 Network Camera Configuration 41 6.1 Configuring Local Parameters 41 6.2 Configuring Time Settings 43 6.3 Configuring Network Settings 45 6.3.1 Configuring TCP/IP Settings 45 6.3.2 Configuring Port Settings 46 6.3.3 Configuring PPPoE Settings 47 6.3.4 Configuring DDNS Settings...
User Manual
Page 15
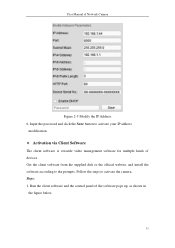
Follow the steps to the prompts. Steps: 1. Get the client software from the supplied disk or the official website, and install the software according to activate the camera. User Manual of the software pops up, as shown in the figure below. 15 Run the client software and the control panel of Network Camera Figure 2-5 Modify the IP Address 6. Input the password and click the Save button to activate your IP address modification. Activation via Client Software The client software is versatile video management software for multiple kinds of devices.
Follow the steps to the prompts. Steps: 1. Get the client software from the supplied disk or the official website, and install the software according to activate the camera. User Manual of the software pops up, as shown in the figure below. 15 Run the client software and the control panel of Network Camera Figure 2-5 Modify the IP Address 6. Input the password and click the Save button to activate your IP address modification. Activation via Client Software The client software is versatile video management software for multiple kinds of devices.
User Manual
Page 20
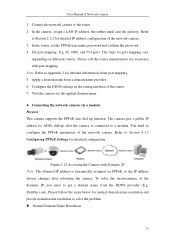
... camera, assign a LAN IP address, the subnet mask and the gateway. Configure the DDNS settings in the setting interface of Network Camera 1. In the router, set the PPPoE user name, password and confirm the password. 4. Please call the router manufacturer for detailed IP address configuration of the dynamic IP, you need to Appendix 2 for detailed information about port mapping. 5. User Manual of the router. 7. Apply a domain name from the DDNS provider (E.g. Connect the network camera...
... camera, assign a LAN IP address, the subnet mask and the gateway. Configure the DDNS settings in the setting interface of Network Camera 1. In the router, set the PPPoE user name, password and confirm the password. 4. Please call the router manufacturer for detailed IP address configuration of the dynamic IP, you need to Appendix 2 for detailed information about port mapping. 5. User Manual of the router. 7. Apply a domain name from the DDNS provider (E.g. Connect the network camera...
User Manual
Page 31
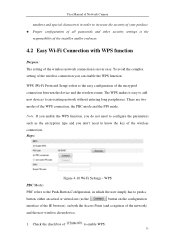
... wireless connection. Check the checkbox of the encrypted connection between the device and the wireless router. User Manual of Network Camera numbers and special characters) in which the user simply has to push a button, either an actual or virtual one (as the encryption type and you don't need to configure the parameters such as the button on the configuration interface of the IE browser), on both the Access...
... wireless connection. Check the checkbox of the encrypted connection between the device and the wireless router. User Manual of Network Camera numbers and special characters) in which the user simply has to push a button, either an actual or virtual one (as the encryption type and you don't need to configure the parameters such as the button on the configuration interface of the IE browser), on both the Access...
User Manual
Page 33
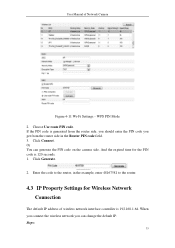
... to the router. 4.3 IP Property Settings for the PIN code is 192.168.1.64. Choose Use route PIN code. Click Connect. Or You can change the default IP. Click Generate. 2. Steps: 33 If the PIN code is generated from the router side, you should enter the PIN code you can generate the PIN code on the camera side. WPS PIN Mode 2. User Manual of wireless network interface controller is...
... to the router. 4.3 IP Property Settings for the PIN code is 192.168.1.64. Choose Use route PIN code. Click Connect. Or You can change the default IP. Click Generate. 2. Steps: 33 If the PIN code is generated from the router side, you should enter the PIN code you can generate the PIN code on the camera side. WPS PIN Mode 2. User Manual of wireless network interface controller is...

User Manual
Page 36
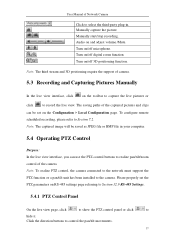
...-adaptive window size. Live view with the sub stream. Live view with the main stream. For IE (internet explorer) user, webcomponents and quick time are supported by the web browser. The original widow size. Live view with the third stream. 36 Toolbar: Operations on the live view page, e.g., live view. The window size is 4:3. User Manual of Network Camera Display Control: Click each tab to adjust the layout and the stream type of the camera and the light and wiper control. (only available for cameras supporting PTZ function) Preset/Patrol Settings: Set...
...-adaptive window size. Live view with the sub stream. Live view with the main stream. For IE (internet explorer) user, webcomponents and quick time are supported by the web browser. The original widow size. Live view with the third stream. 36 Toolbar: Operations on the live view page, e.g., live view. The window size is 4:3. User Manual of Network Camera Display Control: Click each tab to adjust the layout and the stream type of the camera and the light and wiper control. (only available for cameras supporting PTZ function) Preset/Patrol Settings: Set...
User Manual
Page 37
... plug-in your computer. 5.4 Operating PTZ Control Purpose: In the live view page, click to show the PTZ control panel or click to hide it. Turn on the toolbar to capture the live view. Note: The captured image will be set the PTZ parameters on the Configuration > Local Configuration page. Turn on and adjust volume /Mute. Note: To realize PTZ control, the camera connected to the network must support the PTZ function or a pan/tilt unit has been installed...
... plug-in your computer. 5.4 Operating PTZ Control Purpose: In the live view page, click to show the PTZ control panel or click to hide it. Turn on the toolbar to capture the live view. Note: The captured image will be set the PTZ parameters on the Configuration > Local Configuration page. Turn on and adjust volume /Mute. Note: To realize PTZ control, the camera connected to the network must support the PTZ function or a pan/tilt unit has been installed...
User Manual
Page 42
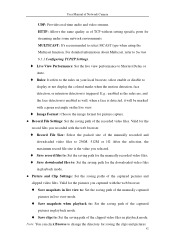
User Manual of Network Camera UDP: Provides real-time audio and video streams. HTTP: Allows the same quality as well, when a face is detected, it will be marked with a green rectangle on your local browser, select enable or disable to display or not display the colored marks when the motion detection, face detection, or intrusion detection is the value you captured with the web browser. Record File Size: Select the packed...
User Manual of Network Camera UDP: Provides real-time audio and video streams. HTTP: Allows the same quality as well, when a face is detected, it will be marked with a green rectangle on your local browser, select enable or disable to display or not display the colored marks when the motion detection, face detection, or intrusion detection is the value you captured with the web browser. Record File Size: Select the packed...
User Manual
Page 51
... and alarm related information and manage the camera remotely when it is connected to save the new settings. And you use the third version, HTTPS protocol must be enabled. For your privacy and to receive the camera information via SNMP port. And SNMP v3 provides encryption and if you also need to use of strong passwords for all passwords and other security settings is required for access. Before...
... and alarm related information and manage the camera remotely when it is connected to save the new settings. And you use the third version, HTTPS protocol must be enabled. For your privacy and to receive the camera information via SNMP port. And SNMP v3 provides encryption and if you also need to use of strong passwords for all passwords and other security settings is required for access. Before...
User Manual
Page 55
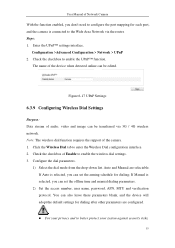
... UPnP Settings 6.3.9 Configuring Wireless Dial Settings Purpose: Data stream of the camera. 1. User Manual of Network Camera With the function enabled, you don't need to configure the port mapping for dialing; Enter the UPnP™ settings interface. Note: The wireless dial function requires the support of audio, video and image can be transferred via the router. Check the checkbox of the device when detected online can be edited. If Manual is connected to the...
... UPnP Settings 6.3.9 Configuring Wireless Dial Settings Purpose: Data stream of the camera. 1. User Manual of Network Camera With the function enabled, you don't need to configure the port mapping for dialing; Enter the UPnP™ settings interface. Note: The wireless dial function requires the support of audio, video and image can be transferred via the router. Check the checkbox of the device when detected online can be edited. If Manual is connected to the...
User Manual
Page 59
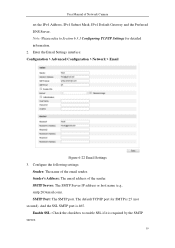
... Network Camera set the IPv4 Address, IPv4 Subnet Mask, IPv4 Default Gateway and the Preferred DNS Server. SMTP Server: The SMTP Server IP address or host name (e.g., smtp.263xmail.com). Enable SSL: Check the checkbox to Section 6.3.1 Configuring TCP/IP Settings for SMTP is required by the SMTP server. 59 Enter the Email Settings interface: Configuration > Advanced Configuration > Network > Email Figure 6-22 Email Settings 3. SMTP Port: The SMTP port. The default TCP/IP port for detailed information. 2. And the SSL SMTP port is 465. User Manual...
... Network Camera set the IPv4 Address, IPv4 Subnet Mask, IPv4 Default Gateway and the Preferred DNS Server. SMTP Server: The SMTP Server IP address or host name (e.g., smtp.263xmail.com). Enable SSL: Check the checkbox to Section 6.3.1 Configuring TCP/IP Settings for SMTP is required by the SMTP server. 59 Enter the Email Settings interface: Configuration > Advanced Configuration > Network > Email Figure 6-22 Email Settings 3. SMTP Port: The SMTP port. The default TCP/IP port for detailed information. 2. And the SSL SMTP port is 465. User Manual...
User Manual
Page 62
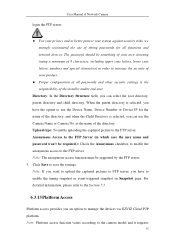
... Save to the FTP server. as the name of the directory; Anonymous Access to the FTP Server (in order to increase the security of your product. Proper configuration of all passwords and other security settings is selected, you have the option to use the Device Name, Device Number or Device IP for all functions and network devices. User Manual of Network Camera login the FTP server. For your...
... Save to the FTP server. as the name of the directory; Anonymous Access to the FTP Server (in order to increase the security of your product. Proper configuration of all passwords and other security settings is selected, you have the option to use the Device Name, Device Number or Device IP for all functions and network devices. User Manual of Network Camera login the FTP server. For your...
User Manual
Page 63
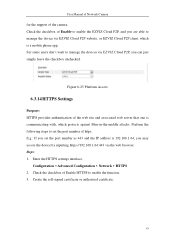
... the web browser. Steps: 1. Perform the following steps to set the port number as 443 and the IP address is communicating with, which is a mobile phone app. For some users don't want to manage the devices via EZVIZ Cloud P2P, you can just simply leave the checkbox unchecked. Configuration > Advanced Configuration > Network > HTTPS 2. E.g.: If you set the port number of Enable HTTPS to enable the function. 3. User Manual of Network Camera...
... the web browser. Steps: 1. Perform the following steps to set the port number as 443 and the IP address is communicating with, which is a mobile phone app. For some users don't want to manage the devices via EZVIZ Cloud P2P, you can just simply leave the checkbox unchecked. Configuration > Advanced Configuration > Network > HTTPS 2. E.g.: If you set the port number of Enable HTTPS to enable the function. 3. User Manual of Network Camera...
User Manual
Page 136
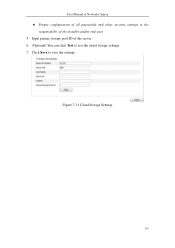
Click Save to test the cloud storage settings. 7. User Manual of Network Camera Proper configuration of all passwords and other security settings is the responsibility of the server. 6. (Optional) You can click Test to save the settings. Figure 7-11 Cloud Storage Settings 136 Input picture storage pool ID of the installer and/or end-user. 5.
Click Save to test the cloud storage settings. 7. User Manual of Network Camera Proper configuration of all passwords and other security settings is the responsibility of the server. 6. (Optional) You can click Test to save the settings. Figure 7-11 Cloud Storage Settings 136 Input picture storage pool ID of the installer and/or end-user. 5.
User Manual
Page 149
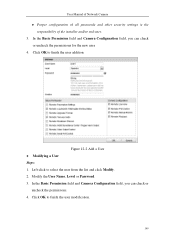
Figure 12-2 Add a User Modifying a User Steps: 1. Click OK to select the user from the list and click Modify. 2. User Manual of Network Camera ● Proper configuration of all passwords and other security settings is the responsibility of the installer and/or end-user. 3. Modify the User Name, Level or Password. 3. Left-click to finish the user modification. 149 Click OK to finish the user addition. In the...
Figure 12-2 Add a User Modifying a User Steps: 1. Click OK to select the user from the list and click Modify. 2. User Manual of Network Camera ● Proper configuration of all passwords and other security settings is the responsibility of the installer and/or end-user. 3. Modify the User Name, Level or Password. 3. Left-click to finish the user modification. 149 Click OK to finish the user addition. In the...
User Manual
Page 157
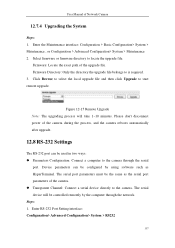
... start remote upgrade. Steps: 1. Firmware Directory: Only the directory the upgrade file belongs to is required. 3. Please don't disconnect power of Network Camera 12.7.4 Upgrading the System Steps: 1. Device parameters can be used in two ways: Parameters Configuration: Connect a computer to the camera through the network. User Manual of the camera during the process, and the camera reboots automatically after upgrade. 12.8 RS-232 Settings The RS-232 port...
... start remote upgrade. Steps: 1. Firmware Directory: Only the directory the upgrade file belongs to is required. 3. Please don't disconnect power of Network Camera 12.7.4 Upgrading the System Steps: 1. Device parameters can be used in two ways: Parameters Configuration: Connect a computer to the camera through the network. User Manual of the camera during the process, and the camera reboots automatically after upgrade. 12.8 RS-232 Settings The RS-232 port...
User Manual
Page 163
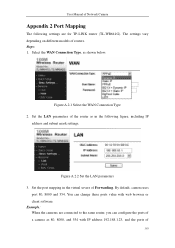
... on different models of Forwarding. Select the WAN Connection Type, as in the virtual severs of routers. Example: When the cameras are for TP-LINK router (TL-WR641G). Steps: 1. You can configure the ports of a camera as 80, 8000, and 554 with web browser or client software. Figure A.2.2 Set the LAN parameters 3. User Manual of Network Camera Appendix 2 Port Mapping The following figure, including IP address and subnet mask settings. Set the...
... on different models of Forwarding. Select the WAN Connection Type, as in the virtual severs of routers. Example: When the cameras are for TP-LINK router (TL-WR641G). Steps: 1. You can configure the ports of a camera as 80, 8000, and 554 with web browser or client software. Figure A.2.2 Set the LAN parameters 3. User Manual of Network Camera Appendix 2 Port Mapping The following figure, including IP address and subnet mask settings. Set the...
Quick Start Guide
Page 38
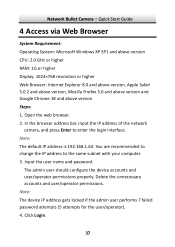
... your computer. 3. Input the user name and password. Click Login. 37 The admin user should configure the device accounts and user/operator permissions properly. Network Bullet Camera·Quick Start Guide 4 Access via Web Browser System Requirement: Operating System: Microsoft Windows XP SP1 and above version CPU: 2.0 GHz or higher RAM: 1G or higher Display: 1024×768 resolution or higher Web Browser: Internet Explorer 8.0 and above version, Apple Safari 5.0.2 and above version, Mozilla Firefox 5.0 and...
... your computer. 3. Input the user name and password. Click Login. 37 The admin user should configure the device accounts and user/operator permissions properly. Network Bullet Camera·Quick Start Guide 4 Access via Web Browser System Requirement: Operating System: Microsoft Windows XP SP1 and above version CPU: 2.0 GHz or higher RAM: 1G or higher Display: 1024×768 resolution or higher Web Browser: Internet Explorer 8.0 and above version, Apple Safari 5.0.2 and above version, Mozilla Firefox 5.0 and...
Quick Start Guide
Page 42
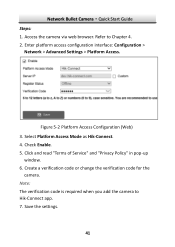
... configuration interface: Configuration > Network > Advanced Settings > Platform Access. Save the settings. 41 Refer to Hik-Connect app. 7. Select Platform Access Mode as Hik-Connect. 4. Note: The verification code is required when you add the camera to Chapter 4. 2. Check Enable. 5. Click and read "Terms of Service" and "Privacy Policy" in pop-up window. 6. Figure 5-2 Platform Access Configuration (Web) 3. Create a verification code or change the verification code for the camera. Network Bullet Camera·Quick Start Guide Steps: 1. Access the camera via web browser...
... configuration interface: Configuration > Network > Advanced Settings > Platform Access. Save the settings. 41 Refer to Hik-Connect app. 7. Select Platform Access Mode as Hik-Connect. 4. Note: The verification code is required when you add the camera to Chapter 4. 2. Check Enable. 5. Click and read "Terms of Service" and "Privacy Policy" in pop-up window. 6. Figure 5-2 Platform Access Configuration (Web) 3. Create a verification code or change the verification code for the camera. Network Bullet Camera·Quick Start Guide Steps: 1. Access the camera via web browser...
Data Sheet
Page 1
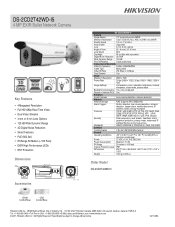
...) Image Settings Compression, color, saturation, brightness, contrast, sharpness, rotate mode, privacy mask Backlight Compensation Yes, zone configured Region of Interest (ROI) Yes Analytics Smart Features Line crossing detection, intrusion detection Network Network Storage NAS (supports NFS,SMB/CIFS) Alarm Triggers Motion detection, line crossing detection, intrusion detection, tamper alarm, network disconnect, IP address conflict, storage exception Protocols TCP/IP, UDP, ICMP, HTTP, HTTPS, FTP, DHCP, DNS, DDNS, RTP, RTSP, RTCP, PPPoE, NTP, UPnP, SMTP, SNMP...
...) Image Settings Compression, color, saturation, brightness, contrast, sharpness, rotate mode, privacy mask Backlight Compensation Yes, zone configured Region of Interest (ROI) Yes Analytics Smart Features Line crossing detection, intrusion detection Network Network Storage NAS (supports NFS,SMB/CIFS) Alarm Triggers Motion detection, line crossing detection, intrusion detection, tamper alarm, network disconnect, IP address conflict, storage exception Protocols TCP/IP, UDP, ICMP, HTTP, HTTPS, FTP, DHCP, DNS, DDNS, RTP, RTSP, RTCP, PPPoE, NTP, UPnP, SMTP, SNMP...
