User Manual
Page 17
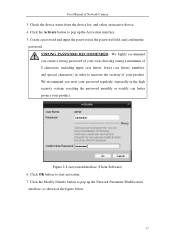
... select an inactive device. 4. Figure 2-8 Activation Interface (Client Software) 6. Click OK button to pop up the Activation interface. 5. Create a password and input the password in the high security system, resetting the password monthly or weekly can better protect your product. User Manual of 8 characters,... case letters, lower case letters, numbers, and special characters) in the figure below. 17 We highly recommend you reset your password regularly, especially in the password field, and confirm the password. Click the Modify Netinfo button to start activation. 7.
... select an inactive device. 4. Figure 2-8 Activation Interface (Client Software) 6. Click OK button to pop up the Activation interface. 5. Create a password and input the password in the high security system, resetting the password monthly or weekly can better protect your product. User Manual of 8 characters,... case letters, lower case letters, numbers, and special characters) in the figure below. 17 We highly recommend you reset your password regularly, especially in the password field, and confirm the password. Click the Modify Netinfo button to start activation. 7.
User Manual
Page 124
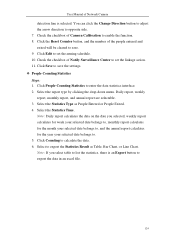
...Click Save to . 5. Select the Statistics Type as Table, Bar Chart, or Line Chart. User Manual of Network Camera detection line is an Export button to calculate the data. 6. Note: Daily report calculates the data on the date you select table to list the statistics, there is selected. Check ...People Counting Statistics to export the Statistics Result as People Entered or People Exited. 4. Select to enter the data statistics interface. 2. Click the Reset Counter button, and the number of Notify Surveillance Center to enable the function. 8. Select the Statistics Time.
...Click Save to . 5. Select the Statistics Type as Table, Bar Chart, or Line Chart. User Manual of Network Camera detection line is an Export button to calculate the data. 6. Note: Daily report calculates the data on the date you select table to list the statistics, there is selected. Check ...People Counting Statistics to export the Statistics Result as People Entered or People Exited. 4. Select to enter the data statistics interface. 2. Click the Reset Counter button, and the number of Notify Surveillance Center to enable the function. 8. Select the Statistics Time.
User Manual
Page 138
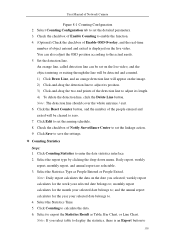
An orange line, called detection line can also adjust the OSD position according to enter the data statistics interface. 2. Click the Reset Counter button, and the number of Notify Surveillance Center to ; Check the checkbox of the people entered and exited will be detected and counted.... as People Entered or People Exited. Select to . 4. Select the Statistics Time. 5. User Manual of object entered and exited is an Export button to 138 Select the report type by clicking the drop-down menu. Daily report, weekly report, monthly report, and annual report are selectable. 3....
An orange line, called detection line can also adjust the OSD position according to enter the data statistics interface. 2. Click the Reset Counter button, and the number of Notify Surveillance Center to ; Check the checkbox of the people entered and exited will be detected and counted.... as People Entered or People Exited. Select to . 4. Select the Statistics Time. 5. User Manual of object entered and exited is an Export button to 138 Select the report type by clicking the drop-down menu. Daily report, weekly report, monthly report, and annual report are selectable. 3....
Quick Start Guide
Page 12
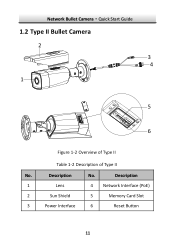
Description 1 Lens 4 Network Interface (PoE) 2 Sun Shield 5 Memory Card Slot 3 Power Interface 6 Reset Button 11 Description No. Network Bullet Camera·Quick Start Guide 1.2 Type II Bullet Camera 2 DC12V IN 3 4 1 5 6 Figure 1-2 Overview of Type II Table 1-2 Description of Type II No.
Description 1 Lens 4 Network Interface (PoE) 2 Sun Shield 5 Memory Card Slot 3 Power Interface 6 Reset Button 11 Description No. Network Bullet Camera·Quick Start Guide 1.2 Type II Bullet Camera 2 DC12V IN 3 4 1 5 6 Figure 1-2 Overview of Type II Table 1-2 Description of Type II No.
Quick Start Guide
Page 13
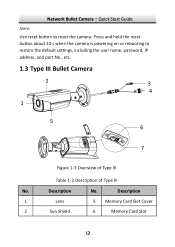
Network Bullet Camera·Quick Start Guide Note: Use reset button to reset the camera: Press and hold the reset button about 10 s when the camera is powering on or rebooting to restore the default settings, including the user name, password, IP address, and port No., etc. 1.3 Type III Bullet Camera 2 DC12V I N 3 4 1 5 6 7 Figure 1-3 Overview of Type III Table 1-3 Description of Type III No. Description No. Description 1 Lens 5 Memory Card Slot Cover 2 Sun Shield 6 Memory Card Slot 12
Network Bullet Camera·Quick Start Guide Note: Use reset button to reset the camera: Press and hold the reset button about 10 s when the camera is powering on or rebooting to restore the default settings, including the user name, password, IP address, and port No., etc. 1.3 Type III Bullet Camera 2 DC12V I N 3 4 1 5 6 7 Figure 1-3 Overview of Type III Table 1-3 Description of Type III No. Description No. Description 1 Lens 5 Memory Card Slot Cover 2 Sun Shield 6 Memory Card Slot 12
Quick Start Guide
Page 14
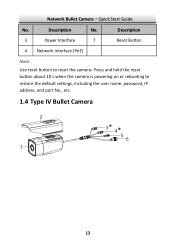
Description No. 3 Power Interface 7 Description Reset Button 4 Network Interface (PoE) Note: Use reset button to reset the camera: Press and hold the reset button about 10 s when the camera is powering on or rebooting to restore the default settings, including the user name, password, IP address, and port No., etc. 1.4 Type IV Bullet Camera 2 1 3* 4* DC12V I N 5 6 13 Network Bullet Camera·Quick Start Guide No.
Description No. 3 Power Interface 7 Description Reset Button 4 Network Interface (PoE) Note: Use reset button to reset the camera: Press and hold the reset button about 10 s when the camera is powering on or rebooting to restore the default settings, including the user name, password, IP address, and port No., etc. 1.4 Type IV Bullet Camera 2 1 3* 4* DC12V I N 5 6 13 Network Bullet Camera·Quick Start Guide No.
Quick Start Guide
Page 15
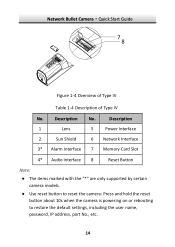
... 5 Power Interface 2 Sun Shield 6 Network Interface 3* Alarm Interface 7 Memory Card Slot 4* Audio Interface 8 Reset Button Note: ● The items marked with the "*" are only supported by certain camera models. ● Use reset button to reset the camera: Press and hold the reset button about 10s when the camera is powering on or rebooting to restore the default...
... 5 Power Interface 2 Sun Shield 6 Network Interface 3* Alarm Interface 7 Memory Card Slot 4* Audio Interface 8 Reset Button Note: ● The items marked with the "*" are only supported by certain camera models. ● Use reset button to reset the camera: Press and hold the reset button about 10s when the camera is powering on or rebooting to restore the default...
Quick Start Guide
Page 18
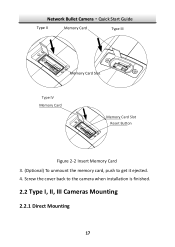
Screw the cover back to get it ejected. 4. Network Bullet Camera·Quick Start Guide Type II Memory Card Type III Memory Card Slot Type IV Memory Card Memory Card Slot Reset Button Figure 2-2 Insert Memory Card 3. (Optional) To unmount the memory card, push to the camera when installation is finished. 2.2 Type I, II, III Cameras Mounting 2.2.1 Direct Mounting 17
Screw the cover back to get it ejected. 4. Network Bullet Camera·Quick Start Guide Type II Memory Card Type III Memory Card Slot Type IV Memory Card Memory Card Slot Reset Button Figure 2-2 Insert Memory Card 3. (Optional) To unmount the memory card, push to the camera when installation is finished. 2.2 Type I, II, III Cameras Mounting 2.2.1 Direct Mounting 17