
User Manual
Page 5
Chapter 1 Operating Instructions Introduction 7 Service 7 General Warnings / Before You Use Your Teknique 8 Hoveround® Teknique / Diagram 12 Hoveround® Teknique / Warning Labels 13 Chapter 1 Operating Instructions 17 Entering Your Teknique 17 Driving Your Teknique 18 Joystick Controllers 20 Chapter 2 Batteries and Charging 22 Caring For Your Batteries and Charger 22 Battery Replacement 23 Charging Your Batteries 24 Chapter 3 Manual Brake Release Levers 27 D82007778 REV N 7/10/12 Table of Contents 5
Chapter 1 Operating Instructions Introduction 7 Service 7 General Warnings / Before You Use Your Teknique 8 Hoveround® Teknique / Diagram 12 Hoveround® Teknique / Warning Labels 13 Chapter 1 Operating Instructions 17 Entering Your Teknique 17 Driving Your Teknique 18 Joystick Controllers 20 Chapter 2 Batteries and Charging 22 Caring For Your Batteries and Charger 22 Battery Replacement 23 Charging Your Batteries 24 Chapter 3 Manual Brake Release Levers 27 D82007778 REV N 7/10/12 Table of Contents 5
User Manual
Page 8
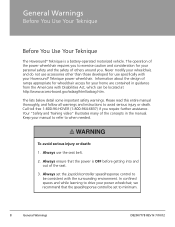
... power wheelchair, we recommend that the power is a battery-operated motorized vehicle. General Warnings Before You Use Your Teknique Before You Use Your Teknique The Hoveround® Teknique is OFF before getting into and out of ramps appropriate for wheelchair access for use specifically with your...Keep your personal safety and the safety of the concepts in guidance from the Americans with Disabilities Act, which can be set the joystick/controller speed/response control to avoid serious injury or death. To avoid serious injury or death: 1. Always ensure that the speed/response...
... power wheelchair, we recommend that the power is a battery-operated motorized vehicle. General Warnings Before You Use Your Teknique Before You Use Your Teknique The Hoveround® Teknique is OFF before getting into and out of ramps appropriate for wheelchair access for use specifically with your...Keep your personal safety and the safety of the concepts in guidance from the Americans with Disabilities Act, which can be set the joystick/controller speed/response control to avoid serious injury or death. To avoid serious injury or death: 1. Always ensure that the speed/response...
User Manual
Page 9
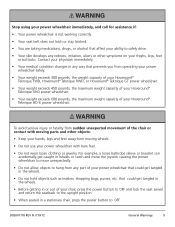
...joystick causing the power wheelchair to move unexpectedly. • Do not allow objects to hang from operating your power wheelchair safely. • Your weight exceeds 300 pounds, the weight capacity of your Hoveround® Teknique FWD, Hoveround® Teknique RWD, or Hoveround® Teknique... GT power wheelchair. • Your weight exceeds 450 pounds, the maximum weight capacity of your Hoveround® Teknique XHD power wheelchair. • Your weight exceeds ...
...joystick causing the power wheelchair to move unexpectedly. • Do not allow objects to hang from operating your power wheelchair safely. • Your weight exceeds 300 pounds, the weight capacity of your Hoveround® Teknique FWD, Hoveround® Teknique RWD, or Hoveround® Teknique... GT power wheelchair. • Your weight exceeds 450 pounds, the maximum weight capacity of your Hoveround® Teknique XHD power wheelchair. • Your weight exceeds ...
User Manual
Page 12
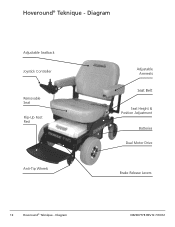
Diagram D82007778 REV N 7/10/12 Diagram Adjustable Seatback Joystick Controller • Removable Seat • Flip-Up Foot Rest • Anti-Tip Wheels • • • Adjustable Armrests • Seat Belt • • • • Seat Height & Position Adjustment Batteries Dual Motor Drive Brake Release Levers 12 Hoveround® Teknique - Hoveround® Teknique -
Diagram D82007778 REV N 7/10/12 Diagram Adjustable Seatback Joystick Controller • Removable Seat • Flip-Up Foot Rest • Anti-Tip Wheels • • • Adjustable Armrests • Seat Belt • • • • Seat Height & Position Adjustment Batteries Dual Motor Drive Brake Release Levers 12 Hoveround® Teknique - Hoveround® Teknique -
User Manual
Page 17
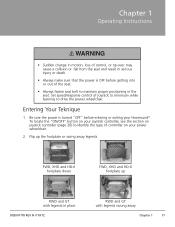
...sure the power is OFF before entering or exiting your power wheelchair. 2. Entering Your Teknique 1. Set speed/response control of the seat. • Always fasten seat belt to identify the type of controller on joystick controller (page 20) to maintain proper positioning in place D82007778 REV N 7/10/12 ...away Chapter 1 17 Flip up RWD and GT with legrests in the seat. To locate the "ON/OFF" button on your joystick controller, see the section on your Hoveround®. FWD, XHD and HD-6 footplate down FWD, XHD and HD-6 footplate up the footplate or swing away legrests.
...sure the power is OFF before entering or exiting your power wheelchair. 2. Entering Your Teknique 1. Set speed/response control of the seat. • Always fasten seat belt to identify the type of controller on joystick controller (page 20) to maintain proper positioning in place D82007778 REV N 7/10/12 ...away Chapter 1 17 Flip up RWD and GT with legrests in the seat. To locate the "ON/OFF" button on your joystick controller, see the section on your Hoveround®. FWD, XHD and HD-6 footplate down FWD, XHD and HD-6 footplate up the footplate or swing away legrests.
User Manual
Page 18
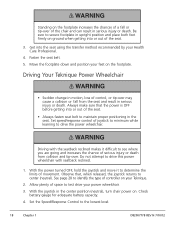
...the footplate. Set speed/response control of joystick to minimum while learning to determine the limits of movement. Do not attempt to drive this power wheelchair with the seatback reclined makes it to drive the power wheelchair. Driving Your Teknique Power Wheelchair • Sudden change in ...both feet firmly on . Get into or out of controller on your Health Care Professional. 4. Always make sure that , when released, the joystick returns to identify the type of the seat. 3. Check battery gauge for adequate battery capacity. 4. See page 20 to center (neutral). Be...
...the footplate. Set speed/response control of joystick to minimum while learning to determine the limits of movement. Do not attempt to drive this power wheelchair with the seatback reclined makes it to drive the power wheelchair. Driving Your Teknique Power Wheelchair • Sudden change in ...both feet firmly on . Get into or out of controller on your Health Care Professional. 4. Always make sure that , when released, the joystick returns to identify the type of the seat. 3. Check battery gauge for adequate battery capacity. 4. See page 20 to center (neutral). Be...

User Manual
Page 19
...minimum if you are a less experienced driver or are automatically engaged. 6. Move the joystick lever fully right. Note that if the joystick is flashing, the controller has sensed a fault condition. If you move the joystick gently back and to the left . Learn the characteristics of your power wheelchair and... to loss of control or tip-over and can result in a confined space. 5. Gently move backward to the right. 9. Gently move the joystick lever backward, and the chair will move in a circle to the left , the chair will move backward to the right. Avoid driving on ...
...minimum if you are a less experienced driver or are automatically engaged. 6. Move the joystick lever fully right. Note that if the joystick is flashing, the controller has sensed a fault condition. If you move the joystick gently back and to the left . Learn the characteristics of your power wheelchair and... to loss of control or tip-over and can result in a confined space. 5. Gently move backward to the right. 9. Gently move the joystick lever backward, and the chair will move in a circle to the left , the chair will move backward to the right. Avoid driving on ...
User Manual
Page 20
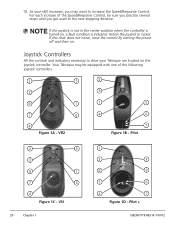
... each increase of the Speed/Response Control, be equipped with one of the following joystick controllers. 2 5 2 3 3 9 1 1 5 7 6 4 6 4 Figure 1A - VSI 20 Chapter 1 1 2 3 8 9 5 6 4 7 Figure 1D - Joystick Controllers All the controls and indicators necessary to increase the Speed/Response Control. Your Teknique may be sure you practice several stops until you may want to drive your...
... each increase of the Speed/Response Control, be equipped with one of the following joystick controllers. 2 5 2 3 3 9 1 1 5 7 6 4 6 4 Figure 1A - VSI 20 Chapter 1 1 2 3 8 9 5 6 4 7 Figure 1D - Joystick Controllers All the controls and indicators necessary to increase the Speed/Response Control. Your Teknique may be sure you practice several stops until you may want to drive your...
User Manual
Page 21
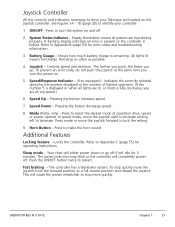
... Figures 1A - 1D (page 20) to identify your Teknique are located on . 5. To prevent an error code, do not push the joystick at top speed.) 6. Pressing the button increases speed. 7. Additional Features Locking feature - Joystick Controller All the controls and indicators necessary to drive your controller...number of operation drive, speed or power options. Speed Down - Mode (Pilot+ only) - In speed mode, move the joystick right to stop quickly move the joystick forward to lock the setting. 9. Horn Button - Locks the controller. Refer to Appendix B (page 53) for 5 minutes...
... Figures 1A - 1D (page 20) to identify your Teknique are located on . 5. To prevent an error code, do not push the joystick at top speed.) 6. Pressing the button increases speed. 7. Additional Features Locking feature - Joystick Controller All the controls and indicators necessary to drive your controller...number of operation drive, speed or power options. Speed Down - Mode (Pilot+ only) - In speed mode, move the joystick right to stop quickly move the joystick forward to lock the setting. 9. Horn Button - Locks the controller. Refer to Appendix B (page 53) for 5 minutes...

User Manual
Page 25
... pins on the front of battery. • DO NOT attempt to use the charger as a DC power source for any non-rechargeable type of the joystick controller. • ONLY USE to Figure 2A below. If it is fully seated in the OFF position. 3. Do not attempt to charge any other type... a frozen battery. 1. Refer to charge AGM sealed lead acid batteries. Connect the charger output cord into the charger port located on the plug with the joystick controller in the charger port. Make sure the plug is not pushed all the way, the batteries will not charge or the plug may become...
... pins on the front of battery. • DO NOT attempt to use the charger as a DC power source for any non-rechargeable type of the joystick controller. • ONLY USE to Figure 2A below. If it is fully seated in the OFF position. 3. Do not attempt to charge any other type... a frozen battery. 1. Refer to charge AGM sealed lead acid batteries. Connect the charger output cord into the charger port located on the plug with the joystick controller in the charger port. Make sure the plug is not pushed all the way, the batteries will not charge or the plug may become...

User Manual
Page 26
...). 7. A light will illuminate on , the batteries are connected. When two red lights are on the output side of the charger. 5. Unplug the charger from the joystick controller. If you are ready to make sure the charger is working . 2. UPG 24BC5000TF-1 AGM sealed lead acid Charger 1. If no lights are charged. 26...
...). 7. A light will illuminate on , the batteries are connected. When two red lights are on the output side of the charger. 5. Unplug the charger from the joystick controller. If you are ready to make sure the charger is working . 2. UPG 24BC5000TF-1 AGM sealed lead acid Charger 1. If no lights are charged. 26...

User Manual
Page 28
... increases the chance of serious injury or death from the seat and can lead to your power wheelchair, a good view of the joystick/controller and comfortable hand access to the joystick and speed/response control. • Inspect all areas of the skin in serious injury or death. A good driving posture is necessary...
... increases the chance of serious injury or death from the seat and can lead to your power wheelchair, a good view of the joystick/controller and comfortable hand access to the joystick and speed/response control. • Inspect all areas of the skin in serious injury or death. A good driving posture is necessary...
User Manual
Page 41
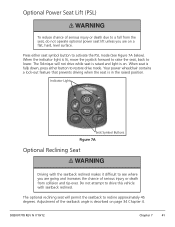
... seatback angle is lit, move the joystick forward to raise the seat, back to lower. The optional reclining seat will not drive while seat is raised and light is in the raised position. When the indicator light is described on page 34 Chapter 4. The Teknique will permit the seatback to recline approximately...
... seatback angle is lit, move the joystick forward to raise the seat, back to lower. The optional reclining seat will not drive while seat is raised and light is in the raised position. When the indicator light is described on page 34 Chapter 4. The Teknique will permit the seatback to recline approximately...

User Manual
Page 44
.... Weekly • Check tire treads and pressure. (Should be driven when PSL is raised and controller is ON. • Check that the rubber boot around joystick is intact. • Check that all seat swivel screws are tight (if so equipped). • Check that the armrest bolts are free to ensure that...
.... Weekly • Check tire treads and pressure. (Should be driven when PSL is raised and controller is ON. • Check that the rubber boot around joystick is intact. • Check that all seat swivel screws are tight (if so equipped). • Check that the armrest bolts are free to ensure that...

User Manual
Page 45
...a damp cloth or towel. Brush-off loose material with a dry bristle brush and wipe with a damp cloth or towel, using a mild detergent. Joystick - Top Cover - Tires - Never spray the chair with a cotton swab, using a mild detergent or window cleaner. Ensure that the power switch ...is designed to operate both inside and outside the home. Cleaning your Teknique The Teknique is off before attempting to clean. Food-type contaminants can be removed from around the joystick boot by carefully cleaning with liquid. To keep the vehicle clean: Seat -
...a damp cloth or towel. Brush-off loose material with a dry bristle brush and wipe with a damp cloth or towel, using a mild detergent. Joystick - Top Cover - Tires - Never spray the chair with a cotton swab, using a mild detergent or window cleaner. Ensure that the power switch ...is designed to operate both inside and outside the home. Cleaning your Teknique The Teknique is off before attempting to clean. Food-type contaminants can be removed from around the joystick boot by carefully cleaning with liquid. To keep the vehicle clean: Seat -

User Manual
Page 48
... correctly routed. Grasp the seat from seat if so attached. 3. Ample cable is provided to allow the arm to lift. The cable that joins the joystick to the junction box is a critical part of seats with post mount Socket Head Cap Screw Removal Figure 9D (Seats with the 1/4 inch hex wrench...
... correctly routed. Grasp the seat from seat if so attached. 3. Ample cable is provided to allow the arm to lift. The cable that joins the joystick to the junction box is a critical part of seats with post mount Socket Head Cap Screw Removal Figure 9D (Seats with the 1/4 inch hex wrench...
User Manual
Page 54
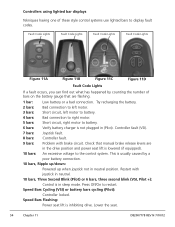
...has happened by a poor battery connection. 10 bars, Ripple up/down: Powered up when joystick not in neutral position. Controller fault (VSI). 7 bars: Joystick fault. 8 bars: Controller fault. 9 bars: Problem with joystick in neutral. 10 bars, Three Second Blink (Pilot) or 6 bars, three second ...blink (VSI, Pilot +): Control is not plugged in sleep mode. This is inhibiting drive. Restart with brake circuit. Controllers using lighted bar displays Tekniques having one of bars ...
...has happened by a poor battery connection. 10 bars, Ripple up/down: Powered up when joystick not in neutral position. Controller fault (VSI). 7 bars: Joystick fault. 8 bars: Controller fault. 9 bars: Problem with joystick in neutral. 10 bars, Three Second Blink (Pilot) or 6 bars, three second ...blink (VSI, Pilot +): Control is not plugged in sleep mode. This is inhibiting drive. Restart with brake circuit. Controllers using lighted bar displays Tekniques having one of bars ...
User Manual
Page 56
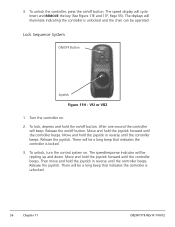
... the controller, press the on/off button. VSI or VR2 1. Move and hold the joystick in reverse until the controller beeps. After one second the controller will cycle. Release the joystick. The speed/response indicator will be a long beep that indicates the controller is unlocked. ...on /off button. To lock, depress and hold the joystick forward until the controller beeps. Lock Sequence System ON/OFF Button Joystick Figure 11H - To unlock, turn the control system on . 2. Move and hold the joystick in reverse until the controller beeps. Turn the controller on...
... the controller, press the on/off button. VSI or VR2 1. Move and hold the joystick in reverse until the controller beeps. After one second the controller will cycle. Release the joystick. The speed/response indicator will be a long beep that indicates the controller is unlocked. ...on /off button. To lock, depress and hold the joystick forward until the controller beeps. Lock Sequence System ON/OFF Button Joystick Figure 11H - To unlock, turn the control system on . 2. Move and hold the joystick in reverse until the controller beeps. Turn the controller on...


