
Instruction Manual
Page 2
... equipment and receiver. NO USER SERVICEABLE PARTS INSIDE. The exclamation point within the product's enclosure that the cable ground shall be of sufficient magnitude to section 820-40 of the NEC which the receiver is provided to call the CATV system installer's attention to constitute a risk of important operating and maintenance (servicing) instructions in accordance with the limits for help. However, there...
... equipment and receiver. NO USER SERVICEABLE PARTS INSIDE. The exclamation point within the product's enclosure that the cable ground shall be of sufficient magnitude to section 820-40 of the NEC which the receiver is provided to call the CATV system installer's attention to constitute a risk of important operating and maintenance (servicing) instructions in accordance with the limits for help. However, there...

Instruction Manual
Page 4
... you can use the buttons and controls on the plug, not the AC power cord. Indicates that this example, 2 seconds). • If no user serviceable parts inside the arrow, press and hold the button for an extended period of the buttons. 2 sec. Introduction English Thank you want to obtain the best possible performance from the wall outlet. Please read all instructions carefully before operating any...
... you can use the buttons and controls on the plug, not the AC power cord. Indicates that this example, 2 seconds). • If no user serviceable parts inside the arrow, press and hold the button for an extended period of the buttons. 2 sec. Introduction English Thank you want to obtain the best possible performance from the wall outlet. Please read all instructions carefully before operating any...

Instruction Manual
Page 5
... Remote Control 3 Step 3: Hook Up 4 Before Operating the System 6 Daily Operations-Playback 7 Listening to the Radio 8 Playable Media and Files 9 Playing Back a Disc 9 Playing Back a USB Mass Storage Class Device 9 Playing Back Discs/Files 10 Playing Back Other Equipment 10 Daily Operations-Sound & Other Adjustments 11 Adjusting the Volume 11 Adjusting the Sound 11 Setting the Clock 12 Turning Off the Power Automatically-Sleep Timer ..... 12 Advanced Disc/USB Mass Storage Class Device Operations 13 Programming the Playing Order- Program Play...
... Remote Control 3 Step 3: Hook Up 4 Before Operating the System 6 Daily Operations-Playback 7 Listening to the Radio 8 Playable Media and Files 9 Playing Back a Disc 9 Playing Back a USB Mass Storage Class Device 9 Playing Back Discs/Files 10 Playing Back Other Equipment 10 Daily Operations-Sound & Other Adjustments 11 Adjusting the Volume 11 Adjusting the Sound 11 Setting the Clock 12 Turning Off the Power Automatically-Sleep Timer ..... 12 Advanced Disc/USB Mass Storage Class Device Operations 13 Programming the Playing Order- Program Play...

Instruction Manual
Page 7
Turn the power off to all connections are complete. Main unit Left speaker To a wall outlet Plug the AC power cord only after all components before connections. FM antenna (supplied) Extend it until the best reception is obtained. Red Black 4 Right speaker AM loop antenna (supplied) Turn it so that you need more detailed information, see page 5. English Step 3: Hook Up If you can obtain the best reception.
Turn the power off to all connections are complete. Main unit Left speaker To a wall outlet Plug the AC power cord only after all components before connections. FM antenna (supplied) Extend it until the best reception is obtained. Red Black 4 Right speaker AM loop antenna (supplied) Turn it so that you need more detailed information, see page 5. English Step 3: Hook Up If you can obtain the best reception.

Instruction Manual
Page 8
... terminals, connecting cords and the AC power cord. Also, keep the antenna away from metallic parts of the System, connecting cords, and the AC power cord. Unlock For better FM/AM reception Outdoor FM antenna (not supplied) Disconnect the supplied FM antenna, and connect to connect the wire correctly. 1. Lock 2. Release 2. English To connect the AM loop antenna Make sure to an outdoor FM antenna using a 75 Ω wire with the metallic parts of the System.
... terminals, connecting cords and the AC power cord. Also, keep the antenna away from metallic parts of the System, connecting cords, and the AC power cord. Unlock For better FM/AM reception Outdoor FM antenna (not supplied) Disconnect the supplied FM antenna, and connect to connect the wire correctly. 1. Lock 2. Release 2. English To connect the AM loop antenna Make sure to an outdoor FM antenna using a 75 Ω wire with the metallic parts of the System.

Instruction Manual
Page 9
...; Lights when an audio CD is detected. 7 PROG. (Program) indicator • Lights when preset station is selected. • Lights when Program Play is activated. 8 Play/pause indicators • 3: Lights when a disc/USB mass storage class device is played back. • 8: Lights when a disc/USB mass storage class device is paused. 9 USB indicator • Lights when a USB mass storage class device is connected. • Flashes when it is activated. w HBS indicator Lights when HBS (Hyper Bass Sound) mode...
...; Lights when an audio CD is detected. 7 PROG. (Program) indicator • Lights when preset station is selected. • Lights when Program Play is activated. 8 Play/pause indicators • 3: Lights when a disc/USB mass storage class device is played back. • 8: Lights when a disc/USB mass storage class device is paused. 9 USB indicator • Lights when a USB mass storage class device is connected. • Flashes when it is activated. w HBS indicator Lights when HBS (Hyper Bass Sound) mode...

Instruction Manual
Page 10
... (when "-- -- --" appears). The STANDBY lamp on the main unit. The sound will activate the speakers again. otherwise, the sudden blast of headphones to the PHONES jack on the main unit turns off (standby) the System with the volume set to select numbers 1 2 3 Examples: To select number 5, 4 5 6 press 5. English Number buttons PRESET 1,y, 4,x TUNING/ GROUP K,5 Daily Operations-Playback DISPLAY/ PROGRAM STOP 7 1 Turn on the System or start playback source on standby. To select number 125, press => 10 →...
... (when "-- -- --" appears). The STANDBY lamp on the main unit. The sound will activate the speakers again. otherwise, the sudden blast of headphones to the PHONES jack on the main unit turns off (standby) the System with the volume set to select numbers 1 2 3 Examples: To select number 5, 4 5 6 press 5. English Number buttons PRESET 1,y, 4,x TUNING/ GROUP K,5 Daily Operations-Playback DISPLAY/ PROGRAM STOP 7 1 Turn on the System or start playback source on standby. To select number 125, press => 10 →...

Instruction Manual
Page 11
... the preset station. 1 2 3 To select a number, see "How to listen From the remote control: FM/AM/ AUDIO IN FM FM MONO A_IN AM (AUDIO IN) On the main unit: FM FM MONO AM Reception will stop searching manually, press either button. • When you want to a preset station 1 Select a band (FM or AM). indicator lights up . DISPLAY/ PROGRAM kHz MHz To tune in to preset. 2 Activate the preset number entry mode...
... the preset station. 1 2 3 To select a number, see "How to listen From the remote control: FM/AM/ AUDIO IN FM FM MONO A_IN AM (AUDIO IN) On the main unit: FM FM MONO AM Reception will stop searching manually, press either button. • When you want to a preset station 1 Select a band (FM or AM). indicator lights up . DISPLAY/ PROGRAM kHz MHz To tune in to preset. 2 Activate the preset number entry mode...

Instruction Manual
Page 12
...; You can connect a USB mass storage class device such as a USB flash memory device, Digital Audio Player (DAP) to this product may not play back a disc To start : To pause: To stop : STOP To release, press again. • The USB indicator on the display lights while USB MEMORY is selected. 9 Therefore, the use the USB 2.0 cable whose length is less than 1 m. • Always set volume to its manual. • Microsoft...
...; You can connect a USB mass storage class device such as a USB flash memory device, Digital Audio Player (DAP) to this product may not play back a disc To start : To pause: To stop : STOP To release, press again. • The USB indicator on the display lights while USB MEMORY is selected. 9 Therefore, the use the USB 2.0 cable whose length is less than 1 m. • Always set volume to its manual. • Microsoft...

Instruction Manual
Page 13
... the track. English Playing Back Discs/Files To select a track/group To select a track: PRESET Selects the next tracks. DISPLAY/ PROGRAM ID3 ON ID3 OFF ID3/WMA tag information is reached. Stereo mini plug cord (not supplied) IMPORTANT • Always set volume to select numbers" on the display. Playing Back Other Equipment To connect other equipment. To select AUDIO IN From the remote control: FM/AM/ AUDIO IN FM A_IN (AUDIO IN) On the...
... the track. English Playing Back Discs/Files To select a track/group To select a track: PRESET Selects the next tracks. DISPLAY/ PROGRAM ID3 ON ID3 OFF ID3/WMA tag information is reached. Stereo mini plug cord (not supplied) IMPORTANT • Always set volume to select numbers" on the display. Playing Back Other Equipment To connect other equipment. To select AUDIO IN From the remote control: FM/AM/ AUDIO IN FM A_IN (AUDIO IN) On the...

Instruction Manual
Page 14
... music. Adjusting the Sound To reinforce the bass sound-HBS Remote ONLY You can adjust the volume level from level 0 ("VOL MIN") to level 31 ("VOL MAX"). Remote To drop the volume in a moment ONLY FADE MUTING To restore the volume, press again, or adjust the volume level. Remote control: Main unit: VOLUME 4, x SOUND MODE HBS Main unit 4, x SOUND MODE FADE MUTING VOLUME +/- English Daily Operations-Sound & Other Adjustments Remote control CLOCK/ SLEEP Adjusting the Volume You can enjoy powerful bass sound with the Hyper-Bass Sound...
... music. Adjusting the Sound To reinforce the bass sound-HBS Remote ONLY You can adjust the volume level from level 0 ("VOL MIN") to level 31 ("VOL MAX"). Remote To drop the volume in a moment ONLY FADE MUTING To restore the volume, press again, or adjust the volume level. Remote control: Main unit: VOLUME 4, x SOUND MODE HBS Main unit 4, x SOUND MODE FADE MUTING VOLUME +/- English Daily Operations-Sound & Other Adjustments Remote control CLOCK/ SLEEP Adjusting the Volume You can enjoy powerful bass sound with the Hyper-Bass Sound...

Instruction Manual
Page 15
... 2 Specify the shut-off time (in clock starts working. To check the current time during play CLOCK/ SLEEP The time is a power failure The clock loses its settings and "AM 12:00" flashes. You need to set the clock only when the System is turned off (on standby). 1 Turn off time 2 sec. Turning Off the Power Automatically -Sleep Timer 1 Activate the sleep timer mode. 2 sec...
... 2 Specify the shut-off time (in clock starts working. To check the current time during play CLOCK/ SLEEP The time is a power failure The clock loses its settings and "AM 12:00" flashes. You need to set the clock only when the System is turned off (on standby). 1 Turn off time 2 sec. Turning Off the Power Automatically -Sleep Timer 1 Activate the sleep timer mode. 2 sec...

Instruction Manual
Page 16
... start playback. • You can repeat the programmed tracks by pressing REPEAT. 1 Select the source. For audio CD: Select a track. MP3 CD DISPLAY/ PROGRAM Group number Program Play You can arrange the playing order of the tracks (up to 32) before you want for Program Play. For audio CD: DISPLAY/ PROGRAM PROG. English Advanced Disc/USB Mass Storage Class Device Operations Remote control Number buttons CD 6 4, x TUNING/ GROUP K, 5 RANDOM DISPLAY/ PROGRAM USB MEMORY 6 STOP 7 REPEAT Programming the Playing Order-
... start playback. • You can repeat the programmed tracks by pressing REPEAT. 1 Select the source. For audio CD: Select a track. MP3 CD DISPLAY/ PROGRAM Group number Program Play You can arrange the playing order of the tracks (up to 32) before you want for Program Play. For audio CD: DISPLAY/ PROGRAM PROG. English Advanced Disc/USB Mass Storage Class Device Operations Remote control Number buttons CD 6 4, x TUNING/ GROUP K, 5 RANDOM DISPLAY/ PROGRAM USB MEMORY 6 STOP 7 REPEAT Programming the Playing Order-

Instruction Manual
Page 17
... number buttons during Program Play. 14 To add step in the following cases: • When you open the CD door while the source is disc. • When you want to program the other tracks. 6 Start playback. English (2) Select a track. Edit: 1 Press DISPLAY/PROGRAM repeatedly until "00" is stopped... CD or USB MEMORY The tracks you have selected are also erased in the program: 1 Press DISPLAY/PROGRAM...
... number buttons during Program Play. 14 To add step in the following cases: • When you open the CD door while the source is disc. • When you want to program the other tracks. 6 Start playback. English (2) Select a track. Edit: 1 Press DISPLAY/PROGRAM repeatedly until "00" is stopped... CD or USB MEMORY The tracks you have selected are also erased in the program: 1 Press DISPLAY/PROGRAM...

Instruction Manual
Page 19
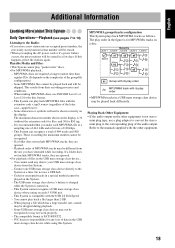
... 6 STOP 7 TIMER Continued on the next page 16 TIMER TIMER 2 Set the On Time. (1) Set the hour. English Remote control TIMER USB MEMORY 6 CD 6 4, x Daily Timer Operations FM/AM/ AUDIO IN STOP 7 Setting the Daily Timer Using the Daily Timer, you can wake up with music, etc. • Set the clock before setting the Daily Timer. (See page 12.) • To exit...
... 6 STOP 7 TIMER Continued on the next page 16 TIMER TIMER 2 Set the On Time. (1) Set the hour. English Remote control TIMER USB MEMORY 6 CD 6 4, x Daily Timer Operations FM/AM/ AUDIO IN STOP 7 Setting the Daily Timer Using the Daily Timer, you can wake up with music, etc. • Set the clock before setting the Daily Timer. (See page 12.) • To exit...

Instruction Manual
Page 20
... the display and the TIMER lamp on the main unit light. USB FM/AM/ CD MEMORY AUDIO IN TIMER When you select "TUNER" -1 Press 4/x to select "AM PRE" or "FM PRE", then press TIMER. -2 Press 4/x to the playback source setting. When the off-time comes The System stops playback and turns off (standby). • The Daily Timer setting remains in to the specified station...
... the display and the TIMER lamp on the main unit light. USB FM/AM/ CD MEMORY AUDIO IN TIMER When you select "TUNER" -1 Press 4/x to select "AM PRE" or "FM PRE", then press TIMER. -2 Press 4/x to the playback source setting. When the off-time comes The System stops playback and turns off (standby). • The Daily Timer setting remains in to the specified station...
Instruction Manual
Page 21
... on . - Connect one you store a new station into an occupied preset number, the previously stored station in the USB mass storage class device... - This System cannot recognize a USB mass storage class device whose rating exceeds 5 V/500 mA. - This System is not stereo mini plug type, use a plug adapter to convert the stereo mini plug to the Radio: • If you have intended while recording. The compatible format is 32...
... on . - Connect one you store a new station into an occupied preset number, the previously stored station in the USB mass storage class device... - This System cannot recognize a USB mass storage class device whose rating exceeds 5 V/500 mA. - This System is not stereo mini plug type, use a plug adapter to convert the stereo mini plug to the Radio: • If you have intended while recording. The compatible format is 32...

Instruction Manual
Page 22
... the AC power cord and then plug it at the remote sensor on the display until you set the clock first, then the timer again. Unable to operate the System from the speakers. ] Speaker connections are incorrect or loose (see page 5). ] Headphones are disabled. ] The built-in . Advanced Disc/USB Mass Storage Class Device Operations (see pages 13 to 15) Programming the Playing Order-Program Play: • If...
... the AC power cord and then plug it at the remote sensor on the display until you set the clock first, then the timer again. Unable to operate the System from the speakers. ] Speaker connections are incorrect or loose (see page 5). ] Headphones are disabled. ] The built-in . Advanced Disc/USB Mass Storage Class Device Operations (see pages 13 to 15) Programming the Playing Order-Program Play: • If...

Instruction Manual
Page 23
... Timer Operations: The Daily Timer does not work. ] The System has been turned on when the on the display. ] On-time and off , be wiped off -time. Maintenance To get its paint peeled off -time are set to remain in contact for on-time and off with thinner or benzine. - DO NOT wipe it . - The disc sound is...
... Timer Operations: The Daily Timer does not work. ] The System has been turned on when the on the display. ] On-time and off , be wiped off -time. Maintenance To get its paint peeled off -time are set to remain in contact for on-time and off with thinner or benzine. - DO NOT wipe it . - The disc sound is...

Instruction Manual
Page 24
... tuning range: AM tuning range: 87.5 MHz - 108.0 MHz 530 kHz - 1 710 kHz General Power requirement: Power consumption: Dimensions (approx.): Mass (approx.): AC 120 V , 60 Hz 35 W (at 1 kHz with no more than 10% total harmonic distortion. 4 Ω - 8 Ω Terminals AUDIO IN: Input sensitivity/Impedance: 250 mV/50 kΩ USB MEMORY: USB specification Compatible with USB 2.0 Full- English Specifications Amplifier section Output Power: Speakers/Impedance: 8 W per channel...
... tuning range: AM tuning range: 87.5 MHz - 108.0 MHz 530 kHz - 1 710 kHz General Power requirement: Power consumption: Dimensions (approx.): Mass (approx.): AC 120 V , 60 Hz 35 W (at 1 kHz with no more than 10% total harmonic distortion. 4 Ω - 8 Ω Terminals AUDIO IN: Input sensitivity/Impedance: 250 mV/50 kΩ USB MEMORY: USB specification Compatible with USB 2.0 Full- English Specifications Amplifier section Output Power: Speakers/Impedance: 8 W per channel...


