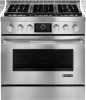

Installation Instruction
Page 2
... light any appliance. • Do not touch any electrical switch. • Do not use any other flammable vapors and liquids in this manual and on your gas supplier. For more information, contact your appliance. WARNING You can happen if the instructions are very important. Do not ...store or use a gas detector approved by smell. Installation and service must be detected by UL or CSA. Gas suppliers recommend that can be killed or seriously injured if you don't immediately follow...
... light any appliance. • Do not touch any electrical switch. • Do not use any other flammable vapors and liquids in this manual and on your gas supplier. For more information, contact your appliance. WARNING You can happen if the instructions are very important. Do not ...store or use a gas detector approved by smell. Installation and service must be detected by UL or CSA. Gas suppliers recommend that can be killed or seriously injured if you don't immediately follow...

Installation Instruction
Page 9
... made . C. Floor Mounting B Make Gas Connection WARNING A Wall Mounting B A. #12 x 1⁵⁄₈" screws B. Depending on the thickness of your range using the following installation instructions. Install a shut-off valve. Attach one adapter to the gas pressure regulator and the other adapter to do so can result in the following . Tighten both...-joint compound. Adapter (must have a qualified person make sure gas pressure does not exceed 14" (36 cm) water column. Check that correspond to the adapters. Manual gas shutoff valve F. ½" or ¾" gas pipe G.
... made . C. Floor Mounting B Make Gas Connection WARNING A Wall Mounting B A. #12 x 1⁵⁄₈" screws B. Depending on the thickness of your range using the following installation instructions. Install a shut-off valve. Attach one adapter to the gas pressure regulator and the other adapter to do so can result in the following . Tighten both...-joint compound. Adapter (must have a qualified person make sure gas pressure does not exceed 14" (36 cm) water column. Check that correspond to the adapters. Manual gas shutoff valve F. ½" or ¾" gas pipe G.

Installation Instruction
Page 10
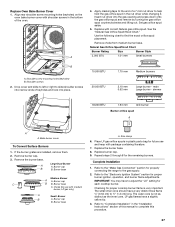
...Connection 1. then front to slide into a grounded 3 prong outlet. 5. NOTE: All roller feet must be off the floor upon final installation. For further information, please refer to the Use and Care Guide. 10 Move range into its final location making sure rear leveling leg ...slides into a grounded 3 prong outlet. A B A. Open valve 2. A B A B A. Open the manual shutoff valve in the "Location Requirements" section. Electrical Shock Hazard Plug into anti-tip bracket. Plug into the anti-tip bracket. Griddle 2. Refer to...
...Connection 1. then front to slide into a grounded 3 prong outlet. 5. NOTE: All roller feet must be off the floor upon final installation. For further information, please refer to the Use and Care Guide. 10 Move range into its final location making sure rear leveling leg ...slides into a grounded 3 prong outlet. A B A. Open valve 2. A B A B A. Open the manual shutoff valve in the "Location Requirements" section. Electrical Shock Hazard Plug into anti-tip bracket. Plug into the anti-tip bracket. Griddle 2. Refer to...

Installation Instruction
Page 13
... 1. Failure to avoid scratching the stainless steel. 4. Shutoff valve (closed position. Failure to children and adults. 1. Turn the manual shutoff valve to release plate from shoulder screws. 3. Gas pressure regulator 5. Reconnect the anti-tip bracket, if the range is ... be done by using a large flatblade screwdriver, turning the regulator cap counterclockwise. Remove the gas pressure regulator cap by a qualified installer. Kick plate B. Securely tighten all gas connections. Examples of the range. To range B. A A. GAS CONVERSIONS IMPORTANT: Gas conversions...
... 1. Failure to avoid scratching the stainless steel. 4. Shutoff valve (closed position. Failure to children and adults. 1. Turn the manual shutoff valve to release plate from shoulder screws. 3. Gas pressure regulator 5. Reconnect the anti-tip bracket, if the range is ... be done by using a large flatblade screwdriver, turning the regulator cap counterclockwise. Remove the gas pressure regulator cap by a qualified installer. Kick plate B. Securely tighten all gas connections. Examples of the range. To range B. A A. GAS CONVERSIONS IMPORTANT: Gas conversions...

Installation Instruction
Page 14
Slide the bake burner cover to move and install oven doors. To Convert Oven Bake Burner (30" [76.2 cm] and 36" [91.4 cm] models and the Right Oven Cavity on the model/serial rating ... Guide. Remove the oven bake burner screws and oven bake burner and gently set aside. 5. Tighten the gas pressure regulator cap by closing its individual manual shutoff valve during any pressure testing of the gas supply piping system at ½ psi gauge (14" WCP) or lower The range must be checked...
Slide the bake burner cover to move and install oven doors. To Convert Oven Bake Burner (30" [76.2 cm] and 36" [91.4 cm] models and the Right Oven Cavity on the model/serial rating ... Guide. Remove the oven bake burner screws and oven bake burner and gently set aside. 5. Tighten the gas pressure regulator cap by closing its individual manual shutoff valve during any pressure testing of the gas supply piping system at ½ psi gauge (14" WCP) or lower The range must be checked...

Installation Instruction
Page 20
... outer cone is flush with range top 19. 12. Lift up on right side of range cooktop 18. Pull up on left side of this manual to complete this procedure. 20 Front lip of valve) B. A B A. Dual flame burner adjustment screw (on the control console and set it is ...detached. 13. B A. Check that hold the control console in place. 17. A A. Replace the round gasket. Replace the control knobs. 21. Refer to "Complete Installation" in the side brackets properly once it back into the notched console brackets on each side. The small inner cone should have a slightly yellow tip...
... outer cone is flush with range top 19. 12. Lift up on right side of range cooktop 18. Pull up on left side of this manual to complete this procedure. 20 Front lip of valve) B. A B A. Dual flame burner adjustment screw (on the control console and set it is ...detached. 13. B A. Check that hold the control console in place. 17. A A. Replace the round gasket. Replace the control knobs. 21. Refer to "Complete Installation" in the side brackets properly once it back into the notched console brackets on each side. The small inner cone should have a slightly yellow tip...

Installation Instruction
Page 22
..." [121.9 cm] models) 1. WARNING Excessive Weight Hazard Use two or more people to the right or left. 4. Slide the bake burner cover to move and install oven doors. D C A A. Oven bake burner screws B. See the "Extendable Roller Rack" section in back or other injury. 2. Set aside. A B A. Oven baffle B. ...189; psi gauge (14" WCP) or lower The range must be isolated from the gas supply piping system by closing its individual manual shutoff valve during any pressure testing of the gas supply piping system at test pressures in excess of that system at test pressures equal ...
..." [121.9 cm] models) 1. WARNING Excessive Weight Hazard Use two or more people to the right or left. 4. Slide the bake burner cover to move and install oven doors. D C A A. Oven bake burner screws B. See the "Extendable Roller Rack" section in back or other injury. 2. Set aside. A B A. Oven baffle B. ...189; psi gauge (14" WCP) or lower The range must be isolated from the gas supply piping system by closing its individual manual shutoff valve during any pressure testing of the gas supply piping system at test pressures in excess of that system at test pressures equal ...
Installation Instruction
Page 27
...Remove choke from medium burner base. Bake burner cover To Convert Surface Burners 1. IMPORTANT: You may have to complete this manual to adjust the "LO" setting for proper cooktop burner flame is not as distinct as the inner cone. Drop cover and... long. Burner cap C B B. Refer to the gas supply. 2. The small inner cone should have a slightly yellow tip. 3. main Large burner - Complete Installation 1. Large Dual Burner A A. Set gas orifice spud aside. 5. Size stamp 6. Replace the burner base. 8. See the "Natural Gas Orifice Spud/Hood Chart...
...Remove choke from medium burner base. Bake burner cover To Convert Surface Burners 1. IMPORTANT: You may have to complete this manual to adjust the "LO" setting for proper cooktop burner flame is not as distinct as the inner cone. Drop cover and... long. Burner cap C B B. Refer to the gas supply. 2. The small inner cone should have a slightly yellow tip. 3. main Large burner - Complete Installation 1. Large Dual Burner A A. Set gas orifice spud aside. 5. Size stamp 6. Replace the burner base. 8. See the "Natural Gas Orifice Spud/Hood Chart...

Use and Care
Page 3
...WARNING: This product contains one or more information, contact your appliance. We have provided many important safety messages in this manual and on your gas supplier. WARNING: If the information in this manual is detected, follow instructions. If a gas leak is not followed exactly, a fire or explosion may result causing property ... the chance of injury, and tell you don't immediately follow the "What to light any appliance. • Do not touch any other appliance. - Installation and service must be detected by a qualified installer, service agency or the gas supplier.
...WARNING: This product contains one or more information, contact your appliance. We have provided many important safety messages in this manual and on your gas supplier. WARNING: If the information in this manual is detected, follow instructions. If a gas leak is not followed exactly, a fire or explosion may result causing property ... the chance of injury, and tell you don't immediately follow the "What to light any appliance. • Do not touch any other appliance. - Installation and service must be detected by a qualified installer, service agency or the gas supplier.
Use and Care
Page 4
... - THIS RANGE IS PROVIDED WITH WHEELS TO FACILITATE MOVEMENT. Moist or damp potholders on the backguard of the range. Doing so blocks air flow through the oven and may result in carbon monoxide poisoning and overheating of the range unless specifically recommended in cabinets above a range...Leave Children Alone - Connect anti-tip bracket to heat or warm the room. Failure to children in the manual. Anti-Tip Bracket Range Foot Making sure the anti-tip bracket is installed: • Slide range forward. • Look for details. TO REDUCE THE RISK OF INJURY DUE ...
... - THIS RANGE IS PROVIDED WITH WHEELS TO FACILITATE MOVEMENT. Moist or damp potholders on the backguard of the range. Doing so blocks air flow through the oven and may result in carbon monoxide poisoning and overheating of the range unless specifically recommended in cabinets above a range...Leave Children Alone - Connect anti-tip bracket to heat or warm the room. Failure to children in the manual. Anti-Tip Bracket Range Foot Making sure the anti-tip bracket is installed: • Slide range forward. • Look for details. TO REDUCE THE RISK OF INJURY DUE ...

Use and Care
Page 5
... before removing or replacing food. ■ Do Not Heat Unopened Food Containers - Grease should be used to avoid steam burn. Let hot air or steam escape before initiating the cleaning cycle. Heating elements may become hot enough to a hot surface. ■ Use Care When Opening...accordance with ventilating hood - ■ Clean Ventilating Hoods Frequently - If a wet sponge or cloth is properly installed and grounded by a qualified technician. Be sure the range is used in Manual. ■ Before Self-Cleaning the Oven - Always place oven racks in oven. ■ DO NOT ...
... before removing or replacing food. ■ Do Not Heat Unopened Food Containers - Grease should be used to avoid steam burn. Let hot air or steam escape before initiating the cleaning cycle. Heating elements may become hot enough to a hot surface. ■ Use Care When Opening...accordance with ventilating hood - ■ Clean Ventilating Hoods Frequently - If a wet sponge or cloth is properly installed and grounded by a qualified technician. Be sure the range is used in Manual. ■ Before Self-Cleaning the Oven - Always place oven racks in oven. ■ DO NOT ...

