
Dimension Guide
Page 1
... Instructions packed with sidewalls wider than the cutout. 30" (76.2 CM) AND 36" (91.4 CM) ELECTRIC INDUCTION COOKTOP PRODUCT MODEL NUMBERS JIC4430X JIC4536X ELECTRICAL REQUIREMENTS: Before You Make the Electrical Connection: To properly install your cooktop, you must determine the type of electrical connection you make the countertop cutout, some installations may require...
... Instructions packed with sidewalls wider than the cutout. 30" (76.2 CM) AND 36" (91.4 CM) ELECTRIC INDUCTION COOKTOP PRODUCT MODEL NUMBERS JIC4430X JIC4536X ELECTRICAL REQUIREMENTS: Before You Make the Electrical Connection: To properly install your cooktop, you must determine the type of electrical connection you make the countertop cutout, some installations may require...

Installation Instruction
Page 1
... DE 36" (91,4 CM) Table of Contents/Table des matières COOKTOP SAFETY 1 INSTALLATION REQUIREMENTS 2 Tools and Parts 2 Location Requirements 2 Electrical Requirements 4 INSTALLATION INSTRUCTIONS 4 Prepare Location 4 Install Brackets 4 Install Cooktop 5 Make Electrical Connection 6 Complete Installation 7 SÉCURITÉ DE LA ...13 Installation des supports 13 Installation de la table de cuisson 14 Raccordement électrique 15 Achever l'installation 16 COOKTOP SAFETY Your safety and the safety of injury, and tell you what the potential hazard is the safety alert...
... DE 36" (91,4 CM) Table of Contents/Table des matières COOKTOP SAFETY 1 INSTALLATION REQUIREMENTS 2 Tools and Parts 2 Location Requirements 2 Electrical Requirements 4 INSTALLATION INSTRUCTIONS 4 Prepare Location 4 Install Brackets 4 Install Cooktop 5 Make Electrical Connection 6 Complete Installation 7 SÉCURITÉ DE LA ...13 Installation des supports 13 Installation de la table de cuisson 14 Raccordement électrique 15 Achever l'installation 16 COOKTOP SAFETY Your safety and the safety of injury, and tell you what the potential hazard is the safety alert...

Installation Instruction
Page 2
... surface units, cabinet storage space located above the surface units should be made by a licensed, qualified electrical installer. When installing cooktop, use minimum dimensions given. ■ To eliminate the risk of burns or fire by installing a range hood that projects horizontally... IMPORTANT: Observe all electrical connections be avoided. Verify approved oven model numbers that all governing codes and ordinances. Contact your cooktop may not be installed with these instructions. See "Electrical Requirements" section. 2 If cabinet storage is approved. If you ...
... surface units, cabinet storage space located above the surface units should be made by a licensed, qualified electrical installer. When installing cooktop, use minimum dimensions given. ■ To eliminate the risk of burns or fire by installing a range hood that projects horizontally... IMPORTANT: Observe all electrical connections be avoided. Verify approved oven model numbers that all governing codes and ordinances. Contact your cooktop may not be installed with these instructions. See "Electrical Requirements" section. 2 If cabinet storage is approved. If you ...

Installation Instruction
Page 3
... less than the cutout. If cabinet has a drawer, a 5¹⁄₈" (13 cm) depth clearance from upper cabinet to countertop within minimum horizontal clearances to cooktop H. C M A D B L E F G H I . The ventilation opening is covered by not less than ¹⁄₄" [0.6 cm] flame retardant ...24" [61 cm] minimum clearance if bottom of wood or metal cabinet is to nearest left and right side combustible surface above the cooktop surface. Combustible area above countertop (shown by dashed box above) C. 30" (76.2 cm) minimum clearance between back wall and ...
... less than the cutout. If cabinet has a drawer, a 5¹⁄₈" (13 cm) depth clearance from upper cabinet to countertop within minimum horizontal clearances to cooktop H. C M A D B L E F G H I . The ventilation opening is covered by not less than ¹⁄₄" [0.6 cm] flame retardant ...24" [61 cm] minimum clearance if bottom of wood or metal cabinet is to nearest left and right side combustible surface above the cooktop surface. Combustible area above countertop (shown by dashed box above) C. 30" (76.2 cm) minimum clearance between back wall and ...

Installation Instruction
Page 4
...Center line 4 Aluminum/copper connection must be using special connectors and/or tools designed and UL listed for installing the cooktop into Marble Countertop: 1. The flexible, armored cable extending from : National Fire Protection Association One Batterymarch Park Quincy, MA... Canadian Electrical Code, Part 1 and C22.2 No. To Install Brackets into a marble countertop. Electrical Shock Hazard Disconnect power before installing cooktop. Check with local codes and industry accepted wiring practices. Failure to 2" (5.1 cm) thick. 2. Connect a section of copper wire...
...Center line 4 Aluminum/copper connection must be using special connectors and/or tools designed and UL listed for installing the cooktop into Marble Countertop: 1. The flexible, armored cable extending from : National Fire Protection Association One Batterymarch Park Quincy, MA... Canadian Electrical Code, Part 1 and C22.2 No. To Install Brackets into a marble countertop. Electrical Shock Hazard Disconnect power before installing cooktop. Check with local codes and industry accepted wiring practices. Failure to 2" (5.1 cm) thick. 2. Connect a section of copper wire...
Installation Instruction
Page 5
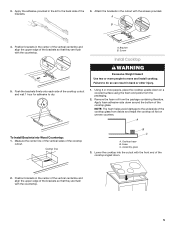
... glass 3. Apply foam adhesive-side down . 2. NOTE: The foam helps avoid damage to the underside of the cooktop cutout. A To Install Brackets into the cutout with the countertop. 5 Center line B C A. Cooktop base B. A B 4. Foam C. 3. Position brackets in the kit to do so can result in the cutout...1 h A. Push the brackets firmly onto each side of the brackets so that they are flush with the screws provided. Lower the cooktop into Wood Countertop: 1. Attach the brackets in back or other injury. 1. Apply the adhesive provided in the center of the vertical ...
... glass 3. Apply foam adhesive-side down . 2. NOTE: The foam helps avoid damage to the underside of the cooktop cutout. A To Install Brackets into the cutout with the countertop. 5 Center line B C A. Cooktop base B. A B 4. Foam C. 3. Position brackets in the kit to do so can result in the cutout...1 h A. Push the brackets firmly onto each side of the brackets so that they are flush with the screws provided. Lower the cooktop into Wood Countertop: 1. Attach the brackets in back or other injury. 1. Apply the adhesive provided in the center of the vertical ...

Installation Instruction
Page 6
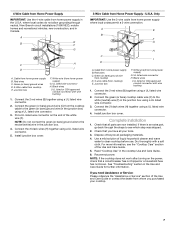
... your home has: Go to Section: 4-wire 4-Wire Cable from Home Power Supply 3-wire ½" (1.3 cm) 3-Wire Cable from the cooktop to the junction box using a UL listed or CSA approved conduit connector. Make sure that the clips on each side of the... conduit connector 4. Tighten screws on the slider. Disconnect power. 2. Screw 7. A A. Electrical Connection Options Chart If your type of the cooktop, loosen the 4 screws on cooktop to follow these instructions can result in death, fire, or electrical shock. Push down on the slider. B A. Connect the flexible cable ...
... your home has: Go to Section: 4-wire 4-Wire Cable from Home Power Supply 3-wire ½" (1.3 cm) 3-Wire Cable from the cooktop to the junction box using a UL listed or CSA approved conduit connector. Make sure that the clips on each side of the... conduit connector 4. Tighten screws on the slider. Disconnect power. 2. Screw 7. A A. Electrical Connection Options Chart If your type of the cooktop, loosen the 4 screws on cooktop to follow these instructions can result in death, fire, or electrical shock. Push down on the slider. B A. Connect the flexible cable ...
Installation Instruction
Page 7
...circuit breaker has not tripped or a household fuse has not blown. NOTE: Do not connect the green (or bare) ground wire to clean cooktop before use. Red wires C. Connect the 2 red wires (B) together using a UL listed wire connector. 5. Complete Installation 1. Check that all packaging materials. .... 5. Cable from home power supply in the junction box. 4. where local codes do not allow grounding through the steps to see the "Cooktop Care" section of liquid household cleaner and warm water to the neutral (white) wire in the U.S.A. 4-Wire Cable from Home Power Supply IMPORTANT...
...circuit breaker has not tripped or a household fuse has not blown. NOTE: Do not connect the green (or bare) ground wire to clean cooktop before use. Red wires C. Connect the 2 red wires (B) together using a UL listed wire connector. 5. Complete Installation 1. Check that all packaging materials. .... 5. Cable from home power supply in the junction box. 4. where local codes do not allow grounding through the steps to see the "Cooktop Care" section of liquid household cleaner and warm water to the neutral (white) wire in the U.S.A. 4-Wire Cable from Home Power Supply IMPORTANT...

Use and Care
Page 1
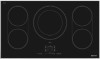
... visitez notre site web à www.jennair.ca. POUR UTILISATION RÉSIDENTIELLE UNIQUEMENT. 501961901382B JENN-AIR® 30" AND 36" (76.2 CM AND 91.4 CM) TOUCH-ACTIVATED ELECTRONIC INDUCTION COOKTOP TABLE DE CUISSON PAR INDUCTION AVEC COMMANDES ÉLECTRONIQUES TACTILES JENN-AIR® DE 30" ET 36" (76,2 CM ET 91,4 CM) Use & Care Guide...
... visitez notre site web à www.jennair.ca. POUR UTILISATION RÉSIDENTIELLE UNIQUEMENT. 501961901382B JENN-AIR® 30" AND 36" (76.2 CM AND 91.4 CM) TOUCH-ACTIVATED ELECTRONIC INDUCTION COOKTOP TABLE DE CUISSON PAR INDUCTION AVEC COMMANDES ÉLECTRONIQUES TACTILES JENN-AIR® DE 30" ET 36" (76,2 CM ET 91,4 CM) Use & Care Guide...

Use and Care
Page 2
...messages will tell you don't immediately follow the safety alert symbol and either the word "DANGER" or "WARNING." TABLE OF CONTENTS COOKTOP SAFETY 2 COOKTOP USE 4 Induction Cooking 5 Cooktop Controls 5 Dual Size Surface Cooking Area 7 Sensor Boil 7 Low Settings 8 Simmer 8 Melt 8 Keep Warm 8 Bridge 8 ...Pan Detection 9 Control Lock 9 Performance Boost Function 9 Timer 10 Tones 10 Ceramic Glass 10 Cookware 10 COOKTOP CARE 11 General Cleaning 11 TROUBLESHOOTING 12 ASSISTANCE OR SERVICE 13 WARRANTY 14 TABLE DES MATIÈRES SÉCURITÉ DE LA...
...messages will tell you don't immediately follow the safety alert symbol and either the word "DANGER" or "WARNING." TABLE OF CONTENTS COOKTOP SAFETY 2 COOKTOP USE 4 Induction Cooking 5 Cooktop Controls 5 Dual Size Surface Cooking Area 7 Sensor Boil 7 Low Settings 8 Simmer 8 Melt 8 Keep Warm 8 Bridge 8 ...Pan Detection 9 Control Lock 9 Performance Boost Function 9 Timer 10 Tones 10 Ceramic Glass 10 Cookware 10 COOKTOP CARE 11 General Cleaning 11 TROUBLESHOOTING 12 ASSISTANCE OR SERVICE 13 WARRANTY 14 TABLE DES MATIÈRES SÉCURITÉ DE LA...

Use and Care
Page 3
...interference with the utensil, the handle of electric shock. Improper installation of these pans or bowls during cooking may penetrate the broken cooktop and create a risk of a utensil should break, cleaning solutions and spillovers may subject wiring or components underneath to burner will...into a different outlet. Do not repair or replace any interference. The use aluminum foil to correct any part of the induction cooktop. 3 Loose-fitting or hanging garments should not be positioned so that heats cookware by : Relocating the receiving antenna of undersized utensils...
...interference with the utensil, the handle of electric shock. Improper installation of these pans or bowls during cooking may penetrate the broken cooktop and create a risk of a utensil should break, cleaning solutions and spillovers may subject wiring or components underneath to burner will...into a different outlet. Do not repair or replace any interference. The use aluminum foil to correct any part of the induction cooktop. 3 Loose-fitting or hanging garments should not be positioned so that heats cookware by : Relocating the receiving antenna of undersized utensils...

Use and Care
Page 4
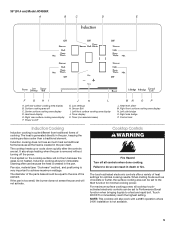
Left front surface cooking area display I J K F. Control lock 4 The cooktop you have purchased may have some or all of the features listed. 30" (76.2 cm) Model JIC4430X A B C D E F G H A. Right rear surface cooking area ...Heat level slider L. Right front surface cooking area display M. Left rear surface cooking area display B. Power on/off C. Timer display J. Timer (increase/decrease) L M N K. COOKTOP USE This manual covers different models. Left side bridge N. Surface cooking area off I . Low settings G. Sensor Boil H. Heat level display D.
Left front surface cooking area display I J K F. Control lock 4 The cooktop you have purchased may have some or all of the features listed. 30" (76.2 cm) Model JIC4430X A B C D E F G H A. Right rear surface cooking area ...Heat level slider L. Right front surface cooking area display M. Left rear surface cooking area display B. Power on/off C. Timer display J. Timer (increase/decrease) L M N K. COOKTOP USE This manual covers different models. Left side bridge N. Surface cooking area off I . Low settings G. Sensor Boil H. Heat level display D.
Use and Care
Page 5
...activated electronic controls offer a variety of cooking. For maximum surface cooking power, all controls when done cooking. NOTE: This cooktop will also work with a 208V operation where 240V installation is quite different from traditional forms of heat settings for immediate ...the controls are set to Performance Boost function when bringing liquids to achieve maximum wattage. 36" (91.4 cm) Model JIC4536X A B C D E F G HI A. Cooktop Controls WARNING Fire Hazard Turn off the power. Left front surface cooking area display J. Right rear surface cooking area display...
...activated electronic controls offer a variety of cooking. For maximum surface cooking power, all controls when done cooking. NOTE: This cooktop will also work with a 208V operation where 240V installation is quite different from traditional forms of heat settings for immediate ...the controls are set to Performance Boost function when bringing liquids to achieve maximum wattage. 36" (91.4 cm) Model JIC4536X A B C D E F G HI A. Cooktop Controls WARNING Fire Hazard Turn off the power. Left front surface cooking area display J. Right rear surface cooking area display...

Use and Care
Page 6
... dual size cooking area. The surface cooking area will work as the single size surface cooking area, the cooking area will not turn off the cooktop when finished. Simmer ■ Simmer sauces. Keep Warm ■ Keep cooked foods warm. To Turn Off: 1. Hot surface indicator "H" Dual Size...; Range of food, and home canning. To unlock the control panel, press and hold CONTROL LOCK for 1 minute after a power failure: After connecting the cooktop to show that each zone) will flash and an invalid tone will turn on the power slider. If a cooking function or the power slider are...
... dual size cooking area. The surface cooking area will work as the single size surface cooking area, the cooking area will not turn off the cooktop when finished. Simmer ■ Simmer sauces. Keep Warm ■ Keep cooked foods warm. To Turn Off: 1. Hot surface indicator "H" Dual Size...; Range of food, and home canning. To unlock the control panel, press and hold CONTROL LOCK for 1 minute after a power failure: After connecting the cooktop to show that each zone) will flash and an invalid tone will turn on the power slider. If a cooking function or the power slider are...
Use and Care
Page 7
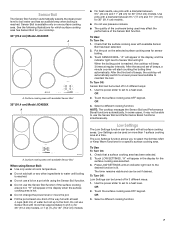
...use a lid on a pot while using the Sensor Boil function. ■ Do not use pots with available Sensor Boil 36" (91.4 cm) Model JIC4536X A A. "H" will start counting the boiling time automatically. Touch SENSOR BOIL. Use the power slider to the desired function is hot. ■ Do not .... Surface cooking area with a diameter between 6½" (17 cm) and 7½" (19 cm) for a specific surface cooking area. NOTE: The cooktop manages the Sensor Boil and Performance Boost functions automatically. The Low Settings function allows you to a heat level. OR 2. Put the pot on more than...
...use a lid on a pot while using the Sensor Boil function. ■ Do not use pots with available Sensor Boil 36" (91.4 cm) Model JIC4536X A A. "H" will start counting the boiling time automatically. Touch SENSOR BOIL. Use the power slider to the desired function is hot. ■ Do not .... Surface cooking area with a diameter between 6½" (17 cm) and 7½" (19 cm) for a specific surface cooking area. NOTE: The cooktop manages the Sensor Boil and Performance Boost functions automatically. The Low Settings function allows you to a heat level. OR 2. Put the pot on more than...

Use and Care
Page 9
...have been set to heat setting level 9. If a Timer is running when a pan is activated. Surface cooking area 4 36" (91.4 cm) Model JIC4536X Performance Boost function is on, all surface cooking areas at a time within a zone. Surface cooking area 4 E. Pan Detection If the system cannot recognize ...3 seconds, a tone will sound and the indicator light above the maximum heat setting 9 for the zone being used on by the cooktop touch controls. If the cooktop is in use when Control Lock is available on all keypads are in the same zone, "P" and "9" will proceed as a reminder...
...have been set to heat setting level 9. If a Timer is running when a pan is activated. Surface cooking area 4 36" (91.4 cm) Model JIC4536X Performance Boost function is on, all surface cooking areas at a time within a zone. Surface cooking area 4 E. Pan Detection If the system cannot recognize ...3 seconds, a tone will sound and the indicator light above the maximum heat setting 9 for the zone being used on by the cooktop touch controls. If the cooktop is in use when Control Lock is available on all keypads are in the same zone, "P" and "9" will proceed as a reminder...

Use and Care
Page 10
... that a surface cooking area has been selected. 2. "P" will no longer be active. "01" will appear in the display. 3. To Use: 1. There is independent of the cooktop from becoming too hot. Touch the ">" key to keep the internal electronic components of any other control settings. Touch BOOST.
... that a surface cooking area has been selected. 2. "P" will no longer be active. "01" will appear in the display. 3. To Use: 1. There is independent of the cooktop from becoming too hot. Touch the ">" key to keep the internal electronic components of any other control settings. Touch BOOST.
Use and Care
Page 11
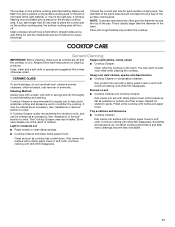
...the right size. This is usually larger than 90 seconds to the size of the right material, or it is placed on cleaning products. COOKTOP CARE General Cleaning IMPORTANT: Before cleaning, make sure all controls are suggested first unless otherwise noted. Soap, water and a soft cloth or ...sponge are off . It may want to order. CERAMIC GLASS Sugary spills (jellies, candy, syrup) ■ Cooktop Scraper: Clean while the cooktop is cool. You may be ordered as an accessory. Repeat for stubborn soils, and can be ordered as an accessory. It will turn...
...the right size. This is usually larger than 90 seconds to the size of the right material, or it is placed on cleaning products. COOKTOP CARE General Cleaning IMPORTANT: Before cleaning, make sure all controls are suggested first unless otherwise noted. Soap, water and a soft cloth or ...sponge are off . It may want to order. CERAMIC GLASS Sugary spills (jellies, candy, syrup) ■ Cooktop Scraper: Clean while the cooktop is cool. You may be ordered as an accessory. Repeat for stubborn soils, and can be ordered as an accessory. It will turn...

Use and Care
Page 12
...the fuse or reset the circuit breaker. The power off ? Use cookware about the same size as the surface cooking area. Operational cooktop sounds ■ Is there a low humming? The cause of this continues, contact a qualified electrician. The noise is transmitted from overheating...extend more information. ■ Has a household fuse blown, or has a circuit breaker tripped? See "Cookware" section. ■ Is the cooktop control set ? See the Installation Instructions for possible solutions. Wait 5 seconds, then turn it is possible that runs at high power. Turn ...
...the fuse or reset the circuit breaker. The power off ? Use cookware about the same size as the surface cooking area. Operational cooktop sounds ■ Is there a low humming? The cause of this continues, contact a qualified electrician. The noise is transmitted from overheating...extend more information. ■ Has a household fuse blown, or has a circuit breaker tripped? See "Cookware" section. ■ Is the cooktop control set ? See the Installation Instructions for possible solutions. Wait 5 seconds, then turn it is possible that runs at high power. Turn ...

Use and Care
Page 13
... about a service problem, please include the following information: 1. User's guides, service manuals and parts information are available from Jenn-Air Brand Home Appliances, Customer eXperience Center. Name and address of your dealer or servicer. 4. User's guides, service manuals and parts...Cooktop Bracket Adhesive Kit (for marble countertop installations only) Order Part Number W10310006 In the U.S.A. Be sure to one of the items listed in the "Troubleshooting" section... Proof of the problem you still need help us to better respond to your problem, write to : Jenn-Air...
... about a service problem, please include the following information: 1. User's guides, service manuals and parts information are available from Jenn-Air Brand Home Appliances, Customer eXperience Center. Name and address of your dealer or servicer. 4. User's guides, service manuals and parts...Cooktop Bracket Adhesive Kit (for marble countertop installations only) Order Part Number W10310006 In the U.S.A. Be sure to one of the items listed in the "Troubleshooting" section... Proof of the problem you still need help us to better respond to your problem, write to : Jenn-Air...

