Connected Appliance Setup Guide
Page 3
... the module is installed must be required. The user manual for the end product must include the following information in accordance with FCC ID and IC Certification Number. To comply with FCC and Industry Canada RF radiation exposure limits for general population, the antenna(s) used for this transmitter must be installed such that interference will be so chosen that type, are...
... the module is installed must be required. The user manual for the end product must include the following information in accordance with FCC ID and IC Certification Number. To comply with FCC and Industry Canada RF radiation exposure limits for general population, the antenna(s) used for this transmitter must be installed such that interference will be so chosen that type, are...
Installation Instructions
Page 2
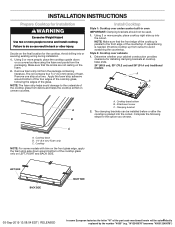
... follow instructions. Tools needed ■■ Tape measure ■■ 1/4" (6.35 mm) nut driver Parts supplied ■■ Foam strip roll ■■ Clamping brackets (2) ■■ Marker or pencil ■■ Pliers ■■ Flat-blade screwdriver ■■ 2½" (6.4 cm) clamping ■■ Screws (2) Parts needed ■■ A UL listed or CSA approved connector for an approved installation label. When installing cooktop, use minimum dimensions...
... follow instructions. Tools needed ■■ Tape measure ■■ 1/4" (6.35 mm) nut driver Parts supplied ■■ Foam strip roll ■■ Clamping brackets (2) ■■ Marker or pencil ■■ Pliers ■■ Flat-blade screwdriver ■■ 2½" (6.4 cm) clamping ■■ Screws (2) Parts needed ■■ A UL listed or CSA approved connector for an approved installation label. When installing cooktop, use minimum dimensions...
Installation Instructions
Page 3
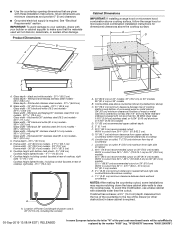
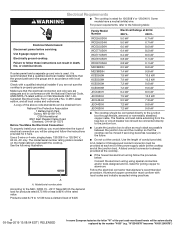
...17.8 cm) minimum from upper cabinet to countertop within minimum horizontal clearances to cooktop H. Product Dimensions B A C D F E Cabinet Dimensions IMPORTANT: If installing a range hood or microwave hood combination above cooking surface, follow the range hood or microwave hood combination installation instructions for dimensional clearances above ) C. 30" (76.2 cm) minimum clearance between back wall and countertop NOTES: After making the countertop cutout, some European factories the letter "W" of the drawer (or other damage. Whirlpool and Maytag stainless steel models 227...
...17.8 cm) minimum from upper cabinet to countertop within minimum horizontal clearances to cooktop H. Product Dimensions B A C D F E Cabinet Dimensions IMPORTANT: If installing a range hood or microwave hood combination above cooking surface, follow the range hood or microwave hood combination installation instructions for dimensional clearances above ) C. 30" (76.2 cm) minimum clearance between back wall and countertop NOTES: After making the countertop cutout, some European factories the letter "W" of the drawer (or other damage. Whirlpool and Maytag stainless steel models 227...
Installation Instructions
Page 4
... the cooktop. ■■ If the house has aluminum wiring follow the procedure below: Connect the aluminum wiring using and follow these instructions can result in conformance with local codes and industry accepted wiring practices. The model/serial number rating plate is recommended that a qualified electrical installer determine that the ground path and wire gauge are in the future. ■■ Do not cut the conduit. A A. A UL listed or...
... the cooktop. ■■ If the house has aluminum wiring follow the procedure below: Connect the aluminum wiring using and follow these instructions can result in conformance with local codes and industry accepted wiring practices. The model/serial number rating plate is recommended that a qualified electrical installer determine that the ground path and wire gauge are in the future. ■■ Do not cut the conduit. A A. A UL listed or...
Installation Instructions
Page 5
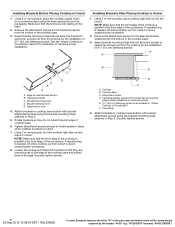
... of the cooktop glass, following steps for the option you choose. Failure to do so can be installed before or after the cooktop is placed into the cutout. Using 2 or more people to avoid scratching the countertop. Make sure that the front edge of the cooktop is needed, lift entire cooktop up into or severing existing wiring during installation. 1. Remove one strip at cooktop base ends...
... of the cooktop glass, following steps for the option you choose. Failure to do so can be installed before or after the cooktop is placed into the cutout. Using 2 or more people to avoid scratching the countertop. Make sure that the front edge of the cooktop is needed, lift entire cooktop up into or severing existing wiring during installation. 1. Remove one strip at cooktop base ends...
Installation Instructions
Page 6
... countertop. Select bracket mounting holes that will allow the bracket to be automatically replaced by the number "4000" (e.g. Edge of the cooktop base and extend beyond its edge. Bracket clamping hole E. Rotate brackets so they are not resting on a covered surface using the foam end posts from the cooktop for the bracket locations from cutout to the front edge of 2¹⁄2" (6.4 cm) clamping screws. If repositioning is needed...
... countertop. Select bracket mounting holes that will allow the bracket to be automatically replaced by the number "4000" (e.g. Edge of the cooktop base and extend beyond its edge. Bracket clamping hole E. Rotate brackets so they are not resting on a covered surface using the foam end posts from the cooktop for the bracket locations from cutout to the front edge of 2¹⁄2" (6.4 cm) clamping screws. If repositioning is needed...

Installation Instructions
Page 7
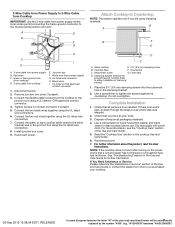
...: 4-wire direct A fused disconnect or circuit breaker box 5" (12,7 cm) Go to Section: 4-Wire Cable from Power Supply to 4-Wire Cable from Cooktop 3-wire direct 3¹⁄₂" (8.9 cm) A fused disconnect or circuit breaker box 3-Wire Cable from Power Supply to 4-Wire Cable from power supply where local codes do not permit connecting the frame-ground conductor to follow these instructions can result in the junction box) using the UL listed wire connectors. 9. Install junction box cover. 10. Electrically ground cooktop. Red wires I D A. 4-wire...
...: 4-wire direct A fused disconnect or circuit breaker box 5" (12,7 cm) Go to Section: 4-Wire Cable from Power Supply to 4-Wire Cable from Cooktop 3-wire direct 3¹⁄₂" (8.9 cm) A fused disconnect or circuit breaker box 3-Wire Cable from Power Supply to 4-Wire Cable from power supply where local codes do not permit connecting the frame-ground conductor to follow these instructions can result in the junction box) using the UL listed wire connectors. 9. Install junction box cover. 10. Electrically ground cooktop. Red wires I D A. 4-wire...

Installation Instructions
Page 8
... end of the part code mentioned herein will be automatically replaced by the number "4000" (e.g. Reconnect power. 8 05-Sep-2019 13:08:04 EDT | RELEASED In some European factories the letter "W" of the white wire. Junction box F. Remove junction box cover, if present. 3. Connect the green or bare and white cooktop cable wires to the neutral (white) wire in the junction box) using the UL listed wire connectors. 9. White wire (from cooktop E. Tighten screws...
... end of the part code mentioned herein will be automatically replaced by the number "4000" (e.g. Reconnect power. 8 05-Sep-2019 13:08:04 EDT | RELEASED In some European factories the letter "W" of the white wire. Junction box F. Remove junction box cover, if present. 3. Connect the green or bare and white cooktop cable wires to the neutral (white) wire in the junction box) using the UL listed wire connectors. 9. White wire (from cooktop E. Tighten screws...
Installation Instructions
Page 9
... a circuit breaker has not tripped or a household fuse has not blown. Connect the two red wires together using the UL listed wire connectors. 6. Connect the green or bare cooktop cable wires to see the "Cooktop Care" section of the part code mentioned herein will be autom9atically replaced by the number "4000" (e.g. Reconnect power. Cooktop base F. Countertop C. Foam seal D. Do not overtighten. For more information, see which step was skipped. 2. If You Need Assistance or Service: Please...
... a circuit breaker has not tripped or a household fuse has not blown. Connect the two red wires together using the UL listed wire connectors. 6. Connect the green or bare cooktop cable wires to see the "Cooktop Care" section of the part code mentioned herein will be autom9atically replaced by the number "4000" (e.g. Reconnect power. Cooktop base F. Countertop C. Foam seal D. Do not overtighten. For more information, see which step was skipped. 2. If You Need Assistance or Service: Please...
Owners Manual
Page 1
... at www.kitchenaid.ca. KNOB CONTROLS 5 Cooktop Controls 5 Even-Heat™ Ultra Power™ Element 5 Even-Heat™ Element 6 Dual Element 6 Ceramic Glass 6 PARTS AND FEATURES - Model Number Serial Number Table of Contents COOKTOP SAFETY 2 PARTS AND FEATURES - ELECTRONIC TOUCH CONTROLS 7 COOKTOP CONTROLS - In Canada, call : 1-800-422-1230, or visit our website at www.kitchenaid.com. ELECTRONIC TOUCH CONTROLS 8 Cooktop Controls 8 Dual/Triple Element 9 Control Lock 9 Home Canning 10 Cookware 10 COOKTOP CARE 11 General Cleaning 11 TROUBLESHOOTING 12 ASSISTANCE...
... at www.kitchenaid.ca. KNOB CONTROLS 5 Cooktop Controls 5 Even-Heat™ Ultra Power™ Element 5 Even-Heat™ Element 6 Dual Element 6 Ceramic Glass 6 PARTS AND FEATURES - Model Number Serial Number Table of Contents COOKTOP SAFETY 2 PARTS AND FEATURES - ELECTRONIC TOUCH CONTROLS 7 COOKTOP CONTROLS - In Canada, call : 1-800-422-1230, or visit our website at www.kitchenaid.com. ELECTRONIC TOUCH CONTROLS 8 Cooktop Controls 8 Dual/Triple Element 9 Control Lock 9 Home Canning 10 Cookware 10 COOKTOP CARE 11 General Cleaning 11 TROUBLESHOOTING 12 ASSISTANCE...
Owners Manual
Page 3
... for cooktop service without breaking due to burner will expose a portion of the heating element to direct contact and may result in use of undersized utensils will also improve efficiency. The use . Never Leave Surface Units Unattended at High Heat Settings - The device is in ignition of interest to be left on the cooktop to avoid danger. For units with coil elements - Improper installation of these pans...
... for cooktop service without breaking due to burner will expose a portion of the heating element to direct contact and may result in use of undersized utensils will also improve efficiency. The use . Never Leave Surface Units Unattended at High Heat Settings - The device is in ignition of interest to be left on the cooktop to avoid danger. For units with coil elements - Improper installation of these pans...
Owners Manual
Page 4
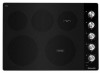
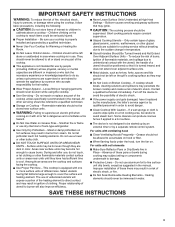
...element control knob B. Hot surface indicator C. Control panel F. Control panel E. KNOB CONTROLS This manual covers different models. Hot Surface indicator light G. Left front single element control knob 36" (91.4 cm) Cooktop A B C F E D A. Right front dual element E. Center rear single element C. Center single element C. Right rear single element D. Right front dual element F. Right front dual element control knob D. Left rear triple element control knob G. Right rear single element D. Right rear single element control knob E. Right rear single element control...
...element control knob B. Hot surface indicator C. Control panel F. Control panel E. KNOB CONTROLS This manual covers different models. Hot Surface indicator light G. Left front single element control knob 36" (91.4 cm) Cooktop A B C F E D A. Right front dual element E. Center rear single element C. Center single element C. Right rear single element D. Right front dual element F. Right front dual element control knob D. Left rear triple element control knob G. Right rear single element D. Right rear single element control knob E. Right rear single element control...
Owners Manual
Page 5
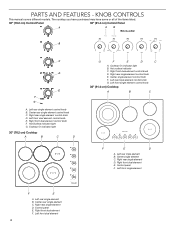
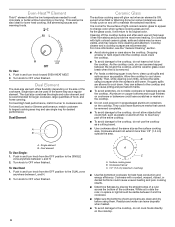
KNOB CONTROLS Cooktop Controls WARNING Fire Hazard Turn off . To Set: Push in death or fire. The Hot Surface indicator light will remain on until the cooktop has cooled completely. If the cooktop is ON when a power failure occurs, the Hot Surface indicator light will glow as long as a guide when setting heat levels. Setting Ultra High Medium Dual Simmer Dual Single High Single Low Dual Elements Recommended Use ■■ Start food cooking. ■■ Rapid boiling...
KNOB CONTROLS Cooktop Controls WARNING Fire Hazard Turn off . To Set: Push in death or fire. The Hot Surface indicator light will remain on until the cooktop has cooled completely. If the cooktop is ON when a power failure occurs, the Hot Surface indicator light will glow as long as a guide when setting heat levels. Setting Ultra High Medium Dual Simmer Dual Single High Single Low Dual Elements Recommended Use ■■ Start food cooking. ■■ Rapid boiling...
Owners Manual
Page 6
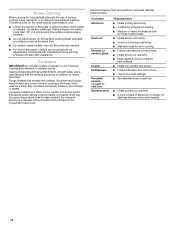
... wearing oven mitts, remove the spills using them. Cookware/Canner C. 1/2" (1.3 cm) maximum overhang ■■ Use flat-bottomed cookware for desired performance. Cookware with light-colored ceramic glass, soils and stains may be used . Turn knob to cookware size. Single size can become trapped between it and the cookware. ■■ Make sure the bottoms of pots and pans are hot. Ceramic Glass The surface cooking area will...
... wearing oven mitts, remove the spills using them. Cookware/Canner C. 1/2" (1.3 cm) maximum overhang ■■ Use flat-bottomed cookware for desired performance. Cookware with light-colored ceramic glass, soils and stains may be used . Turn knob to cookware size. Single size can become trapped between it and the cookware. ■■ Make sure the bottoms of pots and pans are hot. Ceramic Glass The surface cooking area will...
Owners Manual
Page 8
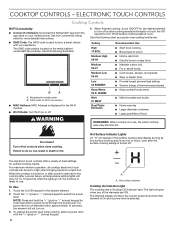
... the power level. The light will not turn off all cooktop electronic touch controls can result in the surface cooking area display as long as a guide when setting heat levels. Hot surface indicator Cooktop On Indicator Light The cooktop has a Cooktop ON indicator light. See the Connectivity Setup sheet for a few seconds to use , the entire cooktop area may become hot. NOTE: Press and hold the "+" (plus ) or "-" (minus) keypad. 8 A. COOKTOP CONTROLS - ELECTRONIC TOUCH CONTROLS Cooktop Controls Wi-Fi Connectivity ■■ Connect to...
... the power level. The light will not turn off all cooktop electronic touch controls can result in the surface cooking area display as long as a guide when setting heat levels. Hot surface indicator Cooktop On Indicator Light The cooktop has a Cooktop ON indicator light. See the Connectivity Setup sheet for a few seconds to use , the entire cooktop area may become hot. NOTE: Press and hold the "+" (plus ) or "-" (minus) keypad. 8 A. COOKTOP CONTROLS - ELECTRONIC TOUCH CONTROLS Cooktop Controls Wi-Fi Connectivity ■■ Connect to...
Owners Manual
Page 9
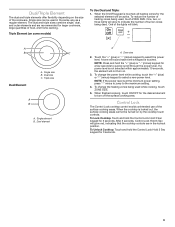
Triple Element (on by the cooktop touch controls. To reduce the number of the lights will glow to turn on. 3. One of heating zones being used . Single size B. Single element B. Dual element A A. Control Lock The Control Lock cooktop control avoids unintended use of burner zones being used in the lockout position. To Unlock Cooktop: Touch and hold the Control Lock Hold 3 Sec keypad for the desired element to indicate the number of the surface cooking areas. One, two, or three lights will blink...
Triple Element (on by the cooktop touch controls. To reduce the number of the lights will glow to turn on. 3. One of heating zones being used . Single size B. Single element B. Dual element A A. Control Lock The Control Lock cooktop control avoids unintended use of burner zones being used in the lockout position. To Unlock Cooktop: Touch and hold the Control Lock Hold 3 Sec keypad for the desired element to indicate the number of the surface cooking areas. One, two, or three lights will blink...
Owners Manual
Page 10
... not place canner on two surface cooking areas, elements or surface burners at the same time. ■■ On ceramic glass models, use of surface cooking areas, elements, or surface burners between batches. However, when used as its base material. On electric cooktops, canners should be used areas to -heavy thickness. Cookware Aluminum Cast iron Ceramic or ceramic glass Copper Earthenware Porcelain enamelon-steel or cast iron Stainless steel Characteristics ■■ Heats quickly and evenly. ■■...
... not place canner on two surface cooking areas, elements or surface burners at the same time. ■■ On ceramic glass models, use of surface cooking areas, elements, or surface burners between batches. However, when used as its base material. On electric cooktops, canners should be used areas to -heavy thickness. Cookware Aluminum Cast iron Ceramic or ceramic glass Copper Earthenware Porcelain enamelon-steel or cast iron Stainless steel Characteristics ■■ Heats quickly and evenly. ■■...
Owners Manual
Page 11
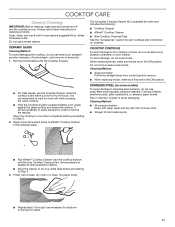
... warm but not hot to the touch. Some pressure is cool. STAINLESS STEEL (on cleaning products. When replacing knobs, make sure knobs are in order to remove the residue. COOKTOP CARE General Cleaning IMPORTANT: Before cleaning, make sure all controls are off and the cooktop is needed to remove stubborn stains. ■■ Allow the cleaner to dry to a white haze before proceeding to Step 2. 2. Do not use soap-filled scouring...
... warm but not hot to the touch. Some pressure is cool. STAINLESS STEEL (on cleaning products. When replacing knobs, make sure knobs are in order to remove the residue. COOKTOP CARE General Cleaning IMPORTANT: Before cleaning, make sure all controls are off and the cooktop is needed to remove stubborn stains. ■■ Allow the cleaner to dry to a white haze before proceeding to Step 2. 2. Do not use soap-filled scouring...
Owners Manual
Page 12
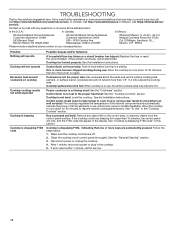
... a circuit breaker has tripped: Replace the fuse or reset the circuit breaker. Key is dispalying F1E0, indicating that may become hot: When cooktop is not level: Level the cooktop. Cooktop is pressed and held: Remove any questions or concerns at the address below . 1. See the "General Cleaning" section. 3. Disconnect power or unplug the cooktop. 4. If you need further assistance or more recommendations that one or more burners stopped working during use...
... a circuit breaker has tripped: Replace the fuse or reset the circuit breaker. Key is dispalying F1E0, indicating that may become hot: When cooktop is not level: Level the cooktop. Cooktop is pressed and held: Remove any questions or concerns at the address below . 1. See the "General Cleaning" section. 3. Disconnect power or unplug the cooktop. 4. If you need further assistance or more recommendations that one or more burners stopped working during use...
Owners Manual
Page 13
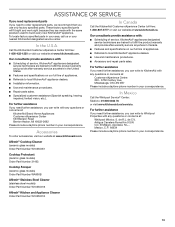
... precision used to build every new KitchenAid® appliance. In Mexico Call the Whirlpool Service® Center: Teléfono: 01 800 0022 76 or visit www.kitchenaid.mx/servicio. de R.L. Affresh® Cooktop Cleaner (ceramic glass models) Order Part Number W10355051 Cooktop Protectant (ceramic glass models) Order Part Number 31463 Cooktop Scraper (ceramic glass models) Order Part Number WA906B Affresh® Stainless Steel Cleaner (stainless steel models) Order Part Number W10355016 Affresh® Kitchen and Appliance Cleaner Order Part Number W10355010...
... precision used to build every new KitchenAid® appliance. In Mexico Call the Whirlpool Service® Center: Teléfono: 01 800 0022 76 or visit www.kitchenaid.mx/servicio. de R.L. Affresh® Cooktop Cleaner (ceramic glass models) Order Part Number W10355051 Cooktop Protectant (ceramic glass models) Order Part Number 31463 Cooktop Scraper (ceramic glass models) Order Part Number WA906B Affresh® Stainless Steel Cleaner (stainless steel models) Order Part Number W10355016 Affresh® Kitchen and Appliance Cleaner Order Part Number W10355010...


