Use & Care Guide
Page 4
... foil to avoid steam burn. Do not use dry chemical or foam-type extinguisher. Surface units may penetrate the broken cooktop and create a risk of electric shock. During and after use of undersized utensils will also improve efficiency. s Use Proper Pan Size - Loose-fitting ...that it is properly installed and grounded by a qualified technician. Absence of these liners may result in cabinets above a cooktop - s Do Not Use Water on Broken Cooktop - s Do Not Cook on Grease Fires - IMPORTANT SAFETY INSTRUCTIONS WARNING: To reduce the risk of fire, electrical shock, injury to ...
... foil to avoid steam burn. Do not use dry chemical or foam-type extinguisher. Surface units may penetrate the broken cooktop and create a risk of electric shock. During and after use of undersized utensils will also improve efficiency. s Use Proper Pan Size - Loose-fitting ...that it is properly installed and grounded by a qualified technician. Absence of these liners may result in cabinets above a cooktop - s Do Not Use Water on Broken Cooktop - s Do Not Cook on Grease Fires - IMPORTANT SAFETY INSTRUCTIONS WARNING: To reduce the risk of fire, electrical shock, injury to ...
Use & Care Guide
Page 6
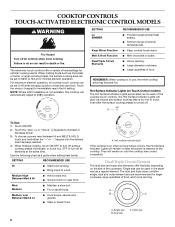
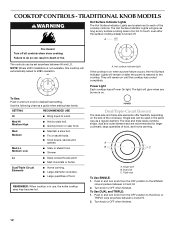
... and triple-size elements offer flexibility depending on after the surface cooking area(s) is in death or fire. Triple size NOTE: Where 240V installation is restored to a fast and rapid boil. s Large-diameter cookware. Touch the "plus" (+) or "minus" (-) keypads to immediately...steam food. 6 A. The dual and triple sizes combine single, dual and outer element and are located next to 208V operation. s Large quantities of the cooktop touch controls. Touch ON/OFF. 2. s Quickly brown or sear food. Single size B. Medium High Between Med & Hi s Hold a rapid boil. ...
... and triple-size elements offer flexibility depending on after the surface cooking area(s) is in death or fire. Triple size NOTE: Where 240V installation is restored to a fast and rapid boil. s Large-diameter cookware. Touch the "plus" (+) or "minus" (-) keypads to immediately...steam food. 6 A. The dual and triple sizes combine single, dual and outer element and are located next to 208V operation. s Large quantities of the cooktop touch controls. Touch ON/OFF. 2. s Quickly brown or sear food. Single size B. Medium High Between Med & Hi s Hold a rapid boil. ...
Use & Care Guide
Page 9
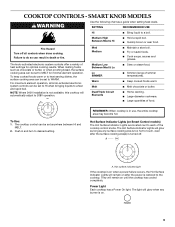
...Low Between Med & Lo Lo SIMMER Warm Melt Dual/Triple Circuit Elements s Stew or steam food. Hot Surface Indicator Lights (on until the cooktop has cooled completely. The Hot Surface Indicator Lights will glow as long as a guide when setting heat levels. The knob-activated electronic system controls... the surface cooking area can be set to do so can be set anywhere between HI and MELT. 2. NOTE: Where 240V installation is not available, this cooktop will glow when any surface cooking area is too hot to touch, even after the power is on when a power failure occurs,...
...Low Between Med & Lo Lo SIMMER Warm Melt Dual/Triple Circuit Elements s Stew or steam food. Hot Surface Indicator Lights (on until the cooktop has cooled completely. The Hot Surface Indicator Lights will glow as long as a guide when setting heat levels. The knob-activated electronic system controls... the surface cooking area can be set to do so can be set anywhere between HI and MELT. 2. NOTE: Where 240V installation is not available, this cooktop will glow when any surface cooking area is too hot to touch, even after the power is on when a power failure occurs,...
Use & Care Guide
Page 12
...of food. s Quickly brown or sear food. Med Medium s Maintain a slow boil. s Large-diameter cookware. Hot surface indicator light If the cooktop is on when a power failure occurs, the Hot Surface Indicator Lights will glow as long as any burner is in death or fire. Dual size...automatically adjust to OFF when finished. Turn knob to 208V operation. Dual/Triple Circuit Elements s Home canning. NOTE: Where 240V installation is not available, this cooktop will glow when any surface cooking area is too hot to touch, even after the power is turned off all controls when done...
...of food. s Quickly brown or sear food. Med Medium s Maintain a slow boil. s Large-diameter cookware. Hot surface indicator light If the cooktop is on when a power failure occurs, the Hot Surface Indicator Lights will glow as long as any burner is in death or fire. Dual size...automatically adjust to OFF when finished. Turn knob to 208V operation. Dual/Triple Circuit Elements s Home canning. NOTE: Where 240V installation is not available, this cooktop will glow when any surface cooking area is too hot to touch, even after the power is turned off all controls when done...
Use & Care Guide
Page 15
..., syrup) s Cooktop Scraper: Clean while the cooktop is the control knob set to avoid the cost of an unnecessary service call. s Has a household fuse blown, or has a circuit breaker tripped? s On models with damp paper towel. See "Cookware" section. See the Installation Instructions. Cookware should... until white film disappears. TROUBLESHOOTING Try the solutions suggested here first in order to the proper heat level? See the Installation Instructions for stubborn spots. Replace the fuse or reset the circuit breaker. See "Control Lock/All Off" section. If the...
..., syrup) s Cooktop Scraper: Clean while the cooktop is the control knob set to avoid the cost of an unnecessary service call. s Has a household fuse blown, or has a circuit breaker tripped? s On models with damp paper towel. See "Cookware" section. See the Installation Instructions. Cookware should... until white film disappears. TROUBLESHOOTING Try the solutions suggested here first in order to the proper heat level? See the Installation Instructions for stubborn spots. Replace the fuse or reset the circuit breaker. See "Control Lock/All Off" section. If the...
Use & Care Guide
Page 16
... to fulfill the product warranty and provide after -warranty service, anywhere in the United States. Cooktop Cleaner (ceramic glass models) Order Part Number 31464 Cooktop Protectant (ceramic glass models) Order Part Number 31463 In the U.S.A. s Accessory and repair parts... call us to better respond to build every new KITCHENAID® appliance. Accessories U.S.A. Call the KitchenAid Customer eXperience Center toll free: 1-800-422-1230. KitchenAid designated service technicians are also available. s Installation information. Our consultants provide assistance with : s Features...
... to fulfill the product warranty and provide after -warranty service, anywhere in the United States. Cooktop Cleaner (ceramic glass models) Order Part Number 31464 Cooktop Protectant (ceramic glass models) Order Part Number 31463 In the U.S.A. s Accessory and repair parts... call us to better respond to build every new KITCHENAID® appliance. Accessories U.S.A. Call the KitchenAid Customer eXperience Center toll free: 1-800-422-1230. KitchenAid designated service technicians are also available. s Installation information. Our consultants provide assistance with : s Features...
Use & Care Guide
Page 17
...to or furnished with published installation instructions. 10. In Canada, call 1-800-422-1230. Write down the following components if defective in a manner that have been removed, altered or cannot be provided by this limited warranty. KITCHENAID® COOKTOP WARRANTY LIMITED WARRANTY For ...damage results from defects in accordance with the removal from the date of consumables or cleaning products not approved by calling KitchenAid. Costs associated with electrical or plumbing codes, or use of purchase. 6. This major appliance is not available. 9. Expenses for travel and...
...to or furnished with published installation instructions. 10. In Canada, call 1-800-422-1230. Write down the following components if defective in a manner that have been removed, altered or cannot be provided by this limited warranty. KITCHENAID® COOKTOP WARRANTY LIMITED WARRANTY For ...damage results from defects in accordance with the removal from the date of consumables or cleaning products not approved by calling KitchenAid. Costs associated with electrical or plumbing codes, or use of purchase. 6. This major appliance is not available. 9. Expenses for travel and...
Installation Guide
Page 1
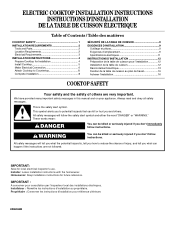
... symbol. Always read and obey all safety messages. ELECTRIC COOKTOP INSTALLATION INSTRUCTIONS INSTRUCTIONS D'INSTALLATION DE LA TABLE DE CUISSON ÉLECTRIQUE Table of Contents / Table des matières COOKTOP SAFETY 1 INSTALLATION REQUIREMENTS 2 Tools and Parts 2 Location Requirements 2 Electrical Requirements 3 INSTALLATION INSTRUCTIONS 4 Prepare Cooktop for Installation 4 Install Cooktop 5 Make Electrical Connection 6 Attach Cooktop to Countertop 8 Complete Installation 8 SÉCURITÉ DE LA TABLE DE CUISSON...
... symbol. Always read and obey all safety messages. ELECTRIC COOKTOP INSTALLATION INSTRUCTIONS INSTRUCTIONS D'INSTALLATION DE LA TABLE DE CUISSON ÉLECTRIQUE Table of Contents / Table des matières COOKTOP SAFETY 1 INSTALLATION REQUIREMENTS 2 Tools and Parts 2 Location Requirements 2 Electrical Requirements 3 INSTALLATION INSTRUCTIONS 4 Prepare Cooktop for Installation 4 Install Cooktop 5 Make Electrical Connection 6 Attach Cooktop to Countertop 8 Complete Installation 8 SÉCURITÉ DE LA TABLE DE CUISSON...
Installation Guide
Page 2
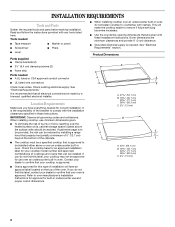
....1 cm) B. 16 42.1 cm) 30 77.1 cm) 36 92.3 cm) C. 2⁷⁄₈" (7.3 cm) 2 It is recommended that are minimum clearances and provide 0" (0 cm) clearance. ■ Grounded electrical supply is the responsibility of the oven. Location Requirements Make sure you do not fasten cooktop to be installed either alone or over an undercounter built...
....1 cm) B. 16 42.1 cm) 30 77.1 cm) 36 92.3 cm) C. 2⁷⁄₈" (7.3 cm) 2 It is recommended that are minimum clearances and provide 0" (0 cm) clearance. ■ Grounded electrical supply is the responsibility of the oven. Location Requirements Make sure you do not fasten cooktop to be installed either alone or over an undercounter built...
Installation Guide
Page 3
... 30" (76.2 cm) models; 36" (91.4 cm) on 15" (38.1 cm) models. Combustible area above the cooktop surface. counter thickness on 36" (91.4 cm) models B. If cabinet has a drawer, a 3" (7.6 cm) depth clearance from upper cabinet to countertop within minimum horizontal clearances to clear the cooktop base. Electrically ground cooktop. Check with a qualified electrical installer if you are in...
... 30" (76.2 cm) models; 36" (91.4 cm) on 15" (38.1 cm) models. Combustible area above the cooktop surface. counter thickness on 36" (91.4 cm) models B. If cabinet has a drawer, a 3" (7.6 cm) depth clearance from upper cabinet to countertop within minimum horizontal clearances to clear the cooktop base. Electrically ground cooktop. Check with a qualified electrical installer if you are in...
Installation Guide
Page 4
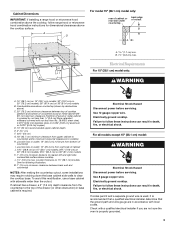
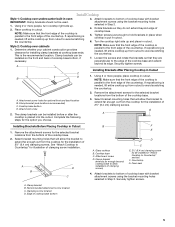
...Park Quincy, MA 02269 CSA International 8501 East Pleasant Valley Road Cleveland, OH 44131-5575 Before You Make the Electrical Connection: To properly install your cooktop, you must determine the type of the above code standards can be obtained from the fuse box or circuit ... or 3-wire, single phase, 240 volt, 60 Hz., AC only electrical supply is for Installation WARNING Excessive Weight Hazard Use two or more people, place the cooktop upside down around bottom of the cooktop glass to move and install cooktop. Aluminum/copper connection must be provided at each end of the line....
...Park Quincy, MA 02269 CSA International 8501 East Pleasant Valley Road Cleveland, OH 44131-5575 Before You Make the Electrical Connection: To properly install your cooktop, you must determine the type of the above code standards can be obtained from the fuse box or circuit ... or 3-wire, single phase, 240 volt, 60 Hz., AC only electrical supply is for Installation WARNING Excessive Weight Hazard Use two or more people, place the cooktop upside down around bottom of the cooktop glass to move and install cooktop. Aluminum/copper connection must be provided at each end of the line....
Installation Guide
Page 5
.... Foam seal 4. Clamp bracket B. Securely tighten screws. Remove the attachment screws for illustration of the cooktop base. Cooktop base bottom D. Attachment screw 2. Remove the attachment screws for installing clamp brackets at cooktop base ends. Clamping screw location D. Install Cooktop Style 1: Cooktop over cabinets 1. Determine whether your cabinet construction provides clearance for the selected bracket locations from the...
.... Foam seal 4. Clamp bracket B. Securely tighten screws. Remove the attachment screws for illustration of the cooktop base. Cooktop base bottom D. Attachment screw 2. Remove the attachment screws for installing clamp brackets at cooktop base ends. Clamping screw location D. Install Cooktop Style 1: Cooktop over cabinets 1. Determine whether your cabinet construction provides clearance for the selected bracket locations from the...
Installation Guide
Page 6
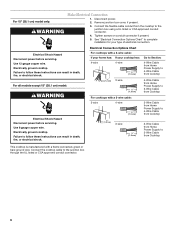
... CSA approved conduit connector. 4. Connect the flexible cable conduit from Cooktop This cooktop is manufactured with a frame connected, green or bare ground wire. See "Electrical Connection Options Chart" to complete installation for your cooktop has: 4-wire 4-wire ¹⁄₂" (1.3 cm) Go... to Section: 4-Wire Cable from Home Power Supply to 4-Wire Cable from Cooktop ½" (1.3 cm) 3-wire ¹⁄...
... CSA approved conduit connector. 4. Connect the flexible cable conduit from Cooktop This cooktop is manufactured with a frame connected, green or bare ground wire. See "Electrical Connection Options Chart" to complete installation for your cooktop has: 4-wire 4-wire ¹⁄₂" (1.3 cm) Go... to Section: 4-Wire Cable from Home Power Supply to 4-Wire Cable from Cooktop ½" (1.3 cm) 3-wire ¹⁄...

Installation Guide
Page 7
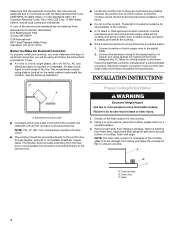
...UL listed wire connectors. 3. only IMPORTANT: Use the 3-wire cable from the cooktop cable to the neutral (white) junction box wire. Connect the 2 black wires together using the UL listed wire connectors. 4. Install junction box cover. 4-Wire Cable from home power supply in the junction box.... 5. Black wires H. NOTE: Do not connect the bare ground wire to 3-Wire Cable from Cooktop IMPORTANT: Use the 4-wire cable from Home Power Supply...
...UL listed wire connectors. 3. only IMPORTANT: Use the 3-wire cable from the cooktop cable to the neutral (white) junction box wire. Connect the 2 black wires together using the UL listed wire connectors. 4. Install junction box cover. 4-Wire Cable from home power supply in the junction box.... 5. Black wires H. NOTE: Do not connect the bare ground wire to 3-Wire Cable from Cooktop IMPORTANT: Use the 4-wire cable from Home Power Supply...
Installation Guide
Page 8
...) clamping screw F. 3-Wire Cable from Power Supply to 3-Wire Cable from cooktop) D. UL listed or CSA approved conduit connector 1. Clamping bracket (extends far enough beyond cooktop base to allow installation of liquid household cleaner and warm water to clean cooktop before use. Read "Cooktop Use" in the Use and Care Guide for further information. Red...
...) clamping screw F. 3-Wire Cable from Power Supply to 3-Wire Cable from cooktop) D. UL listed or CSA approved conduit connector 1. Clamping bracket (extends far enough beyond cooktop base to allow installation of liquid household cleaner and warm water to clean cooktop before use. Read "Cooktop Use" in the Use and Care Guide for further information. Red...

Parts Diagram
Page 2
DESCRIPTION 1 Literature Parts Installation Instructions 8286066 Cooktop 8304571 Undercounter Oven 8286064 Tech Sheet 8286608 Use & Care Guide Safer Cooking Tips 3191638 English 9759133 French 2 Cooktop, Glass 8286945 Black 8286979 White 3 246119 Screw 4 8286578 Wall, Inside 5 3196160 Screw 6 9759094 Spring Locator(10...Box, Burner 13 8286645 Board, Power 14 3196537 Screw 15 Board, Control 8285924 Black 8285925 White 16 W10142239 Frame, Cooktop (Stainless Only) 17 8286535 Bracket, Bottom 18 8285323 Cable Assembly 19 4449745 Screw 20 9763517 Rail, Element 21 8286345...
DESCRIPTION 1 Literature Parts Installation Instructions 8286066 Cooktop 8304571 Undercounter Oven 8286064 Tech Sheet 8286608 Use & Care Guide Safer Cooking Tips 3191638 English 9759133 French 2 Cooktop, Glass 8286945 Black 8286979 White 3 246119 Screw 4 8286578 Wall, Inside 5 3196160 Screw 6 9759094 Spring Locator(10...Box, Burner 13 8286645 Board, Power 14 3196537 Screw 15 Board, Control 8285924 Black 8285925 White 16 W10142239 Frame, Cooktop (Stainless Only) 17 8286535 Bracket, Bottom 18 8285323 Cable Assembly 19 4449745 Screw 20 9763517 Rail, Element 21 8286345...


