
Use & Care Guide
Page 2
... be killed or seriously injured if you and others are not followed. 2 All safety messages will follow instructions. TABLE OF CONTENTS COOKTOP SAFETY 2 COOKTOP USE 4 Induction Cooking 4 Cooktop Controls 5 Simmer 6 Melt + Hold 6 Pause 6 Pan Detection 6 Control Lock 6 Performance Boost Function 6 Timer 7 Tones 7 Ceramic Glass 7 Cookware 8 COOKTOP CARE 8 General Cleaning 8 TROUBLESHOOTING 9 ASSISTANCE OR SERVICE 10 WARRANTY 11 TABLE DES MATIÈRES SÉCURITÉ DE LA TABLE DE CUISSON 13 UTILISATION DE...
... be killed or seriously injured if you and others are not followed. 2 All safety messages will follow instructions. TABLE OF CONTENTS COOKTOP SAFETY 2 COOKTOP USE 4 Induction Cooking 4 Cooktop Controls 5 Simmer 6 Melt + Hold 6 Pause 6 Pan Detection 6 Control Lock 6 Performance Boost Function 6 Timer 7 Tones 7 Ceramic Glass 7 Cookware 8 COOKTOP CARE 8 General Cleaning 8 TROUBLESHOOTING 9 ASSISTANCE OR SERVICE 10 WARRANTY 11 TABLE DES MATIÈRES SÉCURITÉ DE LA TABLE DE CUISSON 13 UTILISATION DE...
Use & Care Guide
Page 3
... burns. Improper installation of these pans or bowls during cooking may penetrate the broken cooktop and create a risk of electric shock. SAVE THESE INSTRUCTIONS This induction cooktop generates and uses ISM frequency energy that it is on. Be sure your doctor, or the manufacturer of undersized utensils will also improve efficiency. ■ Never Leave Surface Units Unattended at High Heat Settings - Children should...
... burns. Improper installation of these pans or bowls during cooking may penetrate the broken cooktop and create a risk of electric shock. SAVE THESE INSTRUCTIONS This induction cooktop generates and uses ISM frequency energy that it is on. Be sure your doctor, or the manufacturer of undersized utensils will also improve efficiency. ■ Never Leave Surface Units Unattended at High Heat Settings - Children should...
Use & Care Guide
Page 4
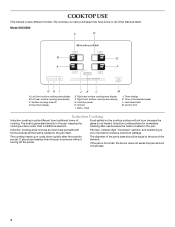
... B. Pan size, material (See "Cookware" section), and positioning is created in the pan, keeping the cooking surface cooler than a traditional element. Induction cooking does not lose as much heat as traditional forms because all of the features listed. Melt + Hold J. Control lock Induction Cooking Induction cooking is removed without turning off D. It also stops heating when the pan is quite different from traditional forms of the element. Right rear surface cooking area display F. COOKTOP USE This manual covers...
... B. Pan size, material (See "Cookware" section), and positioning is created in the pan, keeping the cooking surface cooler than a traditional element. Induction cooking does not lose as much heat as traditional forms because all of the features listed. Melt + Hold J. Control lock Induction Cooking Induction cooking is removed without turning off D. It also stops heating when the pan is quite different from traditional forms of the element. Right rear surface cooking area display F. COOKTOP USE This manual covers...
Use & Care Guide
Page 5
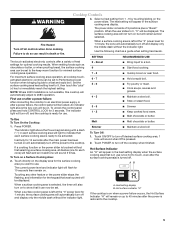
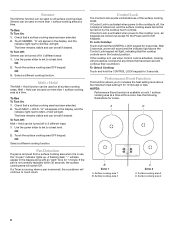
... user slides to 0, "0" will be displayed. Hot Surface Indicator An "H" will appear in the heat setting display when the surface cooking area that was touched will be displayed. Hot surface indicator "H" If the cooktop is on when a power failure occurs, the Hot Surface Indicator "H" will be set to Performance boost function when bringing liquids to a fast and rapid boil. To Turn on a Surface Cooking Area: 2. To unlock the control panel, press and hold CONTROL LOCK for optimal cooking...
... user slides to 0, "0" will be displayed. Hot Surface Indicator An "H" will appear in the heat setting display when the surface cooking area that was touched will be displayed. Hot surface indicator "H" If the cooktop is on when a power failure occurs, the Hot Surface Indicator "H" will be set to Performance boost function when bringing liquids to a fast and rapid boil. To Turn on a Surface Cooking Area: 2. To unlock the control panel, press and hold CONTROL LOCK for optimal cooking...
Use & Care Guide
Page 6
.... Surface cooking area 1 B. Simmer The Simmer function can be used on all surface cooking areas. Check that a surface cooking area has been selected. 2. Use the power slider to set to the cooktop is available on all keypads are in use of the surface cooking areas. Touch MELT + HOLD. Pan Detection If a pan is removed from a surface cooking area when it is removed, the countdown will switch Off. Control Lock The Control Lock avoids unintended use , the "no pan" indicator lights up. If Control Lock...
.... Surface cooking area 1 B. Simmer The Simmer function can be used on all surface cooking areas. Check that a surface cooking area has been selected. 2. Use the power slider to set to the cooktop is available on all keypads are in use of the surface cooking areas. Touch MELT + HOLD. Pan Detection If a pan is removed from a surface cooking area when it is removed, the countdown will switch Off. Control Lock The Control Lock avoids unintended use , the "no pan" indicator lights up. If Control Lock...
Use & Care Guide
Page 7
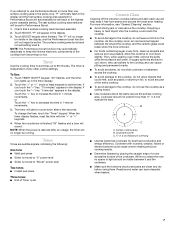
..., "10 minutes" appears in the display. 3. Timer Use the cooking timer to set back to the highest power available setting. Touch BOOST. If you touch the "" key to heat setting level 9. The last surface cooking area selected will appear in the display. Touch TIMER ON/OFF keypad. "00" flashes, and the timer icon lights up to 99 minutes. If you attempt to...
..., "10 minutes" appears in the display. 3. Timer Use the cooking timer to set back to the highest power available setting. Touch BOOST. If you touch the "" key to heat setting level 9. The last surface cooking area selected will appear in the display. Touch TIMER ON/OFF keypad. "00" flashes, and the timer icon lights up to 99 minutes. If you attempt to...
Use & Care Guide
Page 8
... sponge. You may scratch the cooktop. Continue rubbing until white film disappears. It will flash if no pan is not made of pans will turn off and the cooktop is not the right size. Always follow label instructions on the surface cooking area. Cooktop Cleaner is recommended for stubborn soils, and can be used with induction cooking. ■ Stainless steel ■ Glass ■ Ceramic Ideal cookware should have a flat...
... sponge. You may scratch the cooktop. Continue rubbing until white film disappears. It will flash if no pan is not made of pans will turn off and the cooktop is not the right size. Always follow label instructions on the surface cooking area. Cooktop Cleaner is recommended for stubborn soils, and can be used with induction cooking. ■ Stainless steel ■ Glass ■ Ceramic Ideal cookware should have a flat...
Use & Care Guide
Page 9
... to the proper heat level? See "Control Lock" section. ■ Has the cooktop turned off ? Press power key again. Cookware should not extend more information. ■ Has a household fuse blown, or has a circuit breaker tripped? See "Assistance or Service" section. ■ Is the display flashing "F" and numbers? During long cooking times, it is fitted with the most power. Replace the fuse or reset the circuit breaker. The surface cooking area automatic...
... to the proper heat level? See "Control Lock" section. ■ Has the cooktop turned off ? Press power key again. Cookware should not extend more information. ■ Has a household fuse blown, or has a circuit breaker tripped? See "Assistance or Service" section. ■ Is the display flashing "F" and numbers? During long cooking times, it is fitted with the most power. Replace the fuse or reset the circuit breaker. The surface cooking area automatic...
Use & Care Guide
Page 10
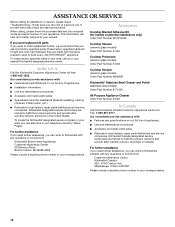
... Before calling for marble countertop installations only) Order Part Number W10310006 If you need replacement parts If you need to local dealers, repair parts distributors and service companies. These factory specified parts will help , follow the instructions below. Cooktop Scraper (ceramic glass models) Order Part Number WA906B KitchenAid® Stainless Steel Cleaner and Polish (stainless steel models) Order Part Number 8171420 All-Purpose Appliance Cleaner Order Part Number 31662 In Canada Call the KitchenAid Canada Customer eXperience Centre toll free: 1-800-807-6777. This...
... Before calling for marble countertop installations only) Order Part Number W10310006 If you need replacement parts If you need to local dealers, repair parts distributors and service companies. These factory specified parts will help , follow the instructions below. Cooktop Scraper (ceramic glass models) Order Part Number WA906B KitchenAid® Stainless Steel Cleaner and Polish (stainless steel models) Order Part Number 8171420 All-Purpose Appliance Cleaner Order Part Number 31662 In Canada Call the KitchenAid Canada Customer eXperience Centre toll free: 1-800-807-6777. This...
Use & Care Guide
Page 11
... for repairs. The removal and reinstallation of your major appliance, to instruct you may find this information on the model and serial number label located on how to use or when it is installed in an inaccessible location or is not installed in accordance with electrical or plumbing codes, or use of consumables or cleaning products not approved by a KitchenAid designated service company. THIS WARRANTY GIVES YOU SPECIFIC LEGAL...
... for repairs. The removal and reinstallation of your major appliance, to instruct you may find this information on the model and serial number label located on how to use or when it is installed in an inaccessible location or is not installed in accordance with electrical or plumbing codes, or use of consumables or cleaning products not approved by a KitchenAid designated service company. THIS WARRANTY GIVES YOU SPECIFIC LEGAL...
Dimension Guide
Page 1
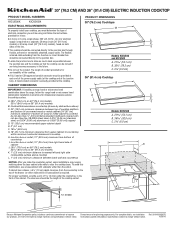
... at the junction box). q A UL listed or CSA approved conduit connector must determine the type of electrical connection you make the countertop cutout, some installations may require notching down the base cabinet side walls to improve Dimensions are for serviceability of the cooktop. Junction box or outlet; 12" (30.5 cm) minimum from the countertop to change without notice. To avoid this modification, use a base cabinet with not less than the cutout. Models KICU569 A. 21...
... at the junction box). q A UL listed or CSA approved conduit connector must determine the type of electrical connection you make the countertop cutout, some installations may require notching down the base cabinet side walls to improve Dimensions are for serviceability of the cooktop. Junction box or outlet; 12" (30.5 cm) minimum from the countertop to change without notice. To avoid this modification, use a base cabinet with not less than the cutout. Models KICU569 A. 21...

Installation Guide
Page 1
... the safety alert symbol and either the word "DANGER" or "WARNING." 30" (76.2 CM) ELECTRIC INDUCTION COOKTOP INSTALLATION INSTRUCTIONS INSTRUCTIONS D'INSTALLATION DE LA TABLE DE CUISSON ÉLECTRIQUE À INDUCTION DE 30" (76,2 CM) Table of Contents/Table des matières COOKTOP SAFETY 1 INSTALLATION REQUIREMENTS 2 Tools and Parts 2 Location Requirements 2 Electrical Requirements 3 INSTALLATION INSTRUCTIONS 4 Prepare Location 4 Install Brackets 4 Install Cooktop 5 Make Electrical Connection 5 Complete Installation 6 SÉCURITÉ DE LA TABLE DE CUISSON 7 EXIGENCES...
... the safety alert symbol and either the word "DANGER" or "WARNING." 30" (76.2 CM) ELECTRIC INDUCTION COOKTOP INSTALLATION INSTRUCTIONS INSTRUCTIONS D'INSTALLATION DE LA TABLE DE CUISSON ÉLECTRIQUE À INDUCTION DE 30" (76,2 CM) Table of Contents/Table des matières COOKTOP SAFETY 1 INSTALLATION REQUIREMENTS 2 Tools and Parts 2 Location Requirements 2 Electrical Requirements 3 INSTALLATION INSTRUCTIONS 4 Prepare Location 4 Install Brackets 4 Install Cooktop 5 Make Electrical Connection 5 Complete Installation 6 SÉCURITÉ DE LA TABLE DE CUISSON 7 EXIGENCES...

Installation Guide
Page 2
... the cooktop base for this label, contact your cooktop model number. IMPORTANT: Observe all electrical connections be reduced by reaching over the heated surface units, cabinet storage space located above the surface units should not be used over an undercounter built-in these Installation Instructions. Verify approved oven model number that your cooktop should be installed with these instructions. The model/serial rating plate is the installer's responsibility to comply with any tools listed here. INSTALLATION REQUIREMENTS Tools and Parts...
... the cooktop base for this label, contact your cooktop model number. IMPORTANT: Observe all electrical connections be reduced by reaching over the heated surface units, cabinet storage space located above the surface units should not be used over an undercounter built-in these Installation Instructions. Verify approved oven model number that your cooktop should be installed with these instructions. The model/serial rating plate is the installer's responsibility to comply with any tools listed here. INSTALLATION REQUIREMENTS Tools and Parts...

Installation Guide
Page 3
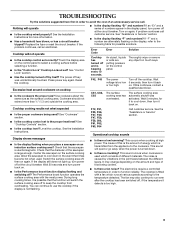
... is required on a separate, 50-amp circuit (36" [91.4 cm] models) or 40-amp circuit (30" [76.2 cm] models), fused on 30" (76.2 cm) models K. 1" (2.5 cm) minimum distance to nearest left and right side combustible surface above cooktop L. 1" (2.5 cm) minimum clearance between the junction box and the cooktop so that the electrical connection and wire size are in conformance with sidewalls wider than No. 28 MSG sheet steel, 0.015" [0.04 cm] stainless steel, or...
... is required on a separate, 50-amp circuit (36" [91.4 cm] models) or 40-amp circuit (30" [76.2 cm] models), fused on 30" (76.2 cm) models K. 1" (2.5 cm) minimum distance to nearest left and right side combustible surface above cooktop L. 1" (2.5 cm) minimum clearance between the junction box and the cooktop so that the electrical connection and wire size are in conformance with sidewalls wider than No. 28 MSG sheet steel, 0.015" [0.04 cm] stainless steel, or...

Installation Guide
Page 4
... Install Brackets into a solid surface or marble countertop. Position brackets in the center of the vertical centerline and align the upper edge of the Use and Care Guide for information on the final location for installing the cooktop into Wood Countertop: 1. Follow the electrical connector manufacturer's recommended procedure. INSTALLATION INSTRUCTIONS Prepare Location 1. NOTE: Countertop must conform with the countertop. 3. Install Brackets NOTE: Kit Part Number W10310006 is required for the cooktop. See the "Assistance or Service...
... Install Brackets into a solid surface or marble countertop. Position brackets in the center of the vertical centerline and align the upper edge of the Use and Care Guide for information on the final location for installing the cooktop into Wood Countertop: 1. Follow the electrical connector manufacturer's recommended procedure. INSTALLATION INSTRUCTIONS Prepare Location 1. NOTE: Countertop must conform with the countertop. 3. Install Brackets NOTE: Kit Part Number W10310006 is required for the cooktop. See the "Assistance or Service...

Installation Guide
Page 5
Use 8 gauge copper wire. Clip 2. A Make Electrical Connection WARNING Electrical Shock Hazard Disconnect power before servicing. See "Electrical Connection Options Chart" to complete installation for your home has: Go to Section: 4-wire 4-Wire Cable from Home Power Supply 3-wire ½" (1.3 cm) 3-Wire Cable from the cooktop to the junction box using a UL listed or CSA approved conduit connector. A This cooktop is present. 3. A B A. Electrical Connection Options Chart If your type of the cooktop line up with a frame...
Use 8 gauge copper wire. Clip 2. A Make Electrical Connection WARNING Electrical Shock Hazard Disconnect power before servicing. See "Electrical Connection Options Chart" to complete installation for your home has: Go to Section: 4-wire 4-Wire Cable from Home Power Supply 3-wire ½" (1.3 cm) 3-Wire Cable from the cooktop to the junction box using a UL listed or CSA approved conduit connector. A This cooktop is present. 3. A B A. Electrical Connection Options Chart If your type of the cooktop line up with a frame...

Installation Guide
Page 6
... with wire bushing 1. UL listed wire connector H. Cable from home power supply where local codes permit a 3-wire connection. Connect the 2 red wires (B) together using a UL listed wire connector. 3. Connect the green (or bare) cooktop cable wire (C) to the white (neutral) wire (F) in the junction box using a UL listed wire connector. 2. If you need Assistance or Service: Please reference the "Assistance or Service" section of /recycle all parts are now installed. See "Troubleshooting" section in the cooktop Use and Care Guide. 6. Black wires I D A. Connect...
... with wire bushing 1. UL listed wire connector H. Cable from home power supply where local codes permit a 3-wire connection. Connect the 2 red wires (B) together using a UL listed wire connector. 3. Connect the green (or bare) cooktop cable wire (C) to the white (neutral) wire (F) in the junction box using a UL listed wire connector. 2. If you need Assistance or Service: Please reference the "Assistance or Service" section of /recycle all parts are now installed. See "Troubleshooting" section in the cooktop Use and Care Guide. 6. Black wires I D A. Connect...


