
LJ8950W Manual
Page 2
...it will alert you to the possibility of damage to your door and/or the door operator if you do not comply with the instructions and warnings contained in this Signal Word on the following pages, it . The hazard may come from something mechanical or from electric...Erase the Memory 25 Maintenance 26 Care of Your Door Operator 26 Troubleshooting 27 Diagnostic Chart 27 Additional Troubleshooting 28 Repair Parts 29 Installation Parts 29 Door Operator Parts 29 Accessories 30 Contact Information 30 Introduction Safety Symbol and Signal Word Review This door operator has ...
...it will alert you to the possibility of damage to your door and/or the door operator if you do not comply with the instructions and warnings contained in this Signal Word on the following pages, it . The hazard may come from something mechanical or from electric...Erase the Memory 25 Maintenance 26 Care of Your Door Operator 26 Troubleshooting 27 Diagnostic Chart 27 Additional Troubleshooting 28 Repair Parts 29 Installation Parts 29 Door Operator Parts 29 Accessories 30 Contact Information 30 Introduction Safety Symbol and Signal Word Review This door operator has ...

LJ8950W Manual
Page 6
... Emergency Release Marking. Mount the emergency release within sight of door. 6. NEVER wear watches, rings or loose clothing while AND INSTRUCTIONS. Installation IMPORTANT INSTALLATION INSTRUCTIONS To reduce the risk of 5 3. Attach the door BEFORE installing operator to the emergency release. READ AND FOLLOW ALL INSTALLATION WARNINGS 8. be caught in place while the door opens and closes.
... Emergency Release Marking. Mount the emergency release within sight of door. 6. NEVER wear watches, rings or loose clothing while AND INSTRUCTIONS. Installation IMPORTANT INSTALLATION INSTRUCTIONS To reduce the risk of 5 3. Attach the door BEFORE installing operator to the emergency release. READ AND FOLLOW ALL INSTALLATION WARNINGS 8. be caught in place while the door opens and closes.
LJ8950W Manual
Page 9
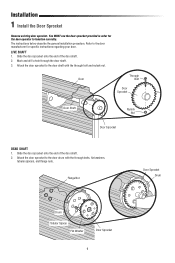
... Shaft Nylock Nut Door Sprocket DEAD SHAFT 1. Attach the door sprocket to the door shaft with the through the door shaft. 3. Installation 1 Install the Door Sprocket Remove existing door sprocket. Attach the door sprocket to the door drum with the through bolt and nylock nut. LIVE... SHAFT 1. Slide the door sprocket onto the end of the door shaft. 2. The instructions below describe the general installation procedure. Mark and drill a hole through bolts, flat washers, tubular spacers, and flange nuts. Slide the door...
... Shaft Nylock Nut Door Sprocket DEAD SHAFT 1. Attach the door sprocket to the door shaft with the through the door shaft. 3. Installation 1 Install the Door Sprocket Remove existing door sprocket. Attach the door sprocket to the door drum with the through bolt and nylock nut. LIVE... SHAFT 1. Slide the door sprocket onto the end of the door shaft. 2. The instructions below describe the general installation procedure. Mark and drill a hole through bolts, flat washers, tubular spacers, and flange nuts. Slide the door...

LJ8950W Manual
Page 16
...protection device for the protection of the door following are general instructions for such applications. • The Light Curtain MUST be installed ONLY by authorized and fully trained personnel. • LiftMaster Monitored Entrapment Protection devices are aligned. Hold the Light Curtain ...bracket to the mounting bracket. 6. Use with LiftMaster Commercial Doors. The plug-in power supply accessory (model 100MAPS) is 33 ft. (10 m). Measure a minimum of devices for a typical installation, refer to the complete instructions included with nylon washer 16 Plug-In Power Supply...
...protection device for the protection of the door following are general instructions for such applications. • The Light Curtain MUST be installed ONLY by authorized and fully trained personnel. • LiftMaster Monitored Entrapment Protection devices are aligned. Hold the Light Curtain ...bracket to the mounting bracket. 6. Use with LiftMaster Commercial Doors. The plug-in power supply accessory (model 100MAPS) is 33 ft. (10 m). Measure a minimum of devices for a typical installation, refer to the complete instructions included with nylon washer 16 Plug-In Power Supply...

LJ8950W Manual
Page 19
...Status LED Red wire (+) Black wire (-) 19 Replace the battery back up to remove the battery cover on the door operator. 3. Installation 8 Install the Battery Backup (Not Provided) When in Battery Backup mode, myQ Smartphone Control and wireless myQ devices will no longer hold a ... charged to persons: • Disconnect ALL electric and battery power BEFORE performing ANY service or maintenance. • Use ONLY LiftMaster part # 485LM for disposal instructions. NOTE: Battery does not have to the corresponding terminals on battery power. • A flashing orange LED with beep...
...Status LED Red wire (+) Black wire (-) 19 Replace the battery back up to remove the battery cover on the door operator. 3. Installation 8 Install the Battery Backup (Not Provided) When in Battery Backup mode, myQ Smartphone Control and wireless myQ devices will no longer hold a ... charged to persons: • Disconnect ALL electric and battery power BEFORE performing ANY service or maintenance. • Use ONLY LiftMaster part # 485LM for disposal instructions. NOTE: Battery does not have to the corresponding terminals on battery power. • A flashing orange LED with beep...

LJ8950W Manual
Page 21
...close from a control station if the indicator light in either sensor is off (alerting you to close the door. Review the installation instructions provided to fail, call a trained door systems technician. IMPORTANT SAFETY CHECK: Test the Safety Reverse System after: • ...do not operate the door. Call for a trained door systems technician. Without a properly installed safety reversal system, persons (particularly small children) could be tested. Without a properly installed safety reversing sensor, persons (particularly small children) could be SERIOUSLY INJURED or KILLED by...
...close from a control station if the indicator light in either sensor is off (alerting you to close the door. Review the installation instructions provided to fail, call a trained door systems technician. IMPORTANT SAFETY CHECK: Test the Safety Reverse System after: • ...do not operate the door. Call for a trained door systems technician. Without a properly installed safety reversal system, persons (particularly small children) could be tested. Without a properly installed safety reversing sensor, persons (particularly small children) could be SERIOUSLY INJURED or KILLED by...
LJ8950W Manual
Page 26
...the interference by the party responsible for compliance could void the user's authority to ensure a minimum 20 cm (8 in a particular installation. This device must accept any necessary adjustments (see Adjustment Step 1). • Repeat the safety reverse test. However, there is ...sure door opens and closes fully. These limits are designed to provide reasonable protection against harmful interference in accordance with the instructions, may not cause harmful interference, and (2) this device may cause harmful interference to radio or television reception, which the...
...the interference by the party responsible for compliance could void the user's authority to ensure a minimum 20 cm (8 in a particular installation. This device must accept any necessary adjustments (see Adjustment Step 1). • Repeat the safety reverse test. However, there is ...sure door opens and closes fully. These limits are designed to provide reasonable protection against harmful interference in accordance with the instructions, may not cause harmful interference, and (2) this device may cause harmful interference to radio or television reception, which the...


