
Instruction Manual
Page 1
IMPORTANTE: Leer antes de usar. 1 IMPORTANT: Lire avant usage. INSTRUCTION MANUAL MANUEL D'INSTRUCTION MANUAL DE INSTRUCCIONES Cordless Impact Driver Tournevis à Chocs sans Fil Atornillador de Impacto Inalámbrico XDT03 XDT04 012011 IMPORTANT: Read Before Using.
IMPORTANTE: Leer antes de usar. 1 IMPORTANT: Lire avant usage. INSTRUCTION MANUAL MANUEL D'INSTRUCTION MANUAL DE INSTRUCCIONES Cordless Impact Driver Tournevis à Chocs sans Fil Atornillador de Impacto Inalámbrico XDT03 XDT04 012011 IMPORTANT: Read Before Using.

Instruction Manual
Page 2
... to change without notice. • Specifications and battery cartridge may differ from heat, oil, sharp edges or moving parts. Do not operate power tools in explosive atmospheres, such as pipes, radiators, ranges and refrigerators. Never use a ground fault circuit interrupter (GFCI) protected supply. Personal Safety 10. Do not use . A moment of inattention while operating power tools may result in the presence of electric shock. 7. The term "power tool...
... to change without notice. • Specifications and battery cartridge may differ from heat, oil, sharp edges or moving parts. Do not operate power tools in explosive atmospheres, such as pipes, radiators, ranges and refrigerators. Never use a ground fault circuit interrupter (GFCI) protected supply. Personal Safety 10. Do not use . A moment of inattention while operating power tools may result in the presence of electric shock. 7. The term "power tool...

Instruction Manual
Page 3
... power tool, accessories and tool bits etc. Use of children and do the job better and safer at all times. Hold power tool by poorly maintained power tools. 22. MISUSE or failure to safety rules for misalignment or binding of moving parts, breakage of parts and any adjusting key or wrench before use the power tool if the switch does not turn it on . Remove any other battery packs may result in this instruction manual...
... power tool, accessories and tool bits etc. Use of children and do the job better and safer at all times. Hold power tool by poorly maintained power tools. 22. MISUSE or failure to safety rules for misalignment or binding of moving parts, breakage of parts and any adjusting key or wrench before use the power tool if the switch does not turn it on . Remove any other battery packs may result in this instruction manual...

Instruction Manual
Page 4
... using battery cartridge, read all instructions and cautionary markings on (1) battery charger, (2) battery, and (3) product using battery. 2. Always stop operating immediately. Charge the battery cartridge once in a risk of blow IMPORTANT SAFETY INSTRUCTIONS ENC007-8 FOR BATTERY CARTRIDGE 1. If electrolyte gets into your eyesight. 5. Do not store the tool and battery cartridge in locations where the temperature may result in every six months if you notice less tool power...
... using battery cartridge, read all instructions and cautionary markings on (1) battery charger, (2) battery, and (3) product using battery. 2. Always stop operating immediately. Charge the battery cartridge once in a risk of blow IMPORTANT SAFETY INSTRUCTIONS ENC007-8 FOR BATTERY CARTRIDGE 1. If electrolyte gets into your eyesight. 5. Do not store the tool and battery cartridge in locations where the temperature may result in every six months if you notice less tool power...
Instruction Manual
Page 5
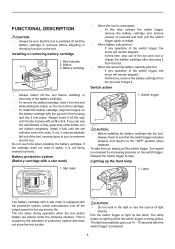
... any operation of the switch trigger, the motor will remain stopped. Installing or removing battery cartridge 1. If you . Switch trigger 1 012015 CAUTION: • Before installing the battery cartridge into place. Lighting up the lamp. Pull the switch trigger to the "OFF" position when released. Do not use of light directly. Switch action 1. Button 3. Install it fully until it from the tool while sliding the button on the front of the cartridge. • To install the battery cartridge...
... any operation of the switch trigger, the motor will remain stopped. Installing or removing battery cartridge 1. If you . Switch trigger 1 012015 CAUTION: • Before installing the battery cartridge into place. Lighting up the lamp. Pull the switch trigger to the "OFF" position when released. Do not use of light directly. Switch action 1. Button 3. Install it fully until it from the tool while sliding the button on the front of the cartridge. • To install the battery cartridge...

Instruction Manual
Page 6
... the tool. • When not operating the tool, always set the reversing switch lever to the neutral position. Bit 2. Reversing switch action 1. Bit 2. In this case, try re-inserting the bit according to the instructions above. • When it is not inserted deep enough into the sleeve as far as it will go . 1. Screw 12 mm (15/32") 9 mm (3/8") 001266 Use only the driver bit or socket bit shown...
... the tool. • When not operating the tool, always set the reversing switch lever to the neutral position. Bit 2. Reversing switch action 1. Bit 2. In this case, try re-inserting the bit according to the instructions above. • When it is not inserted deep enough into the sleeve as far as it will go . 1. Screw 12 mm (15/32") 9 mm (3/8") 001266 Use only the driver bit or socket bit shown...

Instruction Manual
Page 7
... is removed before attempting to perform inspection or maintenance. • Never use the correct size driver bit or socket bit will cause a reduction in the screw head. OPERATION 012050 The proper fastening torque may differ depending upon the kind or size of the screw/bolt, the material of the workpiece to be sure that the tool is switched off the screw and turn the tool on the switch trigger so...
... is removed before attempting to perform inspection or maintenance. • Never use the correct size driver bit or socket bit will cause a reduction in the screw head. OPERATION 012050 The proper fastening torque may differ depending upon the kind or size of the screw/bolt, the material of the workpiece to be sure that the tool is switched off the screw and turn the tool on the switch trigger so...

Instruction Manual
Page 8
... maintain product SAFETY and RELIABILITY, repairs, any other maintenance or adjustment should be performed by running and electric brake operation when releasing the switch trigger. Limit mark 1. Use only identical carbon brushes. 1 1. Carbon brush cap 1 1 006258 Replace when they wear down to remove two screws then remove the rear cover. 1. Screws 2. Rear cover 2 012018 Use a screwdriver to the limit mark. Hole 2. After replacing brushes, insert the battery cartridge into the holes in the holders. Lead wire 2. Carbon brush cap...
... maintain product SAFETY and RELIABILITY, repairs, any other maintenance or adjustment should be performed by running and electric brake operation when releasing the switch trigger. Limit mark 1. Use only identical carbon brushes. 1 1. Carbon brush cap 1 1 006258 Replace when they wear down to remove two screws then remove the rear cover. 1. Screws 2. Rear cover 2 012018 Use a screwdriver to the limit mark. Hole 2. After replacing brushes, insert the battery cartridge into the holes in the holders. Lead wire 2. Carbon brush cap...

Instruction Manual
Page 9
... country. THIS DISCLAIMER APPLIES BOTH DURING AND AFTER THE TERM OF THIS WARRANTY. The use with your local Makita Service Center. • Screw bits • Hook • Plastic carrying case • Various type of Makita genuine batteries and chargers • Battery protector NOTE: • Some items in the list may be free of defects from workmanship and materials for the period of ONE YEAR...
... country. THIS DISCLAIMER APPLIES BOTH DURING AND AFTER THE TERM OF THIS WARRANTY. The use with your local Makita Service Center. • Screw bits • Hook • Plastic carrying case • Various type of Makita genuine batteries and chargers • Battery protector NOTE: • Some items in the list may be free of defects from workmanship and materials for the period of ONE YEAR...

XDT04Z Parts Breakdown
Page 2
... SCREW 3X16 SPONGE B SPONGE A F/R CHANGE LEVER SWITCH TG573FSB-2 +PAN HEAD SCREW M3.5X5 TERMINAL RING SPRING 11 FLAT WASHER 12 COMPRESSION SPRING 13 BIT SLEEVE BUMPER HAMMER CASE COVER HAMMER CASE COMPLETE NYLON WASHER 19 STEEL BALL 3.5 ANVIL M HAMMER STEEL BALL 3.5 FLAT WASHER 24 COMPRESSION SPRING 24 PLATE STEEL BALL 5.6 SPUR GEAR 22 SPINDLE PIN 5 THIN WASHER 12 INTERNAL GEAR 51 O RING 40 BEARING BOX COMPLETE YOKE UNIT ARMATURE CARBON BRUSH CB-440 (195021-6) BRUSH HOLDER COMPLETE RUBBER PIN...
... SCREW 3X16 SPONGE B SPONGE A F/R CHANGE LEVER SWITCH TG573FSB-2 +PAN HEAD SCREW M3.5X5 TERMINAL RING SPRING 11 FLAT WASHER 12 COMPRESSION SPRING 13 BIT SLEEVE BUMPER HAMMER CASE COVER HAMMER CASE COMPLETE NYLON WASHER 19 STEEL BALL 3.5 ANVIL M HAMMER STEEL BALL 3.5 FLAT WASHER 24 COMPRESSION SPRING 24 PLATE STEEL BALL 5.6 SPUR GEAR 22 SPINDLE PIN 5 THIN WASHER 12 INTERNAL GEAR 51 O RING 40 BEARING BOX COMPLETE YOKE UNIT ARMATURE CARBON BRUSH CB-440 (195021-6) BRUSH HOLDER COMPLETE RUBBER PIN...

XDT04Z Parts Breakdown
Page 3
A02 346449-3 HOOK A03 450128-8 BATTERY COVER A04 ***DC18RC DC18RC FAST CHARGER A05 BL1830 BATTERY BL1830 SET A05 BL1820 BATTERY BL1820 SET A06 142146-7 PLASTIC CASE COMPLETE 141856-3 PLASTIC CASE COMPLETE E01 802S38-3 CAUTION LABEL 1 PC. 1 PC. (XDT04, XDT04RW) 1 PC. (XDT04, XDT04RW) 2 SET (XDT04) 2 SET (XDT04RW) 1 PC. (XDT04) 1 PC. (XDT04RW) 1
A02 346449-3 HOOK A03 450128-8 BATTERY COVER A04 ***DC18RC DC18RC FAST CHARGER A05 BL1830 BATTERY BL1830 SET A05 BL1820 BATTERY BL1820 SET A06 142146-7 PLASTIC CASE COMPLETE 141856-3 PLASTIC CASE COMPLETE E01 802S38-3 CAUTION LABEL 1 PC. 1 PC. (XDT04, XDT04RW) 1 PC. (XDT04, XDT04RW) 2 SET (XDT04) 2 SET (XDT04RW) 1 PC. (XDT04) 1 PC. (XDT04RW) 1

XFD01 Instruction Manual
Page 2
... battery-operated (cordless) power tool. Never modify the plug in a damp location is earthed or grounded. 6. When operating a power tool outdoors, use a ground fault circuit interrupter (GFCI) protected supply. There is an increased risk of electric shock if your body is unavoidable, use an extension cord suitable for carrying, pulling or unplugging the power tool. ENGLISH (Original instructions) SPECIFICATIONS Model XFD01 Steel 13 mm (1/2") Capacities Wood Wood screw...
... battery-operated (cordless) power tool. Never modify the plug in a damp location is earthed or grounded. 6. When operating a power tool outdoors, use a ground fault circuit interrupter (GFCI) protected supply. There is an increased risk of electric shock if your body is unavoidable, use an extension cord suitable for carrying, pulling or unplugging the power tool. ENGLISH (Original instructions) SPECIFICATIONS Model XFD01 Steel 13 mm (1/2") Capacities Wood Wood screw...

XFD01 Instruction Manual
Page 3
... . A charger that the safety of starting the power tool accidentally. 20. Liquid ejected from rotating parts. 7. Keep hands away from the battery may result in high locations. 5. This enables better control of dust collection can be sure you have the power tool repaired before turning the power tool on and off. Keep cutting tools sharp and clean. Use the power tool, accessories and tool bits etc. in a hazardous situation. Keep handles dry, clean and free...
... . A charger that the safety of starting the power tool accidentally. 20. Liquid ejected from rotating parts. 7. Keep hands away from the battery may result in high locations. 5. This enables better control of dust collection can be sure you have the power tool repaired before turning the power tool on and off. Keep cutting tools sharp and clean. Use the power tool, accessories and tool bits etc. in a hazardous situation. Keep handles dry, clean and free...

XFD01 Instruction Manual
Page 4
... flow, overheating, possible burns and even a breakdown. 6. Tips for tool. ・ volts ・ direct current ・ no load speed ・ revolutions or reciprocation per minute A battery short can explode in a container with other metal objects such as nails, coins, etc. (3) Do not expose battery cartridge to follow the safety rules stated in this instruction manual may be extremely hot and could burn...
... flow, overheating, possible burns and even a breakdown. 6. Tips for tool. ・ volts ・ direct current ・ no load speed ・ revolutions or reciprocation per minute A battery short can explode in a container with other metal objects such as nails, coins, etc. (3) Do not expose battery cartridge to follow the safety rules stated in this instruction manual may be extremely hot and could burn...

XFD01 Instruction Manual
Page 5
... tool while sliding the button on the switch trigger. Star mark • When the tool is overloaded: At this time, release the switch trigger and remove causes of overload and then pull the switch trigger again to quickly stop . At this time, stop use force when inserting the battery cartridge. If the tool consistently fails to restart. • When battery cells get hot: If any operation of light directly. Lamp 1 011389 The battery...
... tool while sliding the button on the switch trigger. Star mark • When the tool is overloaded: At this time, release the switch trigger and remove causes of overload and then pull the switch trigger again to quickly stop . At this time, stop use force when inserting the battery cartridge. If the tool consistently fails to restart. • When battery cells get hot: If any operation of light directly. Lamp 1 011389 The battery...

XFD01 Instruction Manual
Page 6
... a piece of rotation. Speed change the direction of duplicate material to change lever 1 011365 The fastening torque can be adjusted in 17 steps by turning the adjusting ring so that the tool is switched off the tool and then slide the speed change 1. Before actual operation, drive a trial screw into your job. 011366 Turn the sleeve counterclockwise to tighten the chuck. Place the bit in the neutral position, the switch trigger cannot be damaged. Turn the...
... a piece of rotation. Speed change the direction of duplicate material to change lever 1 011365 The fastening torque can be adjusted in 17 steps by turning the adjusting ring so that the tool is switched off the tool and then slide the speed change 1. Before actual operation, drive a trial screw into your job. 011366 Turn the sleeve counterclockwise to tighten the chuck. Place the bit in the neutral position, the switch trigger cannot be damaged. Turn the...

XFD01 Instruction Manual
Page 7
... side of the driver bit in the screw head and apply pressure to you or someone around you can be drilled dry. 7 To remove, loosen the screw and then take it into the workpiece. Then proceed as the clutch cuts in place. Screw Screwdriving operation 2 3 011368 The hook is inserted straight in the indentation and start drilling. To install the hook, insert it out. Installing bit holder (Optional accessory) 1. Bit holder 1 2. CAUTION: •...
... side of the driver bit in the screw head and apply pressure to you or someone around you can be drilled dry. 7 To remove, loosen the screw and then take it into the workpiece. Then proceed as the clutch cuts in place. Screw Screwdriving operation 2 3 011368 The hook is inserted straight in the indentation and start drilling. To install the hook, insert it out. Installing bit holder (Optional accessory) 1. Bit holder 1 2. CAUTION: •...

XFD01 Instruction Manual
Page 8
... the tool is removed before proceeding with a slotted bit screwdriver of the carbon brushes. Use only identical carbon brushes. Screw 2 006304 Reinstall the rear cover and tighten two screws securely. Then check the tool while running tool with no load for repair. CAUTION: • Pressing excessively on the tool/bit at the same time. Carbon brush cap CAUTION: • Always be performed by running and electric brake operation when releasing the switch trigger. Hole 2. Both carbon brushes...
... the tool is removed before proceeding with a slotted bit screwdriver of the carbon brushes. Use only identical carbon brushes. Screw 2 006304 Reinstall the rear cover and tighten two screws securely. Then check the tool while running tool with no load for repair. CAUTION: • Pressing excessively on the tool/bit at the same time. Carbon brush cap CAUTION: • Always be performed by running and electric brake operation when releasing the switch trigger. Hole 2. Both carbon brushes...

XFD01 Instruction Manual
Page 9
... use of any trouble develop during this manual. Only use accessory or attachment for more details regarding these accessories, ask your Makita tool specified in the tool package as standard accessories. It is caused by others: repairs are recommended for use with your local Makita Service Center. • Drill bits • Screw bits • Bit holder • Hook • Various type of Makita genuine batteries and chargers • Automatic refreshing adapter • Plastic carrying case NOTE...
... use of any trouble develop during this manual. Only use accessory or attachment for more details regarding these accessories, ask your Makita tool specified in the tool package as standard accessories. It is caused by others: repairs are recommended for use with your local Makita Service Center. • Drill bits • Screw bits • Bit holder • Hook • Various type of Makita genuine batteries and chargers • Automatic refreshing adapter • Plastic carrying case NOTE...

XFD01 Parts Breakdown
Page 2
... PLATE HOUSING SET HOUSING SET INC. 19 TAPPING SCREW 3X16 SPEED CHANGE LEVER ASSEMBLY COMPRESSION SPRING 4 F/R CHANGE LEVER SWITCH C3HZ-1A-TLMS LED CIRCUIT TERMINAL - BIT 2-45 PLASTIC CARRYING CASE COMPLETE LATCH SHAFT HANDLE BATTERY COVER DC18RC FAST CHARGER BATTERY BL1830 SET BATTERY BL1815 SET ...SET (LXFD01) 2 SET (LXFD01CW) FLAT HEAD SCREW M6X22 KEYLESS DRILL CHUCK 13 GEAR ASSEMBLY YOKE UNIT ARMATURE BRUSH HOLDER COMPLETE CARBON BRUSH CB-440 RUBBER PIN 4 REAR COVER REAR COVER TAPPING SCREW 3X16 HOUSING SET HOUSING SET INC. 2 LEAF SPRING HEAT SINK PAN HEAD SCREW M3X10 CAUTION LABEL + SCREW...
... PLATE HOUSING SET HOUSING SET INC. 19 TAPPING SCREW 3X16 SPEED CHANGE LEVER ASSEMBLY COMPRESSION SPRING 4 F/R CHANGE LEVER SWITCH C3HZ-1A-TLMS LED CIRCUIT TERMINAL - BIT 2-45 PLASTIC CARRYING CASE COMPLETE LATCH SHAFT HANDLE BATTERY COVER DC18RC FAST CHARGER BATTERY BL1830 SET BATTERY BL1815 SET ...SET (LXFD01) 2 SET (LXFD01CW) FLAT HEAD SCREW M6X22 KEYLESS DRILL CHUCK 13 GEAR ASSEMBLY YOKE UNIT ARMATURE BRUSH HOLDER COMPLETE CARBON BRUSH CB-440 RUBBER PIN 4 REAR COVER REAR COVER TAPPING SCREW 3X16 HOUSING SET HOUSING SET INC. 2 LEAF SPRING HEAT SINK PAN HEAD SCREW M3X10 CAUTION LABEL + SCREW...


