EA7300P EA7900P Instruction Manual
Page 2
... follows: (1) Any warranted part that MAKITA may include parts such as the carburetor, the ignition system, catalytic converter, fuel tanks, fuel lines, fuel caps, valves, canisters, filters, vapor hoses, clamps, connectors, and other 49 states, new small off-road engines/equipments must warrant the emissions control system on your small off -road engine/equipment for the period of time before the first scheduled replacement, the part will be aware that...
... follows: (1) Any warranted part that MAKITA may include parts such as the carburetor, the ignition system, catalytic converter, fuel tanks, fuel lines, fuel caps, valves, canisters, filters, vapor hoses, clamps, connectors, and other 49 states, new small off-road engines/equipments must warrant the emissions control system on your small off -road engine/equipment for the period of time before the first scheduled replacement, the part will be aware that...
EA7300P EA7900P Instruction Manual
Page 3
... the need for repair or replacement of the part. (2) Except as provided above, any adjustment of any warranted part otherwise eligible for warranty coverage as an idle limiter cap or plug) is the emission warranty parts list for your engine or equipment: (I) Fuel Metering System (A) Carburetor and internal parts (and/or pressure regulator or fuel injection system) (B) Fuel Filter, if applicable (C) Choke (Cold start enrichment system) (II) Air Induction System (A) Air filter (B) Intake manifold (III) Ignition System (A) Ignition...
... the need for repair or replacement of the part. (2) Except as provided above, any adjustment of any warranted part otherwise eligible for warranty coverage as an idle limiter cap or plug) is the emission warranty parts list for your engine or equipment: (I) Fuel Metering System (A) Carburetor and internal parts (and/or pressure regulator or fuel injection system) (B) Fuel Filter, if applicable (C) Choke (Cold start enrichment system) (II) Air Induction System (A) Air filter (B) Intake manifold (III) Ignition System (A) Ignition...

EA7300P EA7900P Instruction Manual
Page 4
... Troubleshooting 38 Extract from the spare parts list 39 The EA7300P and EA7900P will have chosen a German quality product. Important instructions for recycling (waste paper recycling). 4 For your chain saw chain 32 Replacing the fuel filter 32 Cleaning the air filter 33 Replacing the spark plug 34 Replacing the starter cable 35 Replacing the return spring 35 Mounting the fan housing 36 Cleaning the cylinder area 36 Replacing / cleaning the spark arrester screen.......... 36 Instructions for which the engine...
... Troubleshooting 38 Extract from the spare parts list 39 The EA7300P and EA7900P will have chosen a German quality product. Important instructions for recycling (waste paper recycling). 4 For your chain saw chain 32 Replacing the fuel filter 32 Cleaning the air filter 33 Replacing the spark plug 34 Replacing the starter cable 35 Replacing the return spring 35 Mounting the fan housing 36 Cleaning the cylinder area 36 Replacing / cleaning the spark arrester screen.......... 36 Instructions for which the engine...
EA7300P EA7900P Instruction Manual
Page 5
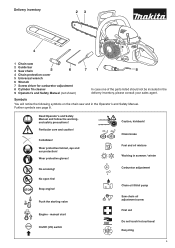
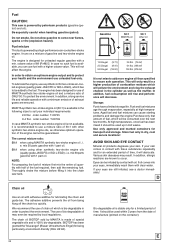
Stop engine! Read Operator's and Safety Manual and follow the warningand safety precautions! Wear protective gloves! manual start On/Off (I/O) switch Chain oil fill/oil pump Saw chain oil adjustment screw First aid Do not touch hot surfaces! Symbols You will notice the following symbols on the chain saw 2 Guide bar 3 Saw chain 5 6 4 Chain protection cover 5 Universal wrench 6 Wrench 7 Screw driver for carburetor adjustment 8 Cylinder fin cleaner 9 Operator's and Safety Manual (not shown) 7 1 8 In case one of the parts listed should not...
Stop engine! Read Operator's and Safety Manual and follow the warningand safety precautions! Wear protective gloves! manual start On/Off (I/O) switch Chain oil fill/oil pump Saw chain oil adjustment screw First aid Do not touch hot surfaces! Symbols You will notice the following symbols on the chain saw 2 Guide bar 3 Saw chain 5 6 4 Chain protection cover 5 Universal wrench 6 Wrench 7 Screw driver for carburetor adjustment 8 Cylinder fin cleaner 9 Operator's and Safety Manual (not shown) 7 1 8 In case one of the parts listed should not...

EA7300P EA7900P Instruction Manual
Page 6
... requirements of oil or fuel mixture. - Always hand over the Operator's and Safety Manual. e) Do not overreach or cut . It is intended for two-handed use replacement bars and chains specified by the front handle with a firm grip on both hands, the right hand on the rear handle and the left hand on the saw with the engine stopped, the guide bar and saw chain when the engine is...
... requirements of oil or fuel mixture. - Always hand over the Operator's and Safety Manual. e) Do not overreach or cut . It is intended for two-handed use replacement bars and chains specified by the front handle with a firm grip on both hands, the right hand on the rear handle and the left hand on the saw with the engine stopped, the guide bar and saw chain when the engine is...
EA7300P EA7900P Instruction Manual
Page 9
... in not exposed to heat or sparks. 9 The saw Parts of the chain saw: illustrations and description of the saw Transporting the chain saw in a vehicle, keep chain and bar covered with the chain guard. Bow guide bars substantially increase the potential for use on MAKITA chain saws nor are recommended. Properly secure your head. Never modify a chain saw WARNING! Always wear noise protection equipment (ear plugs or ear muffs) to rotate. When...
... in not exposed to heat or sparks. 9 The saw Parts of the chain saw: illustrations and description of the saw Transporting the chain saw in a vehicle, keep chain and bar covered with the chain guard. Bow guide bars substantially increase the potential for use on MAKITA chain saws nor are recommended. Properly secure your head. Never modify a chain saw WARNING! Always wear noise protection equipment (ear plugs or ear muffs) to rotate. When...
EA7300P EA7900P Instruction Manual
Page 10
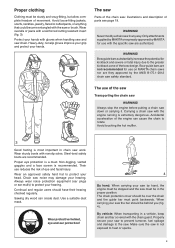
... life!). Fueling Your MAKITA saw on oil-gasoline mixture for the clutch to engage the sprocket and turn the chain which may result in an open area. Use extreme caution when handling gasoline or fuel mix. Always shut off the engine and allow the grip to snap back, but guide the starter rope slowly back to permit the rope to work). Be absolutely sure that guide bar and chain are...
... life!). Fueling Your MAKITA saw on oil-gasoline mixture for the clutch to engage the sprocket and turn the chain which may result in an open area. Use extreme caution when handling gasoline or fuel mix. Always shut off the engine and allow the grip to snap back, but guide the starter rope slowly back to permit the rope to work). Be absolutely sure that guide bar and chain are...

EA7300P EA7900P Instruction Manual
Page 11
... the saw . 8 WARNING! When starting a cut, the blade can best oppose and absorb the push, pull and kickback forces of the saw firmly with incorrect idle speed adjustment. When sawing, make proper adjustments or repairs. WARNING! You cannot control reactive forces (see the appropriate section of the chain. Use your saw in this position does not permit the operator proper control of your chain saw chain tension frequently, especially just after installing a new chain. Adjust the idle speed...
... the saw . 8 WARNING! When starting a cut, the blade can best oppose and absorb the push, pull and kickback forces of the saw firmly with incorrect idle speed adjustment. When sawing, make proper adjustments or repairs. WARNING! You cannot control reactive forces (see the appropriate section of the chain. Use your saw in this position does not permit the operator proper control of your chain saw chain tension frequently, especially just after installing a new chain. Adjust the idle speed...

EA7300P EA7900P Instruction Manual
Page 18
... in a high or locked place, away from children. replace worn sprockets or chains. The bucking cut is then made on the compression side to pre- Maintenance and Repair Never operate a chain saw Keep the chain, bar and sprocket clean and lubricated; WARNING! Have such work not described in the appropriate section of this manual. a blowdown area, fig. 35). Follow the maintenance and repair instructions in this manual. Pull out...
... in a high or locked place, away from children. replace worn sprockets or chains. The bucking cut is then made on the compression side to pre- Maintenance and Repair Never operate a chain saw Keep the chain, bar and sprocket clean and lubricated; WARNING! Have such work not described in the appropriate section of this manual. a blowdown area, fig. 35). Follow the maintenance and repair instructions in this manual. Pull out...
EA7300P EA7900P Instruction Manual
Page 19
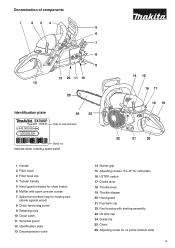
...20 1 Handle 2 Filter cover 3 Filter hood clip 4 Tubular handle 5 Hand guard (release for chain brake) 6 Muffler with spark arrester screen 7 Spike bar (toothed stop for holding saw steady against wood) 8 Chain tensioning screw 9 Retaining nuts 10 Chain catch 11 Sprocket guard 12 Identification plate 13 Decompression valve 14 Starter grip 15 Adjusting screws "S-L-H" for carburetor 16 I/STOP-switch 17 Choke lever 18 Throttle lever 19 Throttle stopper 20 Hand guard 21 Fuel tank cap 22 Fan housing with starting assembly 23 Oil tank cap 24 Guide bar 25 Chain 26 Adjusting screw for oil pump...
...20 1 Handle 2 Filter cover 3 Filter hood clip 4 Tubular handle 5 Hand guard (release for chain brake) 6 Muffler with spark arrester screen 7 Spike bar (toothed stop for holding saw steady against wood) 8 Chain tensioning screw 9 Retaining nuts 10 Chain catch 11 Sprocket guard 12 Identification plate 13 Decompression valve 14 Starter grip 15 Adjusting screws "S-L-H" for carburetor 16 I/STOP-switch 17 Choke lever 18 Throttle lever 19 Throttle stopper 20 Hand guard 21 Fuel tank cap 22 Fan housing with starting assembly 23 Oil tank cap 24 Guide bar 25 Chain 26 Adjusting screw for oil pump...
EA7300P EA7900P Instruction Manual
Page 21
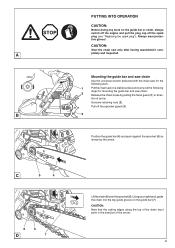
... the chain saw for mounting the guide bar and saw chain: 2 Release the chain brake by the arrow. Always wear protective gloves! Pull off the spark plug (see "Replacing the spark plug"). Using your right hand, guide the chain into the top guide groove on the guide bar or chain, always switch off the engine and pull the plug cap off the sprocket guard (3). Unscrew retaining nuts (2). C 5 4 6 5 D 7 Lift the chain (6) over the sprocket (5). CAUTION: Start the chain saw only after having assembled it...
... the chain saw for mounting the guide bar and saw chain: 2 Release the chain brake by the arrow. Always wear protective gloves! Pull off the spark plug (see "Replacing the spark plug"). Using your right hand, guide the chain into the top guide groove on the guide bar or chain, always switch off the engine and pull the plug cap off the sprocket guard (3). Unscrew retaining nuts (2). C 5 4 6 5 D 7 Lift the chain (6) over the sprocket (5). CAUTION: Start the chain saw only after having assembled it...
EA7300P EA7900P Instruction Manual
Page 24
... (petrol) and oil). NOTE: For preparing the fuel-oil mixture first mix the entire oil quantity with 1 part oil. Use only approved and marked containers for being flung off the chain too quickly. Eyes can cause starting problems and damage the engine.Purchase only that amount of 50:1 with 1 part oil. 50:1 when using MAKITA synthetic two-stroke engine oil , i. octane value of special vegetable oils and is powered by contact...
... (petrol) and oil). NOTE: For preparing the fuel-oil mixture first mix the entire oil quantity with 1 part oil. Use only approved and marked containers for being flung off the chain too quickly. Eyes can cause starting problems and damage the engine.Purchase only that amount of 50:1 with 1 part oil. 50:1 when using MAKITA synthetic two-stroke engine oil , i. octane value of special vegetable oils and is powered by contact...
EA7300P EA7900P Instruction Manual
Page 26
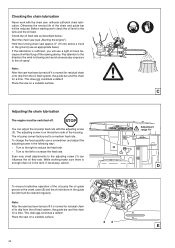
...: Start the chain saw on a suitable surface. Note: After the saw has been turned off it is normal for residual chain oil to increase the feed rate. The oil pump comes factory‑set to drip from the oil feed system, the guide bar and the chain for a time. Adjusting the chain lubrication The engine must be switched off the sawing device. Even very small adjustments to the adjusting screw (1) can adjust the oil pump feed...
...: Start the chain saw on a suitable surface. Note: After the saw has been turned off it is normal for residual chain oil to increase the feed rate. The oil pump comes factory‑set to drip from the oil feed system, the guide bar and the chain for a time. Adjusting the chain lubrication The engine must be switched off the sawing device. Even very small adjustments to the adjusting screw (1) can adjust the oil pump feed...
EA7300P EA7900P Instruction Manual
Page 27
... the half-throttle lock. Stopping the engine Move the I /STOP ignition switch (3) as the engine is positioned before starting : Pull the choke (1) out until you test the chain brake, do NOT use the chain saw without first checking the chain brake! Hold the tubular handle tightly with the chain saw . As soon as shown by the arrow. Now release the chain brake. Make sure you hear the first ignition. Slowly pull out the starter cable until it...
... the half-throttle lock. Stopping the engine Move the I /STOP ignition switch (3) as the engine is positioned before starting : Pull the choke (1) out until you test the chain brake, do NOT use the chain saw without first checking the chain brake! Hold the tubular handle tightly with the chain saw . As soon as shown by the arrow. Now release the chain brake. Make sure you hear the first ignition. Slowly pull out the starter cable until it...
EA7300P EA7900P Instruction Manual
Page 31
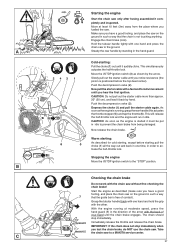
... on the guide bar or chain, always switch off the engine and pull the plug cap off the spark plug (see "PUTTING INTO OPERATION A-H". Regular inspection and maintenance are important for proper positioning. CAUTION: Start the chain saw only after having assembled it completely and inspected. Unscrew screw (6) and remove the brake mechanism cover (7). 8 Clean the guide plate (5) and brake mechanism cover (7). For replacing the guide bar, chain, and sprocket see "Replacing the spark plug"). B) and clean the interior with a brush Remove the chain (3) and guide bar (2). Always...
... on the guide bar or chain, always switch off the engine and pull the plug cap off the spark plug (see "PUTTING INTO OPERATION A-H". Regular inspection and maintenance are important for proper positioning. CAUTION: Start the chain saw only after having assembled it completely and inspected. Unscrew screw (6) and remove the brake mechanism cover (7). 8 Clean the guide plate (5) and brake mechanism cover (7). For replacing the guide bar, chain, and sprocket see "Replacing the spark plug"). B) and clean the interior with a brush Remove the chain (3) and guide bar (2). Always...
EA7300P EA7900P Instruction Manual
Page 33
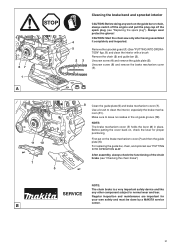
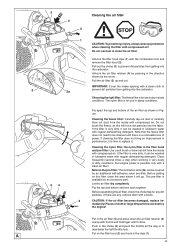
... filter hood and pre-filter: Use a soft brush or blow out dirt from getting into the fabric. Before assembling the air filter, check the choke flap for use fuel to prevent dirt particles from the inside with compressed air. Before putting on the filter hood (2) and hook in performance, it is very dirty, it . CAUTION: If the air filter becomes damaged, replace immediately! If the filter is time...
... filter hood and pre-filter: Use a soft brush or blow out dirt from getting into the fabric. Before assembling the air filter, check the choke flap for use fuel to prevent dirt particles from the inside with compressed air. Before putting on the filter hood (2) and hook in performance, it is very dirty, it . CAUTION: If the air filter becomes damaged, replace immediately! If the filter is time...
EA7300P EA7900P Instruction Manual
Page 34
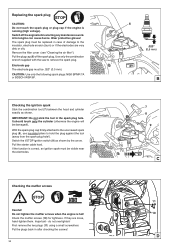
... not stick the tool in after checking the screws! 34 6 .020" (0,5 mm) B 7 8 9 C 11 10 D Do not tighten the muffler screws when the engine is running (high voltage). With the spark-plug cap firmly attached to the unscrewed spark plug (8), use insulated pliers to remove the spark plug. Wear protective gloves! Remove the filter cover (see "Cleaning the air filter"). First remove the two plugs (11) using a small screwdriver. If the function is correct, an ignition spark must be visible...
... not stick the tool in after checking the screws! 34 6 .020" (0,5 mm) B 7 8 9 C 11 10 D Do not tighten the muffler screws when the engine is running (high voltage). With the spark-plug cap firmly attached to the unscrewed spark plug (8), use insulated pliers to remove the spark plug. Wear protective gloves! Remove the filter cover (see "Cleaning the air filter"). First remove the two plugs (11) using a small screwdriver. If the function is correct, an ignition spark must be visible...
EA7300P EA7900P Instruction Manual
Page 35
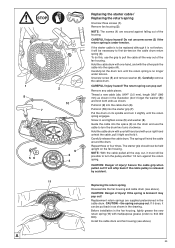
... the fan housing, lightly grease the new return spring (11) with the other push the cable into the space (4) on the drum and use the grip to turn until the return spring engages. Guide the cable into the space (4). NOTE: With the cable pulled all the way out of injury! Replacement return springs are secured against the return spring. Remove fan housing (2). Do not unscrew screw (5) if the...
... the fan housing, lightly grease the new return spring (11) with the other push the cable into the space (4) on the drum and use the grip to turn until the return spring engages. Guide the cable into the space (4). NOTE: With the cable pulled all the way out of injury! Replacement return springs are secured against the return spring. Remove fan housing (2). Do not unscrew screw (5) if the...

EA7300P EA7900P Instruction Manual
Page 37
... devices. The user of the chain saw Guide bar/chain Fuel, oil tanks Carburetor Clean exterior, check for damage. Replace if damaged. 35 Before each start Saw chain Inspect for damage and sharpness Check chain tension 29-30 23 Guide bar Check for damage Chain lubrication Functional check 26 Chain brake Functional check 27 OFF switch, Safety locking button, Throttle lever Functional check 27 Fuel/oil tank cap Check for tightness and lekages 25 Every day Air filter and filter hood Guide bar Guide bar support Idle speed Clean (more often...
... devices. The user of the chain saw Guide bar/chain Fuel, oil tanks Carburetor Clean exterior, check for damage. Replace if damaged. 35 Before each start Saw chain Inspect for damage and sharpness Check chain tension 29-30 23 Guide bar Check for damage Chain lubrication Functional check 26 Chain brake Functional check 27 OFF switch, Safety locking button, Throttle lever Functional check 27 Fuel/oil tank cap Check for tightness and lekages 25 Every day Air filter and filter hood Guide bar Guide bar support Idle speed Clean (more often...

EA7300P EA7900P Instruction Manual
Page 38
... your chain saw, depend among other than original MAKITA spare parts are used . Cylinder base packing ring defective, radial shaft packings defective, cylinder or piston rings defective Spark plug does not seal. Engine starts, but Fuel supply Fuel tank is not covered by the guarantee. ment, muffler clogged, exhaust channel in the wiring, plug cap or spark plug defective. Oil guide groove dirty. Tank venting defective, fuel line interrupted, cable defective, STOP switch defective. Decompression valve dirty Insufficient power...
... your chain saw, depend among other than original MAKITA spare parts are used . Cylinder base packing ring defective, radial shaft packings defective, cylinder or piston rings defective Spark plug does not seal. Engine starts, but Fuel supply Fuel tank is not covered by the guarantee. ment, muffler clogged, exhaust channel in the wiring, plug cap or spark plug defective. Oil guide groove dirty. Tank venting defective, fuel line interrupted, cable defective, STOP switch defective. Decompression valve dirty Insufficient power...


