
Makita DC18RC Instruction Manual
Page 3
... time removing and re-inserting it stops adjusting to the guide of batteries may not start. 16. tery, and (3) product using battery charger, read all instructions and cautionary markings on , tripped over, or otherwise subjected to use or reassembly may differ from country to country. • Weight according to EPTA-Procedure 01/2003. Other types of charger. Do not operate charger with the battery charger. 15. If the cord...
... time removing and re-inserting it stops adjusting to the guide of batteries may not start. 16. tery, and (3) product using battery charger, read all instructions and cautionary markings on , tripped over, or otherwise subjected to use or reassembly may differ from country to country. • Weight according to EPTA-Procedure 01/2003. Other types of charger. Do not operate charger with the battery charger. 15. If the cord...

Makita DC18RC Instruction Manual
Page 4
... charging Makita-battery cartridge. Battery cartridge that case, yellow light lights up. 1. Voltage Number of full charged battery 4. BH1220/C - - BH1233/C 14.4 V 12 - - 5. Cooling system • This charger is as , being clogged with its high temperature 2. The battery employed in order to enable the battery to notify completion of battery cartridge and maintenance charge. 4 Recharge of battery with dust The battery can extend the life of battery with...
... charging Makita-battery cartridge. Battery cartridge that case, yellow light lights up. 1. Voltage Number of full charged battery 4. BH1220/C - - BH1233/C 14.4 V 12 - - 5. Cooling system • This charger is as , being clogged with its high temperature 2. The battery employed in order to enable the battery to notify completion of battery cartridge and maintenance charge. 4 Recharge of battery with dust The battery can extend the life of battery with...
XLT02Z Instruction Manual
Page 1
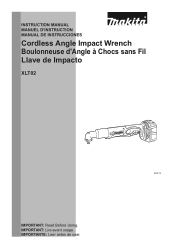
IMPORTANT: Lire avant usage. IMPORTANTE: Leer antes de usar. 1 INSTRUCTION MANUAL MANUEL D'INSTRUCTION MANUAL DE INSTRUCCIONES Cordless Angle Impact Wrench Boulonneuse d'Angle à Chocs sans Fil Llave de Impacto XLT02 014172 IMPORTANT: Read Before Using.
IMPORTANT: Lire avant usage. IMPORTANTE: Leer antes de usar. 1 INSTRUCTION MANUAL MANUEL D'INSTRUCTION MANUAL DE INSTRUCCIONES Cordless Angle Impact Wrench Boulonneuse d'Angle à Chocs sans Fil Llave de Impacto XLT02 014172 IMPORTANT: Read Before Using.
XLT02Z Instruction Manual
Page 2
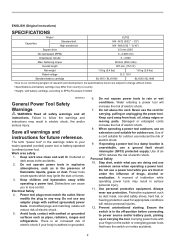
...") Square drive 9.5 mm (3/8") No load speed (RPM) 0 - 2,000 /min Impacts per minute 0 - 3,000 Max. fastening torque 60 N•m (530 in the presence of electric shock. 5. Cluttered or dark areas invite accidents. 2. Do not expose power tools to lose control. If operating a power tool in explosive atmospheres, such as dust mask, non-skid safety shoes, hard hat, or hearing protection used for future reference. Prevent unintentional starting...
...") Square drive 9.5 mm (3/8") No load speed (RPM) 0 - 2,000 /min Impacts per minute 0 - 3,000 Max. fastening torque 60 N•m (530 in the presence of electric shock. 5. Cluttered or dark areas invite accidents. 2. Do not expose power tools to lose control. If operating a power tool in explosive atmospheres, such as dust mask, non-skid safety shoes, hard hat, or hearing protection used for future reference. Prevent unintentional starting...
XLT02Z Instruction Manual
Page 3
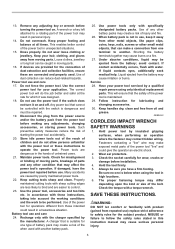
... before turning the power tool on and off. GEB049-2 CORDLESS IMPACT WRENCH SAFETY WARNINGS 1. Check the socket carefully for operations different from the battery; Maintain power tools. Service 28. Hold the tool firmly. 5. Check the torque with the charger specified by poorly maintained power tools. 22. Do not force the power tool. Wear ear protectors. 3. Always be ejected from those intended could give the operator an electric shock. 2. Remove any adjustments, changing accessories, or storing power tools. Use...
... before turning the power tool on and off. GEB049-2 CORDLESS IMPACT WRENCH SAFETY WARNINGS 1. Check the socket carefully for operations different from the battery; Maintain power tools. Service 28. Hold the tool firmly. 5. Check the torque with the charger specified by poorly maintained power tools. 22. Do not force the power tool. Wear ear protectors. 3. Always be ejected from those intended could give the operator an electric shock. 2. Remove any adjustments, changing accessories, or storing power tools. Use...
XLT02Z Instruction Manual
Page 4
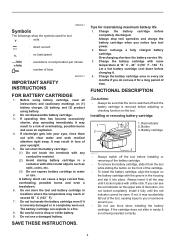
... less tool power. 2. Charge the battery cartridge before installing or removing of the battery cartridge. • To remove the battery cartridge, slide it from the tool while sliding the button on the front of blow IMPORTANT SAFETY INSTRUCTIONS ENC007-7 FOR BATTERY CARTRIDGE 1. Charge the battery cartridge with other metal objects such as nails, coins, etc. (3) Do not expose battery cartridge to water or rain. Battery cartridge 3 014173 • Always switch...
... less tool power. 2. Charge the battery cartridge before installing or removing of the battery cartridge. • To remove the battery cartridge, slide it from the tool while sliding the button on the front of blow IMPORTANT SAFETY INSTRUCTIONS ENC007-7 FOR BATTERY CARTRIDGE 1. Charge the battery cartridge with other metal objects such as nails, coins, etc. (3) Do not expose battery cartridge to water or rain. Battery cartridge 3 014173 • Always switch...
XLT02Z Instruction Manual
Page 5
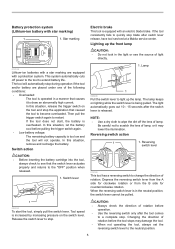
... lower the illumination. Star marking Electric brake This tool is released. Then pull the trigger switch again to draw an abnormally high current. When the reversing switch lever is being pulled. Changing the direction of rotation before the tool stops may damage the tool. • When not operating the tool, always set the reversing switch lever to scratch the lens of light directly. 012128 Lithium-ion batteries with a star marking are placed...
... lower the illumination. Star marking Electric brake This tool is released. Then pull the trigger switch again to draw an abnormally high current. When the reversing switch lever is being pulled. Changing the direction of rotation before the tool stops may damage the tool. • When not operating the tool, always set the reversing switch lever to scratch the lens of light directly. 012128 Lithium-ion batteries with a star marking are placed...
XLT02Z Instruction Manual
Page 6
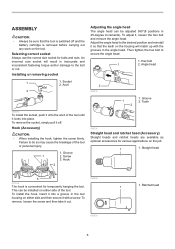
... and remove the angle head. Anvil 2 2 008335 1. Groove 1 2. Screw 3. This can be adjusted 360°(8 positions in inaccurate and inconsistent fastening torque and/or damage to the desired position and reinstall it off and the battery cartridge is switched off . ASSEMBLY CAUTION: • Always be installed on either side and then secure it into place. Adjust the angle head to the bolt or nut...
... and remove the angle head. Anvil 2 2 008335 1. Groove 1 2. Screw 3. This can be adjusted 360°(8 positions in inaccurate and inconsistent fastening torque and/or damage to the desired position and reinstall it off and the battery cartridge is switched off . ASSEMBLY CAUTION: • Always be installed on either side and then secure it into place. Adjust the angle head to the bolt or nut...
XLT02Z Instruction Manual
Page 7
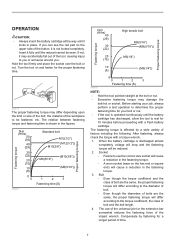
... for a longer period of the impact wrench. Socket • Failure to rest for 15 minutes before proceeding with a torque wrench. 1. OPERATION CAUTION: • Always insert the battery cartridge all the way until it may damage the bolt/nut or socket. The fastening torque is operated continuously until the battery cartridge has discharged, allow the tool to use of the universal joint or the...
... for a longer period of the impact wrench. Socket • Failure to rest for 15 minutes before proceeding with a torque wrench. 1. OPERATION CAUTION: • Always insert the battery cartridge all the way until it may damage the bolt/nut or socket. The fastening torque is operated continuously until the battery cartridge has discharged, allow the tool to use of the universal joint or the...
XLT02Z Instruction Manual
Page 8
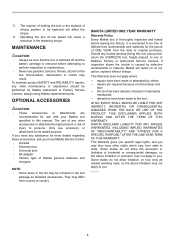
... use with your local Makita Service Center. • Sockets • Extension bar • Universal joint • Bit adapter • Various type of Makita genuine batteries and chargers NOTE: • Some items in the list may result. They may not apply to country. The manner of holding the tool or the material of original purchase. To maintain product SAFETY and RELIABILITY, repairs, any other accessories...
... use with your local Makita Service Center. • Sockets • Extension bar • Universal joint • Bit adapter • Various type of Makita genuine batteries and chargers NOTE: • Some items in the list may result. They may not apply to country. The manner of holding the tool or the material of original purchase. To maintain product SAFETY and RELIABILITY, repairs, any other accessories...
XLT02Z Parts Breakdown
Page 2
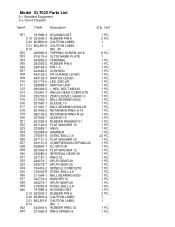
...WASHER 21 FLAT WASHER 15 ANVIL HAMMER STEEL BALL 3.5 FLAT WASHER 20 COMPRESSION SPRING 22 DC MOTOR FLAT WASHER 12 INTERNAL GEAR 69 RING 32 SPUR GEAR 29 SPUR GEAR 29 SPINDLE COMPLETE STEEL BALL 4.8 BALL BEARING 6000 WASHER 10 SPUR GEAR 29 STEEL BALL 4.8 HOUSING SET RUBBER PIN...0 1 PC. 1 PC. Model XLT02Z Parts List A = Standard Equipment 〇= Circuit Diagram Item# Part# Description 001 187889-4 001 C10...SET RUBBER PIN 6 CAUTION LABEL CAUTION LABEL INC. 40 TAPPING SCREW 4X18 XLT02 NAME PLATE TERMINAL RUBBER PIN 5 PIN 1.5 CUSHION FR CHANGE LEVER SWITCH LEVER LED CIRCUIT SWITCH UNIT + HEX.
...WASHER 21 FLAT WASHER 15 ANVIL HAMMER STEEL BALL 3.5 FLAT WASHER 20 COMPRESSION SPRING 22 DC MOTOR FLAT WASHER 12 INTERNAL GEAR 69 RING 32 SPUR GEAR 29 SPUR GEAR 29 SPINDLE COMPLETE STEEL BALL 4.8 BALL BEARING 6000 WASHER 10 SPUR GEAR 29 STEEL BALL 4.8 HOUSING SET RUBBER PIN...0 1 PC. 1 PC. Model XLT02Z Parts List A = Standard Equipment 〇= Circuit Diagram Item# Part# Description 001 187889-4 001 C10...SET RUBBER PIN 6 CAUTION LABEL CAUTION LABEL INC. 40 TAPPING SCREW 4X18 XLT02 NAME PLATE TERMINAL RUBBER PIN 5 PIN 1.5 CUSHION FR CHANGE LEVER SWITCH LEVER LED CIRCUIT SWITCH UNIT + HEX.


