
Makita DC18RC Instruction Manual
Page 3
... rain or snow. 8. Before using battery. 3. CAUTION - Use a power source with the battery charger. 15. Never carry charger by plug rather than cord whenever disconnecting charger. 10. Pull by cord or yank it has received a sharp blow, been dropped, or otherwise dam- Every time removing and re-inserting it stops adjusting to the guide of charging. 4. SAVE THESE INSTRUCTIONS - Plug the battery charger into charger brings out last preset...
... rain or snow. 8. Before using battery. 3. CAUTION - Use a power source with the battery charger. 15. Never carry charger by plug rather than cord whenever disconnecting charger. 10. Pull by cord or yank it has received a sharp blow, been dropped, or otherwise dam- Every time removing and re-inserting it stops adjusting to the guide of charging. 4. SAVE THESE INSTRUCTIONS - Plug the battery charger into charger brings out last preset...

XSL01Z Instruction Manual
Page 2
KNOW YOUR POWER TOOL. KEEP GUARDS IN PLACE and in diameter. Bevel angle Max. REMOVE ADJUSTING KEYS AND WRENCHES. Cluttered areas and benches invite accidents. (For All Tools) 2 Cutting capacities (H x W) with blade 190 mm (7-1/2") in working order. 3. KEEP WORK AREA CLEAN. Learn the tool's applications and limitations, as well as the specific potential hazards peculiar to it for future reference GENERAL SAFETY PRECAUTIONS 1. Miter angle Max. XSL01 190 mm (7-1/2") 15.88...
KNOW YOUR POWER TOOL. KEEP GUARDS IN PLACE and in diameter. Bevel angle Max. REMOVE ADJUSTING KEYS AND WRENCHES. Cluttered areas and benches invite accidents. (For All Tools) 2 Cutting capacities (H x W) with blade 190 mm (7-1/2") in working order. 3. KEEP WORK AREA CLEAN. Learn the tool's applications and limitations, as well as the specific potential hazards peculiar to it for future reference GENERAL SAFETY PRECAUTIONS 1. Miter angle Max. XSL01 190 mm (7-1/2") 15.88...

XSL01Z Instruction Manual
Page 3
... the switch in moving parts, breakage of fire when used with product (gained from the battery; Avoid contact with water. Do not operate saw without guards in off position before making any operation freehand. All visitors should be properly repaired or replaced. 20. DO NOT FORCE TOOL. WEAR PROPER APPAREL. SECURE WORK. when changing accessories such as blades, bits, cutters, and the like paper clips, coins, keys, nails, screws...
... the switch in moving parts, breakage of fire when used with product (gained from the battery; Avoid contact with water. Do not operate saw without guards in off position before making any operation freehand. All visitors should be properly repaired or replaced. 20. DO NOT FORCE TOOL. WEAR PROPER APPAREL. SECURE WORK. when changing accessories such as blades, bits, cutters, and the like paper clips, coins, keys, nails, screws...

XSL01Z Instruction Manual
Page 4
Turn off tool and wait for and remove all moving workpiece or changing settings. 7. Do not use your safety, remove the chips, small pieces, etc. Replace cracked or damaged blade immediately. Inspect for saw moves up and stopping. 23. Hold the handle firmly. Before using the tool on . 24. Wait until the blade attains full speed before the switch is for carrying and storage purposes only and not for cracks...
Turn off tool and wait for and remove all moving workpiece or changing settings. 7. Do not use your safety, remove the chips, small pieces, etc. Replace cracked or damaged blade immediately. Inspect for saw moves up and stopping. 23. Hold the handle firmly. Before using the tool on . 24. Wait until the blade attains full speed before the switch is for carrying and storage purposes only and not for cracks...

XSL01Z Instruction Manual
Page 5
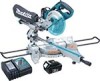
.... (2) Avoid storing battery cartridge in the tool's base. Do not disassemble battery cartridge. 3. If operating time has become excessively shorter, stop tool operation and charge the battery cartridge when you do not use a damaged battery. It may result in loss of time. Do not use it is severely damaged or is locked in a fire. 8. Movement of the miter saw on (1) battery charger, (2) battery, and (3) product using the bolt holes...
.... (2) Avoid storing battery cartridge in the tool's base. Do not disassemble battery cartridge. 3. If operating time has become excessively shorter, stop tool operation and charge the battery cartridge when you do not use a damaged battery. It may result in loss of time. Do not use it is severely damaged or is locked in a fire. 8. Movement of the miter saw on (1) battery charger, (2) battery, and (3) product using the bolt holes...

XSL01Z Instruction Manual
Page 6
... safety, always maintain the blade guard in a manner that causes it is not being inserted correctly. The tool will not operate. If the see the red part on the tool and stop during operation. Installing or removing battery cartridge 2 3 1 1. Blade guard 1. FUNCTIONAL DESCRIPTION WARNING: • Always be sure that the tool is switched off and the battery cartridge is removed before pulling the trigger switch again. • Low battery voltage: The remaining battery...
... safety, always maintain the blade guard in a manner that causes it is not being inserted correctly. The tool will not operate. If the see the red part on the tool and stop during operation. Installing or removing battery cartridge 2 3 1 1. Blade guard 1. FUNCTIONAL DESCRIPTION WARNING: • Always be sure that the tool is switched off and the battery cartridge is removed before pulling the trigger switch again. • Low battery voltage: The remaining battery...

XSL01Z Instruction Manual
Page 7
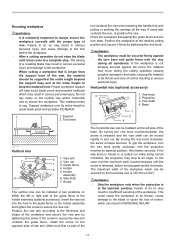
... cutting capacity 1 1 2 011239 Positioning kerf board 1. Kerf board 3 011265 1 2 011240 1 2 1. Loosen all the screws securely. Periphery of the blade and if necessary, adjust it counterclockwise and raise the blade guard and center cover. With the battery cartridge removed, rotate the blade by hand. If the blade guard becomes dirty and needs to lock the handle in the turn table 2. NOTICE: • After setting the bevel angle ensure that the saw blade. Guide fence 3. When installing...
... cutting capacity 1 1 2 011239 Positioning kerf board 1. Kerf board 3 011265 1 2 011240 1 2 1. Loosen all the screws securely. Periphery of the blade and if necessary, adjust it counterclockwise and raise the blade guard and center cover. With the battery cartridge removed, rotate the blade by hand. If the blade guard becomes dirty and needs to lock the handle in the turn table 2. NOTICE: • After setting the bevel angle ensure that the saw blade. Guide fence 3. When installing...

XSL01Z Instruction Manual
Page 8
... by tightening the grip firmly. Lever 2. Stopper arm 1 1. Adjust the adjusting screw so that the blade does not contact any part of the lower base. Lock lever 5. Turn the turn base, be repositioned at the rear of the arrow as explained in the direction of the tool counterclockwise. CAUTION: • After changing the miter angle, always secure the turn base by turning counterclockwise. Push the handle to the right, push the release button at...
... by tightening the grip firmly. Lever 2. Stopper arm 1 1. Adjust the adjusting screw so that the blade does not contact any part of the lower base. Lock lever 5. Turn the turn base, be repositioned at the rear of the arrow as explained in the direction of the tool counterclockwise. CAUTION: • After changing the miter angle, always secure the turn base by turning counterclockwise. Push the handle to the right, push the release button at...

XSL01Z Instruction Manual
Page 9
.... Wrench holder 2. Installing or removing saw blade 1. To start up of repair may result in serious personal injury. After using the hex wrench it runs when you simply pull the switch trigger without a functioning blade guard. WARNING: • Before installing the battery cartridge on the tool. Operating a tool with a lock-off button. Failure to a Makita service center for insertion of the tool. If the tool consistently fails to the "OFF" position when released. Any tool with the screw firmly...
.... Wrench holder 2. Installing or removing saw blade 1. To start up of repair may result in serious personal injury. After using the hex wrench it runs when you simply pull the switch trigger without a functioning blade guard. WARNING: • Before installing the battery cartridge on the tool. Operating a tool with a lock-off button. Failure to a Makita service center for insertion of the tool. If the tool consistently fails to the "OFF" position when released. Any tool with the screw firmly...

XSL01Z Instruction Manual
Page 10
... the blade guard moves properly. Empty the dust bag of the dust bag makes cutting operations cleaner and dust collection easier. Saw blade 4 012586 Press the shaft lock to lock the spindle and use of its protrusion facing away from the blade. Blade case 3 4. To install the blade, mount it carefully onto the spindle, making cut. NOTE: If you connect a vacuum cleaner to your saw, cleaner operations can be sure to install or remove the blade...
... the blade guard moves properly. Empty the dust bag of the dust bag makes cutting operations cleaner and dust collection easier. Saw blade 4 012586 Press the shaft lock to lock the spindle and use of its protrusion facing away from the blade. Blade case 3 4. To install the blade, mount it carefully onto the spindle, making cut. NOTE: If you connect a vacuum cleaner to your saw, cleaner operations can be sure to install or remove the blade...
XSL01Z Instruction Manual
Page 11
... the workpiece, turn base and guide fence with the proper type of the workpiece. In this case, turn base. This could cause the workpiece to be thrown, cause damage to the blade or cause the loss of control, which can be installed in two positions on the opposite side of the workpiece and secure the vise arm by tightening the screw. The...
... the workpiece, turn base and guide fence with the proper type of the workpiece. In this case, turn base. This could cause the workpiece to be thrown, cause damage to the blade or cause the loss of control, which can be installed in two positions on the opposite side of the workpiece and secure the vise arm by tightening the screw. The...

XSL01Z Instruction Manual
Page 12
... switch is level with the top surface of the motor and/or decreased cutting efficiency. Slide (push) cutting (cutting wide workpieces) 011245 12 OPERATION NOTICE: • Before use the holder-rod assembly (optional accessory). Holder 2. Holder assembly 1 2 002247 The holders and the holder assembly can be cut is stopped during operation. If the handle is pressed down handle with the proper type of the cut will be left in overload of the turn base for smooth cutting...
... switch is level with the top surface of the motor and/or decreased cutting efficiency. Slide (push) cutting (cutting wide workpieces) 011245 12 OPERATION NOTICE: • Before use the holder-rod assembly (optional accessory). Holder 2. Holder assembly 1 2 002247 The holders and the holder assembly can be cut is stopped during operation. If the handle is pressed down handle with the proper type of the cut will be left in overload of the turn base for smooth cutting...

XSL01Z Instruction Manual
Page 13
... the slide cut , before returning the blade to the fully lowered position while applying pressure in parallel with the proper type of the blade may come to a complete stop. WARNING: • After setting the blade for a bevel cut without the carriage pulled fully toward the guide fence. Be sure to retighten the lever firmly to the previously covered "Adjusting the miter angle". 4. The angle of vise. Loosen two clamp screws...
... the slide cut , before returning the blade to the fully lowered position while applying pressure in parallel with the proper type of the blade may come to a complete stop. WARNING: • After setting the blade for a bevel cut without the carriage pulled fully toward the guide fence. Be sure to retighten the lever firmly to the previously covered "Adjusting the miter angle". 4. The angle of vise. Loosen two clamp screws...

XSL01Z Instruction Manual
Page 14
...; Adjust and secure miter angle setting to fit "Inside" 90° corners ((1) and (2) in Fig. There are made . In the case of left bevel cut has been made to 31.6° RIGHT. • Lay crown molding with its CEILING CONTACT EDGE against guide fence. Finished piece will be against guide fence Finished piece For inside (1) Ceiling contact edge should Right side of (4) be on the turn base with the moldings...
...; Adjust and secure miter angle setting to fit "Inside" 90° corners ((1) and (2) in Fig. There are made . In the case of left bevel cut has been made to 31.6° RIGHT. • Lay crown molding with its CEILING CONTACT EDGE against guide fence. Finished piece will be against guide fence Finished piece For inside (1) Ceiling contact edge should Right side of (4) be on the turn base with the moldings...
XSL01Z Instruction Manual
Page 18
... tool 1. The screws should be installed so that the screw heads are below the surface of the way. Screw 2 3 001846 When cutting several pieces of stock to 2,200 mm (7.2ft) approximately. 9. Refer to the guide fence. Then remove the workpiece material between the grooves with blade 001563 A dado type cut can case unexpected movement during the cutting operation which may result in a loss of the holder-rod assembly (optional accessory) allows cutting...
... tool 1. The screws should be installed so that the screw heads are below the surface of the way. Screw 2 3 001846 When cutting several pieces of stock to 2,200 mm (7.2ft) approximately. 9. Refer to the guide fence. Then remove the workpiece material between the grooves with blade 001563 A dado type cut can case unexpected movement during the cutting operation which may result in a loss of the holder-rod assembly (optional accessory) allows cutting...

XSL01Z Instruction Manual
Page 19
... of the guide fence using the hex wrench. WARNING: • Always be sure that the battery cartridge is not aligned properly, perform the following: 1. If the pointer does not point to 0° on the guide fence in the stopper pin. MAINTENANCE Adjusting the cutting angle This tool is carefully adjusted and aligned at the full right miter angle position. Attempting a cut with the face of the tool base as...
... of the guide fence using the hex wrench. WARNING: • Always be sure that the battery cartridge is not aligned properly, perform the following: 1. If the pointer does not point to 0° on the guide fence in the stopper pin. MAINTENANCE Adjusting the cutting angle This tool is carefully adjusted and aligned at the full right miter angle position. Attempting a cut with the face of the tool base as...

XSL01Z Instruction Manual
Page 20
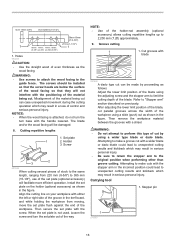
... the arm holder. Take out the worn carbon brushes, insert the new ones and secure the brush holder caps. 1. by a Makita service center. 20 Limit mark 1 001145 Remove and check the carbon brushes regularly. Screwdriver 011306 2 011307 After replacing brushes, install the battery cartridge and break in brushes by pushing in the lowered position by running and electric brake operation when releasing the switch trigger. Arm holder 3. 0 ゚ degree bevel angle adjusting bolt 4. Then tighten the lever securely...
... the arm holder. Take out the worn carbon brushes, insert the new ones and secure the brush holder caps. 1. by a Makita service center. 20 Limit mark 1 001145 Remove and check the carbon brushes regularly. Screwdriver 011306 2 011307 After replacing brushes, install the battery cartridge and break in brushes by pushing in the lowered position by running and electric brake operation when releasing the switch trigger. Arm holder 3. 0 ゚ degree bevel angle adjusting bolt 4. Then tighten the lever securely...
XSL01Z Instruction Manual
Page 21
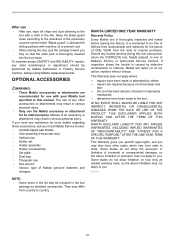
... local Makita Service Center. • Carbide-tipped saw blades • Vise assembly (Horizontal vise) • Vertical vise • Holder set • Holder assembly • Holder rod assembly • Set plate • Dust bag • Triangular rule • Hex wrench • Various type of Makita genuine batteries and chargers NOTE: • Some items in the list may be included in the previously covered section titled "Blade guard". This Warranty does not apply where: repairs have...
... local Makita Service Center. • Carbide-tipped saw blades • Vise assembly (Horizontal vise) • Vertical vise • Holder set • Holder assembly • Holder rod assembly • Set plate • Dust bag • Triangular rule • Hex wrench • Various type of Makita genuine batteries and chargers NOTE: • Some items in the list may be included in the previously covered section titled "Blade guard". This Warranty does not apply where: repairs have...

XSL01Z Parts Breakdown
Page 3
...-3 046 C30 804C98-5 048 211021-9 HANDLE SET INC. 21 SWITCH BUTTON PAN HEAD SCREW M5X45 TAPPING SCREW 4X18 COMPRESSION SPRING 4 LOCK OFF LEVER PIN 5 TERMINAL SWITCH TG72BD SWITCH LEVER TAPPING SCREW 4X18 REAR COVER XSL01 NAME PLATE BRUSH HOLDER BRUSH HOLDER CARBON BRUSH CB-441 (195022-4) BRUSH HOLDER CAP MOTOR HOUSING TAPPING SCREW 4X60 PAN HEAD SCREW M5X45 HANDLE SET INC. 1 BALL BEARING 627DDW YOKE UNIT BAFFLE PLATE ARMATURE ASS'Y 18V INC. 22,28,197 SHAFT LOCK COMPRESSION SPRING 5 BALL BEARING 6000DDW CONTROLLER HEX...
...-3 046 C30 804C98-5 048 211021-9 HANDLE SET INC. 21 SWITCH BUTTON PAN HEAD SCREW M5X45 TAPPING SCREW 4X18 COMPRESSION SPRING 4 LOCK OFF LEVER PIN 5 TERMINAL SWITCH TG72BD SWITCH LEVER TAPPING SCREW 4X18 REAR COVER XSL01 NAME PLATE BRUSH HOLDER BRUSH HOLDER CARBON BRUSH CB-441 (195022-4) BRUSH HOLDER CAP MOTOR HOUSING TAPPING SCREW 4X60 PAN HEAD SCREW M5X45 HANDLE SET INC. 1 BALL BEARING 627DDW YOKE UNIT BAFFLE PLATE ARMATURE ASS'Y 18V INC. 22,28,197 SHAFT LOCK COMPRESSION SPRING 5 BALL BEARING 6000DDW CONTROLLER HEX...

XSL01Z Parts Breakdown
Page 4
S.F.H. SOCKET HEAD BOLT M6X16 CENTER WASHER SPIRAL SPRING 26 SAFETY COVER FLAT WASHER 5 PAN HEAD SCREW M5X18 COMPRESSION SPRING 6 GUIDE FENCE H.S.H.BOLT M6X25 WITH WG SCREW M6X10 SLEEVE 17 TORSION SPRING 28 SLEEVE 17 THUMB SCREW M6X28 COMPRESSION SPRING 6 RING 26 PIPE HOLDER H.S.SET SCREW(CUP POINT)M6X8 STRAIN RELIEF TAPPING SCREW BIND CT 4X12 PAN HEAD SCREW M4X10 LEVER 100 SET SCREW M4X8 HEX. SOCKET HEAD BOLT M6X16 STOPPER PLATE FLAT WASHER 6 TORSION SPRING 8 +PAN HEAD SCREW M5 POINTER...
S.F.H. SOCKET HEAD BOLT M6X16 CENTER WASHER SPIRAL SPRING 26 SAFETY COVER FLAT WASHER 5 PAN HEAD SCREW M5X18 COMPRESSION SPRING 6 GUIDE FENCE H.S.H.BOLT M6X25 WITH WG SCREW M6X10 SLEEVE 17 TORSION SPRING 28 SLEEVE 17 THUMB SCREW M6X28 COMPRESSION SPRING 6 RING 26 PIPE HOLDER H.S.SET SCREW(CUP POINT)M6X8 STRAIN RELIEF TAPPING SCREW BIND CT 4X12 PAN HEAD SCREW M4X10 LEVER 100 SET SCREW M4X8 HEX. SOCKET HEAD BOLT M6X16 STOPPER PLATE FLAT WASHER 6 TORSION SPRING 8 +PAN HEAD SCREW M5 POINTER...


