
Operating and Installation manual
Page 1
en - US, CA M.-Nr. 07 844 520 Operating and Installation Instructions Ceramic Cooktop KM 5621 KM 5624 KM 5627 To prevent accidents and appliance damage, read these instructions before installation or use.
en - US, CA M.-Nr. 07 844 520 Operating and Installation Instructions Ceramic Cooktop KM 5621 KM 5624 KM 5627 To prevent accidents and appliance damage, read these instructions before installation or use.

Operating and Installation manual
Page 2
... 11 Clean the cooktop 11 Heat the cooktop 11 How the burners operate 12 Operation 13 Turning on 13 Turning on the second heating ring 13 Turning off 13 Residual heat indicator 14 Selecting cookware 15 Overheat protection 16 Cleaning and Care 17 Frequently asked questions 18 Technical Service 19 IMPORTANT INSTALLATION SAFETY INSTRUCTIONS 22 Installation 25 Sealing 26 Tiled surfaces 26 Installation dimensions 27 KM 5621 27 KM 5624 28 KM 5627 29 Installation 30 Electrical connection...
... 11 Clean the cooktop 11 Heat the cooktop 11 How the burners operate 12 Operation 13 Turning on 13 Turning on the second heating ring 13 Turning off 13 Residual heat indicator 14 Selecting cookware 15 Overheat protection 16 Cleaning and Care 17 Frequently asked questions 18 Technical Service 19 IMPORTANT INSTALLATION SAFETY INSTRUCTIONS 22 Installation 25 Sealing 26 Tiled surfaces 26 Installation dimensions 27 KM 5621 27 KM 5624 28 KM 5627 29 Installation 30 Electrical connection...

Operating and Installation manual
Page 3
... injured. ~ The appliance is hot during use and remains so for some time after being switched off. Children ~ Children should not use to sit or stand on the appliance to any future user. Danger of interest to children in use the cooktop for residential cooking, and for a future user. Keep these operating instructions in this manual. Other uses are not permitted and...
... injured. ~ The appliance is hot during use and remains so for some time after being switched off. Children ~ Children should not use to sit or stand on the appliance to any future user. Danger of interest to children in use the cooktop for residential cooking, and for a future user. Keep these operating instructions in this manual. Other uses are not permitted and...

Operating and Installation manual
Page 4
... parts can the manufacturer guarantee the safety of electric shock. Otherwise the warranty is under warranty repairs should be met. Do not use the appliance until it has been repaired. 4 It is properly installed and grounded by an authorized service technician. Ensure power is not supplied to the appliance until repair work should break, cleaning solutions and spills may become hot during use. ~ Do not use...
... parts can the manufacturer guarantee the safety of electric shock. Otherwise the warranty is under warranty repairs should be met. Do not use the appliance until it has been repaired. 4 It is properly installed and grounded by an authorized service technician. Ensure power is not supplied to the appliance until repair work should break, cleaning solutions and spills may become hot during use. ~ Do not use...

Operating and Installation manual
Page 5
... Residual Heat Indicator will get hot and can result in use . ~ Never cover the burner with oven mitts or potholders when using the appliance. Moist or damp potholders used on grease fires. During operation, the cooking area and its surroundings will remain lit. As long as it heats. ~ Do not store aerosols, combustibles or any fire or flame. 5 Built-up into the hood by...
... Residual Heat Indicator will get hot and can result in use . ~ Never cover the burner with oven mitts or potholders when using the appliance. Moist or damp potholders used on grease fires. During operation, the cooking area and its surroundings will remain lit. As long as it heats. ~ Do not store aerosols, combustibles or any fire or flame. 5 Built-up into the hood by...

Operating and Installation manual
Page 6
... the cooktop. cooking grease, accumulate on the appliance. ~ Do not use pots and pans with a wet sponge or cloth, be used on the ceramic cooktop. Steam could penetrate electrical components and cause a short circuit. ~ Do not allow the cooktop to cover the heating element. Grains of salt and sand can cause scratches. Make sure that the bases of any fat or oils and are clean, free...
... the cooktop. cooking grease, accumulate on the appliance. ~ Do not use pots and pans with a wet sponge or cloth, be used on the ceramic cooktop. Steam could penetrate electrical components and cause a short circuit. ~ Do not allow the cooktop to cover the heating element. Grains of salt and sand can cause scratches. Make sure that the bases of any fat or oils and are clean, free...

Operating and Installation manual
Page 7
... should be removed as quickly as possible to prevent them from burning on and becoming difficult to remove. ~ Aluminum cookware or cookware with the door open. These spots can damage the underlying electronics. ~ If the cooktop built in the "Residual Heat" indicator area. SAVE THESE INSTRUCTIONS AND REVIEW THEM PERIODICALLY 7 This can be removed with ceramic glass or stainless steel cleaner (see "Cleaning and Care"). ~ Never heat up...
... should be removed as quickly as possible to prevent them from burning on and becoming difficult to remove. ~ Aluminum cookware or cookware with the door open. These spots can damage the underlying electronics. ~ If the cooktop built in the "Residual Heat" indicator area. SAVE THESE INSTRUCTIONS AND REVIEW THEM PERIODICALLY 7 This can be removed with ceramic glass or stainless steel cleaner (see "Cleaning and Care"). ~ Never heat up...

Operating and Installation manual
Page 11
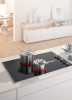
... soap to clean the cooktop, this small gap, the electrical safety of operation. It will dissipate after a short time and does not indicate a faulty connection or appliance defect. 11 Before using for the first time Clean the cooktop ^ Before using for facet cooktops: A small gap between the cooktop and the work surface may be visible in the first days of your appliance is heated.
... soap to clean the cooktop, this small gap, the electrical safety of operation. It will dissipate after a short time and does not indicate a faulty connection or appliance defect. 11 Before using for the first time Clean the cooktop ^ Before using for facet cooktops: A small gap between the cooktop and the work surface may be visible in the first days of your appliance is heated.

Operating and Installation manual
Page 12
... the selected power level. When a power level is set, the heat element turns on and the heating strip is electronically regulated. a Overheat protection b Heating strip The power setting determines how hot the burner will switch on the model, the heating strips may be separated by a ring. Depending on and off as needed to prevent the ceramic glass from overheating (see "Overheat protection"). How the burners operate One-zone burners use one heating strip...
... the selected power level. When a power level is set, the heat element turns on and the heating strip is electronically regulated. a Overheat protection b Heating strip The power setting determines how hot the burner will switch on the model, the heating strips may be separated by a ring. Depending on and off as needed to prevent the ceramic glass from overheating (see "Overheat protection"). How the burners operate One-zone burners use one heating strip...

Operating and Installation manual
Page 15
... and aluminum pans may leave a residue on a large burner. - These lines can switch off the cooking zone 5 to 10 minutes before cleaning. - Each time this way you can be used because they have poor heat transfer and may mar the appearance of metallic lines. In this residue is normal. Use little water when cooking and take care to remove and may scratch the cooktop surface. - This...
... and aluminum pans may leave a residue on a large burner. - These lines can switch off the cooking zone 5 to 10 minutes before cleaning. - Each time this way you can be used because they have poor heat transfer and may mar the appearance of metallic lines. In this residue is normal. Use little water when cooking and take care to remove and may scratch the cooktop surface. - This...

Operating and Installation manual
Page 17
... pads, steel wool or hard brushes. Never use . If they become pitted. ^ Turn the burner off. ^ Using a shielded scraper blade, scrape the melted item immediately off any spills immediately before cleaning. Clean any soiling using a soft cloth or use a steam cleaner to clean this appliance. Pressurized steam could penetrate electrical components and cause a short circuit. They will damage the surface. The ceramic surface can be cleaned using a soft...
... pads, steel wool or hard brushes. Never use . If they become pitted. ^ Turn the burner off. ^ Using a shielded scraper blade, scrape the melted item immediately off any spills immediately before cleaning. Clean any soiling using a soft cloth or use a steam cleaner to clean this appliance. Pressurized steam could penetrate electrical components and cause a short circuit. They will damage the surface. The ceramic surface can be cleaned using a soft...

Operating and Installation manual
Page 18
... conducts heat poorly. Start cooking at a high power level, then switch back manually. the contents do not heat The circuit breaker has up when turned on , being heated. This turning on again automatically. The "overheat protection" has triggered. Check whether a fuse is activated by an authorized technician in accordance with local and national safety regulations. The heating element Power levels 1 to 8: not a turns off during use. Frequently asked questions ,Repairs...
... conducts heat poorly. Start cooking at a high power level, then switch back manually. the contents do not heat The circuit breaker has up when turned on , being heated. This turning on again automatically. The "overheat protection" has triggered. Check whether a fuse is activated by an authorized technician in accordance with local and national safety regulations. The heating element Power levels 1 to 8: not a turns off during use. Frequently asked questions ,Repairs...

Operating and Installation manual
Page 22
... safety distances specified in these instructions must be installed over heated surfaces cabinet storage space above the appliance should also be heat-resistant. ~ The cooktop must not be followed carefully. Please contact the Miele Technical Service Department with specific requirements. ~ You must ensure the power cable for the appliance will not come into the countertop when installed. Keep this instruction book with the consumer for the...
... safety distances specified in these instructions must be installed over heated surfaces cabinet storage space above the appliance should also be heat-resistant. ~ The cooktop must not be followed carefully. Please contact the Miele Technical Service Department with specific requirements. ~ You must ensure the power cable for the appliance will not come into the countertop when installed. Keep this instruction book with the consumer for the...

Operating and Installation manual
Page 23
... by the hood manufacturer must be passed through. If there is not required. A gap of at least 4 ½ " (110 mm). wok burner and electric cooktop), and they have different minimum safety distances, always observe the greater distance. 23 IMPORTANT INSTALLATION SAFETY INSTRUCTIONS Safety distance from divider Installation of a divider under the cooktop, the distance between the upper edge of the work surface and...
... by the hood manufacturer must be passed through. If there is not required. A gap of at least 4 ½ " (110 mm). wok burner and electric cooktop), and they have different minimum safety distances, always observe the greater distance. 23 IMPORTANT INSTALLATION SAFETY INSTRUCTIONS Safety distance from divider Installation of a divider under the cooktop, the distance between the upper edge of the work surface and...
Operating and Installation manual
Page 24
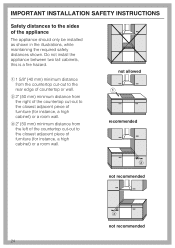
... instance, a high cabinet) or a room wall. not allowed recommended not recommended not recommended 24 IMPORTANT INSTALLATION SAFETY INSTRUCTIONS Safety distances to the sides of furniture (for instance, a high cabinet) or a room wall. a 1 5/8" (40 mm) minimum distance from the left of the countertop cut -out to the closest adjacent piece of countertop or wall. b 2" (50 mm) minimum distance from the right of the countertop cut -out to...
... instance, a high cabinet) or a room wall. not allowed recommended not recommended not recommended 24 IMPORTANT INSTALLATION SAFETY INSTRUCTIONS Safety distances to the sides of furniture (for instance, a high cabinet) or a room wall. a 1 5/8" (40 mm) minimum distance from the left of the countertop cut -out to the closest adjacent piece of countertop or wall. b 2" (50 mm) minimum distance from the right of the countertop cut -out to...

Operating and Installation manual
Page 25
Cooktops flush with the countertop Frame/Facet cooktops a Wall frame b Wall covering x = thickness of wall covering 9/16" (15 mm) 2" (50 mm) - 9/16" (15 mm) = minimum safety distance 1 3/8" (35 mm). For example: thickness of the wall covering c Countertop d Countertop cut-out e Minimum safety distance with flammable materials 2" (50 mm) with non-flammable materials 2" (50 mm) minus x 25 Installation Safety distance from the wall covering If a wall covering is made of non-combustible...
Cooktops flush with the countertop Frame/Facet cooktops a Wall frame b Wall covering x = thickness of wall covering 9/16" (15 mm) 2" (50 mm) - 9/16" (15 mm) = minimum safety distance 1 3/8" (35 mm). For example: thickness of the wall covering c Countertop d Countertop cut-out e Minimum safety distance with flammable materials 2" (50 mm) with non-flammable materials 2" (50 mm) minus x 25 Installation Safety distance from the wall covering If a wall covering is made of non-combustible...

Operating and Installation manual
Page 26
... needs to be removed for the countertop. Installation Frame/Facet Cooktops Sealing Tiled surfaces The appliance must be flat and even so that the frame will lie evenly and the sealing strip under the edge of the appliance can provide an adequate seal against the countertop. 26 The sealing strip under the edge of the upper part of the appliance provides a sufficient seal...
... needs to be removed for the countertop. Installation Frame/Facet Cooktops Sealing Tiled surfaces The appliance must be flat and even so that the frame will lie evenly and the sealing strip under the edge of the appliance can provide an adequate seal against the countertop. 26 The sealing strip under the edge of the upper part of the appliance provides a sufficient seal...

Operating and Installation manual
Page 30
... materials used must be heat resistant. Facet cooktops: A special sealing strip ensures the slip-proof seating of the cooktop in the "Installation dimensions". Ensure that these materials do not get on the top edge of the cut surfaces with the appliance; Installation The exact positions of the spring clamps and the support bars (for facet cooktops) on the top surface of the countertop panels. ^ Position...
... materials used must be heat resistant. Facet cooktops: A special sealing strip ensures the slip-proof seating of the cooktop in the "Installation dimensions". Ensure that these materials do not get on the top edge of the cut surfaces with the appliance; Installation The exact positions of the spring clamps and the support bars (for facet cooktops) on the top surface of the countertop panels. ^ Position...

Operating and Installation manual
Page 32
... be lifted out using a special tool. This is sealed correctly. Do not permanently seal into position. Installation Insert the cooktop ^ Feed the power cord down through the cut-out. ^ Place the cooktop lightly on the spring clips. ^ With a hand on each side of the appliance press down to fit. ^ Connect the appliance to the main power supply (see "Electrical connection"). ^ Turn the appliance on...
... be lifted out using a special tool. This is sealed correctly. Do not permanently seal into position. Installation Insert the cooktop ^ Feed the power cord down through the cut-out. ^ Place the cooktop lightly on the spring clips. ^ With a hand on each side of the appliance press down to fit. ^ Connect the appliance to the main power supply (see "Electrical connection"). ^ Turn the appliance on...
Operating and Installation manual
Page 33
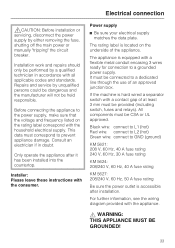
... switch, fuses and relays). Electrical connection ,CAUTION: Before installation or servicing, disconnect the power supply by a qualified technician in doubt. Repairs and service by unqualified persons could be dangerous and the manufacturer will not be performed by either removing the fuse, shutting off the main power or manually "tripping" the circuit breaker. Black wire: connect to L1 (hot) Red wire: connect to L2 (hot) Green wire: connect to a grounded power supply. Installer: Please leave these instructions with...
... switch, fuses and relays). Electrical connection ,CAUTION: Before installation or servicing, disconnect the power supply by a qualified technician in doubt. Repairs and service by unqualified persons could be dangerous and the manufacturer will not be performed by either removing the fuse, shutting off the main power or manually "tripping" the circuit breaker. Black wire: connect to L1 (hot) Red wire: connect to L2 (hot) Green wire: connect to a grounded power supply. Installer: Please leave these instructions with...


