
TTB1840 / TTB516 Owners Manual
Page 1
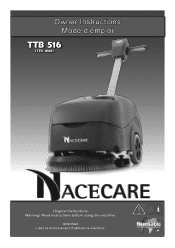
Read instructions before using the machine. Owner Instructions Mode d'emploi TTB 516 (TTB 1840) Original Instructions Warning! Attention Lisez la notice avant d'utiliser la machine.
Read instructions before using the machine. Owner Instructions Mode d'emploi TTB 516 (TTB 1840) Original Instructions Warning! Attention Lisez la notice avant d'utiliser la machine.
TTB1840 / TTB516 Owners Manual
Page 2
...Moving the Machine Machine Operation Page 12 Pre-scrub mode Page 13 Floor tool in use Page 13 Hi-Lo setting Page 13 Setting... the cleaning controls Page 14 Brush overload (Over Current) Page 14 Regular Maintenance Cleaning Tanks and Filters Removing / replacing the clean-water tank Replacing the waste water tank Changing the floor-tool blades Refitting the floor-tool blades Battery care Removing the battery-pack fuse Machine Charging Trouble shooting / Specifications Recommended spare parts... Page 6 / 7 Quick set-up guide Machine set-up Page 8 Fitting the ...
...Moving the Machine Machine Operation Page 12 Pre-scrub mode Page 13 Floor tool in use Page 13 Hi-Lo setting Page 13 Setting... the cleaning controls Page 14 Brush overload (Over Current) Page 14 Regular Maintenance Cleaning Tanks and Filters Removing / replacing the clean-water tank Replacing the waste water tank Changing the floor-tool blades Refitting the floor-tool blades Battery care Removing the battery-pack fuse Machine Charging Trouble shooting / Specifications Recommended spare parts... Page 6 / 7 Quick set-up guide Machine set-up Page 8 Fitting the ...

TTB1840 / TTB516 Owners Manual
Page 3
Clean water tank 5. Battery connector 19. Brush deck 6. Clean-water on / off tap 9. Vacuum hose 13. Squeegee blades 7. Separator 14. Spare / replacement battery 3 233969 / 01/13 (A20) Floor-tool retaining knobs 8. Rear moving wheels 11. Floor-tool vacuum hose 12. Operator control panel ( see page 4 ) 2. Clean-water filler cap 15. Clean-water level...
Clean water tank 5. Battery connector 19. Brush deck 6. Clean-water on / off tap 9. Vacuum hose 13. Squeegee blades 7. Separator 14. Spare / replacement battery 3 233969 / 01/13 (A20) Floor-tool retaining knobs 8. Rear moving wheels 11. Floor-tool vacuum hose 12. Operator control panel ( see page 4 ) 2. Clean-water filler cap 15. Clean-water level...

TTB1840 / TTB516 Owners Manual
Page 4
Control Panel Overview 1 2 3 4 5 6 11 7 8 9 10 11 1 Battery Charge Level Indicator 2 Hi / Lo Indicator 3 Brush Operation / Load Indicator 4 Vacuum Indicator 5 Water Flow Indicator 6 Hi / Lo Button 7 Cycle sequence button 8 Water Flow On / Off Button 9 Handle Position Lever 10 On / Off Switch 11 On / Off Lever For full easy to follow Instructions oncontrol panel set up and use, see machine operationset-up page 14 4 233969 / 01/13 (A20)
Control Panel Overview 1 2 3 4 5 6 11 7 8 9 10 11 1 Battery Charge Level Indicator 2 Hi / Lo Indicator 3 Brush Operation / Load Indicator 4 Vacuum Indicator 5 Water Flow Indicator 6 Hi / Lo Button 7 Cycle sequence button 8 Water Flow On / Off Button 9 Handle Position Lever 10 On / Off Switch 11 On / Off Lever For full easy to follow Instructions oncontrol panel set up and use, see machine operationset-up page 14 4 233969 / 01/13 (A20)

TTB1840 / TTB516 Owners Manual
Page 5
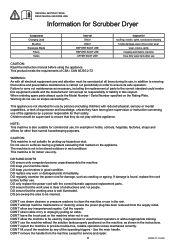
Rating Label About the Machine Company name and address Machine description Power/ Voltage/ Frequency Weight Splash proof rating Max gradient Machine year / week / serial number Safety Critical Component Charging Lead: 18AWG x 3 core SVT Cable (Black) Battery Charger: ...
Rating Label About the Machine Company name and address Machine description Power/ Voltage/ Frequency Weight Splash proof rating Max gradient Machine year / week / serial number Safety Critical Component Charging Lead: 18AWG x 3 core SVT Cable (Black) Battery Charger: ...
TTB1840 / TTB516 Owners Manual
Page 6
... supervision or instruction concerning use in hotels, schools, hospitals, factories, shops and offices for service and repair. 6 233969 / 01/13 (A20) DON'T attempt machine maintenance or cleaning unless the power plug has been removed from the machine except for other than normal housekeeping purposes. Call the experts DON'T strain cable or try to provide trouble-free...
... supervision or instruction concerning use in hotels, schools, hospitals, factories, shops and offices for service and repair. 6 233969 / 01/13 (A20) DON'T attempt machine maintenance or cleaning unless the power plug has been removed from the machine except for other than normal housekeeping purposes. Call the experts DON'T strain cable or try to provide trouble-free...
TTB1840 / TTB516 Owners Manual
Page 7
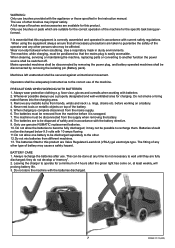
...supply when removing the battery. 8. When cleaning, servicing or maintaining the machine, replacing parts or converting to another function the power source shall be adequately instructed as to the correct use of 4 hours after use genuine NUMATIC replacement batteries. 10. Batteries should not be discharged ...11.Do not allow the batteries to become fully discharged; Whenever possible always use a properly designated and well-ventilated area for the specific task being performed. When using the equipment always ensure that all necessary precautions are Valve Regulated Lead Acid ...
...supply when removing the battery. 8. When cleaning, servicing or maintaining the machine, replacing parts or converting to another function the power source shall be adequately instructed as to the correct use of 4 hours after use genuine NUMATIC replacement batteries. 10. Batteries should not be discharged ...11.Do not allow the batteries to become fully discharged; Whenever possible always use a properly designated and well-ventilated area for the specific task being performed. When using the equipment always ensure that all necessary precautions are Valve Regulated Lead Acid ...

TTB1840 / TTB516 Owners Manual
Page 8
...Quick Set-Up Guide Please read before use . Fig 1 2 Fit the Brush / Pad (Fig 2). 3 Fig 2 Swing the floor-tool carrier from behind the brush. (Fig 3). 4 5 Fig 3 Using the two locking knobs fitted to the floor-tool, secure to the floor-tool to the machine (Fig 5) and plug in the power ...tool carrier. (Fig 4). Ensure the Batteries are charged before commencing any operation. Using the handle position lever, move the handle into the upright position. (Fig 1). Ensure the battery has been charged before use . Fill the clean-water to a Max of all the packaging, carefully ...
...Quick Set-Up Guide Please read before use . Fig 1 2 Fit the Brush / Pad (Fig 2). 3 Fig 2 Swing the floor-tool carrier from behind the brush. (Fig 3). 4 5 Fig 3 Using the two locking knobs fitted to the floor-tool, secure to the floor-tool to the machine (Fig 5) and plug in the power ...tool carrier. (Fig 4). Ensure the Batteries are charged before commencing any operation. Using the handle position lever, move the handle into the upright position. (Fig 1). Ensure the battery has been charged before use . Fill the clean-water to a Max of all the packaging, carefully ...
TTB1840 / TTB516 Owners Manual
Page 9
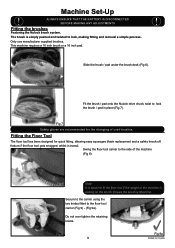
...tool has been designed for the changing of the machine (Fig 8). Secure to the carrier using the two knobs fitted to lock the brush / pad in transit. Fig 9 9 Fig... floor-tool if the weight of the machine is easier to the side of used brushes. Do not over tighten the retaining knobs. Fig 8 Note: It is..., making fitting and removal a simple process. The brush is fitted first. Only use manufacturer supplied brushes. Slide the brush / pad under the brush deck (Fig 6).... allowing easy squeegee blade replacement and a safety knock-off feature if the floor tool gets snagged, whilst in ...
...tool has been designed for the changing of the machine (Fig 8). Secure to the carrier using the two knobs fitted to lock the brush / pad in transit. Fig 9 9 Fig... floor-tool if the weight of the machine is easier to the side of used brushes. Do not over tighten the retaining knobs. Fig 8 Note: It is..., making fitting and removal a simple process. The brush is fitted first. Only use manufacturer supplied brushes. Slide the brush / pad under the brush deck (Fig 6).... allowing easy squeegee blade replacement and a safety knock-off feature if the floor tool gets snagged, whilst in ...
TTB1840 / TTB516 Owners Manual
Page 10
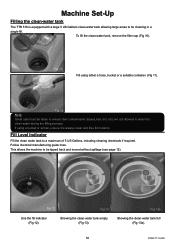
... fill. Fig 13a Showing the clean-water tank full (Fig 13a). 10 233969 / 01/13 (A20) Follow chemical manufacturing guide lines. Fig 12 Fig 13 Use the fill indicator (Fig 12). Machine Set-Up Filling the clean-water tank The TTB 516 is always clean and free from debris. Fill Level Indicator Fill... the clean water tank to be tipped back and moved without spillage (see page 12). To fill the clean-water tank...
... fill. Fig 13a Showing the clean-water tank full (Fig 13a). 10 233969 / 01/13 (A20) Follow chemical manufacturing guide lines. Fig 12 Fig 13 Use the fill indicator (Fig 12). Machine Set-Up Filling the clean-water tank The TTB 516 is always clean and free from debris. Fill Level Indicator Fill... the clean water tank to be tipped back and moved without spillage (see page 12). To fill the clean-water tank...

TTB1840 / TTB516 Owners Manual
Page 11
... (Fig 16). Numatic part (629044) Wet Floor sign (available if required) 11 Fig 16 233969 / 01/13 (A20) Control of Substances Hazardous to the manufacturers specification. For further guidance on the left of chemical, dilute to Health (COSHH) For best results use in auto scrubber-driers....! Visit http://www.hse.gov.uk/ for use a non-foaming type of the machine is the On / Off water tap (Fig 14). Ideally set the tap to 450 this enables the cleaning solution to health and safety instructions online. Machine Set-Up ! Always ensure that chemical manufacturers safety ...
... (Fig 16). Numatic part (629044) Wet Floor sign (available if required) 11 Fig 16 233969 / 01/13 (A20) Control of Substances Hazardous to the manufacturers specification. For further guidance on the left of chemical, dilute to Health (COSHH) For best results use in auto scrubber-driers....! Visit http://www.hse.gov.uk/ for use a non-foaming type of the machine is the On / Off water tap (Fig 14). Ideally set the tap to 450 this enables the cleaning solution to health and safety instructions online. Machine Set-Up ! Always ensure that chemical manufacturers safety ...
TTB1840 / TTB516 Owners Manual
Page 12
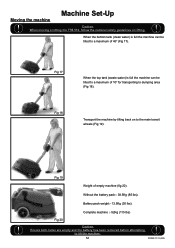
... (Fig 17). Caution Ensure both tanks are empty and the battery has been removed before attempting to a maximum of empty machine (fig 20). Caution When moving or lifting the TTB 516, follow the national safety guidelines on to dumping area (Fig 18). Fig 17 When the top tank (waste water) is... lift the machine. ! 12 233969 / 01/13 (A20) Battery pack weight:- 13.5Kg (30 lbs). Fig 18 Transport the machine by tilting back on lifting. ! Moving the machine Machine Set-Up ! Without the battery pack:- 38.5Kg (85 lbs).
... (Fig 17). Caution Ensure both tanks are empty and the battery has been removed before attempting to a maximum of empty machine (fig 20). Caution When moving or lifting the TTB 516, follow the national safety guidelines on to dumping area (Fig 18). Fig 17 When the top tank (waste water) is... lift the machine. ! 12 233969 / 01/13 (A20) Battery pack weight:- 13.5Kg (30 lbs). Fig 18 Transport the machine by tilting back on lifting. ! Moving the machine Machine Set-Up ! Without the battery pack:- 38.5Kg (85 lbs).

TTB1840 / TTB516 Owners Manual
Page 13
... floor-tool carrier is dispersed via 'THRU-FEED' system. Fig 24 If streaking occurs, wipe the floor-tool blades clean (Fig 25). Hi - Lo Setting 13 233969 / 01/13 (A20) Overlap the scrubbing path by the floor-tool (see page 9). Floor tool in the raised position. The waste water... clean (Fig 24). Lift the lever near the base of soiling. Fig 25 Note Care must be taken to lock the floortool in use a 'double scrub' technique. Note The lever moves upward and backward motion to reduce speed when cornering or when manoeuvring around obstacles. On heavily soiled floors...
... floor-tool carrier is dispersed via 'THRU-FEED' system. Fig 24 If streaking occurs, wipe the floor-tool blades clean (Fig 25). Hi - Lo Setting 13 233969 / 01/13 (A20) Overlap the scrubbing path by the floor-tool (see page 9). Floor tool in the raised position. The waste water... clean (Fig 24). Lift the lever near the base of soiling. Fig 25 Note Care must be taken to lock the floortool in use a 'double scrub' technique. Note The lever moves upward and backward motion to reduce speed when cornering or when manoeuvring around obstacles. On heavily soiled floors...

TTB1840 / TTB516 Owners Manual
Page 14
... be open. Heavy brush load decreases the available battery run time. 14 233969 / 01/13 (A20) If the brush motor keeps overloading consider using a different type of brush. cycle button to default mode. The tap button will automatically turn off and return to operate the brush only The ...start button once (Fig 26). (Fig 27a) Whilst the brush motor is required in this mode. (Fig 27c). Setting the cleaning controls 1 To activate the control panel: press the 1 Fig 26 450 Fig 27 cycle button or press a trigger (Fig 26). To start...
... be open. Heavy brush load decreases the available battery run time. 14 233969 / 01/13 (A20) If the brush motor keeps overloading consider using a different type of brush. cycle button to default mode. The tap button will automatically turn off and return to operate the brush only The ...start button once (Fig 26). (Fig 27a) Whilst the brush motor is required in this mode. (Fig 27c). Setting the cleaning controls 1 To activate the control panel: press the 1 Fig 26 450 Fig 27 cycle button or press a trigger (Fig 26). To start...
TTB1840 / TTB516 Owners Manual
Page 15
... cap fitted to lock in mind, this included easy stripping-down (Fig 29). Replace by fitting the rear of the filter first then clipping the front to the left hand side of use , empty waste-water tank using clean water. After use in place (Fig 31) (Fig 32). Fig 30 Fig 30a Fig 31... water draining cap. 15 233969 / 01/13 (A20) Fig 32 Disconnect and remove the battery before proceeding with clean water (Fig 30)(Fig 30a). Rinse using emptying hose and flush-out with ease of the machine. Once emptied the top waste-water tank can be examined at every clean-down and...
... cap fitted to lock in mind, this included easy stripping-down (Fig 29). Replace by fitting the rear of the filter first then clipping the front to the left hand side of use , empty waste-water tank using clean water. After use in place (Fig 31) (Fig 32). Fig 30 Fig 30a Fig 31... water draining cap. 15 233969 / 01/13 (A20) Fig 32 Disconnect and remove the battery before proceeding with clean water (Fig 30)(Fig 30a). Rinse using emptying hose and flush-out with ease of the machine. Once emptied the top waste-water tank can be examined at every clean-down and...
TTB1840 / TTB516 Owners Manual
Page 17
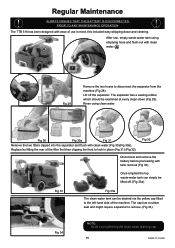
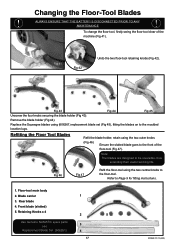
... to the moulded location lugs. Note: The blades are designed to Page 9 for fitting instructions. 1. Floor-tool main body 2. Rear blade 4. Changing the Floor-Tool Blades ! use 3 Replacement Blade Set (606261) 4 17 233969 / 01/13 (A20) To change the floor-tool, firstly... swing the floor-tool clear of the floor-tool (Fig 47). Retaining Knobs x 4 1 2 5 Use Genuine NUMATIC spare parts. ALWAYS ENSURE THAT THE BATTERY ...
... to the moulded location lugs. Note: The blades are designed to Page 9 for fitting instructions. 1. Floor-tool main body 2. Rear blade 4. Changing the Floor-Tool Blades ! use 3 Replacement Blade Set (606261) 4 17 233969 / 01/13 (A20) To change the floor-tool, firstly... swing the floor-tool clear of the floor-tool (Fig 47). Retaining Knobs x 4 1 2 5 Use Genuine NUMATIC spare parts. ALWAYS ENSURE THAT THE BATTERY ...

TTB1840 / TTB516 Owners Manual
Page 18
... day before you disconnect the battery from the machine. Removing the battery Battery Care Unplug the battery from the machine using (208526) Numatic approved part (Fig 52). Split the pack and replace the fuse using the red connection handle (Fig 48). i.e. Remove the six screws holding the battery pack together (Fig 51). leaving the...
... day before you disconnect the battery from the machine. Removing the battery Battery Care Unplug the battery from the machine using (208526) Numatic approved part (Fig 52). Split the pack and replace the fuse using the red connection handle (Fig 48). i.e. Remove the six screws holding the battery pack together (Fig 51). leaving the...

TTB1840 / TTB516 Owners Manual
Page 19
...lead required for part numbers. Connect the charger to the battery and plug the charger into the charger. See TTB-516 Spares list for your country into a suitable power supply (Fig ...on the front of the batteries; Fig 53 Connect the charger unit to a suitable power supply. Spare replacement batteries are illuminated (Fig 54). Machine Charging To ensure your machine remains at its own...life, please follow the simple steps below: Under normal daily usage: Recharge batteries after each use regardless of 45 mins approx (Lo Mode), when fully charged. The battery supplied for this...
...lead required for part numbers. Connect the charger to the battery and plug the charger into the charger. See TTB-516 Spares list for your country into a suitable power supply (Fig ...on the front of the batteries; Fig 53 Connect the charger unit to a suitable power supply. Spare replacement batteries are illuminated (Fig 54). Machine Charging To ensure your machine remains at its own...life, please follow the simple steps below: Under normal daily usage: Recharge batteries after each use regardless of 45 mins approx (Lo Mode), when fully charged. The battery supplied for this...
TTB1840 / TTB516 Owners Manual
Page 20
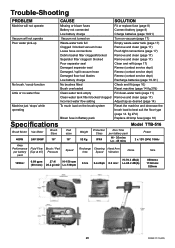
fig 27d) Replace 40 Amp fuse (page 18) Specifications Brush Motor Vac Motor Brush Sizes Pad sizes 400W 24V 300W 16" 16" Weight 52 Kg Protection Class IPX4 Model TTB-516 Run Time per battery pack Hi - 35 mins Lo - 45 mins Power 2 x 12V (24V) 18Ahr Area Performance Fluid Flow ...2Kph 0.6 m/s2 Lo-68.2 dB(A) 850mmx 1132mmx 520mm 20 233969 / 01/13 (A20) Trouble-Shooting PROBLEM Machine will not operate CAUSE Missing or blown fuses Battery not connected Low battery charge SOLUTION Fit or replace fuse (page 8) Connect battery (page 8) Charge batteries (page 19/21) Vacuum will not ...
fig 27d) Replace 40 Amp fuse (page 18) Specifications Brush Motor Vac Motor Brush Sizes Pad sizes 400W 24V 300W 16" 16" Weight 52 Kg Protection Class IPX4 Model TTB-516 Run Time per battery pack Hi - 35 mins Lo - 45 mins Power 2 x 12V (24V) 18Ahr Area Performance Fluid Flow ...2Kph 0.6 m/s2 Lo-68.2 dB(A) 850mmx 1132mmx 520mm 20 233969 / 01/13 (A20) Trouble-Shooting PROBLEM Machine will not operate CAUSE Missing or blown fuses Battery not connected Low battery charge SOLUTION Fit or replace fuse (page 8) Connect battery (page 8) Charge batteries (page 19/21) Vacuum will not ...
TTB1840 / TTB516 Owners Manual
Page 21
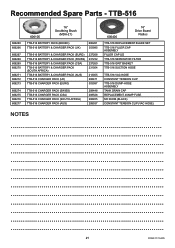
... PACK (CSA) TTB-516 CHARGER PACK (SOUTH AFRICA) TTB-516 CHARGER PACK (AUS) 208448 208526 208455 208537 606400 16" Drive Board Padloc TTB-516 REPLACEMENT BLADE SET TTB-516 FILLER CAP ASSEMBLY FILLER CAP LID TTB-516 SEPERATOR FILTER TTB-516 GRIT BASKET TTB-516 SUCTION HOSE TTB-516 VAC HOSE CONSTANT... TENSION CLIP TTB-516 DUMP-HOSE ASSEMBLY TANK DRAIN CAP REPLACEMENT 40AMP FUSE M5 KNOB (BLACK) CONSTANT TENSION CLIP (VAC HOSE) NOTES ... 21 233969 / 01/13 (A20) Recommended Spare Parts -
... PACK (CSA) TTB-516 CHARGER PACK (SOUTH AFRICA) TTB-516 CHARGER PACK (AUS) 208448 208526 208455 208537 606400 16" Drive Board Padloc TTB-516 REPLACEMENT BLADE SET TTB-516 FILLER CAP ASSEMBLY FILLER CAP LID TTB-516 SEPERATOR FILTER TTB-516 GRIT BASKET TTB-516 SUCTION HOSE TTB-516 VAC HOSE CONSTANT... TENSION CLIP TTB-516 DUMP-HOSE ASSEMBLY TANK DRAIN CAP REPLACEMENT 40AMP FUSE M5 KNOB (BLACK) CONSTANT TENSION CLIP (VAC HOSE) NOTES ... 21 233969 / 01/13 (A20) Recommended Spare Parts -


