NT-1507 English Manual
Page 4
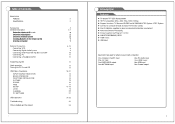
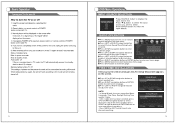
Button Description in TV mode Overview of back panel Overview of remote control Installing Batteries in the remote control Antenna connection Connecting VCR Connecting Digital Audio System Connecting DVD Player/Set-Top Box via HDMI Connecting PC Connecting a Headphone/USB INPUT SOURCE SELECTION BASIC OPERATION FIRST TIME INSTALLATION PICTURE SO UND TIM E SETUP LO CK CHANNEL PC SETTINGS 4 5 6 7 7 8-12 8 9 10 11 12 12 13 13 14-21 14 14 14 15 16 17 17-18 19 20 21 21-22 23 24 HDM I input One HDMI input
Button Description in TV mode Overview of back panel Overview of remote control Installing Batteries in the remote control Antenna connection Connecting VCR Connecting Digital Audio System Connecting DVD Player/Set-Top Box via HDMI Connecting PC Connecting a Headphone/USB INPUT SOURCE SELECTION BASIC OPERATION FIRST TIME INSTALLATION PICTURE SO UND TIM E SETUP LO CK CHANNEL PC SETTINGS 4 5 6 7 7 8-12 8 9 10 11 12 12 13 13 14-21 14 14 14 15 16 17 17-18 19 20 21 21-22 23 24 HDM I input One HDMI input
NT-1507 English Manual
Page 6
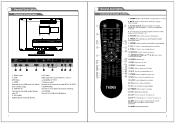
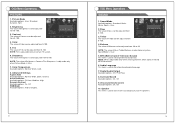
USB USB input 3. AV input Video input for external devices. 6. COAXIAL Connect to an antenna or cable NTSC & ATSC. 8. PC AUDIO Audio input for external devices, such as a camcorder or VCR. 7. Power input 2. Antenna input Connect to a Digital Audio device. / // EARPHONE Connect a set of a device with a HDMI output. 4. VGA/PC IN Connect to the HDMI jack of phone for private listening. 9. POWER IN PUT USB DC 12V H DM I IN VGA IN PC CV BS R A UD IO IN IN L RF E ARPHO...
USB USB input 3. AV input Video input for external devices. 6. COAXIAL Connect to an antenna or cable NTSC & ATSC. 8. PC AUDIO Audio input for external devices, such as a camcorder or VCR. 7. Power input 2. Antenna input Connect to a Digital Audio device. / // EARPHONE Connect a set of a device with a HDMI output. 4. VGA/PC IN Connect to the HDMI jack of phone for private listening. 9. POWER IN PUT USB DC 12V H DM I IN VGA IN PC CV BS R A UD IO IN IN L RF E ARPHO...
NT-1507 English Manual
Page 9
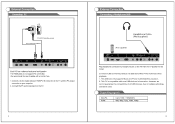
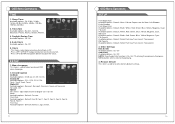
POWER INPUT USB DC 12V HDMI IN VGA IN PC CVBS R L RF EARPHONE COAXIAL AUDIO IN IN IN OUT OUT 11 (Not supplied) POWER I N P UT USB DC 12V HDMI IN VGA IN PC CVBS R L RF EARPHONE COAXIAL A UD I O IN IN IN OUT OUT U p to 13 66×7 68@6 0Hz 12
POWER INPUT USB DC 12V HDMI IN VGA IN PC CVBS R L RF EARPHONE COAXIAL AUDIO IN IN IN OUT OUT 11 (Not supplied) POWER I N P UT USB DC 12V HDMI IN VGA IN PC CVBS R L RF EARPHONE COAXIAL A UD I O IN IN IN OUT OUT U p to 13 66×7 68@6 0Hz 12
NT-1507 English Manual
Page 10
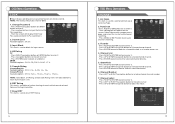
... MENU button to exit auto channel searching. 13 14 Press MENU or EXIT button to return t o prev ious m enu page. If this is your firs t tim e turning on thi s TV, Setup Wizard will app ears on t he uni t or rem ote control to disp lay the main menu. Press RIGHT navigation button or ENTER button to adj ust. In Setup Wizard, the users can adjust Menu...
... MENU button to exit auto channel searching. 13 14 Press MENU or EXIT button to return t o prev ious m enu page. If this is your firs t tim e turning on thi s TV, Setup Wizard will app ears on t he uni t or rem ote control to disp lay the main menu. Press RIGHT navigation button or ENTER button to adj ust. In Setup Wizard, the users can adjust Menu...
NT-1507 English Manual
Page 11
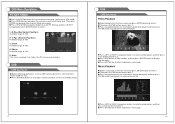
..., Low, Medium, High. Sound Mode Available options: Standard, Music, Mov ie, Sp orts, U ser. 2. NOT E: MT S is ad justab le onl y when viewing cha nnels which conta in certain TV system. 6. Color The valu e of Sharpness can b e adjusted from 0-100. 5. N OTE: Tint is used to turn on ly in rela ted MTS information. 6. Advanced Settings A spect Ratio Av...
..., Low, Medium, High. Sound Mode Available options: Standard, Music, Mov ie, Sp orts, U ser. 2. NOT E: MT S is ad justab le onl y when viewing cha nnels which conta in certain TV system. 6. Color The valu e of Sharpness can b e adjusted from 0-100. 5. N OTE: Tint is used to turn on ly in rela ted MTS information. 6. Advanced Settings A spect Ratio Av...
NT-1507 English Manual
Page 12
... is used to factory default settings. 18 Font Edge Color Availab le options: Default , Black , Whit e, Red , Gree n, Blu e, Yell ow, Ma genta , Cyan . F G Opa city Available options: Default , Solid, Flashing, Translucent, Transparent. Other Settings B lue Screen Availab le options: On, Off A udio Only Availab le options: On, Off . And p ress MENU button will play th e aud io only. Restore Default This item is used to reset to...
... is used to factory default settings. 18 Font Edge Color Availab le options: Default , Black , Whit e, Red , Gree n, Blu e, Yell ow, Ma genta , Cyan . F G Opa city Available options: Default , Solid, Flashing, Translucent, Transparent. Other Settings B lue Screen Availab le options: On, Off A udio Only Availab le options: On, Off . And p ress MENU button will play th e aud io only. Restore Default This item is used to reset to...
NT-1507 English Manual
Page 13
... to select preferred signal rec eiving Type. 2. C han ge Password - Air/Cable This item is used t o rese t RRT Rating . 19 CHANNEL 1. P ress R IGHT or ENT ER bu tton to start auto chann el se arching. - P ress U P or DOWN navigation button t o select pref erred channel. - Then the screen will dis play E nter N ew Password a nd Con firm P asswo rd item s. 2. S ystem Lock Available op...
... to select preferred signal rec eiving Type. 2. C han ge Password - Air/Cable This item is used t o rese t RRT Rating . 19 CHANNEL 1. P ress R IGHT or ENT ER bu tton to start auto chann el se arching. - P ress U P or DOWN navigation button t o select pref erred channel. - Then the screen will dis play E nter N ew Password a nd Con firm P asswo rd item s. 2. S ystem Lock Available op...
NT-1507 English Manual
Page 14
...button to return to dis play tool bar again. Pres s MENU butt on uni t top o r remo te con trol to set the unit in VGA mode....USB memo ry dev ice firs t, whic h con tains Photo and Music fil es. Auto If this item is e ntered , it . Clock Available rang e: 0-100. 4. P ress EXIT button...button to enter it . P ress LEFT or RIGH T navi gation button s to s elect w anted option , and then press enter button to enter disc C. Pres s SOU RCE b utton on the unit o r remo te con trol to set the unit in Medi a mod e. Then pr ess EN TER button to confirm it wi ll adjus t the P C screen...
...button to return to dis play tool bar again. Pres s MENU butt on uni t top o r remo te con trol to set the unit in VGA mode....USB memo ry dev ice firs t, whic h con tains Photo and Music fil es. Auto If this item is e ntered , it . Clock Available rang e: 0-100. 4. P ress EXIT button...button to enter it . P ress LEFT or RIGH T navi gation button s to s elect w anted option , and then press enter button to enter disc C. Pres s SOU RCE b utton on the unit o r remo te con trol to set the unit in Medi a mod e. Then pr ess EN TER button to confirm it wi ll adjus t the P C screen...


