English Manual
Page 1
24 WIDE SCREEN HD LED TV WITH DVD PLAYER MODEL NO.: NTD-2460
24 WIDE SCREEN HD LED TV WITH DVD PLAYER MODEL NO.: NTD-2460

English Manual
Page 4
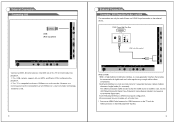
Connecting DVD Player/Set-Top Box HDMI input One YPbPr input Two HDMI input
Connecting DVD Player/Set-Top Box HDMI input One YPbPr input Two HDMI input
English Manual
Page 5
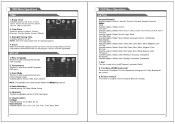
.... 5. VOLUME +/- In the on the disc will eject. POWER Press POWER button to move up/down. 6. After placed a disc in the disc tray, press this button when the power is pulled in automatically. 4. In the on -screen menu of front and side panel VO L+ VOL - MENU Press to see an on -screen menu, use them to toggle between all the available input sources 8. Press to change channels. NTD-2460...
.... 5. VOLUME +/- In the on the disc will eject. POWER Press POWER button to move up/down. 6. After placed a disc in the disc tray, press this button when the power is pulled in automatically. 4. In the on -screen menu of front and side panel VO L+ VOL - MENU Press to see an on -screen menu, use them to toggle between all the available input sources 8. Press to change channels. NTD-2460...

English Manual
Page 6
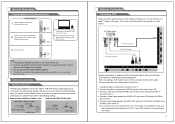
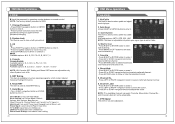
USB (TV) USB input 7. VGA/PC IN Connect to an antenna or cable NTSC & ATSC. 8. Power input 2. EARPHONE Connect a set of a device with a HDMI output. Y(CVBS) / Pb / Pr Connect video. 6. HDMI 1 & 2 Connect to a Digital Audio device. 4. PC AUDIO Audio input for private listening. 3. AUDIO L/R Audio input for external devices, such as a camcorder or VCR. 5. ANTENNA INPUT Connect to the video output jack on your PC. 10. AC 1 00 -2 40 V~ 50 /60 Hz EARP HO NE COAX OUT L R CV BS /Y Pb IN...
USB (TV) USB input 7. VGA/PC IN Connect to an antenna or cable NTSC & ATSC. 8. Power input 2. EARPHONE Connect a set of a device with a HDMI output. Y(CVBS) / Pb / Pr Connect video. 6. HDMI 1 & 2 Connect to a Digital Audio device. 4. PC AUDIO Audio input for private listening. 3. AUDIO L/R Audio input for external devices, such as a camcorder or VCR. 5. ANTENNA INPUT Connect to the video output jack on your PC. 10. AC 1 00 -2 40 V~ 50 /60 Hz EARP HO NE COAX OUT L R CV BS /Y Pb IN...
English Manual
Page 8
The batteries shall not be exposed to excessive heat such as sunshine, fire or the like. Antennas with 300ohm flat twins Leads AC 100-240V~ 50/60Hz EARPHONE COAX OUT L R CVBS/Y Pb Pr IN IN
The batteries shall not be exposed to excessive heat such as sunshine, fire or the like. Antennas with 300ohm flat twins Leads AC 100-240V~ 50/60Hz EARPHONE COAX OUT L R CVBS/Y Pb Pr IN IN
English Manual
Page 10
This USB slot only supports Music (MP3) and Photo (JPG) multimedia files playback. 2. AC 100-240V~ 50/60Hz EARPHONE COAX OUT L R CVBS/Y Pb Pr IN IN AC 100-240V~ 50/60Hz EARPHONE COAX OUT L R CVBS/Y Pb Pr IN IN Connect a USB 2.0 memory device into USB slot of all USB devices, due to multiple technology standards used. However, we cannot guarantee the compatibility of this TV for multimedia files playback. 1. This TV is compatible with most USB devices in the market.
This USB slot only supports Music (MP3) and Photo (JPG) multimedia files playback. 2. AC 100-240V~ 50/60Hz EARPHONE COAX OUT L R CVBS/Y Pb Pr IN IN AC 100-240V~ 50/60Hz EARPHONE COAX OUT L R CVBS/Y Pb Pr IN IN Connect a USB 2.0 memory device into USB slot of all USB devices, due to multiple technology standards used. However, we cannot guarantee the compatibility of this TV for multimedia files playback. 1. This TV is compatible with most USB devices in the market.

English Manual
Page 11
AC 100-240V~ 50/60Hz EARPHONE COAX OUT L R CVBS/Y Pb Pr IN IN (Not supplied) AC 100-240V~ 50/60Hz EARPHONE COAX OUT L R CVBS/Y Pb Pr IN IN Up to 1366×768@60Hz
AC 100-240V~ 50/60Hz EARPHONE COAX OUT L R CVBS/Y Pb Pr IN IN (Not supplied) AC 100-240V~ 50/60Hz EARPHONE COAX OUT L R CVBS/Y Pb Pr IN IN Up to 1366×768@60Hz
English Manual
Page 14
OverScan (HDMI mode only) Turn on/off OverScan if Users found the image wasn't fully displayed on screen. 9. Restore Default This item is used to reset to factory default settings. 8.
OverScan (HDMI mode only) Turn on/off OverScan if Users found the image wasn't fully displayed on screen. 9. Restore Default This item is used to reset to factory default settings. 8.
English Manual
Page 15
Boot Setting: set Picture Mode, Default Volume, Max Volume, Boot Source. (Boot Channel & Channel Select won't work if no TV signals.) Hotel Lock: turn on /off Hotel Mode. USB to USB device. CHANNEL 7. Reset Hotel Setting: reset above hotel setting. Hotel Mode: turn on /off Tuner Lock, Keypad Lock or Menu Lock. Power Save: select desired Power Save time. TV to USB: export data to TV: import data from USB device. Hotel Menu -Press RIGHT navigation button or ENTER button to enter it.
Boot Setting: set Picture Mode, Default Volume, Max Volume, Boot Source. (Boot Channel & Channel Select won't work if no TV signals.) Hotel Lock: turn on /off Hotel Mode. USB to USB device. CHANNEL 7. Reset Hotel Setting: reset above hotel setting. Hotel Mode: turn on /off Tuner Lock, Keypad Lock or Menu Lock. Power Save: select desired Power Save time. TV to USB: export data to TV: import data from USB device. Hotel Menu -Press RIGHT navigation button or ENTER button to enter it.


