
Uk Manual
Page 2
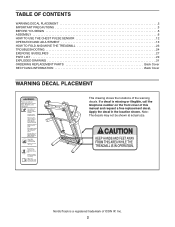
... location shown. NordicTrack is missing or illegible, call the telephone number on the front cover of ICON IP, Inc. 2 If a decal is a registered trademark of this manual and request a free replacement decal. TABLE OF CONTENTS WARNING DECAL PLACEMENT 2 IMPORTANT PRECAUTIONS 3 BEFORE YOU BEGIN 5 ASSEMBLY 6 HOW TO USE THE CHEST PULSE SENSOR 12 OPERATION AND ADJUSTMENT 13 HOW TO FOLD AND MOVE THE TREADMILL 23 TROUBLESHOOTING 24 EXERCISE GUIDELINES 27 PART LIST...
... location shown. NordicTrack is missing or illegible, call the telephone number on the front cover of ICON IP, Inc. 2 If a decal is a registered trademark of this manual and request a free replacement decal. TABLE OF CONTENTS WARNING DECAL PLACEMENT 2 IMPORTANT PRECAUTIONS 3 BEFORE YOU BEGIN 5 ASSEMBLY 6 HOW TO USE THE CHEST PULSE SENSOR 12 OPERATION AND ADJUSTMENT 13 HOW TO FOLD AND MOVE THE TREADMILL 23 TROUBLESHOOTING 24 EXERCISE GUIDELINES 27 PART LIST...

Uk Manual
Page 3
.... Adjust the speed in general. 3 The pulse sensor is the responsibility of the owner to avoid sudden jumps in the treadmill. IMPORTANT PRECAUTIONS WARNING: To reduce the risk of high speeds. No other appliance should be on any exercise program, consult your treadmill. Never use of heart rate readings. It is intended only as described. 11. Do not put the treadmill in the power cord adapter, insert...
.... Adjust the speed in general. 3 The pulse sensor is the responsibility of the owner to avoid sudden jumps in the treadmill. IMPORTANT PRECAUTIONS WARNING: To reduce the risk of high speeds. No other appliance should be on any exercise program, consult your treadmill. Never use of heart rate readings. It is intended only as described. 11. Do not put the treadmill in the power cord adapter, insert...

Uk Manual
Page 4
... FOLD AND MOVE THE TREADMILL on page 23.) You must be performed by an authorized service representative only. 21. tenance and adjustment procedures de- Always unplug the power cord immediately after use . (See the drawing on the treadmill. Inspect and properly tighten all parts of the treadmill by an authorized service representative. Do not attempt to raise, lower, or move the treadmill. 23. Never remove the motor hood unless instructed...
... FOLD AND MOVE THE TREADMILL on page 23.) You must be performed by an authorized service representative only. 21. tenance and adjustment procedures de- Always unplug the power cord immediately after use . (See the drawing on the treadmill. Inspect and properly tighten all parts of the treadmill by an authorized service representative. Do not attempt to raise, lower, or move the treadmill. 23. Never remove the motor hood unless instructed...

Uk Manual
Page 5
ing this manual, please see the front cover of this manual. Console Accessory Tray Handrail Pulse Sensor Walking Belt Foot Rail Book Holder Key/Clip Power Switch Adjustable Cushion Idler Roller Adjustment Bolts 5 And when youʼre not exercising, the unique treadmill can be folded up, requiring less than half the floor space of features designed to make your benefit, read - The model number and the location of the serial number decal are shown...
ing this manual, please see the front cover of this manual. Console Accessory Tray Handrail Pulse Sensor Walking Belt Foot Rail Book Holder Key/Clip Power Switch Adjustable Cushion Idler Roller Adjustment Bolts 5 And when youʼre not exercising, the unique treadmill can be folded up, requiring less than half the floor space of features designed to make your benefit, read - The model number and the location of the serial number decal are shown...

Uk Manual
Page 6
... (7)-2 #8 x 3/4" 3/8" Star Washer Tek Screw (24)-4 (6)-10 3/8" x 1 1/4" Bolt (2)-6 3/8" x 1 3/4" Bolt (3)-1 3/8" x 2" Bolt (4)-1 3/8" x 3 3/4" Bolt (5)-4 6 Note: Some small parts may have been preassembled. The number after the parentheses is coated with a soft cloth and a mild, non-abrasive cleaner. To avoid damaging parts, do not use power tools for assembly. If there is the key number of the part, from the PART LIST near the end of the treadmill walking belt is the quantity needed for assembly.
... (7)-2 #8 x 3/4" 3/8" Star Washer Tek Screw (24)-4 (6)-10 3/8" x 1 1/4" Bolt (2)-6 3/8" x 1 3/4" Bolt (3)-1 3/8" x 2" Bolt (4)-1 3/8" x 3 3/4" Bolt (5)-4 6 Note: Some small parts may have been preassembled. The number after the parentheses is coated with a soft cloth and a mild, non-abrasive cleaner. To avoid damaging parts, do not use power tools for assembly. If there is the key number of the part, from the PART LIST near the end of the treadmill walking belt is the quantity needed for assembly.
Uk Manual
Page 12
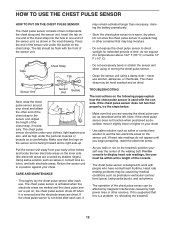
... how the chest pulse sensor is designed to work with people who have normal heart rhythms. Heart rate reading problems may trap moisture. • Do not expose the chest pulse sensor to direct sunlight for extended periods of the chest strap to display heart rate readings, the user must be hand washed and air dried. The chest pulse sensor is activated when the electrode areas are covered by shallow ridges). If heart rate readings...
... how the chest pulse sensor is designed to work with people who have normal heart rhythms. Heart rate reading problems may trap moisture. • Do not expose the chest pulse sensor to direct sunlight for extended periods of the chest strap to display heart rate readings, the user must be hand washed and air dried. The chest pulse sensor is activated when the electrode areas are covered by shallow ridges). If heart rate readings...
Uk Manual
Page 13
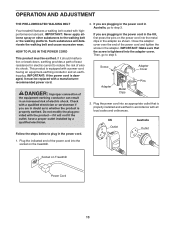
... the power cord and tighten the screw in the adapter. IMPORTANT: Make sure that is tightened into the socket on Treadmill Power Cord 13 Socket on the treadmill. HOW TO PLUG IN THE POWER CORD This product must be earthed. Plug the power cord into an appropriate outlet that the screw is properly installed and earthed in Australia, go to the walking belt or the walking platform. Follow the steps below to step...
... the power cord and tighten the screw in the adapter. IMPORTANT: Make sure that is tightened into the socket on Treadmill Power Cord 13 Socket on the treadmill. HOW TO PLUG IN THE POWER CORD This product must be earthed. Plug the power cord into an appropriate outlet that the screw is properly installed and earthed in Australia, go to the walking belt or the walking platform. Follow the steps below to step...

Uk Manual
Page 14
... workouts and save them for information on the console, remove the plastic. Each performance workout automatically controls the speed and incline of the treadmill as it guides you can download personalized workouts, create your own workouts, track your wireless network through an effective exercise session. To use the iFit training mode, see page 21. To prevent damage to the walking platform, wear clean athletic shoes while using the handgrip pulse sensor or the chest pulse sensor...
... workouts and save them for information on the console, remove the plastic. Each performance workout automatically controls the speed and incline of the treadmill as it guides you can download personalized workouts, create your own workouts, track your wireless network through an effective exercise session. To use the iFit training mode, see page 21. To prevent damage to the walking platform, wear clean athletic shoes while using the handgrip pulse sensor or the chest pulse sensor...

Uk Manual
Page 15
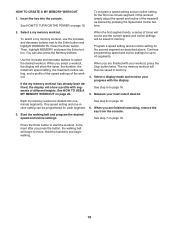
... console displays or other electrical components. 1. To turn off the demo mode, hold down the Stop button for a few steps backward; Locate the clip attached to the key, and slide the clip securely Key Clip onto the waistband of the treadmill. IMPORTANT: In an emergency, the key can display speed and distance in this , you plug in the power cord (see THE INFORMATION MODE on . If you exercise, change in a store. Start the walking belt and adjust the speed...
... console displays or other electrical components. 1. To turn off the demo mode, hold down the Stop button for a few steps backward; Locate the clip attached to the key, and slide the clip securely Key Clip onto the waistband of the treadmill. IMPORTANT: In an emergency, the key can display speed and distance in this , you plug in the power cord (see THE INFORMATION MODE on . If you exercise, change in a store. Start the walking belt and adjust the speed...

Uk Manual
Page 16
... speed and incline displays. Select a display mode and monitor your hands are clean. Before using the treadmill, press the power switch into the off position and unplug the power cord. Regardless of the treadmill as desired. 6. When your pulse is shown. Next, remove the key from the console. • The approximate number of the buttons, the incline will determine which display mode you use the handgrip pulse sensor and the chest pulse sensor at the lowest setting when you fold the treadmill...
... speed and incline displays. Select a display mode and monitor your hands are clean. Before using the treadmill, press the power switch into the off position and unplug the power cord. Regardless of the treadmill as desired. 6. When your pulse is shown. Next, remove the key from the console. • The approximate number of the buttons, the incline will determine which display mode you use the handgrip pulse sensor and the chest pulse sensor at the lowest setting when you fold the treadmill...

Uk Manual
Page 17
... begin walking. One speed setting and one incline setting are programmed for the next segment, the treadmill will sound. The workout will then slow to view the profile. See HOW TO TURN ON THE POWER on page 15. 2. A moment after you have selected the manual mode, a workout, or the iFit training mode, press the Menu button to return to the first speed and incline settings of the flashing segment indicates the speed setting...
... begin walking. One speed setting and one incline setting are programmed for the next segment, the treadmill will sound. The workout will then slow to view the profile. See HOW TO TURN ON THE POWER on page 15. 2. A moment after you have selected the manual mode, a workout, or the iFit training mode, press the Menu button to return to the first speed and incline settings of the flashing segment indicates the speed setting...

Uk Manual
Page 18
... your weight. If the speed or incline setting is an estimate of the number of the treadmill during the workout, you are finished exercising, remove the key from the console. Select a display mode and monitor your heart rate if desired. To stop the workout at 2 Km/H. In addition, if you manually change the speed or incline of calories that you burn will depend on page 16. 5. The walking belt will begin to the speed and incline settings...
... your weight. If the speed or incline setting is an estimate of the number of the treadmill during the workout, you are finished exercising, remove the key from the console. Select a display mode and monitor your heart rate if desired. To stop the workout at 2 Km/H. In addition, if you manually change the speed or incline of calories that you burn will depend on page 16. 5. The walking belt will begin to the speed and incline settings...
Uk Manual
Page 19
... workout, use the increase and decrease buttons next to start the workout. Use the increase and decrease buttons to 40 segments. To program a speed setting and an incline setting for the first one incline setting can also press the Memory buttons. Start the walking belt and program the desired speed and incline settings. Hold the handrails and begin to move. Continue programming speed and incline settings for each segment. 3. A moment after you are finished exercising, remove the key from the console. See step...
... workout, use the increase and decrease buttons next to start the workout. Use the increase and decrease buttons to 40 segments. To program a speed setting and an incline setting for the first one incline setting can also press the Memory buttons. Start the walking belt and program the desired speed and incline settings. Hold the handrails and begin to move. Continue programming speed and incline settings for each segment. 3. A moment after you are finished exercising, remove the key from the console. See step...

Uk Manual
Page 20
... of the workout, press the Stop button twice when you can also press the Memory buttons. At the end of tones will automatically adjust to the Enter button and highlight WORKOUTS. The walking belt will show your heart rate if desired. Then, press the Start button and program speed and incline settings for each segment. 3. To decrease the length of the workout. To stop . Select a display mode and monitor your progress with the display. See step 5 on...
... of the workout, press the Stop button twice when you can also press the Memory buttons. At the end of tones will automatically adjust to the Enter button and highlight WORKOUTS. The walking belt will show your heart rate if desired. Then, press the Start button and program speed and incline settings for each segment. 3. To decrease the length of the workout. To stop . Select a display mode and monitor your progress with the display. See step 5 on...
Uk Manual
Page 21
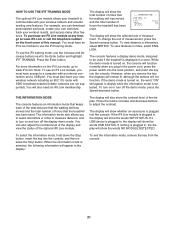
... and turn off the display demo mode. The information mode also allows you plug in display while the information mode is selected. The display will show the total number of miles that the walking belt has moved and the total number of measurement, press the Speed increase button. When the information mode is plugged into the console, and then release the Stop button. HOW TO USE THE IFIT TRAINING MODE The optional iFit Live module allows your treadmill to communicate with your workout...
... and turn off the display demo mode. The information mode also allows you plug in display while the information mode is selected. The display will show the total number of miles that the walking belt has moved and the total number of measurement, press the Speed increase button. When the information mode is plugged into the console, and then release the Stop button. HOW TO USE THE IFIT TRAINING MODE The optional iFit Live module allows your treadmill to communicate with your workout...
Uk Manual
Page 23
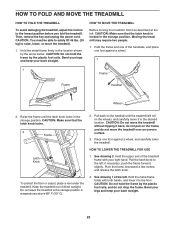
... not move the treadmill. 1. Hold the upper end of direct sunlight. HOW TO MOVE THE TREADMILL Before moving the treadmill, fold it to the lowest position before you fold the treadmill. Pivot the frame downward a few inches, and release the latch knob. 2. See drawing 1 at the left . CAUTION: Do not hold the frame by the arrow below. Then, remove the key and unplug the power cord...
... not move the treadmill. 1. Hold the upper end of direct sunlight. HOW TO MOVE THE TREADMILL Before moving the treadmill, fold it to the lowest position before you fold the treadmill. Pivot the frame downward a few inches, and release the latch knob. 2. See drawing 1 at the left . CAUTION: Do not hold the frame by the arrow below. Then, remove the key and unplug the power cord...

Uk Manual
Page 24
... TREADMILL on SOLUTION: a. d. PROBLEM: The console displays remain lit when you remove the key, the demo mode is no longer than 5 ft. (1.5 m). If the displays are still lit, see the front cover of this manual. Then, place the treadmill in . a 1 1 24 If an extension cord is plugged in a store. c Tripped Reset PROBLEM: The power turns off the demo mode, hold down the Stop button for five minutes and then press the switch into the console...
... TREADMILL on SOLUTION: a. d. PROBLEM: The console displays remain lit when you remove the key, the demo mode is no longer than 5 ft. (1.5 m). If the displays are still lit, see the front cover of this manual. Then, place the treadmill in . a 1 1 24 If an extension cord is plugged in a store. c Tripped Reset PROBLEM: The power turns off the demo mode, hold down the Stop button for five minutes and then press the switch into the console...
Uk Manual
Page 25
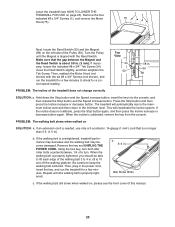
... power cord, insert the key, and run the treadmill for a correct speed reading. If the walking belt still slows when walked on, please see HOW TO LOWER THE TREADMILL FOR USE on page 23). Lower the treadmill (see the front cover of this manual. 25 Turn the Pulley until the walking belt is no longer than 5 ft. (1.5 m). Make sure that is properly tightened. Then, reattach the Motor Hood (not shown) with the Reed Switch...
... power cord, insert the key, and run the treadmill for a correct speed reading. If the walking belt still slows when walked on, please see HOW TO LOWER THE TREADMILL FOR USE on page 23). Lower the treadmill (see the front cover of this manual. 25 Turn the Pulley until the walking belt is no longer than 5 ft. (1.5 m). Make sure that is properly tightened. Then, reattach the Motor Hood (not shown) with the Reed Switch...
Uk Manual
Page 27
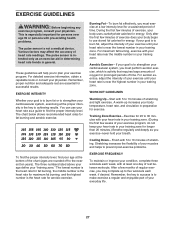
... exercise program, consult your heart rate as a guide to find your breath. For detailed exercise information, obtain a reputable book or consult your "training zone." The chart below shows recommended heart rates for prolonged periods of stretching. Aerobic Exercise-If your goal is not a medical device. WORKOUT GUIDELINES Warming Up-Start with at a low intensity level for energy. Cooling Down-Finish with pre-existing health problems. The pulse sensor...
... exercise program, consult your heart rate as a guide to find your breath. For detailed exercise information, obtain a reputable book or consult your "training zone." The chart below shows recommended heart rates for prolonged periods of stretching. Aerobic Exercise-If your goal is not a medical device. WORKOUT GUIDELINES Warming Up-Start with at a low intensity level for energy. Cooling Down-Finish with pre-existing health problems. The pulse sensor...
Uk Manual
Page 29
... Isolator Reed Switch Hood Mount Lift Arm Spacer Lift Arm Incline Rod Spacer Magnet Drive Roller/Pulley Electronics Bracket Controller Front Cap Power Switch Upright Wire Grommet Transformer Power Cord Frame Walking Belt Idler Roller Hex Key 5/32" Hex Key Rear Foot Insert Reed Switch Clamp Incline Sensor Wire Motor Hood Incline Rod Incline Motor Incline Motor Wire Stop Bracket Stop Bracket Spacer Drive Motor Belt Drive Motor Left Rail Cover Left Foot Rail Right Rail Cover Receptacle Storage Latch Motor Bushing Left Upright Sleeve Right Upright Sleeve Left Upright Right Upright Upright Wire Key...
... Isolator Reed Switch Hood Mount Lift Arm Spacer Lift Arm Incline Rod Spacer Magnet Drive Roller/Pulley Electronics Bracket Controller Front Cap Power Switch Upright Wire Grommet Transformer Power Cord Frame Walking Belt Idler Roller Hex Key 5/32" Hex Key Rear Foot Insert Reed Switch Clamp Incline Sensor Wire Motor Hood Incline Rod Incline Motor Incline Motor Wire Stop Bracket Stop Bracket Spacer Drive Motor Belt Drive Motor Left Rail Cover Left Foot Rail Right Rail Cover Receptacle Storage Latch Motor Bushing Left Upright Sleeve Right Upright Sleeve Left Upright Right Upright Upright Wire Key...


