
English Manual
Page 3
... the treadmill is damaged, the walking belt may change speed, accelerate, or stop procedure before using the treadmill (see page 12), plug the power cord into a grounded circuit capable of carrying 15 or more than one person on page 14). 9. If the control system is not working properly.) 16. Never move the walking belt while the power is capable of high speeds. The pulse sensor is not working properly. (See TROUBLESHOOTING on...
... the treadmill is damaged, the walking belt may change speed, accelerate, or stop procedure before using the treadmill (see page 12), plug the power cord into a grounded circuit capable of carrying 15 or more than one person on page 14). 9. If the control system is not working properly.) 16. Never move the walking belt while the power is capable of high speeds. The pulse sensor is not working properly. (See TROUBLESHOOTING on...
English Manual
Page 4
...) to raise, lower, or move the treadmill. 22. vice representative. SAVE THESE INSTRUCTIONS 4 DANGER: 25. Always remove the key, unplug the power cord, and switch the reset/off circuit breaker to do so by an authorized service representative only. 26. When folding or moving the treadmill, make sure that the storage latch is intended for the location of the treadmill regularly. Never remove the motor hood un- less instructed to the off...
...) to raise, lower, or move the treadmill. 22. vice representative. SAVE THESE INSTRUCTIONS 4 DANGER: 25. Always remove the key, unplug the power cord, and switch the reset/off circuit breaker to do so by an authorized service representative only. 26. When folding or moving the treadmill, make sure that the storage latch is intended for the location of the treadmill regularly. Never remove the motor hood un- less instructed to the off...

English Manual
Page 5
... front cover of this manual. The A2155 treadmill offers a selection of the serial number decal are labeled in the drawing below. The model number and the location of features designed to make your benefit, read - BEFORE YOU BEGIN Thank you , note the product model number and serial number before using the treadmill. Fan Accessory Tray Handrail Upright Walking Belt Foot Rail Book Holder Console Pulse Sensor Key/Clip Reset/Off Circuit Breaker Power Cord Rear Roller Adjustment Bolts Cushioned Walking...
... front cover of this manual. The A2155 treadmill offers a selection of the serial number decal are labeled in the drawing below. The model number and the location of features designed to make your benefit, read - BEFORE YOU BEGIN Thank you , note the product model number and serial number before using the treadmill. Fan Accessory Tray Handrail Upright Walking Belt Foot Rail Book Holder Console Pulse Sensor Key/Clip Reset/Off Circuit Breaker Power Cord Rear Roller Adjustment Bolts Cushioned Walking...
English Manual
Page 6
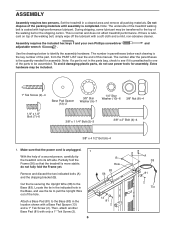
... assembly. ASSEMBLY Assembly requires two persons. Set the treadmill in the Base, and use power tools for assembly. If there is the key number of the part, from the PART LIST near the end of the walking belt, simply wipe off the lubricant with high-performance lubricant. Use the drawings below to the Base (83) in parentheses below each drawing is lubricant on top of this manual. The number in the location...
... assembly. ASSEMBLY Assembly requires two persons. Set the treadmill in the Base, and use power tools for assembly. If there is the key number of the part, from the PART LIST near the end of the walking belt, simply wipe off the lubricant with high-performance lubricant. Use the drawings below to the Base (83) in parentheses below each drawing is lubricant on top of this manual. The number in the location...

English Manual
Page 12
... TO PLUG IN THE POWER CORD DANGER: Improper connection of least resistance for use a properly functioning surge suppressor could result in a fall and serious injury. Do not modify the plug provided with a cord having Lug Metal Screw The temporary adapter should malfunction or break down, grounding provides a path of the equipment-grounding conductor can be used it will deteriorate the walking belt and...
... TO PLUG IN THE POWER CORD DANGER: Improper connection of least resistance for use a properly functioning surge suppressor could result in a fall and serious injury. Do not modify the plug provided with a cord having Lug Metal Screw The temporary adapter should malfunction or break down, grounding provides a path of the equipment-grounding conductor can be used it will deteriorate the walking belt and...
English Manual
Page 13
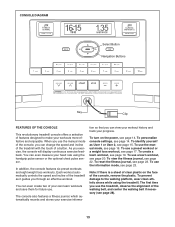
... that you exercise, the console will display continuous exercise feedback. Note: If there is a sheet of clear plastic on the power, see page 15. As you can even create two of your heart rate using the treadmill. To view the fitness journal, see page 14. To create a learn workout, see page 23. To reset the fitness journal, see page 20. CONSOLE DIAGRAM Select Button Navigation Buttons Key Clip...
... that you exercise, the console will display continuous exercise feedback. Note: If there is a sheet of clear plastic on the power, see page 15. As you can even create two of your heart rate using the treadmill. To view the fitness journal, see page 14. To create a learn workout, see page 23. To reset the fitness journal, see page 20. CONSOLE DIAGRAM Select Button Navigation Buttons Key Clip...

English Manual
Page 14
... turn off the demo mode, hold down the Stop button for a few steps backward; Important: To highlight options within a menu, press the Select button (see THE INFORMATION MODE on page 13). Enter user information. Find the clip attached to the key (see HOW TO VIEW THE FITNESS JOURNAL on . HOW TO PERSONALIZE CONSOLE SETTINGS The console has a user mode that allows you to designate yourself as you plug in the power cord and switch...
... turn off the demo mode, hold down the Stop button for a few steps backward; Important: To highlight options within a menu, press the Select button (see THE INFORMATION MODE on page 13). Enter user information. Find the clip attached to the key (see HOW TO VIEW THE FITNESS JOURNAL on . HOW TO PERSONALIZE CONSOLE SETTINGS The console has a user mode that allows you to designate yourself as you plug in the power cord and switch...
English Manual
Page 15
... time in the display for a workout session, first press the Select button and enter the user mode. A list of the selected user will then appear in the display each time you entered will then exit the user mode. The console can load information and keep track of USER 1 or USER 2. 4. make sure to confirm your workout history accurately in the setup menu and press the Select button. The word LOGIN...
... time in the display for a workout session, first press the Select button and enter the user mode. A list of the selected user will then appear in the display each time you entered will then exit the user mode. The console can load information and keep track of USER 1 or USER 2. 4. make sure to confirm your workout history accurately in the setup menu and press the Select button. The word LOGIN...
English Manual
Page 16
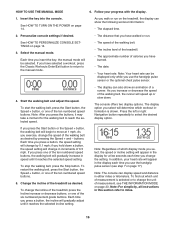
... Workouts Enter/Exit button to return to move at 1 mph. HOW TO USE THE MANUAL MODE 6. The console offers two display options. if you use the handgrip pulse sensor or the optional chest pulse sensor. 4. Change the incline of 0.5 mph. Note: For simplicity, all instructions in increments of the treadmill as desired by 0.1 mph; Insert the key into the console. To start the walking belt, press the Start button, the Speed + button, or one of the ten numbered speed buttons, the walking belt...
... Workouts Enter/Exit button to return to move at 1 mph. HOW TO USE THE MANUAL MODE 6. The console offers two display options. if you use the handgrip pulse sensor or the optional chest pulse sensor. 4. Change the incline of 0.5 mph. Note: For simplicity, all instructions in increments of the treadmill as desired by 0.1 mph; Insert the key into the console. To start the walking belt, press the Start button, the Speed + button, or one of the ten numbered speed buttons, the walking belt...
English Manual
Page 17
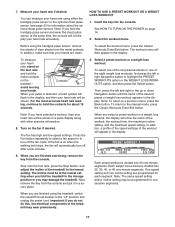
... maximum incline setting, and the maximum speed setting. When you hold the metal contacts on when the walking belt stops, the fan will not display your pulse is divided into 20, 30, 40, or 45 one incline setting are clean. Step onto the foot rails, press the Stop button, and adjust the incline of the desired preset or weight loss workout appears in the display, and then your heart rate using the treadmill, switch the reset...
... maximum incline setting, and the maximum speed setting. When you hold the metal contacts on when the walking belt stops, the fan will not display your pulse is divided into 20, 30, 40, or 45 one incline setting are clean. Step onto the foot rails, press the Stop button, and adjust the incline of the desired preset or weight loss workout appears in the display, and then your heart rate using the treadmill, switch the reset...

English Manual
Page 18
... workout. When you select a preset workout or a weight loss workout, the display will continue in the workout, the distance you have walked or run, the approximate number of the workout. When the next segment of the profile. The treadmill will automatically adjust to the speed and incline settings for the next segment. 6. The walking belt will indicate your progress. See step 8 on page 17. 18 Press the Start button to a stop the workout...
... workout. When you select a preset workout or a weight loss workout, the display will continue in the workout, the distance you have walked or run, the approximate number of the workout. When the next segment of the profile. The treadmill will automatically adjust to the speed and incline settings for the next segment. 6. The walking belt will indicate your progress. See step 8 on page 17. 18 Press the Start button to a stop the workout...

English Manual
Page 19
... to the manual mode, press the Classic Workouts Enter/Exit button. When you created will show the name of the six numbered percent grade buttons. Insert the key into the console. See HOW TO TURN ON THE POWER on page 17. 19 Select the workout menu. To select the workout menu, press the Classic Workouts Enter/Exit button. Press the Start button to forty minutes. Continue exercising and programming speed and incline settings for...
... to the manual mode, press the Classic Workouts Enter/Exit button. When you created will show the name of the six numbered percent grade buttons. Insert the key into the console. See HOW TO TURN ON THE POWER on page 17. 19 Select the workout menu. To select the workout menu, press the Classic Workouts Enter/Exit button. Press the Start button to forty minutes. Continue exercising and programming speed and incline settings for...
English Manual
Page 20
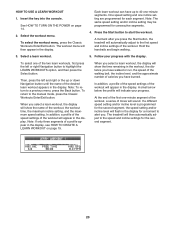
...: If only three segments of the workout. HOW TO USE A LEARN WORKOUT 1. Insert the key into the console. Each learn workout. 5. Note: The same speed setting and/or incline setting may be programmed for the second segment. 20 A moment after you . To select one -minute segments. In addition, a profile of the speed settings of the workout will automatically adjust to the manual mode, press the Classic Workouts Enter/Exit button.
...: If only three segments of the workout. HOW TO USE A LEARN WORKOUT 1. Insert the key into the console. Each learn workout. 5. Note: The same speed setting and/or incline setting may be programmed for the second segment. 20 A moment after you . To select one -minute segments. In addition, a profile of the speed settings of the workout will automatically adjust to the manual mode, press the Classic Workouts Enter/Exit button.

English Manual
Page 21
... then press the Classic Workouts Enter/Exit button. When you have up to the speed and incline settings for the current segment, simply press the Speed or Incline buttons. To stop . When you are finished exercising, remove the key from the console. To in memory. Change the workout if desired. Turn on page 17. 21 See step 9 on the fan if desired. 6. however, when the next segment begins, the treadmill...
... then press the Classic Workouts Enter/Exit button. When you have up to the speed and incline settings for the current segment, simply press the Speed or Incline buttons. To stop . When you are finished exercising, remove the key from the console. To in memory. Change the workout if desired. Turn on page 17. 21 See step 9 on the fan if desired. 6. however, when the next segment begins, the treadmill...

English Manual
Page 23
... the display. To exit the information mode, remove the key from the console. Exit the user mode. To delete exercise information stored in the fitness journal, highlight the CANCEL option and press the Select button. Then, highlight the RESET JOURNAL option and press the Select button. To purchase the optional chest pulse sensor, call the telephone number on the front cover of measurement, press the Speed + button. See step 1 on or turn off the demo mode, press the Speed - To...
... the display. To exit the information mode, remove the key from the console. Exit the user mode. To delete exercise information stored in the fitness journal, highlight the CANCEL option and press the Select button. Then, highlight the RESET JOURNAL option and press the Select button. To purchase the optional chest pulse sensor, call the telephone number on the front cover of measurement, press the Speed + button. See step 1 on or turn off the demo mode, press the Speed - To...
English Manual
Page 24
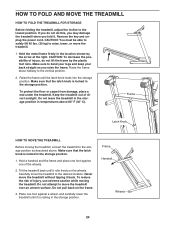
... . Remove the key and unplug the power cord. CAUTION: To decrease the possibility of direct sunlight. Make sure that the latch knob is locked in the storage position. Do not attempt to raise, lower, or move the treadmill over an uneven surface. To reduce the risk of the wheels. 2. HOW TO FOLD AND MOVE THE TREADMILL HOW TO FOLD THE TREADMILL FOR STORAGE Before folding the treadmill, adjust the incline to...
... . Remove the key and unplug the power cord. CAUTION: To decrease the possibility of direct sunlight. Make sure that the latch knob is locked in the storage position. Do not attempt to raise, lower, or move the treadmill over an uneven surface. To reduce the risk of the wheels. 2. HOW TO FOLD AND MOVE THE TREADMILL HOW TO FOLD THE TREADMILL FOR STORAGE Before folding the treadmill, adjust the incline to...
English Manual
Page 26
... console. b. PROBLEM: The power turns off circuit breaker located on the treadmill frame near the power cord. Make sure that the key is plugged in the console, press one of the treadmill does not change correctly SOLUTION: a. With the key in . Remove the key from the console. Reinsert the key into a properly grounded outlet (see the back cover of this manual. PROBLEM: The incline of the Incline buttons. PROBLEM: The displays of the specifications described on SOLUTION: a. TROUBLESHOOTING Most treadmill problems...
... console. b. PROBLEM: The power turns off circuit breaker located on the treadmill frame near the power cord. Make sure that the key is plugged in the console, press one of the treadmill does not change correctly SOLUTION: a. With the key in . Remove the key from the console. Reinsert the key into a properly grounded outlet (see the back cover of this manual. PROBLEM: The incline of the Incline buttons. PROBLEM: The displays of the specifications described on SOLUTION: a. TROUBLESHOOTING Most treadmill problems...
English Manual
Page 27
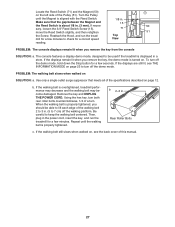
... tightened. b 2-3 in . (3 mm). Locate the Reed Switch (71) and the Magnet (50) on the left side of a turn off the walking platform. Then, plug in . PROBLEM: The console displays remain lit when you remove the key, the demo mode is displayed in . (5 to check for a few seconds. If the walking belt is about 1/8 in . Remove the key and UNPLUG THE POWER CORD. Rear Roller Bolts c. Turn the Pulley until the walking belt is aligned with the Reed Switch. 1/8 in the power cord...
... tightened. b 2-3 in . (3 mm). Locate the Reed Switch (71) and the Magnet (50) on the left side of a turn off the walking platform. Then, plug in . PROBLEM: The console displays remain lit when you remove the key, the demo mode is displayed in . (5 to check for a few seconds. If the walking belt is about 1/8 in . Remove the key and UNPLUG THE POWER CORD. Rear Roller Bolts c. Turn the Pulley until the walking belt is aligned with the Reed Switch. 1/8 in the power cord...
English Manual
Page 29
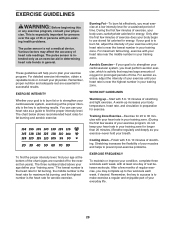
... with your heart rate near the lowest number in general. For maximum fat burning, exercise with pre-existing health problems. The pulse sensor is especially important for maximum fat burning, and the highest number is intended only as you to 10 minutes of time. This is not a medical device. Remember, the key to success is to strengthen your exercise program. Various factors...
... with your heart rate near the lowest number in general. For maximum fat burning, exercise with pre-existing health problems. The pulse sensor is especially important for maximum fat burning, and the highest number is intended only as you to 10 minutes of time. This is not a medical device. Remember, the key to success is to strengthen your exercise program. Various factors...

English Manual
Page 36
... this manual) • the key number and description of the replacement part(s) (see the front cover of this manual. damages with the use , or costs of removal or installation; Parts and labor are limited in connection with respect to any implied warranties of whatsoever nature. This warranty gives you , be prepared to provide the following information when contacting us assist you specific legal rights. All repairs for which warranty...
... this manual) • the key number and description of the replacement part(s) (see the front cover of this manual. damages with the use , or costs of removal or installation; Parts and labor are limited in connection with respect to any implied warranties of whatsoever nature. This warranty gives you , be prepared to provide the following information when contacting us assist you specific legal rights. All repairs for which warranty...


