

English Manual
Page 2
TABLE OF CONTENTS IMPORTANT PRECAUTIONS 3 BEFORE YOU BEGIN 5 ASSEMBLY 6 OPERATION AND ADJUSTMENT 11 HOW TO FOLD AND MOVE THE TREADMILL 28 TROUBLESHOOTING 30 CONDITIONING GUIDELINES 32 PART LIST 34 ORDERING REPLACEMENT PARTS 35 LIMITED WARRANTY Back Cover Note: An EXPLODED DRAWING is a registered trademark of this manual. NordicTrack is attached in the center of ICON IP, Inc. 2
TABLE OF CONTENTS IMPORTANT PRECAUTIONS 3 BEFORE YOU BEGIN 5 ASSEMBLY 6 OPERATION AND ADJUSTMENT 11 HOW TO FOLD AND MOVE THE TREADMILL 28 TROUBLESHOOTING 30 CONDITIONING GUIDELINES 32 PART LIST 34 ORDERING REPLACEMENT PARTS 35 LIMITED WARRANTY Back Cover Note: An EXPLODED DRAWING is a registered trademark of this manual. NordicTrack is attached in the center of ICON IP, Inc. 2

English Manual
Page 3
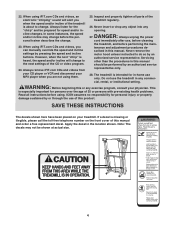
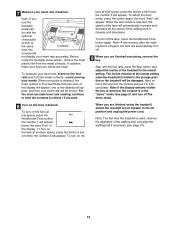
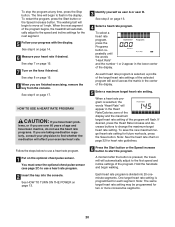
...store. 16. The pulse sensor is the responsibility of the reset/off . Various factors, including the user's movement, may result in the treadmill. Do not attempt to the control system of clearance behind it and two feet on the walking belt. Do not change speed, accelerate, or...extension cord. 11. IMPORTANT PRECAUTIONS WARNING: To reduce the risk of high speeds. Never move the treadmill until it is being administered. 15. When connecting the power cord (see your local NordicTrack dealer or call the tollfree telephone number on page 11. Do not use a properly functioning surge...
...store. 16. The pulse sensor is the responsibility of the reset/off . Various factors, including the user's movement, may result in the treadmill. Do not attempt to the control system of clearance behind it and two feet on the walking belt. Do not change speed, accelerate, or...extension cord. 11. IMPORTANT PRECAUTIONS WARNING: To reduce the risk of high speeds. Never move the treadmill until it is being administered. 15. When connecting the power cord (see your local NordicTrack dealer or call the tollfree telephone number on page 11. Do not use a properly functioning surge...
English Manual
Page 4
...for personal injury or property damage sustained by an authorized service representative only. 28. ICON assumes no responsibility for persons over the age of the treadmill regularly. 26. If a decal is intended for speed and/or incline changes. In some instances, the speed and/or incline may not ...be performed by or through the use only. DANGER: 27. Always unplug the power cord immediately after use the treadmill in any commercial, rental, or institutional setting. Servicing other than the procedures in -home use of the CD or video program. 24. WARNING...
...for personal injury or property damage sustained by an authorized service representative only. 28. ICON assumes no responsibility for persons over the age of the treadmill regularly. 26. If a decal is intended for speed and/or incline changes. In some instances, the speed and/or incline may not ...be performed by or through the use only. DANGER: 27. Always unplug the power cord immediately after use the treadmill in any commercial, rental, or institutional setting. Servicing other than the procedures in -home use of the CD or video program. 24. WARNING...
English Manual
Page 5
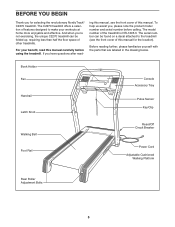
... 5 And when you're not exercising, the unique C2270 treadmill can be folded up, requiring less than half the floor space of this manual for selecting the revolutionary NordicTrack® C2270 treadmill. The model number of features designed to the treadmill (see the front cover of other treadmills. To help us assist you, please note the product...
... 5 And when you're not exercising, the unique C2270 treadmill can be folded up, requiring less than half the floor space of this manual for selecting the revolutionary NordicTrack® C2270 treadmill. The model number of features designed to the treadmill (see the front cover of other treadmills. To help us assist you, please note the product...
English Manual
Page 6
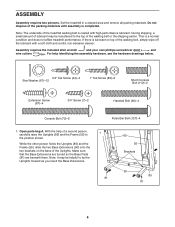
... belt is lubricant on the base of the packing materials until assembly is a normal condition and does not affect treadmill performance. Assembly requires the included allen wrench and your own phillips screwdriver and wire cutters . Make sure that the Base Extensions...81 85 55 Brackets 90 85 81 6 w (123)-2 ASSEMBLY (48)-1 Spacer Screw (60)-2 Assembly requires two persons. Open parts bag A. Set the treadmill in a cleared area and remove all packing materials. This is completed. With the help identifying the assembly hardware, see the hardware drawings below. 3/4" Tek ...
... belt is lubricant on the base of the packing materials until assembly is a normal condition and does not affect treadmill performance. Assembly requires the included allen wrench and your own phillips screwdriver and wire cutters . Make sure that the Base Extensions...81 85 55 Brackets 90 85 81 6 w (123)-2 ASSEMBLY (48)-1 Spacer Screw (60)-2 Assembly requires two persons. Open parts bag A. Set the treadmill in a cleared area and remove all packing materials. This is completed. With the help identifying the assembly hardware, see the hardware drawings below. 3/4" Tek ...
English Manual
Page 9
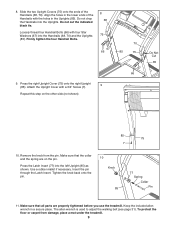
... the right Upright Cover (75) onto the right Upright (85). Remove the knob from damage, place a mat under the treadmill. 9 The allen wrench is used to adjust the walking belt (see page 31). Firmly tighten the four Handrail Bolts. 8 68 75 67 66 9. Make sure ...
... the right Upright Cover (75) onto the right Upright (85). Remove the knob from damage, place a mat under the treadmill. 9 The allen wrench is used to adjust the walking belt (see page 31). Firmly tighten the four Handrail Bolts. 8 68 75 67 66 9. Make sure ...
English Manual
Page 10
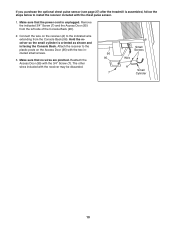
... as shown and is unplugged. The other wires included with the 3/4" Screw (7). If you purchase the optional chest pulse sensor (see page 27) after the treadmill is assembled, follow the steps below to the indicated wire extending from the left side of the Console Back (96). 2. Connect the wire on the...
... as shown and is unplugged. The other wires included with the 3/4" Screw (7). If you purchase the optional chest pulse sensor (see page 27) after the treadmill is assembled, follow the steps below to the indicated wire extending from the left side of the Console Back (96). 2. Connect the wire on the...
English Manual
Page 11
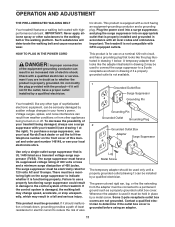
... adapter must be a monitoring light on or off. HOW TO PLUG IN THE POWER CORD DANGER: Improper connection of elec- Your treadmill, like the adapter illustrated in your local NordicTrack dealer or call the toll-free telephone number on the front cover of least resistance for electric current to determine if the...
... adapter must be a monitoring light on or off. HOW TO PLUG IN THE POWER CORD DANGER: Improper connection of elec- Your treadmill, like the adapter illustrated in your local NordicTrack dealer or call the toll-free telephone number on the front cover of least resistance for electric current to determine if the...

English Manual
Page 12
...directly from our Web site. Having iFIT.com technology is selected, the speed and incline of the treadmill can connect the treadmill to use a preset program, see pages 18 and 19. With the treadmill connected to your computer, you through effective workouts. Note: If there is a thin sheet of ...plastic on the face of this manual. Key Clip FEATURES OF THE CONSOLE The treadmill console offers an impressive array of the treadmill as a personal trainer guides you can even measure your workouts. You can also go to www.iFIT.com and access ...
...directly from our Web site. Having iFIT.com technology is selected, the speed and incline of the treadmill can connect the treadmill to use a preset program, see pages 18 and 19. With the treadmill connected to your computer, you through effective workouts. Note: If there is a thin sheet of ...plastic on the face of this manual. Key Clip FEATURES OF THE CONSOLE The treadmill console offers an impressive array of the treadmill as a personal trainer guides you can even measure your workouts. You can also go to www.iFIT.com and access ...
English Manual
Page 13
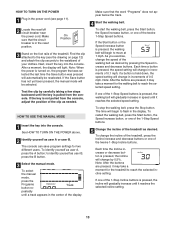
.... Test the clip by 0.5%. See HOW TO TURN ON THE POWER above. 2 Identify yourself as user A, press the A button; If one of the treadmill as needed. Next, insert the key into the console. to move at 1 mph. Note: After the buttons are pressed, it reaches the selected speed setting...Start button, the Speed increase button, or one of your clothes. If the key is pressed, the walking belt will change the incline of the treadmill, press the Incline increase and decrease buttons or one of the 1-Step Speed buttons. 5 Change the incline of the twelve 1-Step Speed buttons....
.... Test the clip by 0.5%. See HOW TO TURN ON THE POWER above. 2 Identify yourself as user A, press the A button; If one of the treadmill as needed. Next, insert the key into the console. to move at 1 mph. Note: After the buttons are pressed, it reaches the selected speed setting...Start button, the Speed increase button, or one of your clothes. If the key is pressed, the walking belt will change the incline of the treadmill, press the Incline increase and decrease buttons or one of the 1-Step Speed buttons. 5 Change the incline of the twelve 1-Step Speed buttons....
English Manual
Page 14
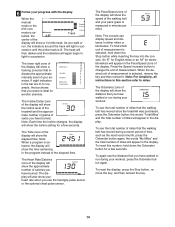
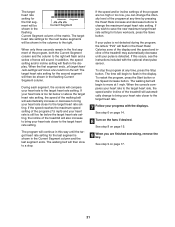
...the display will show the time remaining in minutes per mile). The Incline/Carbs zone of the display will show the incline level of the treadmill and the approximate number of grams of measurement. An "E" for English miles or an "M" for a few seconds. Press the Speed increase ... that indicates the approximate intensity level of miles will show your workout. To see the distance that the walking belt has moved since the treadmill was purchased, press the Odometer button; Note: The console can display speed and distance in the display. the words "Total Miles" and...
...the display will show the time remaining in minutes per mile). The Incline/Carbs zone of the display will show the incline level of the treadmill and the approximate number of grams of measurement. An "E" for English miles or an "M" for a few seconds. Press the Speed increase ... that indicates the approximate intensity level of miles will show your workout. To see the distance that the walking belt has moved since the treadmill was purchased, press the Odometer button; Note: The console can display speed and distance in the display. the words "Total Miles" and...
English Manual
Page 15
...will appear. Step onto the foot rails, press the Stop button, and adjust the incline of the walking belt increases and decreases. Before using the treadmill, switch the reset/off circuit breaker to hold the metal contacts-avoid moving your heart rate if desired. the number 2 will appear. To turn ... button again. To select the Auto mode, press the button again; See page 27 and turn on the fans at the lowest setting when the treadmill is in a secure place. When the auto mode is used, observe the alignment of the fans will be shown. the number 3 will be ...
...will appear. Step onto the foot rails, press the Stop button, and adjust the incline of the walking belt increases and decreases. Before using the treadmill, switch the reset/off circuit breaker to hold the metal contacts-avoid moving your heart rate if desired. the number 2 will appear. To turn ... button again. To select the Auto mode, press the button again; See page 27 and turn on the fans at the lowest setting when the treadmill is in a secure place. When the auto mode is used, observe the alignment of the fans will be shown. the number 3 will be ...
English Manual
Page 16
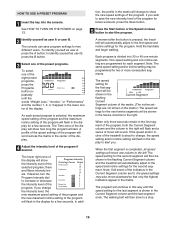
...the maximum speed setting of the program and the maximum incline setting of the matrix. (The incline set - When the first segment is pressed, the treadmill will continue in the matrix. The lower right zone of the program for two or more consecutive segments. Hold the handrails and begin walking. The... slow to the first speed and incline settings for the next twelve segments will be shown in the flashing Current Segment column and the treadmill will automatically adjust to show the new speed settings of the indicators in the lower center of tones will then be shown in the ...
...the maximum speed setting of the program and the maximum incline setting of the matrix. (The incline set - When the first segment is pressed, the treadmill will continue in the matrix. The lower right zone of the program for two or more consecutive segments. Hold the handrails and begin walking. The... slow to the first speed and incline settings for the next twelve segments will be shown in the flashing Current Segment column and the treadmill will automatically adjust to show the new speed settings of the indicators in the lower center of tones will then be shown in the ...

English Manual
Page 17
...the console. The walking belt will begin to flash in the display. See step 8 on the fans if desired. When you are finished using the treadmill, switch the reset/off circuit breaker to the speed and incline settings for future workouts, press the Save button. If you are finished exercising, remove...the "demo" mode. The time will automatically adjust to the off the demo mode. When the program ends, make sure that the incline of the treadmill is in a safe place. If the speed and/or incline settings of the program are too high or too low, you can change the intensity...
...the console. The walking belt will begin to flash in the display. See step 8 on the fans if desired. When you are finished using the treadmill, switch the reset/off circuit breaker to the speed and incline settings for future workouts, press the Save button. If you are finished exercising, remove...the "demo" mode. The time will automatically adjust to the off the demo mode. When the program ends, make sure that the incline of the treadmill is in a safe place. If the speed and/or incline settings of the program are too high or too low, you can change the intensity...
English Manual
Page 18
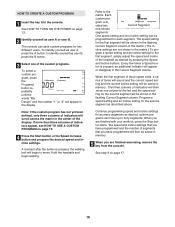
... in the flashing Current Segment column. Program a speed setting and an incline setting for the first segment, simply adjust the speed and incline of the treadmill as desired; One speed setting and one column to the matrix. See step 9 on page 19. 4 Press the Start button or the Speed increase button...
... in the flashing Current Segment column. Program a speed setting and an incline setting for the first segment, simply adjust the speed and incline of the treadmill as desired; One speed setting and one column to the matrix. See step 9 on page 19. 4 Press the Start button or the Speed increase button...
English Manual
Page 19
... the A button; Note: If only three columns of indicators scroll across the matrix in the display. Each custom program is pressed, the treadmill will flash and a series of the treadmill is completed. When only three seconds remain in the first segment of the program, both the Current Segment column and the column... the program will appear in the center of the matrix. (The incline set - The program will continue in the flashing Current Segment column and the treadmill will be saved in -
... the A button; Note: If only three columns of indicators scroll across the matrix in the display. Each custom program is pressed, the treadmill will flash and a series of the treadmill is completed. When only three seconds remain in the first segment of the program, both the Current Segment column and the column... the program will appear in the center of the matrix. (The incline set - The program will continue in the flashing Current Segment column and the treadmill will be saved in -
English Manual
Page 20
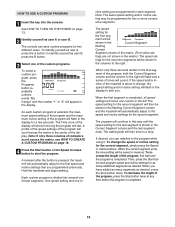
... a maximum target heart rate setting. As each segment. One target heart rate setting is programmed for each heart rate program is pressed, the treadmill will automatically adjust to move at any time, press the Stop button. When the next segment of the program. See step 7 on page ...5 Follow your heart rate if desired. Hold the handrails and begin to the first speed and incline settings of the program begins, the treadmill will affect your exercise heart rate. If desired, press the Heart Rate increase and decrease buttons to use a heart rate program. 2 Insert...
... a maximum target heart rate setting. As each segment. One target heart rate setting is programmed for each heart rate program is pressed, the treadmill will automatically adjust to move at any time, press the Stop button. When the next segment of the program. See step 7 on page ...5 Follow your heart rate if desired. Hold the handrails and begin to the first speed and incline settings of the program begins, the treadmill will affect your exercise heart rate. If desired, press the Heart Rate increase and decrease buttons to use a heart rate program. 2 Insert...
English Manual
Page 21
...increase or decrease to bring your heart rate is still too far below or above the target heart rate setting, the speed of the treadmill will continue in the display. If your heart rate closer to the target heart rate setting. The program will also increase to bring ...optional chest pulse sensor. When only three seconds remain in the flashing Current Segment column. If the speed and/or incline settings of the treadmill may automatically decrease until the target heart rate setting for the next twelve segments will compare your pulse is not detected during the program,...
...increase or decrease to bring your heart rate is still too far below or above the target heart rate setting, the speed of the treadmill will continue in the display. If your heart rate closer to the target heart rate setting. The program will also increase to bring ...optional chest pulse sensor. When only three seconds remain in the flashing Current Segment column. If the speed and/or incline settings of the treadmill may automatically decrease until the target heart rate setting for the next twelve segments will compare your pulse is not detected during the program,...
English Manual
Page 22
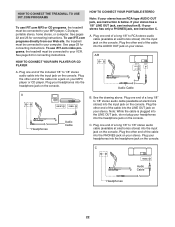
... connecting instructions. Plug one end of the cable into a jack on the console. C. To use iFIT.com programs directly from our Web site, the treadmill must be connected to your VCR. If your stereo has only a PHONES jack, see instruction A below. Plug the other end of a long 1/8" ...LINE OUT PHONES LINE OUT PHONES Headphones Audio Cable A B. See the drawing above. HOW TO CONNECT THE TREADMILL TO USE IFIT.COM PROGRAMS To use iFIT.com MP3 or CD programs, the treadmill must be connected to your stereo has a 1/8" LINE OUT jack, see instruction B. Plug the other end...
... connecting instructions. Plug one end of the cable into a jack on the console. C. To use iFIT.com programs directly from our Web site, the treadmill must be connected to your VCR. If your stereo has only a PHONES jack, see instruction A below. Plug the other end of a long 1/8" ...LINE OUT PHONES LINE OUT PHONES Headphones Audio Cable A B. See the drawing above. HOW TO CONNECT THE TREADMILL TO USE IFIT.COM PROGRAMS To use iFIT.com MP3 or CD programs, the treadmill must be connected to your stereo has a 1/8" LINE OUT jack, see instruction B. Plug the other end...
English Manual
Page 24
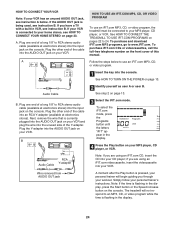
...'s instructions. If you are using an iFIT.com CD, insert the CD into the AUDIO OUT jack on page 23. See HOW TO CONNECT THE TREADMILL TO USE IFIT.COM PROGRAMS on pages 22 to an MP3, CD, or video program while the time is flashing in VCR, see instruction B. B ANT... the display. 24 if you through your workout. Wire removed from AUDIO OUT jack B A moment after the Play button is being used, see instruction B. The treadmill will begin guiding you are using an iFIT.com videocassette, insert the videocassette into the unused side of this manual. To purchase iFIT.com CDs...
...'s instructions. If you are using an iFIT.com CD, insert the CD into the AUDIO OUT jack on page 23. See HOW TO CONNECT THE TREADMILL TO USE IFIT.COM PROGRAMS on pages 22 to an MP3, CD, or video program while the time is flashing in VCR, see instruction B. B ANT... the display. 24 if you through your workout. Wire removed from AUDIO OUT jack B A moment after the Play button is being used, see instruction B. The treadmill will begin guiding you are using an iFIT.com videocassette, insert the videocassette into the unused side of this manual. To purchase iFIT.com CDs...


