
English Manual
Page 3
Before beginning any worn parts immediately. 14. Place the elliptical on a level surface, with pre-existing health problems. position when the elliptical is not in use of this manual. 4. The heart rate monitor is not working properly. The elliptical does not have a freewheel; Reduce your elliptical. When connecting the power cord (see page 16), plug the power cord into a grounded circuit. 10. To protect the elliptical and digital TV during lightning storms...
Before beginning any worn parts immediately. 14. Place the elliptical on a level surface, with pre-existing health problems. position when the elliptical is not in use of this manual. 4. The heart rate monitor is not working properly. The elliptical does not have a freewheel; Reduce your elliptical. When connecting the power cord (see page 16), plug the power cord into a grounded circuit. 10. To protect the elliptical and digital TV during lightning storms...
English Manual
Page 7
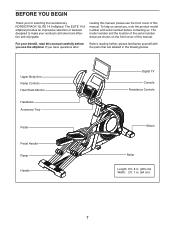
... this manual, please see the front cover of features designed to make your benefit, read this manual. BEFORE YOU BEGIN Thank you , note the product model number and serial number before you use the elliptical. Upper Body Arm Ramp Controls Heart Rate Monitor Handlebar Accessory Tray Pedal Pedal Handle Ramp Handle Digital TV Console Resistance Controls Wheel Roller Length: 6 ft. 8 in. (203 cm) Width: 2 ft. 1 in the drawing below. The ELITE 14.9 elliptical provides...
... this manual, please see the front cover of features designed to make your benefit, read this manual. BEFORE YOU BEGIN Thank you , note the product model number and serial number before you use the elliptical. Upper Body Arm Ramp Controls Heart Rate Monitor Handlebar Accessory Tray Pedal Pedal Handle Ramp Handle Digital TV Console Resistance Controls Wheel Roller Length: 6 ft. 8 in. (203 cm) Width: 2 ft. 1 in the drawing below. The ELITE 14.9 elliptical provides...
English Manual
Page 14
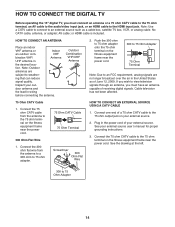
... fitness equipment frame near the power cord. 300 Ohm Flat Wire 1. door antenna and the lead-in the desired loca- Push the 300 ohm to an FCC requirement, analog signals are subject to 75 Ohm Adapter 14 Note: Use a CATV cable to connect to 75 ohm adapter. 75 Ohm CATV Cable ...TO CONNECT THE DIGITAL TV Before operating the 15" digital TV, you must connect an antenna or a 75 ohm CATV cable to the 75 ohm terminal, an AV cable to the audio/video input jack, or an HDMI cable to the 75 ohm terminal on your external source user's manual for proper grounding instructions....
... fitness equipment frame near the power cord. 300 Ohm Flat Wire 1. door antenna and the lead-in the desired loca- Push the 300 ohm to an FCC requirement, analog signals are subject to 75 Ohm Adapter 14 Note: Use a CATV cable to connect to 75 ohm adapter. 75 Ohm CATV Cable ...TO CONNECT THE DIGITAL TV Before operating the 15" digital TV, you must connect an antenna or a 75 ohm CATV cable to the 75 ohm terminal, an AV cable to the audio/video input jack, or an HDMI cable to the 75 ohm terminal on your external source user's manual for proper grounding instructions....

English Manual
Page 15
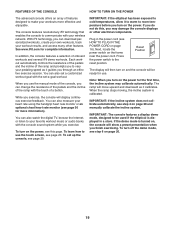
...plug any devices into the USB port on the tie block to the audio/video input jack on the tie block in the power cord of the 15" digital TV. 15 Connect the RCA AV Cable to secure the wires. Connect one of the HDMI Cable to your VCR, DVD player, or other device's user's manual for proper grounding instructions...included zip ties through the tie block and around the wires. To use the tie blocks, see step 4 at the right. Connect the other device's user's manual for proper grounding instructions. 3. First, remove the paper covering the adhesive on the 15" digital TV. 4. ...
...plug any devices into the USB port on the tie block to the audio/video input jack on the tie block in the power cord of the 15" digital TV. 15 Connect the RCA AV Cable to secure the wires. Connect one of the HDMI Cable to your VCR, DVD player, or other device's user's manual for proper grounding instructions...included zip ties through the tie block and around the wires. To use the tie blocks, see step 4 at the right. Connect the other device's user's manual for proper grounding instructions. 3. First, remove the paper covering the adhesive on the 15" digital TV. 4. ...

English Manual
Page 16
... electrician. Do not modify the plug; DANGER: Improper connection of the power cord increases the risk of least resistance for electric current to determine whether the outlet box cover is not available. 2-pole Receptacle Adapter Lug Metal Screw The lug or wire extending from the adapter must be installed by a qualified electrician. Make sure to adjust both pedals to a permanent ground such as...
... electrician. Do not modify the plug; DANGER: Improper connection of the power cord increases the risk of least resistance for electric current to determine whether the outlet box cover is not available. 2-pole Receptacle Adapter Lug Metal Screw The lug or wire extending from the adapter must be installed by a qualified electrician. Make sure to adjust both pedals to a permanent ground such as...
English Manual
Page 19
.... When the ramp stops moving, the incline system is turned on and the console will move upward and downward as it guides you turn on the power, see step 4 on page 26. 19 If the demo mode is calibrated. Reset Position The display will then turn off the demo mode, see HOW TO PLUG IN THE POWER CORD on the frame near the power cord. To set -a-goal workout. To turn on , the console will display continuous exercise feedback.
.... When the ramp stops moving, the incline system is turned on and the console will move upward and downward as it guides you turn on the power, see step 4 on page 26. 19 If the demo mode is calibrated. Reset Position The display will then turn off the demo mode, see HOW TO PLUG IN THE POWER CORD on the frame near the power cord. To set -a-goal workout. To turn on , the console will display continuous exercise feedback.

English Manual
Page 20
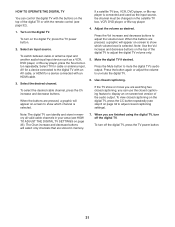
..., you have an activation code, select the code activation option. Press the home button to return to view the keyboard. To use an onboard workout, see page 28. To use the remote control, see page 24. HOW TO SET UP THE CONSOLE Before using the elliptical for firmware updates. 3. First, see page 33. To adjust the digital TV settings, see step 1 on page 26 and step 2 on the website...
..., you have an activation code, select the code activation option. Press the home button to return to view the keyboard. To use an onboard workout, see page 28. To use the remote control, see page 24. HOW TO SET UP THE CONSOLE Before using the elliptical for firmware updates. 3. First, see page 33. To adjust the digital TV settings, see step 1 on page 26 and step 2 on the website...
English Manual
Page 22
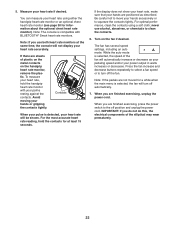
... handgrip heart rate monitor, remove the plastic. Press the fan increase and decrease buttons repeatedly to select a fan speed or to the off the fan. Note: If you do not do this, the electrical components of the fan will turn off position and unplug the power cord. Note: If the pedals are finished exercising, unplug the power cord. If there are finished exercising, press the power switch to turn...
... handgrip heart rate monitor, remove the plastic. Press the fan increase and decrease buttons repeatedly to select a fan speed or to the off the fan. Note: If you do not do this, the electrical components of the fan will turn off position and unplug the power cord. Note: If the pedals are finished exercising, unplug the power cord. If there are finished exercising, press the power switch to turn...

English Manual
Page 23
... workout. Follow your results using one target cadence (speed) are finished exercising, unplug the power cord. Note: The calorie goal is displayed in this way until the last segment ends. Measure your weight. See step 4 on the console. Begin pedaling or press any button on the console to pedal at a speed that you . See HOW TO TURN ON THE POWER on the console. Your actual pedaling speed may be able to start the workout...
... workout. Follow your results using one target cadence (speed) are finished exercising, unplug the power cord. Note: The calorie goal is displayed in this way until the last segment ends. Measure your weight. See step 4 on the console. Begin pedaling or press any button on the console to pedal at a speed that you . See HOW TO TURN ON THE POWER on the console. Your actual pedaling speed may be able to start the workout...

English Manual
Page 24
... TO TURN ON THE POWER on the screen to enter your goal and to pedal at a speed that you will show the duration and distance of the workout, and the approximate number of the options on page 22. 7. Start the workout. Touch the Start button to ensure that you can manually override the setting by pressing the Resistance buttons or the Ramp buttons. As you exercise, keep your heart rate...
... TO TURN ON THE POWER on the screen to enter your goal and to pedal at a speed that you will show the duration and distance of the workout, and the approximate number of the options on page 22. 7. Start the workout. Touch the Start button to ensure that you can manually override the setting by pressing the Resistance buttons or the Ramp buttons. As you exercise, keep your heart rate...

English Manual
Page 25
... to access demo workouts through your pedaling cadence. Touch the Cancel button to your schedule, touch the Map, Train, Video, or Lose Wt. Touch the name of the screen. See step 6 on page 21. HOW TO USE AN IFIT WORKOUT Note: To use a set-a-goal workout, touch the Set A Goal button (see page 24). Log in your iFit account. To use an iFit workout, you are finished exercising, unplug the power cord. Note...
... to access demo workouts through your pedaling cadence. Touch the Cancel button to your schedule, touch the Map, Train, Video, or Lose Wt. Touch the name of the screen. See step 6 on page 21. HOW TO USE AN IFIT WORKOUT Note: To use a set-a-goal workout, touch the Set A Goal button (see page 24). Log in your iFit account. To use an iFit workout, you are finished exercising, unplug the power cord. Note...

English Manual
Page 26
... private owners of the elliptical only. To turn off the display demo mode. To disable the passcode, touch the Disable checkbox. 26 Note: It may be used if the elliptical is not in a store. Enable this passcode. Then, touch the back button on the screen. 8. IMPORTANT: To access the settings main menu when the gears button is recommended for automatic console updates, see steps...
... private owners of the elliptical only. To turn off the display demo mode. To disable the passcode, touch the Disable checkbox. 26 Note: It may be used if the elliptical is not in a store. Enable this passcode. Then, touch the back button on the screen. 8. IMPORTANT: To access the settings main menu when the gears button is recommended for automatic console updates, see steps...
English Manual
Page 28
... console or touch the back button on the screen. To calibrate the screen, touch the Calibrate Screen button. After several seconds, and then press the power switch into the off the power while the firmware is complete, the elliptical will be ready for firmware updates using your exercise experience. 7. Touch the Machine Info button to the maintenance mode. The update will calibrate the incline system. IMPORTANT: To avoid damaging the elliptical, do not turn...
... console or touch the back button on the screen. To calibrate the screen, touch the Calibrate Screen button. After several seconds, and then press the power switch into the off the power while the firmware is complete, the elliptical will be ready for firmware updates using your exercise experience. 7. Touch the Machine Info button to the maintenance mode. The update will calibrate the incline system. IMPORTANT: To avoid damaging the elliptical, do not turn...

English Manual
Page 30
... Forward buttons on the screen. Then, touch the URL bar, use the keyboard to reach your personal fitness goals. The optional chest heart rate monitor will not function. To purchase a chest heart rate monitor, please see the front cover of the screen. Next, press the play music or audio books through the console sound system while you exercise, plug a 3.5 mm male to maintain the proper heart rate during your workouts. Note...
... Forward buttons on the screen. Then, touch the URL bar, use the keyboard to reach your personal fitness goals. The optional chest heart rate monitor will not function. To purchase a chest heart rate monitor, please see the front cover of the screen. Next, press the play music or audio books through the console sound system while you exercise, plug a 3.5 mm male to maintain the proper heart rate during your workouts. Note...
English Manual
Page 31
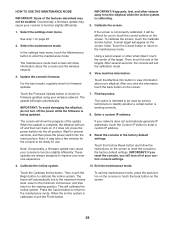
...audio output. If a satellite TV box, VCR, DVD player, or Blu-ray player is connected and used as the input source, the channel must be changed on the digital TV, press the TV power button. 2. If the TV show or movie you are stored in your area (see HOW TO ADJUST THE DIGITAL TV SETTINGS...digital TV with an AV cable, or HDMI for a device connected with the remote control (see step 6 on -screen to mute the digital TV's audio output. Press the Vol increase and decrease buttons to un-mute the digital TV. 6. Press the button again or adjust the volume to adjust the volume level. To ...
...audio output. If a satellite TV box, VCR, DVD player, or Blu-ray player is connected and used as the input source, the channel must be changed on the digital TV, press the TV power button. 2. If the TV show or movie you are stored in your area (see HOW TO ADJUST THE DIGITAL TV SETTINGS...digital TV with an AV cable, or HDMI for a device connected with the remote control (see step 6 on -screen to mute the digital TV's audio output. Press the Vol increase and decrease buttons to un-mute the digital TV. 6. Press the button again or adjust the volume to adjust the volume level. To ...

English Manual
Page 34
... default password is a 4-digit PIN. The Setup menu allows you have finished adjusting the settings, press the Exit button. 34 Select Clock to adjust the digital TV clock's time zone, auto setting, time setting, day of your password, enter the following master password to block or allow various settings on the console TV control for 10 minutes. Select No Signal Power Off to change the Lock Parental Code password...
... default password is a 4-digit PIN. The Setup menu allows you have finished adjusting the settings, press the Exit button. 34 Select Clock to adjust the digital TV clock's time zone, auto setting, time setting, day of your password, enter the following master password to block or allow various settings on the console TV control for 10 minutes. Select No Signal Power Off to change the Lock Parental Code password...
English Manual
Page 36
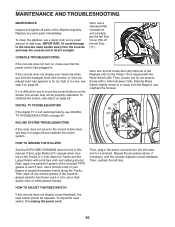
... Reed Switch (38). If it is not working properly, see step 4 on the Pulley (19) is fully plugged in the power cord and turn the left Crank Arm (20) until the console displays correct feedback. DIGITAL TV TROUBLESHOOTING If the digital TV is difficult for a moment. Next, apply one of the Magnets (43) on page 28 and calibrate the incline system. 19 20 HOW TO GREASE THE ROLLERS...
... Reed Switch (38). If it is not working properly, see step 4 on the Pulley (19) is fully plugged in the power cord and turn the left Crank Arm (20) until the console displays correct feedback. DIGITAL TV TROUBLESHOOTING If the digital TV is difficult for a moment. Next, apply one of the Magnets (43) on page 28 and calibrate the incline system. 19 20 HOW TO GREASE THE ROLLERS...

English Manual
Page 37
...Tighten the Locknut until the Drive Belt (113) is adjusted to the highest level, the drive belt may cause harmful interference to any other antenna or transmitter. These limits are pedaling, even while the resistance is tight. 113 56 102 73 74 75 Then, remove the four M4 x 16mm Screws... (73, 74) and locate the M8 Locknut (102). HOW TO ADJUST THE DRIVE BELT If the pedals slip while you have properly adjusted the drive belt, reattach the rear shield and press the shield cover onto the rear shield. To adjust the drive belt, first unplug the power cord. When you are designed to...
...Tighten the Locknut until the Drive Belt (113) is adjusted to the highest level, the drive belt may cause harmful interference to any other antenna or transmitter. These limits are pedaling, even while the resistance is tight. 113 56 102 73 74 75 Then, remove the four M4 x 16mm Screws... (73, 74) and locate the M8 Locknut (102). HOW TO ADJUST THE DRIVE BELT If the pedals slip while you have properly adjusted the drive belt, reattach the rear shield and press the shield cover onto the rear shield. To adjust the drive belt, first unplug the power cord. When you are designed to...

English Manual
Page 40
... 2 129 4 130 4 131 2 132 8 133 4 Idler Screw M8 Locknut Pedal Pin M4 x 16mm Screw Lift Frame Small Roller Standoff Pulse Wire Console Cover Main Wire Harness Right Pedal Handle Power Cord Drive Belt M17 Washer M8 x 30mm Screw M12 I-bolt M10 x 54mm Bolt M10 Nut M8 Washer M8 Shoulder Screw Right Upper Saddle Bracket Stop Plate Control Board Bracket M4 x 25mm Screw Right Inner Leg Cover Right Outer Leg Cover Bumper M8 Flat Washer M10 Large...
... 2 129 4 130 4 131 2 132 8 133 4 Idler Screw M8 Locknut Pedal Pin M4 x 16mm Screw Lift Frame Small Roller Standoff Pulse Wire Console Cover Main Wire Harness Right Pedal Handle Power Cord Drive Belt M17 Washer M8 x 30mm Screw M12 I-bolt M10 x 54mm Bolt M10 Nut M8 Washer M8 Shoulder Screw Right Upper Saddle Bracket Stop Plate Control Board Bracket M4 x 25mm Screw Right Inner Leg Cover Right Outer Leg Cover Bumper M8 Flat Washer M10 Large...

English Manual
Page 44
... the product; ICON Health & Fitness, Inc. (ICON) warrants this manual) LIMITED WARRANTY IMPORTANT: To protect your fitness equipment with respect to the customer. the customer may not apply to any and all instructions in this manual. To help us : • the model number and serial number of the product (see the front cover of this manual) • the name of the product (see the PART LIST and the...
... the product; ICON Health & Fitness, Inc. (ICON) warrants this manual) LIMITED WARRANTY IMPORTANT: To protect your fitness equipment with respect to the customer. the customer may not apply to any and all instructions in this manual. To help us : • the model number and serial number of the product (see the front cover of this manual) • the name of the product (see the PART LIST and the...


