Instruction Manual
Page 2
TABLE OF CONTENTS Before Using the Unit Introduction 3 Moderate Step Function 4 Important Safety Information 5 Know Your Unit 7 Stride Length Measurement 8 Settings 9 Operating Instructions Attaching the Pedometer 10 Counting Steps 11 Changing the Display 12 About the Display 14 Using the Memory Function 15 Battery Replacement 16 Using the System Reset Function 18 Care and Maintenance Care and Maintenance 19 Troubleshooting Tips 20 Specifications 21 FCC Statement 22 Warranty 23 2
TABLE OF CONTENTS Before Using the Unit Introduction 3 Moderate Step Function 4 Important Safety Information 5 Know Your Unit 7 Stride Length Measurement 8 Settings 9 Operating Instructions Attaching the Pedometer 10 Counting Steps 11 Changing the Display 12 About the Display 14 Using the Memory Function 15 Battery Replacement 16 Using the System Reset Function 18 Care and Maintenance Care and Maintenance 19 Troubleshooting Tips 20 Specifications 21 FCC Statement 22 Warranty 23 2
Instruction Manual
Page 3
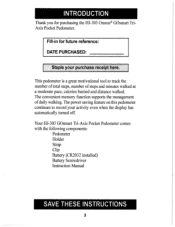
...: DATE PURCHASED:, Staple your activity even when the display has automatically turned off. Fill-in for purchasing the HJ-303 Omron® GOsmart TriAxis Pocket Pedometer. Your HJ-303 GOsmart Tri-Axis Pocket Pedometer comes with the following components: Pedometer Holder Strap Clip Battery (CR2032 installed) Battery Screwdriver Instruction Manual SAVE THESE INSTRUCTIONS 3 This pedometer is a great motivational tool to record your purchase receipt here.
...: DATE PURCHASED:, Staple your activity even when the display has automatically turned off. Fill-in for purchasing the HJ-303 Omron® GOsmart TriAxis Pocket Pedometer. Your HJ-303 GOsmart Tri-Axis Pocket Pedometer comes with the following components: Pedometer Holder Strap Clip Battery (CR2032 installed) Battery Screwdriver Instruction Manual SAVE THESE INSTRUCTIONS 3 This pedometer is a great motivational tool to record your purchase receipt here.
Instruction Manual
Page 5
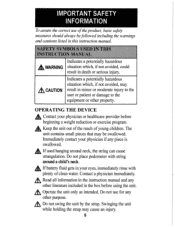
...instruction manual. att , Operate the unit only as intended. Do not swing the unit by the strap. Swinging the unit while holding the strap may be swallowed. Do not place pedometer with plenty of young children. If used hanging around a child's neck. Keep the unit out of the reach of clean water. LL If battery... fluid gets in minor or moderate injury to the user or patient or damage to the ...
...instruction manual. att , Operate the unit only as intended. Do not swing the unit by the strap. Swinging the unit while holding the strap may be swallowed. Do not place pedometer with plenty of young children. If used hanging around a child's neck. Keep the unit out of the reach of clean water. LL If battery... fluid gets in minor or moderate injury to the user or patient or damage to the ...
Instruction Manual
Page 6
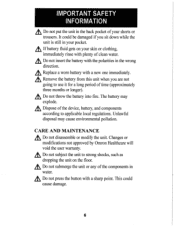
...6 A Replace a worn battery with plenty of your pocket. AS, Dispose of time (approximately three months or longer). CARE AND MAINTENANCE Do not disassemble or modify the unit. Changes or modifications not approved by Omron Healthcare will void the user warranty. it for a long period of the device, battery, and components...the unit on your skin or clothing, immediately rinse with a new one immediately. ZIS, Do not insert the battery with a sharp point. A t Do not subject the unit to use it Do not submerge the unit or any of the components in your shorts or trousers. A t If...
...6 A Replace a worn battery with plenty of your pocket. AS, Dispose of time (approximately three months or longer). CARE AND MAINTENANCE Do not disassemble or modify the unit. Changes or modifications not approved by Omron Healthcare will void the user warranty. it for a long period of the device, battery, and components...the unit on your skin or clothing, immediately rinse with a new one immediately. ZIS, Do not insert the battery with a sharp point. A t Do not subject the unit to use it Do not submerge the unit or any of the components in your shorts or trousers. A t If...
Instruction Manual
Page 7
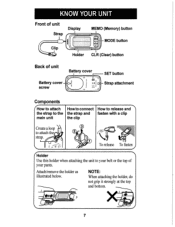
... pants. MODE button CLA CLR (Clear) button Back of unit Strap 1 Clip Display Holder MEMO (Memory) button ',s7ah 771-- KNOW YOUR UNIT Front of unit Battery cover SET button Battery cover tio42: screw CA I F4 - jai 0 -4 0 To release To fasten ( Holder 4'6\ Use this holder when attaching the unit to attach the strap.
... pants. MODE button CLA CLR (Clear) button Back of unit Strap 1 Clip Display Holder MEMO (Memory) button ',s7ah 771-- KNOW YOUR UNIT Front of unit Battery cover SET button Battery cover tio42: screw CA I F4 - jai 0 -4 0 To release To fasten ( Holder 4'6\ Use this holder when attaching the unit to attach the strap.
Instruction Manual
Page 8
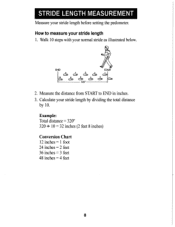
Example: Total distance = 320" 320 10 = 32 inches (2 feet 8 inches) Conversion Chart 12 inches =1 foot 24 inches = 2 feet 36 inches = 3 feet 48 inches = 4 feet 8 END 10 9 7 CD c: 8 CP 5 c 6 C:0 320" 3 C3) 4 Cp 2 cx) START 1 2. Measure the distance from START to measure your stride length before setting the pedometer. Calculate your normal stride as illustrated below. Walk 10 steps with your stride length by dividing the total distance by 10. STRIDE LENGTH MEASUREMENT Measure your stride length 1. How to END in inches. 3.
Example: Total distance = 320" 320 10 = 32 inches (2 feet 8 inches) Conversion Chart 12 inches =1 foot 24 inches = 2 feet 36 inches = 3 feet 48 inches = 4 feet 8 END 10 9 7 CD c: 8 CP 5 c 6 C:0 320" 3 C3) 4 Cp 2 cx) START 1 2. Measure the distance from START to measure your stride length before setting the pedometer. Calculate your normal stride as illustrated below. Walk 10 steps with your stride length by dividing the total distance by 10. STRIDE LENGTH MEASUREMENT Measure your stride length 1. How to END in inches. 3.
Instruction Manual
Page 9
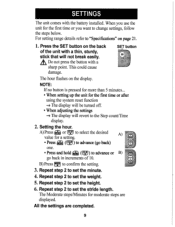
...to change settings, follow the steps below. Repeat step 2 to confirm the setting. 3. All the settings are displayed. I& Do not press the button with the battery installed. Setting the hour. The unit comes with a sharp point. DE B) Press pi to set the height. 6. Repeat step 2 to "Specifications" on ...completed. 9 For setting range details refer to set the weight. 5. Press the SET button on the display. SET button The hour flashes on the back of 10. The Moderate steps/Minutes for the first time or after using the system reset function The display will...
...to change settings, follow the steps below. Repeat step 2 to confirm the setting. 3. All the settings are displayed. I& Do not press the button with the battery installed. Setting the hour. The unit comes with a sharp point. DE B) Press pi to set the height. 6. Repeat step 2 to "Specifications" on ...completed. 9 For setting range details refer to set the weight. 5. Press the SET button on the display. SET button The hour flashes on the back of 10. The Moderate steps/Minutes for the first time or after using the system reset function The display will...
Instruction Manual
Page 10
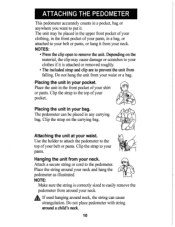
...unit in your shirt or pants. Attaching the unit at your neck and hang the pedometer as illustrated. Attach a secure string or cord to put it. Depending on the ...your pants, in any carrying bag. Use the holder to attach the pedometer to the top of your pants. Do not place pedometer with string around neck, the string can...pedometer from falling. Clip the strap to the top of your waist or a bag. Clip the strap on the material, the clip may be placed in a bag, or attached to your belt or pants, or hang it is correctly sized to your belt or pants. A t If used...
...unit in your shirt or pants. Attaching the unit at your neck and hang the pedometer as illustrated. Attach a secure string or cord to put it. Depending on the ...your pants, in any carrying bag. Use the holder to attach the pedometer to the top of your pants. Do not place pedometer with string around neck, the string can...pedometer from falling. Clip the strap to the top of your waist or a bag. Clip the strap on the material, the clip may be placed in a bag, or attached to your belt or pants, or hang it is correctly sized to your belt or pants. A t If used...
Instruction Manual
Page 11
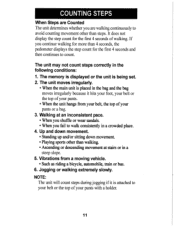
The unit moves irregularly. • When the main unit is placed in the bag and the bag moves irregularly because it is being set. 2. Vibrations from your belt, the top of your pants or a bag. 3. NOTE: The unit will count steps during jogging if it hits your foot,...• Playing sports other than steps. The unit may not count steps correctly in a crowded place. 4. If you continue walking for more than 4 seconds, the pedometer displays the step count for the first 4 seconds of your belt or the top of walking. Jogging or walking extremely slowly. Walking at stairs or...
The unit moves irregularly. • When the main unit is placed in the bag and the bag moves irregularly because it is being set. 2. Vibrations from your belt, the top of your pants or a bag. 3. NOTE: The unit will count steps during jogging if it hits your foot,...• Playing sports other than steps. The unit may not count steps correctly in a crowded place. 4. If you continue walking for more than 4 seconds, the pedometer displays the step count for the first 4 seconds of your belt or the top of walking. Jogging or walking extremely slowly. Walking at stairs or...
Instruction Manual
Page 12
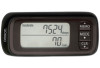
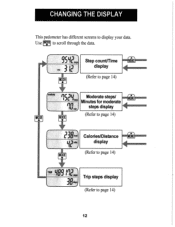
CHANGING THE DISPLAY This pedometer has different screens to page 14) 12 Use MDEJ to scroll through the data. 4542 PM MODE A Step count/Time MIZX MEMO display (Refer to page 14) ianodente 524ste:s Moderate steps/ MEMO nn Minutes for moderate steps display IU mitv MODE MODE (Refer to page 14) 30 Calories/Distance MEMO display MODE (Refer to page 14) in TRIP 1109 is Trip steps display (Refer to display your data.
CHANGING THE DISPLAY This pedometer has different screens to page 14) 12 Use MDEJ to scroll through the data. 4542 PM MODE A Step count/Time MIZX MEMO display (Refer to page 14) ianodente 524ste:s Moderate steps/ MEMO nn Minutes for moderate steps display IU mitv MODE MODE (Refer to page 14) 30 Calories/Distance MEMO display MODE (Refer to page 14) in TRIP 1109 is Trip steps display (Refer to display your data.
Instruction Manual
Page 13
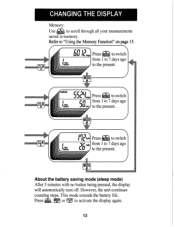
... switch CLR from 1 to 7 days ago to the present. )n" MOoDE About the battery saving mode (sleep mode) After 5 minutes with no button being pressed, the display will automatically turn off. However, the unit continues counting steps. Refer to "Using the Memory Function" on page 15. !bey CLR Press I EAM0 to switch from... I da from 1 to 7 days ago to the present. \ N ,-.,- Press fflt MODE or to scroll through all your measurements saved in memory. This mode extends the battery life. CHANGING THE DISPLAY 6,Q Memory: Use to activate the display again. 13
... switch CLR from 1 to 7 days ago to the present. )n" MOoDE About the battery saving mode (sleep mode) After 5 minutes with no button being pressed, the display will automatically turn off. However, the unit continues counting steps. Refer to "Using the Memory Function" on page 15. !bey CLR Press I EAM0 to switch from... I da from 1 to 7 days ago to the present. \ N ,-.,- Press fflt MODE or to scroll through all your measurements saved in memory. This mode extends the battery life. CHANGING THE DISPLAY 6,Q Memory: Use to activate the display again. 13
Instruction Manual
Page 15
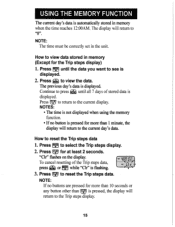
... to the current display. Press OE to reset the Trip steps data 1. NOTE: If no button is displayed. 2. USING THE MEMORY FUNCTION The current day's data ...time reaches 12:00AM. NOTES: • The time is not displayed when using the memory function. • If no buttons are pressed for more than ... minute, the display will return to view data stored in the unit. How to reset the Trip steps data. LI 9 !le, • (RIP LIP 3. Continue to..., the display will return to the Trip steps display. 15 To cancel resetting of stored data is flashing. Press Flo until all 7 days of the...
... to the current display. Press OE to reset the Trip steps data 1. NOTE: If no button is displayed. 2. USING THE MEMORY FUNCTION The current day's data ...time reaches 12:00AM. NOTES: • The time is not displayed when using the memory function. • If no buttons are pressed for more than ... minute, the display will return to view data stored in the unit. How to reset the Trip steps data. LI 9 !le, • (RIP LIP 3. Continue to..., the display will return to the Trip steps display. 15 To cancel resetting of stored data is flashing. Press Flo until all 7 days of the...
Instruction Manual
Page 16
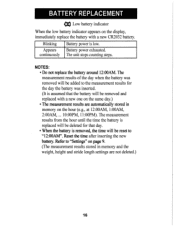
...battery will be removed and replaced with a new CR2032 battery. Reset the time after inserting the new battery. continuously The unit stops counting steps. NOTES: • Do not replace the battery around 12:OOAM. Appears Battery power exhausted. Refer to the measurement results for the day the battery was removed will be added to "Settings... and the weight, height and stride length settings are not deleted.) 16 BATTERY REPLACEMENT CIO Low battery indicator When the low battery indicator appears on the display, immediately replace the battery with a new one on the hour (e.g.,...
...battery will be removed and replaced with a new CR2032 battery. Reset the time after inserting the new battery. continuously The unit stops counting steps. NOTES: • Do not replace the battery around 12:OOAM. Appears Battery power exhausted. Refer to the measurement results for the day the battery was removed will be added to "Settings... and the weight, height and stride length settings are not deleted.) 16 BATTERY REPLACEMENT CIO Low battery indicator When the low battery indicator appears on the display, immediately replace the battery with a new one on the hour (e.g.,...
Instruction Manual
Page 17
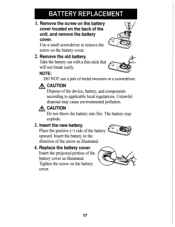
... screw on the battery cover. 2. Remove the screw on the battery cover located on the back of the battery upward. Use a small screwdriver to applicable local regulations. CAUTION Do not throw the battery into fire. The battery may cause environmental pollution. Insert the new battery. Insert the projected portion of the arrow as illustrated. BATTERY REPLACEMENT 1. Place the positive...
... screw on the battery cover. 2. Remove the screw on the battery cover located on the back of the battery upward. Use a small screwdriver to applicable local regulations. CAUTION Do not throw the battery into fire. The battery may cause environmental pollution. Insert the new battery. Insert the projected portion of the arrow as illustrated. BATTERY REPLACEMENT 1. Place the positive...
Instruction Manual
Page 18
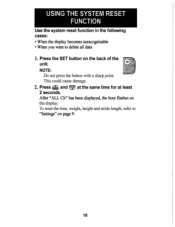
Press the SET button on the display. USING THE SYSTEM RESET FUNCTION Use the system reset function in the following cases: • When the display becomes unrecognizable • When you want to "Settings" on page 9. 18 After "ALL Clr" has been displayed, the hour flashes on the back of the unit. Press and kild at the same time for at least 2 seconds. To reset the time, weight, height and stride length, refer to delete all data 1. This could cause damage. 2. NOTE: Do not press the button with a sharp point.
Press the SET button on the display. USING THE SYSTEM RESET FUNCTION Use the system reset function in the following cases: • When the display becomes unrecognizable • When you want to "Settings" on page 9. 18 After "ALL Clr" has been displayed, the hour flashes on the back of the unit. Press and kild at the same time for at least 2 seconds. To reset the time, weight, height and stride length, refer to delete all data 1. This could cause damage. 2. NOTE: Do not press the button with a sharp point.
Instruction Manual
Page 19
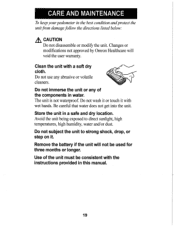
...Omron Healthcare will not be consistent with the instructions provided in the best condition andprotect the unitfrom damagefollow the directions listed below: CAUTION Do not disassemble or modify the unit. Store the unit in water. Clean the unit with wet hands. Do not immerse the unit or any abrasive or volatile cleaners. Use... of the components in a safe and dry location. CARE AND MAINTENANCE To keepyour pedometer in this manual. 19 Do not use any of the unit must be used for three months or longer. Do not wash it...
...Omron Healthcare will not be consistent with the instructions provided in the best condition andprotect the unitfrom damagefollow the directions listed below: CAUTION Do not disassemble or modify the unit. Store the unit in water. Clean the unit with wet hands. Do not immerse the unit or any abrasive or volatile cleaners. Use... of the components in a safe and dry location. CARE AND MAINTENANCE To keepyour pedometer in this manual. 19 Do not use any of the unit must be used for three months or longer. Do not wash it...
Instruction Manual
Page 20
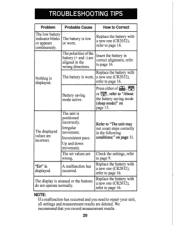
...: If a malfunction has occurred and you record measurement results. 20 TROUBLESHOOTING TIPS Problem Probable Cause How to repair your unit, all settings and measurement results are deleted. "Err" is displayed. We recommend that you need to Correct The low battery indicator blinks The battery is worn. Replace the battery with a new one (CR2032), refer to page 16. Nothing...
...: If a malfunction has occurred and you record measurement results. 20 TROUBLESHOOTING TIPS Problem Probable Cause How to repair your unit, all settings and measurement results are deleted. "Err" is displayed. We recommend that you need to Correct The low battery indicator blinks The battery is worn. Replace the battery with a new one (CR2032), refer to page 16. Nothing...
Instruction Manual
Page 21
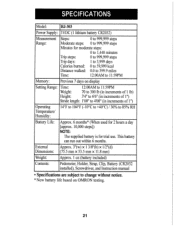
... oz (battery included) Contents: Pedometer, Holder, Strap, Clip, Battery (CR2032 installed), Screwdriver, and Instruction manual • Specifications are subject to change without notice. * New battery life based on display Setting Range: ...Battery Life: Approx. 6 months* (When used for 2 hours a day [approx. 10,000 steps]) NOTE: The supplied battery is for moderate steps: 0 to 1,440 minutes Trip steps: 0 to 999,999 steps Trip days: 1 to 3,999 days Calories burned: 0 to 59,999 kcal Distance walked: 0.0 to 999,999 steps Minutes for trial use. SPECIFICATIONS , Model: HJ-303...
... oz (battery included) Contents: Pedometer, Holder, Strap, Clip, Battery (CR2032 installed), Screwdriver, and Instruction manual • Specifications are subject to change without notice. * New battery life based on display Setting Range: ...Battery Life: Approx. 6 months* (When used for 2 hours a day [approx. 10,000 steps]) NOTE: The supplied battery is for moderate steps: 0 to 1,440 minutes Trip steps: 0 to 999,999 steps Trip days: 1 to 3,999 days Calories burned: 0 to 59,999 kcal Distance walked: 0.0 to 999,999 steps Minutes for trial use. SPECIFICATIONS , Model: HJ-303...
Instruction Manual
Page 22
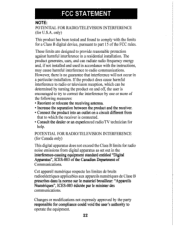
The product generates, uses, and can be determined by turning the product on a circuit different from digital apparatus as set out in a residential installation. Changes or modifications not expressly approved by one or more of the following measures: • Reorient or relocate the ...8226; Connect the product into an outlet on and off, the user is connected. • Consult the dealer or an experienced radio/TV technician for compliance could void the user's authority to comply with the instructions, may cause harmful interference to correct the interference by the party...
The product generates, uses, and can be determined by turning the product on a circuit different from digital apparatus as set out in a residential installation. Changes or modifications not expressly approved by one or more of the following measures: • Reorient or relocate the ...8226; Connect the product into an outlet on and off, the user is connected. • Consult the dealer or an experienced radio/TV technician for compliance could void the user's authority to comply with the instructions, may cause harmful interference to correct the interference by the party...
Instruction Manual
Page 23
...specific problem. The above warranties extend only to state. Repair or replacement is our only responsibility and your name, address, phone number, and description of purchase, when used ...repair or replace without charge any pedometer covered by calling 1-800-634-4350 for warranty service is available on how long an implied warranty lasts, so the above exclusions may not apply to you . To obtain warranty service contact Omron Healthcare's Customer Service by the above warranties. WARRANTY Limited Warranty Your HJ-303, Omron GOsmart Tri-Axis Pocket Pedometer, excluding the battery...
...specific problem. The above warranties extend only to state. Repair or replacement is our only responsibility and your name, address, phone number, and description of purchase, when used ...repair or replace without charge any pedometer covered by calling 1-800-634-4350 for warranty service is available on how long an implied warranty lasts, so the above exclusions may not apply to you . To obtain warranty service contact Omron Healthcare's Customer Service by the above warranties. WARRANTY Limited Warranty Your HJ-303, Omron GOsmart Tri-Axis Pocket Pedometer, excluding the battery...


