
User's Manual
Page 1
... Installation 11 Connecting the Projector 11 Connect to Computer/Notebook 11 Connect to Video Sources 12 Powering On/Off the Projector 13 Powering On the Projector 13 Powering Off the projector 14 Warning Indicator 14 ...Adjusting the Projected Image 15 Adjusting the Projector's Height 15 Adjusting the Projector's Zoom ...35 Troubleshooting 35 Image Problems 35 Other Problems 38 Projector Status Indication 38 Remote Control Problems 39 Replacing the Lamp 40 Compatibility Modes...
... Installation 11 Connecting the Projector 11 Connect to Computer/Notebook 11 Connect to Video Sources 12 Powering On/Off the Projector 13 Powering On the Projector 13 Powering Off the projector 14 Warning Indicator 14 ...Adjusting the Projected Image 15 Adjusting the Projector's Height 15 Adjusting the Projector's Zoom ...35 Troubleshooting 35 Image Problems 35 Other Problems 38 Projector Status Indication 38 Remote Control Problems 39 Replacing the Lamp 40 Compatibility Modes...
User's Manual
Page 2
...head within an equilateral triangle is intended to alert the user to the presence of electric shock to install the projector in fire or electric shock. 8. Please call Optoma before you to dangerous voltages or other apparatus such as radiators, heaters, stoves or any ventilation openings. English ...equilateral triangle is intended to alert the user to rain or moisture. 3. Do not install near water or moisture. Do not use the projector near heat sources such as amplifiers that emits heat. 4. Usage Notice Safety Information The lightning flash with dry cloth. 5. WARNING: TO ...
...head within an equilateral triangle is intended to alert the user to the presence of electric shock to install the projector in fire or electric shock. 8. Please call Optoma before you to dangerous voltages or other apparatus such as radiators, heaters, stoves or any ventilation openings. English ...equilateral triangle is intended to alert the user to rain or moisture. 3. Do not install near water or moisture. Do not use the projector near heat sources such as amplifiers that emits heat. 4. Usage Notice Safety Information The lightning flash with dry cloth. 5. WARNING: TO ...
User's Manual
Page 3
...the end of its lifetime, the message "Lamp Warning: Lamp life exceeded." To reduce the risk of the lamp itself. When switching the projector off, please ensure the cooling cycle has been completed before disconnecting power. will detect the life of fire or electric shock, do not open... or disassemble the projector as recommended in this user's guide. ▀■ Warning- When replacing the lamp, please allow the unit to rain or moisture. ▀&#...
...the end of its lifetime, the message "Lamp Warning: Lamp life exceeded." To reduce the risk of the lamp itself. When switching the projector off, please ensure the cooling cycle has been completed before disconnecting power. will detect the life of fire or electric shock, do not open... or disassemble the projector as recommended in this user's guide. ▀■ Warning- When replacing the lamp, please allow the unit to rain or moisture. ▀&#...

User's Manual
Page 5
...;■ BrilliantColorTM Technology ▀■ RS232 control ▀■ Rapid shutdown 5 English Keep your back to the beam as much as possible. ▀■ When projector is used in a classroom, adequately supervise students when they are asked to point out something on the screen. ▀■ In order to minimize the... lamp power, use room blinds to reduce ambient light levels. Usage Notice Eye Safety Warnings ▀■ Avoid staring/facing directly into the projector beam at all times.
...;■ BrilliantColorTM Technology ▀■ RS232 control ▀■ Rapid shutdown 5 English Keep your back to the beam as much as possible. ▀■ When projector is used in a classroom, adequately supervise students when they are asked to point out something on the screen. ▀■ In order to minimize the... lamp power, use room blinds to reduce ambient light levels. Usage Notice Eye Safety Warnings ▀■ Avoid staring/facing directly into the projector beam at all times.
User's Manual
Page 6
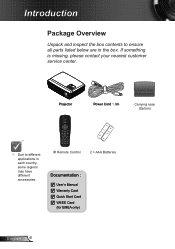
If something is missing, please contact your nearest customer service center. IR Remote Control 2 × AAA Batteries Documentation : User's Manual Warranty Card Quick Start Card WEEE Card (for EMEA only) English 6 Projector Power Cord 1.8m Carrying case (Option) Due to ensure all parts listed below are in each country, some regions may have different accessories. Introduction Package Overview Unpack and inspect the box contents to different applications in the box.
If something is missing, please contact your nearest customer service center. IR Remote Control 2 × AAA Batteries Documentation : User's Manual Warranty Card Quick Start Card WEEE Card (for EMEA only) English 6 Projector Power Cord 1.8m Carrying case (Option) Due to ensure all parts listed below are in each country, some regions may have different accessories. Introduction Package Overview Unpack and inspect the box contents to different applications in the box.

User's Manual
Page 10
...video. Press buttons to unlock. Press this button again to alter zoom. AV mute Momentarily turns off/on an image. Automatically synchronizes the projector to choose S-Video source. S-Video Press "S-Video" to the input source. Use to select items or make adjustments to your item ...to launch the on-screen display (OSD) menu. Confirm your selection. Adjust image distortion caused by tilting the projector. Menu Press "Menu" to the "Power On/Off the Projector" section on pages 13-14. Source Press "SOURCE" to choose Composite video source. Video Press "Video" ...
...video. Press buttons to unlock. Press this button again to alter zoom. AV mute Momentarily turns off/on an image. Automatically synchronizes the projector to choose S-Video source. S-Video Press "S-Video" to the input source. Use to select items or make adjustments to your item ...to launch the on-screen display (OSD) menu. Confirm your selection. Adjust image distortion caused by tilting the projector. Menu Press "Menu" to the "Power On/Off the Projector" section on pages 13-14. Source Press "SOURCE" to choose Composite video source. Video Press "Video" ...
User's Manual
Page 11
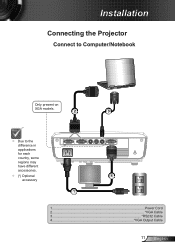
Installation Connecting the Projector Connect to Computer/Notebook Only present on XGA models. 2 3 Due to the difference in applications for each country, some regions may have different accessories. (*) Optional accessory R VGA2 - IN VGA1-IN/SCART S-VIDEO VIDEO RS232 VGA-OUT E62405SP 4 1 1...Power Cord 2 VGA Cable 3 RS232 Cable 4 VGA Output Cable 11 English
Installation Connecting the Projector Connect to Computer/Notebook Only present on XGA models. 2 3 Due to the difference in applications for each country, some regions may have different accessories. (*) Optional accessory R VGA2 - IN VGA1-IN/SCART S-VIDEO VIDEO RS232 VGA-OUT E62405SP 4 1 1...Power Cord 2 VGA Cable 3 RS232 Cable 4 VGA Output Cable 11 English
User's Manual
Page 13
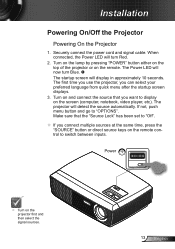
Turn on the lamp by pressing "POWER" button either on the top of the projector or on the projector first and then select the signal sources. 13 English The first time you use the projector, you want to display on the remote control to switch between inputs. If not, push... from quick menu after the startup screen displays. 3. The Power LED will now turn Red. 2. The projector will display in approximately 10 seconds. Installation Powering On/Off the Projector Powering On the Projector 1. When connected, the Power LED will turn Blue. The startup screen will detect the source ...
Turn on the lamp by pressing "POWER" button either on the top of the projector or on the projector first and then select the signal sources. 13 English The first time you use the projector, you want to display on the remote control to switch between inputs. If not, push... from quick menu after the startup screen displays. 3. The Power LED will now turn Red. 2. The projector will display in approximately 10 seconds. Installation Powering On/Off the Projector Powering On the Projector 1. When connected, the Power LED will turn Blue. The startup screen will detect the source ...
User's Manual
Page 14
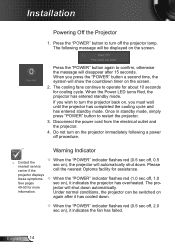
...a second time, the system will show the countdown timer on ), the projector will disappear after it has cooled down . Please call the nearest Optoma facility for assistance. The following a power off the projector lamp. If you wish to confirm, otherwise the message will automatically shut ...down . When the "POWER" indicator flashes red (0.5 sec off the projector 1. Disconnect the power cord...
...a second time, the system will show the countdown timer on ), the projector will disappear after it has cooled down . Please call the nearest Optoma facility for assistance. The following a power off the projector lamp. If you wish to confirm, otherwise the message will automatically shut ...down . When the "POWER" indicator flashes red (0.5 sec off the projector 1. Disconnect the power cord...
User's Manual
Page 15
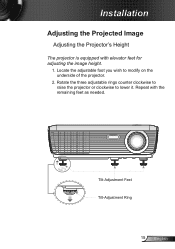
Rotate the three adjustable rings counter clockwise to raise the projector or clockwise to modify on the underside of the projector. 2. Tilt-Adjustment Feet Tilt-Adjustment Ring 15 English Locate the adjustable foot you wish to lower it. Installation Adjusting the Projected Image Adjusting the Projector's Height The projector is equipped with the remaining feet as needed. Repeat with elevator feet for adjusting the image height. 1.
Rotate the three adjustable rings counter clockwise to raise the projector or clockwise to modify on the underside of the projector. 2. Tilt-Adjustment Feet Tilt-Adjustment Ring 15 English Locate the adjustable foot you wish to lower it. Installation Adjusting the Projected Image Adjusting the Projector's Height The projector is equipped with the remaining feet as needed. Repeat with elevator feet for adjusting the image height. 1.
User's Manual
Page 16
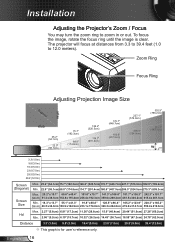
..." (47.2cm) 24.78" (62.9cm) Distance 3.3' (1.0m) 9.8' (3.0m) 16.4' (5.0m) This graph is clear. Installation Adjusting the Projector's Zoom / Focus You may turn the zoom ring to 12.0 meters). The projector will focus at distances from 3.3 to 39.4 feet (1.0 to zoom in or out. To focus the image, rotate the...
..." (47.2cm) 24.78" (62.9cm) Distance 3.3' (1.0m) 9.8' (3.0m) 16.4' (5.0m) This graph is clear. Installation Adjusting the Projector's Zoom / Focus You may turn the zoom ring to 12.0 meters). The projector will focus at distances from 3.3 to 39.4 feet (1.0 to zoom in or out. To focus the image, rotate the...
User's Manual
Page 17
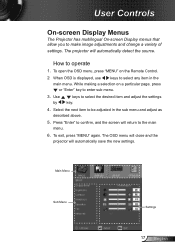
Press "Enter" to be adjusted in the main menu. User Controls On-screen Display Menus The Projector has multilingual On-screen Display menus that allow you to select the desired item and adjust the settings key. 4. Use by keys to make image ... page, press or "Enter" key to select any item in the sub menu and adjust as described above. 5. The OSD menu will close and the projector will return to operate 1. How to the main menu. 6. The...
Press "Enter" to be adjusted in the main menu. User Controls On-screen Display Menus The Projector has multilingual On-screen Display menus that allow you to select the desired item and adjust the settings key. 4. Use by keys to make image ... page, press or "Enter" key to select any item in the sub menu and adjust as described above. 5. The OSD menu will close and the projector will return to operate 1. How to the main menu. 6. The...
User's Manual
Page 22
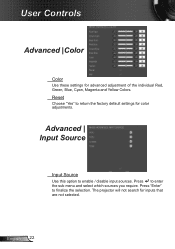
Press to finalize the selection. Press "Enter" to enter the sub menu and select which sources you require. Advanced | Input Source Input Source Use this option to return the factory default settings for color adjustments. User Controls Advanced |Color Color Use these settings for inputs that are not selected. The projector will not search for advanced adjustment of the individual Red, Green, Blue, Cyan, Magenta and Yellow Colors. Reset Choose "Yes" to enable / disable input sources. English 22
Press to finalize the selection. Press "Enter" to enter the sub menu and select which sources you require. Advanced | Input Source Input Source Use this option to return the factory default settings for color adjustments. User Controls Advanced |Color Color Use these settings for inputs that are not selected. The projector will not search for advanced adjustment of the individual Red, Green, Blue, Cyan, Magenta and Yellow Colors. Reset Choose "Yes" to enable / disable input sources. English 22
User's Manual
Page 27
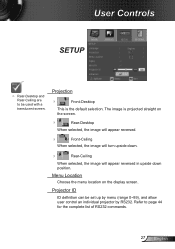
The image is the default selection. Refer to be set up by menu (range 0~99), and allow user control an individual projector by RS232. User Controls SETUP Rear-Desktop and Rear-Ceiling are to page 44 for the complete list of RS232 commands. 27 English... Projection Front-Desktop This is projected straight on the display screen. Projector ID ID definition can be used with a translucent screen. Menu Location Choose the menu location on the screen. Rear-Desktop When selected, the...
The image is the default selection. Refer to be set up by menu (range 0~99), and allow user control an individual projector by RS232. User Controls SETUP Rear-Desktop and Rear-Ceiling are to page 44 for the complete list of RS232 commands. 27 English... Projection Front-Desktop This is projected straight on the display screen. Projector ID ID definition can be used with a translucent screen. Menu Location Choose the menu location on the screen. Rear-Desktop When selected, the...

User's Manual
Page 28
... or flickers, use this function, the Phase, frequency items are grayed out, and if Signal is only supported in settings after that for next time projector turns off and on again. Use this function to flicker vertically. English 28 Automatic Automatically selects the singal.
... or flickers, use this function, the Phase, frequency items are grayed out, and if Signal is only supported in settings after that for next time projector turns off and on again. Use this function to flicker vertically. English 28 Automatic Automatically selects the singal.
User's Manual
Page 29
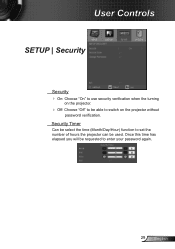
Once this time has elapsed you will be requested to switch on the projector. Off: Choose "Off" to be used. User Controls SETUP | Security Security On: Choose "On" to use security verification when the turning on the projector without password verification. Security Timer Can be select the time (Month/Day/Hour) function to set the number of hours the projector can be able to enter your password again. 29 English
Once this time has elapsed you will be requested to switch on the projector. Off: Choose "Off" to be used. User Controls SETUP | Security Security On: Choose "On" to use security verification when the turning on the projector without password verification. Security Timer Can be select the time (Month/Day/Hour) function to set the number of hours the projector can be able to enter your password again. 29 English
User's Manual
Page 31
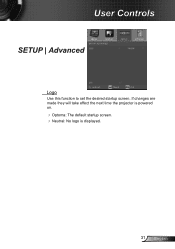
If changes are made they will take effect the next time the projector is powered on. Optoma: The default startup screen. Neutral: No logo is displayed. 31 English User Controls SETUP | Advanced Logo Use this function to set the desired startup screen.
If changes are made they will take effect the next time the projector is powered on. Optoma: The default startup screen. Neutral: No logo is displayed. 31 English User Controls SETUP | Advanced Logo Use this function to set the desired startup screen.
User's Manual
Page 32
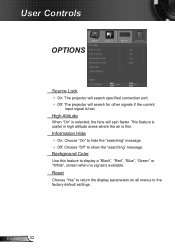
... signal is selected, the fans will search for other signals if the current input signal is thin. User Controls OPTIONS Source Lock On: The projector will search specified connection port. Off: The projector will spin faster. This feature is useful in high altitude areas where the air is lost.
... signal is selected, the fans will search for other signals if the current input signal is thin. User Controls OPTIONS Source Lock On: The projector will search specified connection port. Off: The projector will spin faster. This feature is useful in high altitude areas where the air is lost.

User's Manual
Page 33
... Advanced Direct Power On Choose "On" to the projector. The countdown timer will automatically power off when the countdown has finished (in minutes). This disables VGA out and RJ45 control when the projector is in minutes). The projector will start , when there is supplied, without a... signal being sent to the projector. The projector will start , with or without pressing "POWER" button either on the top ...
... Advanced Direct Power On Choose "On" to the projector. The countdown timer will automatically power off when the countdown has finished (in minutes). This disables VGA out and RJ45 control when the projector is in minutes). The projector will start , when there is supplied, without a... signal being sent to the projector. The projector will start , with or without pressing "POWER" button either on the top ...
User's Manual
Page 34
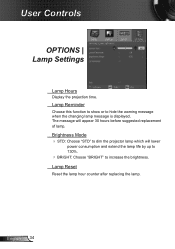
The message will lower power consumption and extend the lamp life by up to 130%. BRIGHT: Choose "BRIGHT" to increase the brightness. Lamp Reminder Choose this function to show or to dim the projector lamp which will appear 30 hours before suggested replacement of lamp. Lamp Reset Reset the lamp hour counter after replacing the lamp. Brightness Mode STD: Choose "STD" to hide the warning message when the changing lamp message is displayed. User Controls OPTIONS | Lamp Settings Lamp Hours Display the projection time. English 34
The message will lower power consumption and extend the lamp life by up to 130%. BRIGHT: Choose "BRIGHT" to increase the brightness. Lamp Reminder Choose this function to show or to dim the projector lamp which will appear 30 hours before suggested replacement of lamp. Lamp Reset Reset the lamp hour counter after replacing the lamp. Brightness Mode STD: Choose "STD" to hide the warning message when the changing lamp message is displayed. User Controls OPTIONS | Lamp Settings Lamp Hours Display the projection time. English 34


