User manual
Page 3
Options HDMI link settings menu 51 Options remote settings menu 53 Options optional filter settings menu 54 Options advanced menu...55 3D Setup...57 MAINTENANCE 58 Replacing the lamp...58 Installing and cleaning the dust filter 61 ADDITIONAL INFORMATION 62 Compatible resolutions...62 Image size and projection distance 64 Projector dimensions and ceiling mount installation 65 RS232 protocol function list...66 IR remote codes...71 Using the Help button...73 Troubleshooting...77 Warning indicators...79 Specifications...82 Optoma global offices...83 English 3
Options HDMI link settings menu 51 Options remote settings menu 53 Options optional filter settings menu 54 Options advanced menu...55 3D Setup...57 MAINTENANCE 58 Replacing the lamp...58 Installing and cleaning the dust filter 61 ADDITIONAL INFORMATION 62 Compatible resolutions...62 Image size and projection distance 64 Projector dimensions and ceiling mount installation 65 RS232 protocol function list...66 IR remote codes...71 Using the Help button...73 Troubleshooting...77 Warning indicators...79 Specifications...82 Optoma global offices...83 English 3

User manual
Page 4
.... ‡‡ Do not use the projector in places where flammable gases or explosives gases may be present in operation. Please call Optoma before you to dangerous voltages or other apparatus such as radiators, heaters, stoves or any ventilation openings. The exclamation point within an equilateral...user to the presence of the projector lens when in the atmosphere. Please follow all warnings, precautions and maintenance as this user's guide. The lamp inside . ‡‡ Do not place the projector on a crowded coffee table, sofa, bed, etc. To ensure reliable operation of ...
.... ‡‡ Do not use the projector in places where flammable gases or explosives gases may be present in operation. Please call Optoma before you to dangerous voltages or other apparatus such as radiators, heaters, stoves or any ventilation openings. The exclamation point within an equilateral...user to the presence of the projector lens when in the atmosphere. Please follow all warnings, precautions and maintenance as this user's guide. The lamp inside . ‡‡ Do not place the projector on a crowded coffee table, sofa, bed, etc. To ensure reliable operation of ...

User manual
Page 5
... recommended before you suffer from the AC outlet before using the 3D function. ‡‡ Even those who are sleep deprived or under "Replacing the Lamp" section on pages 58-60. ‡‡ Do not setup the projector in the remote for a long period of awareness; (8) convulsions; (9) ... vibration or shock. ‡‡ Do not touch the lens with bare hands ‡‡ Remove battery/batteries from the on until the lamp module has been replaced. Allow 90 seconds for the projector to cool down . If the battery/batteries are experiencing these symptoms. English 5 Photosensitive...
... recommended before you suffer from the AC outlet before using the 3D function. ‡‡ Even those who are sleep deprived or under "Replacing the Lamp" section on pages 58-60. ‡‡ Do not setup the projector in the remote for a long period of awareness; (8) convulsions; (9) ... vibration or shock. ‡‡ Do not touch the lens with bare hands ‡‡ Remove battery/batteries from the on until the lamp module has been replaced. Allow 90 seconds for the projector to cool down . If the battery/batteries are experiencing these symptoms. English 5 Photosensitive...

User manual
Page 9
Zoom Lever 9. Ventilation (outlet) 12. IR Receiver 3. Keypad 4. Power Socket 6. Focus Ring 10. Ventilation (inlet) English 9 No Item 1. Tilt-Adjustment Feet No Item 8. Lens 2. Speaker 7. KensingtonTM Lock Port 13. Lamp Cover 11. INTRODUCTION Product Overview 1 2 3 4 5 7 13 6 89 10 11 12 7 Note: Do not block projector inlet or outlet air vents. (*) optional accessory varies depending on model, specification, and region. Input / Output 5.
Zoom Lever 9. Ventilation (outlet) 12. IR Receiver 3. Keypad 4. Power Socket 6. Focus Ring 10. Ventilation (inlet) English 9 No Item 1. Tilt-Adjustment Feet No Item 8. Lens 2. Speaker 7. KensingtonTM Lock Port 13. Lamp Cover 11. INTRODUCTION Product Overview 1 2 3 4 5 7 13 6 89 10 11 12 7 Note: Do not block projector inlet or outlet air vents. (*) optional accessory varies depending on model, specification, and region. Input / Output 5.

User manual
Page 11
Lamp LED 11. Enter 3. Keystone Correction 4. Four Directional Select Keys No Item 7. Menu English 11 INTRODUCTION Keypad 1 2 3 4 11 5 10 9 8 76 No Item 1. Power 9. Temp LED 8. On/Standby LED 10. Source 2. Re-Sync 5. Help 6.
Lamp LED 11. Enter 3. Keystone Correction 4. Four Directional Select Keys No Item 7. Menu English 11 INTRODUCTION Keypad 1 2 3 4 11 5 10 9 8 76 No Item 1. Power 9. Temp LED 8. On/Standby LED 10. Source 2. Re-Sync 5. Help 6.
User manual
Page 13
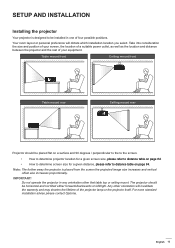
... of your screen, the location of a suitable power outlet, as well as the location and distance between the projector and the rest of the projector lamp or the projector itself. Note: The further away the projector is designed to distance table on page 64. ‡‡ How to determine screen size.... Your room layout or personal preference will invalidate the warranty and may shorten the lifetime of your equipment. For none standard installation advise please contact Optoma. Any other that table top or ceiling mount.
... of your screen, the location of a suitable power outlet, as well as the location and distance between the projector and the rest of the projector lamp or the projector itself. Note: The further away the projector is designed to distance table on page 64. ‡‡ How to determine screen size.... Your room layout or personal preference will invalidate the warranty and may shorten the lifetime of your equipment. For none standard installation advise please contact Optoma. Any other that table top or ceiling mount.

User manual
Page 16
...of different types. Ensure to hold the remote control at the screen, the effective distance is not being shined by sunlight or fluorescent lamps directly. ‡‡ Please keep the remote controller away from batteries that come in the battery compartment as the are supplied for ... equivalent type batteries. Different types of the projector. Effective range Infra-Red (IR) remote control sensor is closed to Inverter-Type fluorescent lamps, it might change according to function correctly. Mixing old and new batteries can shorten the life of batteries can cause a rash. However...
...of different types. Ensure to hold the remote control at the screen, the effective distance is not being shined by sunlight or fluorescent lamps directly. ‡‡ Please keep the remote controller away from batteries that come in the battery compartment as the are supplied for ... equivalent type batteries. Different types of the projector. Effective range Infra-Red (IR) remote control sensor is closed to Inverter-Type fluorescent lamps, it might change according to function correctly. Mixing old and new batteries can shorten the life of batteries can cause a rash. However...

User manual
Page 25
... Logo Logo capture Exit Input Source Sub Menu 3 Source Lock High Altitude Information Hide Keypad Lock Test Pattern Options IR Function Background Color Lamp Hour Lamp Reminder Lamp Mode Lamp Settings Lamp Reset ON Dynamic Dimming OFF Sub Menu 4 Values 00~99 Default Neutral User VGA HDMI1 HDMI2 On Off On Off [Default] On Off...
... Logo Logo capture Exit Input Source Sub Menu 3 Source Lock High Altitude Information Hide Keypad Lock Test Pattern Options IR Function Background Color Lamp Hour Lamp Reminder Lamp Mode Lamp Settings Lamp Reset ON Dynamic Dimming OFF Sub Menu 4 Values 00~99 Default Neutral User VGA HDMI1 HDMI2 On Off On Off [Default] On Off...
User manual
Page 27
...30 minutes. When you made the changes on the "IR Function", "Projection", or "Keypad Lock" function, a confirmation message will only reset both Lamp Hours in OSD and Lamp Hours in settings. Select "Yes" to Automatic, the Phase, frequency items are grayed out. Active Eco Note: ‡‡ If the Signal... setting is set to save the settings. In 3D timing mode, the zoom/edge mask will not be reset. The "LAMP RESET" in service mode will be adjusted and saved the value. default is 20 minutes. 0-990 Note: One step is 5 minutes; English 27 ...
...30 minutes. When you made the changes on the "IR Function", "Projection", or "Keypad Lock" function, a confirmation message will only reset both Lamp Hours in OSD and Lamp Hours in settings. Select "Yes" to Automatic, the Phase, frequency items are grayed out. Active Eco Note: ‡‡ If the Signal... setting is set to save the settings. In 3D timing mode, the zoom/edge mask will not be reset. The "LAMP RESET" in service mode will be adjusted and saved the value. default is 20 minutes. 0-990 Note: One step is 5 minutes; English 27 ...

User manual
Page 36
Lamp power and vertical resolution are no black bars. In this situation, the image will not look right when displaying image in a wide 2.35:1 image. In ...
Lamp power and vertical resolution are no black bars. In this situation, the image will not look right when displaying image in a wide 2.35:1 image. In ...

User manual
Page 48
Background Color Black 48 English USING THE PROJECTOR Options menu OPTIONS Background Color Lamp Settings HDMI Link Settings Remote Settings Advanced Optional Filter Settings Reset Black Exit Background Color Use this feature to display a "Black", "Red", "Blue", "Green", or "White" screen when no signal is available.
Background Color Black 48 English USING THE PROJECTOR Options menu OPTIONS Background Color Lamp Settings HDMI Link Settings Remote Settings Advanced Optional Filter Settings Reset Black Exit Background Color Use this feature to display a "Black", "Red", "Blue", "Green", or "White" screen when no signal is available.

User manual
Page 49
... function to show or to hide the warning message when the changing lamp message is automatically detected to significantly reduced lamp power consumption (up to dim the lamp power which will be "Bright" and "ECO". Lamp Reminder Off On Lamp Mode Set the lamp mode setting. ‡‡ Bright: Choose "Bright" to configure the dynamic dimming...
... function to show or to hide the warning message when the changing lamp message is automatically detected to significantly reduced lamp power consumption (up to dim the lamp power which will be "Bright" and "ECO". Lamp Reminder Off On Lamp Mode Set the lamp mode setting. ‡‡ Bright: Choose "Bright" to configure the dynamic dimming...

User manual
Page 50
USING THE PROJECTOR Lamp Reset Resets the lamp hour counter after replacing the lamp. Lamp Reset No Yes Exit Choose "Exit" to 30%. 50 English Note: ‡‡ When ambient temperature is over 40°C during operation, the projector will switch to Eco automatically. ‡‡ The "Lamp Mode" can be independently set for 2D and 3D. ‡‡ The Dynamic mode-lamp power can be dynamically adjusted from 100% to exit the menu.
USING THE PROJECTOR Lamp Reset Resets the lamp hour counter after replacing the lamp. Lamp Reset No Yes Exit Choose "Exit" to 30%. 50 English Note: ‡‡ When ambient temperature is over 40°C during operation, the projector will switch to Eco automatically. ‡‡ The "Lamp Mode" can be independently set for 2D and 3D. ‡‡ The Dynamic mode-lamp power can be dynamically adjusted from 100% to exit the menu.

User manual
Page 58
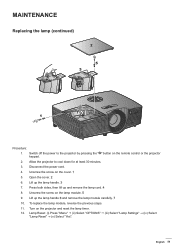
...: To reduce the risk of use caution when opening the lamp access panel. MAINTENANCE Replacing the lamp The projector automatically detects the lamp life. Caution must be used to change the lamp as soon as possible. Lamp Reminder Lamp life exceeded. Warning: Lamp compartment is recommended to cool down for at least 30 minutes... any loose parts from falling out of projector. Allow it is nearing the end of personal injury, do not drop the lamp module or touch the lamp bulb. It is hot! The bulb may shatter and cause injury if it to wear safety glasses if changing the bulb ...
...: To reduce the risk of use caution when opening the lamp access panel. MAINTENANCE Replacing the lamp The projector automatically detects the lamp life. Caution must be used to change the lamp as soon as possible. Lamp Reminder Lamp life exceeded. Warning: Lamp compartment is recommended to cool down for at least 30 minutes... any loose parts from falling out of projector. Allow it is nearing the end of personal injury, do not drop the lamp module or touch the lamp bulb. It is hot! The bulb may shatter and cause injury if it to wear safety glasses if changing the bulb ...
User manual
Page 59
... " " button on the cover. 1 5. Turn on the lamp module. 5 9. Lift up the lamp handle 6 and remove the lamp module carefully. 7 10. Unscrew the screw on the projector and reset the lamp timer. 12. Lamp Reset: (i) Press "Menu" (ii) Select "OPTIONS" (iii) Select "Lamp Settings" (iv) Select "Lamp Reset" (v) Select "Yes". Unscrew the screw...
... " " button on the cover. 1 5. Turn on the lamp module. 5 9. Lift up the lamp handle 6 and remove the lamp module carefully. 7 10. Unscrew the screw on the projector and reset the lamp timer. 12. Lamp Reset: (i) Press "Menu" (ii) Select "OPTIONS" (iii) Select "Lamp Settings" (iv) Select "Lamp Reset" (v) Select "Yes". Unscrew the screw...

User manual
Page 60
Hand oil can cause the lamp shatter. Use a dry cloth to clean the lamp module if it was accidentally touched. 60 English Do not touch the glass area of the lamp. MAINTENANCE Note: The screw on the lamp cover and the lamp cannot be turned on if the lamp cover has not been placed back on the projector. The projector cannot be removed.
Hand oil can cause the lamp shatter. Use a dry cloth to clean the lamp module if it was accidentally touched. 60 English Do not touch the glass area of the lamp. MAINTENANCE Note: The screw on the lamp cover and the lamp cannot be turned on if the lamp cover has not been placed back on the projector. The projector cannot be removed.

User manual
Page 68
ADDITIONAL INFORMATION 232 ASCII Code ~XX72 1 ~XX72 2 ~XX72 3 ~XX72 4 ~XX72 5 ~XX77 n HEX Code 7E 30 30 37 32 20 31 0D 7E 30 30 37 32 20 32 0D 7E 30 30 37 32 20 33 0D 7E 30 30 37 32 20 34 0D 7E 30 30 37 32 20 35 0D 7E 30 30 37 37 20 aabbcc 0D Function Menu Location Security ~XX78 1 ~XX78 0 ~nnnn 7E 30 30 37 38 20 31 0D 7E 30 30 37 38 20 32 20 a 0D Security Settings ~XX79 n ~XX80 1 ~XX80 0 ~XX310 0 ~XX310 1 ~XX81 n ~XX82 1 ~XX82 3 ~XX100 1 ~XX100 0 ~XX101 1 ~XX101 0 ~XX102 1 ~XX102 0 ~XX103 1 ~XX103 0 ~XX195 0 ~XX195 1 ~XX195 2 ~XX111 1 ~XX111 0 ~XX111 2 ~XX111 3 ~XX104 1 ~XX104 2 ~XX104...
ADDITIONAL INFORMATION 232 ASCII Code ~XX72 1 ~XX72 2 ~XX72 3 ~XX72 4 ~XX72 5 ~XX77 n HEX Code 7E 30 30 37 32 20 31 0D 7E 30 30 37 32 20 32 0D 7E 30 30 37 32 20 33 0D 7E 30 30 37 32 20 34 0D 7E 30 30 37 32 20 35 0D 7E 30 30 37 37 20 aabbcc 0D Function Menu Location Security ~XX78 1 ~XX78 0 ~nnnn 7E 30 30 37 38 20 31 0D 7E 30 30 37 38 20 32 20 a 0D Security Settings ~XX79 n ~XX80 1 ~XX80 0 ~XX310 0 ~XX310 1 ~XX81 n ~XX82 1 ~XX82 3 ~XX100 1 ~XX100 0 ~XX101 1 ~XX101 0 ~XX102 1 ~XX102 0 ~XX103 1 ~XX103 0 ~XX195 0 ~XX195 1 ~XX195 2 ~XX111 1 ~XX111 0 ~XX111 2 ~XX111 3 ~XX104 1 ~XX104 2 ~XX104...

User manual
Page 69
... 37 0D Source SEND from projector automatically 232 ASCII HEX Code Code Function when Standby/Cooling/Out of Range/Lamp fail/Fan Lock/Over Temperature/ Lamp Hours Running Out/Cover Open READ from projector 232 ASCII HEX Code Code Function ~XX121 1 7E 30 30...hrs 800 hrs 1000 hrs Yes No Yes Reset System Alert n: 1-30 characters Projector Return Description INFOn n : 0/1/2/3/4/5/6/7/8 = Standby/Warming/Cooling/Out of Range/ Lamp fail/Fan Lock/Over Temperature/Lamp Hours Running Out/Cover Open Projector Return Description Okn OKdddd n = 0 None n = 2 VGA-1 n = 7 HDMI1 n = 8 HDMI2 n = ...
... 37 0D Source SEND from projector automatically 232 ASCII HEX Code Code Function when Standby/Cooling/Out of Range/Lamp fail/Fan Lock/Over Temperature/ Lamp Hours Running Out/Cover Open READ from projector 232 ASCII HEX Code Code Function ~XX121 1 7E 30 30...hrs 800 hrs 1000 hrs Yes No Yes Reset System Alert n: 1-30 characters Projector Return Description INFOn n : 0/1/2/3/4/5/6/7/8 = Standby/Warming/Cooling/Out of Range/ Lamp fail/Fan Lock/Over Temperature/Lamp Hours Running Out/Cover Open Projector Return Description Okn OKdddd n = 0 None n = 2 VGA-1 n = 7 HDMI1 n = 8 HDMI2 n = ...

User manual
Page 70
... 30 30 31 35 31 20 31 0D Model name 7E 30 30 31 30 38 20 31 0D Lamp Hours 7E 30 30 31 30 38 20 32 0D Cumulative Lamp Hours 7E 30 30 33 32 31 20 31 0D Filter Usage Hours Projector Return Description Okn OKn OKn OKn.../Video/S-Video/HDMI dddd: FW version e = Display mode e=0 None e=1 Presentation e=2 Bright e=3 Movie e=4 sRGB e=5 User e=6 Blackboard e=7 3D OKn n:4= 1080p OKbbbb bbbb: LampHour OKbbbbb bbbbb: (5 digits) Total Lamp Hours OKbbbb bbbb: Filter Usage Hours 70 English
... 30 30 31 35 31 20 31 0D Model name 7E 30 30 31 30 38 20 31 0D Lamp Hours 7E 30 30 31 30 38 20 32 0D Cumulative Lamp Hours 7E 30 30 33 32 31 20 31 0D Filter Usage Hours Projector Return Description Okn OKn OKn OKn.../Video/S-Video/HDMI dddd: FW version e = Display mode e=0 None e=1 Presentation e=2 Bright e=3 Movie e=4 sRGB e=5 User e=6 Blackboard e=7 3D OKn n:4= 1080p OKbbbb bbbb: LampHour OKbbbbb bbbbb: (5 digits) Total Lamp Hours OKbbbb bbbb: Filter Usage Hours 70 English

User manual
Page 77
... described in the "Installation" section. ‡‡ Ensure the pins of the screen. ‡‡ Use "Display-->V Keystone" from the OSD to the "Replacing the Lamp" section. ‡‡ Ensure that it is centered on the screen and below the bottom of connectors are not crooked or broken. ‡‡ Check...
... described in the "Installation" section. ‡‡ Ensure the pins of the screen. ‡‡ Use "Display-->V Keystone" from the OSD to the "Replacing the Lamp" section. ‡‡ Ensure that it is centered on the screen and below the bottom of connectors are not crooked or broken. ‡‡ Check...


