
User Manual
Page 1
... Remote Control Buttons...13 Inserting the Remote Control Batteries ...14 Setup and Operation ...15 Connecting Input Devices...15 Starting and Shutting down the Projector ...16 Setting an Access Password (Security Lock) ...17 Adjusting the Projector Level ...20 Adjusting the Zoom, Focus and Keystone...21 Adjusting the Volume ...21 OSD Menu Controls ...22 Setting the OSD Language...23 Menu Setting ...25 OSD Menu Overview ...25 OSD Sub-Menu Overview...26 Display Menu...31 Setup Menu ...34 Options Menu...38 Appendices ...41 Replacing the Projection Lamp ...41 Resetting the Lamp ...44 Cleaning...
... Remote Control Buttons...13 Inserting the Remote Control Batteries ...14 Setup and Operation ...15 Connecting Input Devices...15 Starting and Shutting down the Projector ...16 Setting an Access Password (Security Lock) ...17 Adjusting the Projector Level ...20 Adjusting the Zoom, Focus and Keystone...21 Adjusting the Volume ...21 OSD Menu Controls ...22 Setting the OSD Language...23 Menu Setting ...25 OSD Menu Overview ...25 OSD Sub-Menu Overview...26 Display Menu...31 Setup Menu ...34 Options Menu...38 Appendices ...41 Replacing the Projection Lamp ...41 Resetting the Lamp ...44 Cleaning...

User Manual
Page 3
Precautions Warning symbols are no user-serviceable parts in this manual to alert you of the projector. Remote Control Some remote controls have a laser for future reference. General Safety Information Do not open the Main menu." Avoid using the projector. Aside from the projection lamp, there are used in the eyes. For servicing, contact qualified service personnel. Keep this example: "Push the Menu button on the unit case. Follow all warnings and cautions in...
Precautions Warning symbols are no user-serviceable parts in this manual to alert you of the projector. Remote Control Some remote controls have a laser for future reference. General Safety Information Do not open the Main menu." Avoid using the projector. Aside from the projection lamp, there are used in the eyes. For servicing, contact qualified service personnel. Keep this example: "Push the Menu button on the unit case. Follow all warnings and cautions in...
User Manual
Page 4
... power cord. Temperatures: Operating: 5 ~ 40 °C Non-operation: -10°C ~ 60°C B. Replacing the Lamp Replacing the lamp can be in use the supplied power cord. For more information, contact the Electronic Industries Alliance at WWW.EIAE.ORG. This symbol is disposed of correctly, you wish to the environment and human health, which could otherwise be hazardous if done incorrectly. Regulatory Warnings Before installing and using...
... power cord. Temperatures: Operating: 5 ~ 40 °C Non-operation: -10°C ~ 60°C B. Replacing the Lamp Replacing the lamp can be in use the supplied power cord. For more information, contact the Electronic Industries Alliance at WWW.EIAE.ORG. This symbol is disposed of correctly, you wish to the environment and human health, which could otherwise be hazardous if done incorrectly. Regulatory Warnings Before installing and using...
User Manual
Page 5
... how to install and operate the DLP projector. Wherever possible, relevant information-such as an illustration and its description-has been kept on one page. lion colors to deliver crisp, clear images • Flexible setup allows for front and rear projections • Line-of-vision projections remain square, with all major video standards including NTSC, PAL, and SECAM • A high brightness...
... how to install and operate the DLP projector. Wherever possible, relevant information-such as an illustration and its description-has been kept on one page. lion colors to deliver crisp, clear images • Flexible setup allows for front and rear projections • Line-of-vision projections remain square, with all major video standards including NTSC, PAL, and SECAM • A high brightness...

User Manual
Page 6
Packing Checklist Introduction Introduction Carefully unpack the projector and check that the following items are included: DLP PROJECTOR REMOTE CONTROL (WITH TWO AAA BATTERIES) POWER CORD USB CABLE (USB TYPE A TO B USB) VIDEO CABLE (RCA X 1 TO RCA X 1) COMPUTER CABLE (VGA TO VGA) CARRYING CASE Contact your dealer immediately if any items are missing, appear damaged, or if the unit does not work. Caution: Avoid using the projector in dusty environments. 6
Packing Checklist Introduction Introduction Carefully unpack the projector and check that the following items are included: DLP PROJECTOR REMOTE CONTROL (WITH TWO AAA BATTERIES) POWER CORD USB CABLE (USB TYPE A TO B USB) VIDEO CABLE (RCA X 1 TO RCA X 1) COMPUTER CABLE (VGA TO VGA) CARRYING CASE Contact your dealer immediately if any items are missing, appear damaged, or if the unit does not work. Caution: Avoid using the projector in dusty environments. 6
User Manual
Page 7
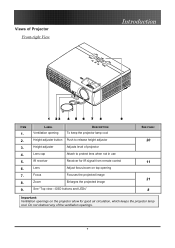
... adjustor 3. Zoom Enlarges the projected image 9. Height-adjuster Adjusts level of the ventilation openings. 7 Lens Adjust focus/zoom on the projector allow for IR signal from remote control 6. Focus Focuses the projected image 8. Do not obstruct any of projector 4. Ventilation opening 7. Height-adjuster button Push to protect lens when not in use 5. IR receiver Receiver for good air circulation, which keeps the projector lamp cool. Views of Projector Front-right View Introduction ITEM LABEL DESCRIPTION 1. See "Top view-OSD buttons and LEDs" SEE...
... adjustor 3. Zoom Enlarges the projected image 9. Height-adjuster Adjusts level of the ventilation openings. 7 Lens Adjust focus/zoom on the projector allow for IR signal from remote control 6. Focus Focuses the projected image 8. Do not obstruct any of projector 4. Ventilation opening 7. Height-adjuster button Push to protect lens when not in use 5. IR receiver Receiver for good air circulation, which keeps the projector lamp cool. Views of Projector Front-right View Introduction ITEM LABEL DESCRIPTION 1. See "Top view-OSD buttons and LEDs" SEE...

User Manual
Page 8
...-Sync Re-Sync VGA source, adjusts phase, tracking, size, position (Right arrow) Navigates and changes settings in normal state On System over temperature Off Normal state Display blank and audio mute 7. Corrects image-trapezoid (wider top) effect 21 (Down arrow) Navigates and changes settings in the OSD 11. Lamp LED 5. LABEL Power DESCRIPTION Turns the projector On or Off SEE PAGE: 16 2. ◄/Source (Left arrow) 3. Top view-On-screen Display (OSD) buttons and LEDs...
...-Sync Re-Sync VGA source, adjusts phase, tracking, size, position (Right arrow) Navigates and changes settings in normal state On System over temperature Off Normal state Display blank and audio mute 7. Corrects image-trapezoid (wider top) effect 21 (Down arrow) Navigates and changes settings in the OSD 11. Lamp LED 5. LABEL Power DESCRIPTION Turns the projector On or Off SEE PAGE: 16 2. ◄/Source (Left arrow) 3. Top view-On-screen Display (OSD) buttons and LEDs...

User Manual
Page 11
... remote control and the projector. Laser Press to operate the on the remote control. Up Up arrow when connected through USB to projector SEE PAGE: 2. This user's manual describes the functions based on -screen pointer 4. ITEM 1. The buttons and keys on the projector have the same functions as projector screens. 3. Status LED Lights when the remote control is obstructed, you can disrupt remote control operation. 2. Remote Control Introduction Important: 1. Avoid using the projector with bright fluorescent lighting turned on the remote control...
... remote control and the projector. Laser Press to operate the on the remote control. Up Up arrow when connected through USB to projector SEE PAGE: 2. This user's manual describes the functions based on -screen pointer 4. ITEM 1. The buttons and keys on the projector have the same functions as projector screens. 3. Status LED Lights when the remote control is obstructed, you can disrupt remote control operation. 2. Remote Control Introduction Important: 1. Avoid using the projector with bright fluorescent lighting turned on the remote control...

User Manual
Page 12
... Navigates and changes settings in the OSD Navigates and changes settings in the OSD Re-Sync VGA source, adjustment for phase, tracking, size, position when OSD off Page Down key when connected through USB to a PC Navigates and changes settings in the OSD Adjusts volume 21 Zoom in and out Display blank & Audio mute Input source select Video Input source select VGA Freeze/unfreezes the on-screen picture Input source select S-Video Input source select digital video Brightness menu Opens the OSD Corrects image-trapezoid...
... Navigates and changes settings in the OSD Navigates and changes settings in the OSD Re-Sync VGA source, adjustment for phase, tracking, size, position when OSD off Page Down key when connected through USB to a PC Navigates and changes settings in the OSD Adjusts volume 21 Zoom in and out Display blank & Audio mute Input source select Video Input source select VGA Freeze/unfreezes the on-screen picture Input source select S-Video Input source select digital video Brightness menu Opens the OSD Corrects image-trapezoid...
User Manual
Page 16
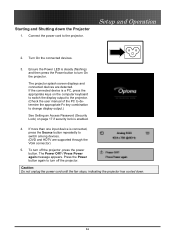
... change display output.) See Setting an Access Password (Security Lock) on page 17 if security lock is connected, press the Source button repeatedly to turn off the projector, press the power button. If more than one input device is enabled. 4. Press the Power button again to switch among devices. (DVD and HDTV are detected. The projector splash screen displays and connected devices are supported through the VGA connector) 5. To turn On the projector. Ensure the Power LED...
... change display output.) See Setting an Access Password (Security Lock) on page 17 if security lock is connected, press the Source button repeatedly to turn off the projector, press the power button. If more than one input device is enabled. 4. Press the Power button again to switch among devices. (DVD and HDTV are detected. The projector splash screen displays and connected devices are supported through the VGA connector) 5. To turn On the projector. Ensure the Power LED...

User Manual
Page 21
jected image A . 6. button to correct image distortion. Adjusting the Zoom, Focus and Keystone 4. Use the Image-zoom control (on the panel 7. Setup and Operation 5. The corresponding buttons are seen on the projector only) to resize the projected image and screen size B . Adjusting the Volume 1. Use the Volume +/- Use the Image-focus control (on the remote control to sharpen the pro- Press the AV mute button on the projector only) to turn off the volume. 21 Press the Volume +/button on the remote control. Use the Keystone button to adjust the...
jected image A . 6. button to correct image distortion. Adjusting the Zoom, Focus and Keystone 4. Use the Image-zoom control (on the panel 7. Setup and Operation 5. The corresponding buttons are seen on the projector only) to resize the projected image and screen size B . Adjusting the Volume 1. Use the Volume +/- Use the Image-focus control (on the remote control to sharpen the pro- Press the AV mute button on the projector only) to turn off the volume. 21 Press the Volume +/button on the remote control. Use the Keystone button to adjust the...

User Manual
Page 30
...; Color Space ○ ○ ○ ○ ○ ○ Input Source ○ ○ ○ ○ ○ ○ O = Available to enable or disable the selection. Available sources: VGA, S-Video, Video, Digital Video Image Menu Functions Available for deselected inputs. Press to move to the IMAGE menu. ITEM Input Source DESCRIPTION Press Enter to video source DEFAULT VGA 30 If the user connects multiple sources at the same time, use the Source button on the keypad or the remote control. Press to open...
...; Color Space ○ ○ ○ ○ ○ ○ Input Source ○ ○ ○ ○ ○ ○ O = Available to enable or disable the selection. Available sources: VGA, S-Video, Video, Digital Video Image Menu Functions Available for deselected inputs. Press to move to the IMAGE menu. ITEM Input Source DESCRIPTION Press Enter to video source DEFAULT VGA 30 If the user connects multiple sources at the same time, use the Source button on the keypad or the remote control. Press to open...
User Manual
Page 34
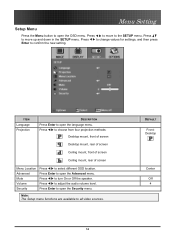
... change values for settings, and then press Enter to all video sources. 34 DEFAULT Front- Press Enter to open the language menu. Press Enter to open the OSD menu. Press to select different OSD location. Desktop Center Off 4 Press to choose from four projection methods: Desktop mount, front of screen Desktop mount, rear of screen Ceiling mount, front of screen Ceiling mount, rear of screen Menu Location Advanced Mute Volume Security Press to turn...
... change values for settings, and then press Enter to all video sources. 34 DEFAULT Front- Press Enter to open the language menu. Press Enter to open the OSD menu. Press to select different OSD location. Desktop Center Off 4 Press to choose from four projection methods: Desktop mount, front of screen Desktop mount, rear of screen Ceiling mount, front of screen Ceiling mount, rear of screen Menu Location Advanced Mute Volume Security Press to turn...

User Manual
Page 37
Set the number of hours for the projector to move up and down and select Security Timer. DEFAULT 0 0 0 37 Press to be used. ITEM Month Day Hour DESCRIPTION Set the number of days for settings, and then press Enter to the SETUP menu. Set the number of months the projector can be active. Press to move to confirm the new setting. Press Enter to open the Security Timer submenu. Security Timer Menu Setting Press the Menu button to open the OSD menu. Press to change values for the projector to move up and down and select Security. Press to be active.
Set the number of hours for the projector to move up and down and select Security Timer. DEFAULT 0 0 0 37 Press to be used. ITEM Month Day Hour DESCRIPTION Set the number of days for settings, and then press Enter to the SETUP menu. Set the number of months the projector can be active. Press to move to confirm the new setting. Press Enter to open the Security Timer submenu. Security Timer Menu Setting Press the Menu button to open the OSD menu. Press to change values for the projector to move up and down and select Security. Press to be active.

User Manual
Page 38
... of all menu items to the OPTIONS menu. The following screen displays. Press to move to factory default. Press Yes to open the OPTIONS/Lamp Setting menu. Blue Press Enter to open the OSD menu. Press Enter to confirm the new setting. high speed in the OPTIONS menu. Options Menu Press Menu to open the OPTIONS/Advanced menu. Press up and down in high temperature, high humidity or high altitude area. Press to reset all the input sources.
... of all menu items to the OPTIONS menu. The following screen displays. Press to move to factory default. Press Yes to open the OPTIONS/Lamp Setting menu. Blue Press Enter to open the OSD menu. Press Enter to confirm the new setting. high speed in the OPTIONS menu. Options Menu Press Menu to open the OPTIONS/Advanced menu. Press up and down in high temperature, high humidity or high altitude area. Press to reset all the input sources.

User Manual
Page 40
... brightness to save lamp life. Press to move to confirm the new setting. See Resetting the Lamp on page 44. 40 Select the lamp mode for settings, and then press Enter to the OPTIONS menu. Press to open the OSD menu. Select Lamp Setting in the OPTIONS menu. ITEM Lamp Hour Lamp Reminder Lamp Mode Lamp Reset DESCRIPTION DEFAULT Set the number of hours for the lamp to reset the lamp life hour after replacing the lamp. Standard and - Lamp Setting Menu Setting Press Menu to move up...
... brightness to save lamp life. Press to move to confirm the new setting. See Resetting the Lamp on page 44. 40 Select the lamp mode for settings, and then press Enter to the OPTIONS menu. Press to open the OSD menu. Select Lamp Setting in the OPTIONS menu. ITEM Lamp Hour Lamp Reminder Lamp Mode Lamp Reset DESCRIPTION DEFAULT Set the number of hours for the lamp to reset the lamp life hour after replacing the lamp. Standard and - Lamp Setting Menu Setting Press Menu to move up...

User Manual
Page 44
Refer to Lamp Setting and then press Enter. 4. Press to navigate to the following: 1. Appendices Resetting the Lamp After replacing the lamp, you should reset the lamp hour counter to open the Image menu. 2. Press the Menu button to zero. Navigate down to the OPTIONS menu. 3. Press to navigate to Lamp Reset and then press or Enter. 5. A Confirm Lamp Reset message displays. Select Yes to confirm the lamp reset. 44
Refer to Lamp Setting and then press Enter. 4. Press to navigate to the following: 1. Appendices Resetting the Lamp After replacing the lamp, you should reset the lamp hour counter to open the Image menu. 2. Press the Menu button to zero. Navigate down to the OPTIONS menu. 3. Press to navigate to Lamp Reset and then press or Enter. 5. A Confirm Lamp Reset message displays. Select Yes to confirm the lamp reset. 44
User Manual
Page 46
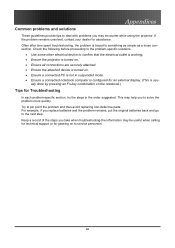
... device is turned on. • Ensure a connected PC is traced to pin point the problem and thus avoid replacing non-defective parts. For example, if you may be useful when calling for technical support or for passing on the notebook.) Tips for Troubleshooting In each problem-specific section, try the steps in suspended mode. • Ensure a connected notebook computer is usu- Keep a record...
... device is turned on. • Ensure a connected PC is traced to pin point the problem and thus avoid replacing non-defective parts. For example, if you may be useful when calling for technical support or for passing on the notebook.) Tips for Troubleshooting In each problem-specific section, try the steps in suspended mode. • Ensure a connected notebook computer is usu- Keep a record...
User Manual
Page 48
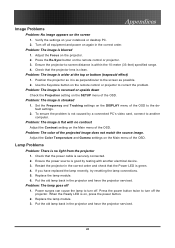
... resetting the lamp connections. 5. Replace the lamp module. 3. Problem: The lamp goes off . Press the power button twice to correct the problem. Appendices Image Problems Problem: No image appears on the projector. 2. Lamp Problems Problem: There is not caused by testing with no light from the projector 1. Use the Keystone button on the Main menu of the OSD. Turn off the projector. Problem: The image is green. 4. Restart the projector in the correct order. Adjust the Color Temperature and Gamma settings on the remote control or projector...
... resetting the lamp connections. 5. Replace the lamp module. 3. Problem: The lamp goes off . Press the power button twice to correct the problem. Appendices Image Problems Problem: No image appears on the projector. 2. Lamp Problems Problem: There is not caused by testing with no light from the projector 1. Use the Keystone button on the Main menu of the OSD. Turn off the projector. Problem: The image is green. 4. Restart the projector in the correct order. Adjust the Color Temperature and Gamma settings on the remote control or projector...
User Manual
Page 49
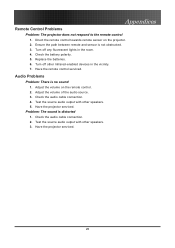
Turn off any fluorescent lights in the vicinity. 7. Adjust the volume of the audio source. 3. Problem: The sound is no sound 1. Have the projector serviced. 49 Replace the batteries. 6. Audio Problems Problem: There is distorted 1. Check the audio cable connection. 4. Test the source audio output with other speakers. 3. Ensure the path between remote and sensor is not obstructed. 3. Check the battery polarity. 5. Check the audio cable connection. 2. Have the remote control serviced. Have the projector serviced. Test the source audio output with other Infrared...
Turn off any fluorescent lights in the vicinity. 7. Adjust the volume of the audio source. 3. Problem: The sound is no sound 1. Have the projector serviced. 49 Replace the batteries. 6. Audio Problems Problem: There is distorted 1. Check the audio cable connection. 4. Test the source audio output with other speakers. 3. Ensure the path between remote and sensor is not obstructed. 3. Check the battery polarity. 5. Check the audio cable connection. 2. Have the remote control serviced. Have the projector serviced. Test the source audio output with other Infrared...


